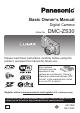
Basic Owner’s Manual Digital Camera Model No. DMC-ZS30 Please read these instructions carefully before using this product, and save this manual for future use. More detailed instructions on the operation of this camera are contained in “Owner’s Manual for advanced features (PDF format)” in the supplied disc. Install it on your PC to read it. Register online at www.panasonic.com/register (U.S.
Dear Customer, Thank you for choosing Panasonic! You have purchased one of the most sophisticated and reliable products on the market today. Used properly, we’re sure it will bring you and your family years of enjoyment. Please take time to fill in the information below. The serial number is on the tag located on the underside of your camera. Be sure to retain this manual as your convenient camera information source. Date of Purchase Dealer Phone No. Dealer Purchased From Model No.
WARNING: To reduce the risk of fire, electric shock or product damage, ••Do not expose this unit to rain, moisture, dripping or splashing. ••Use only the recommended accessories. ••Do not remove covers. ••Do not repair this unit by yourself. Refer servicing to qualified service personnel. ■■About the battery pack CAUTION Battery pack (Lithium ion battery pack) •• Use the specified unit to recharge the battery pack. •• Do not use the battery pack with equipment other than the specified unit.
FCC Note: This equipment has been tested and found to comply with the limits for a Class B digital device, pursuant to Part 15 of the FCC Rules. These limits are designed to provide reasonable protection against harmful interference in a residential installation. This equipment generates, uses, and can radiate radio frequency energy and, if not installed and used in accordance with the instructions, may cause harmful interference to radio communications.
■■About the AC adaptor (supplied) CAUTION! To reduce the risk of fire, electric shock or product damage, •• Do not install or place this unit in a bookcase, built-in cabinet or in another confined space. Ensure this unit is well ventilated. AC adaptor This AC adaptor operates on AC between 110V and 240V. But ••In the U.S.A. and Canada, the AC adaptor must be connected to a 120V AC power supply only. ••When connecting to an AC supply outside of the U.S.A.
Certification and Compliance See Camera for the certification and compliance mark specific to that device. 1 Select [Wi-Fi Setup] in the [Wi-Fi] menu to select [Approved Regulations], and press 2 Press [MENU/SET] Contains FCC ID: VPYLBXN604 This transmitter must not be co-located or operated in conjunction with any other antenna or transmitter.
Contents Information for Your Safety..... 2 Before use................................. 8 Standard accessories.............. 9 Names and Functions of Main Parts............................... 10 Touch operations.................... 12 Inserting and removing the battery or SD memory card (optional)................................. 14 Charging the battery.............. 15 Setting the clock..................... 16 Setting the menu.................... 18 Taking pictures.......................
Before use ■■Camera handling ●●Keep the camera away from excessive vibration, force, or pressure. ●●The camera is not dust resistant, splash resistant, or waterproof. Avoid using the camera in places with excessive dust or sand, or where water can come into contact with the camera. ■■Condensation (When the lens or the LCD monitor is fogged up) ●●Condensation may occur when the camera is exposed to sudden changes of temperature or humidity.
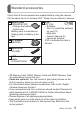
Standard accessories Check that all the accessories are supplied before using the camera. Part numbers are as of January 2013. These may be subject to change. Battery pack DMW-BCM13PP ••Charge the battery before use. Battery pack is indicated as battery pack or battery in the text. AC adaptor VSK0768 DVD VFF1146 ••Software: Use it to install the software on your PC. ••Map data ••Owner’s Manual for advanced features DVD is indicated as disc in the text.
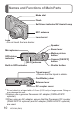
Names and Functions of Main Parts Mode dial Flash Self-timer indicator/AF Assist Lamp NFC antenna Lens ••Do not touch the lens barrier. Lens barrel Speaker Zoom lever Microphones Motion picture button GPS status indicator [Wi-Fi] antenna Built-in GPS antenna Camera [ON/OFF] button Shutter button Tripod mount* ••Ensure that the tripod is stable. Card/Battery door Release lever DC coupler cover * Do not attach to a tripod with a 5.5 mm (0.22 inch) or longer screw. Doing so may damage this unit.
[EXPOSURE] button [MAP] button [Wi-Fi] button Playback button Cursor buttons [MENU/SET] LCD monitor Charging lamp/ Wi-Fi connection lamp [Q.MENU]/ [ ] (Delete/Cancel) button [DISP.] button We recommend using the supplied hand strap to avoid dropping the camera. [HDMI] socket* [AV OUT/DIGITAL] socket ••This socket is also used when charging the battery. * Do not connect any other cables except the HDMI micro cable (RP-CHEU15: optional). Doing so may cause malfunction.
Touch operations This camera’s touch screen senses pressure that is applied to the screen. Touch To “touch” is to press the touch screen and then pull the finger back again. Touching is used to select icons or pictures, among other actions. Drag To “drag” is to touch and slide your finger across the touch screen surface. Dragging (sliding your finger across the screen) is used to scroll the pictures or change the range of the pictures displayed.
●●If the type of sheet made to protect LCD screens that are available in the market is to be used, observe the precautions that are contained with the sheet. (Some types of protective sheets may impair the screen’s appearance and ease of operation.) ●●If the camera is used with a protective sheet available on the market attached to its screen or if the screen is not very responsive, touch the screen with a little more pressure.
Inserting and removing the battery or SD memory card (optional) Make sure that the camera is turned off. Slide the release lever ( ) to the [OPEN] position and open the card/battery door [OPEN] [LOCK] Insert the battery and card, making sure that their orientation is correct ••Battery: Insert the battery all the way firmly and check that it is locked by lever ( ). ••Card: Insert the card all the way firmly until it clicks. Close the door Slide the release lever to the [LOCK] position.
Charging the battery ••The battery that can be used with this unit is DMW-BCM13PP. ••The battery is not charged when the camera is shipped. Charge the battery before use. ••Charge the battery with the AC adaptor (supplied) indoors (10 °C to 30 °C (50 °F to 86 °F)). Make sure that the camera is turned off.
Setting the clock The clock is not set when the camera is shipped. Disconnect the unit from the AC adaptor (supplied). Press the Camera [ON/OFF] button ( ) Press [MENU/SET] ( ) Press to select the items (year, month, day, hour, minute, display order or time display format), and press to set Press [MENU/SET] to set ••To cancel → Press [ ] button. Confirm the setting and press [MENU/SET] ••To return to the previous screen, press [ ] button.
When [Please set the home area] is displayed, press [MENU/SET] Press to set your home area and press [MENU/SET] The current time and home area are set. ■■Changing time settings Select [Clock Set] from [Rec] or [Setup] menu, perform Please see the next page on how to set the menu. and (ENG) VQT4S89 .
Setting the menu Refer to the following procedures to operate the menus. Example: Setting [AF Mode] from to in the [Program AE] Mode Press [MENU/SET] to display the menu Switching to the [Rec] menu Use cursor button to select [Rec] and press [MENU/SET] ••The menu type can also be selected by touch operations. Press to select [AF Mode] and then press [MENU/SET] ••Depending on the item, its setting may not appear or it may be displayed in a different way.
Taking pictures Press the Camera [ON/OFF] button ( ) Shutter button Set to the desired recording mode ( ) ■■Recording mode Take pictures with automatic settings. Take pictures with automatic shutter speed and aperture value settings. Determine aperture, then record pictures. Determine shutter speed, then record pictures. Determine aperture and shutter speed, then record pictures. Record pictures using pre-registered settings. Record panorama pictures. Take pictures using Scene modes.
Recording motion pictures You can record motion pictures with audio (stereo). Zoom can also be used during recording. Press the motion picture button ( ) to start recording Press the motion picture button ( ) again to end recording Remaining recording time (approx.) Elapsed recording time ●●Immediately release the motion picture button after pressing it all the way. ●●You can continuously record a motion picture in [MP4] for up to 29 minutes 59 seconds or approx. 4 GB.
Viewing your pictures Press the Playback button ( ) Drag your finger across the screen, and select the picture to be played back ●●By holding down the Playback button while the camera is off, you can turn the camera on in Playback Mode. ●●To play back a motion picture, touch after selecting a picture. ●●To switch to Recording Mode, press the playback button again or press the shutter button halfway during playback. Deleting pictures Deleted pictures cannot be recovered.
GPS and map functions Before using the camera, be sure to read “License Agreement for Place Name and Map Data” (Owner’s Manual for advanced features). This camera can record the location information of a place where a picture was taken on the pictures. The camera can also automatically adjust the time or display a place where a picture was taken on a map during playback.
Using the GPS function to execute positioning Press [MENU/SET] ( ) Press to select [GPS] menu and press [MENU/SET] Press to select [GPS Setting] and press [MENU/SET] Press to select [ON] and press [MENU/SET] ••A message appears on the screen. After confirming the message, press [MENU/SET]. ■■When [GPS Setting] is [ON], the GPS function works even if the camera is turned off. ••Electromagnetic waves from the camera can affect instruments and meters.
GPS and map functions ■■Displaying the status and result of positioning The icons that indicate the status and result of positioning will appear on the LCD monitor. When positioning is successful, camera will search the place name information (name of place and landmark) inside its internal database and display it. GPS reception icon The same number of icons as the number of the GPS satellites (from which radio signals are successfully received) stop flashing and light.
Confirming the place where you took a picture using a map You can display a map showing the location where a picture was taken or your current location. ●●If you copy the map data stored on the supplied DVD to a memory card, you can display more detailed maps. For details, refer to “Using the map data on the disc (supplied)” (Owner’s Manual for advanced features).
Recording/viewing pictures with a smartphone/tablet You can use the Wi-Fi function to connect to another device through wireless LAN (a system that exchanges information with radio waves without using cables), record pictures from an away location, and transfer pictures saved in this unit to a TV or PC. This section describes how to make a Wi-Fi connection between this unit and a smartphone/tablet to record pictures using the smartphone/ tablet and to transfer pictures to the smartphone/tablet.
Easily connect to a smartphone/tablet Use the NFC (Near Field Communication) function to easily connect this unit to a smartphone/tablet with Wi-Fi for remote recording and to send pictures to the smartphone/tablet. ••This function can be used with NFC compatible devices with Android (2.3.3 or above).
Recording/viewing pictures with a smartphone/tablet Connecting to a smartphone/tablet Start up “Image App” on your smartphone/ tablet Place your smartphone/tablet to the side of this unit Place over this area (within 5 mm (0.20 inch)) Place the NFC area of your smartphone/tablet over the part of this unit as shown in the figure below. ••Do not bump your smartphone/tablet strongly against this unit.
Taking pictures via a smartphone/tablet (remote recording) Select [ ] on a smartphone/tablet ••The recorded images are saved in the camera. ••Some settings are not available. ••The screen differs depending on the operating system. ●●Cannot be set for recording AVCHD motion pictures at [60p] in [FHD]. ●●If the internal camera temperature rises because the surrounding temperature is high or a motion picture is recorded continuously, recording may be stopped halfway through to protect the camera.
Recording/viewing pictures with a smartphone/tablet Transferring a still picture easily to your smartphone/tablet When transferring just 1 still picture to your smartphone/tablet with “Image App” installed, you can use the NFC function to easily send the picture.
Reading the Owner’s Manual (PDF format) More detailed instructions on the operation of this camera are contained in “Owner’s Manual for advanced features (PDF format)” in the supplied disc. Install it on your PC to read it. To read the supplied DVD, use a DVD drive with single-sided dual layer support.
Supplied software The supplied disc contains the following software. Install the software on your computer to use. Pictures can be captured to a PC, and can be viewed, PHOTOfunSTUDIO organized, printed, etc. Also, still pictures can be corrected and motion pictures can be edited. 9.1 PE •• Compatible OS: Windows 8 / 7 / Vista / XP LUMIX Map Tool 1.1 The map data recorded on the DVD (supplied) can be copied to your card. •• Compatible OS: Windows 8 / 7 / Vista / XP Mac OS X v10.4 / v10.5 / v10.6 / v10.
Specifications Specifications are subject to change without notice. Digital Camera: Information for your safety Power Source Power Consumption Camera effective pixels Image sensor DC 5.1 V When recording: 1.7 W When playing back: 1.1 W 18,100,000 pixels 1/2.3″ MOS sensor, total pixel number 18,900,000 pixels Primary color filter Lens Optical 20 x zoom [NANO SURFACE f=4.3 mm to 86.0 mm (35 mm film camera equivalent: COATING] 24 mm to 480 mm) / F3.3 (Max. Wide) to F6.4 (Max.
Specifications LCD monitor 3.0″ TFT LCD (4:3) (Approx. 921,600 dots) (field of view ratio about 100%) / Touch screen Microphones Stereo Speaker Monaural Recording media Built-in Memory (Approx. 12 MB) SD Memory Card / SDHC Memory Card / SDXC Memory Card Recording file format Still picture JPEG (based on Design rule for Camera File system, based on Exif 2.
Wireless transmitter Compliance IEEE 802.11b/g/n standard (standard wireless LAN protocol) Frequency range 2412 MHz to 2462 MHz (1 - 11ch) used (central frequency) Encryption Wi-Fi compliant WPA™ / WPA2™ method Access method Infrastructure mode AC adaptor (Panasonic VSK0768): Information for your safety Input Output ~ 110 V to 240 V, 50/60 Hz, 0.2 A 5 V, 800 mA Battery pack (lithium-ion) (Panasonic DMW-BCM13PP): Information for your safety Voltage / capacity 3.
Digital Camera Accessory System Description Battery pack*1 DC coupler*2 AC adaptor*2*3 Marine case*4 USB connection cable AV cable HDMI micro cable Accessory# DMW-BCM13 DMW-DCC14 DMW-AC5 DMW-MCTZ40 DMW-USBC1 DMW-AVC1 RP-CHEU15 *1 The battery pack can be charged from the camera using the AC adaptor (supplied). *2 The AC adaptor (optional) can only be used with the designated Panasonic DC Coupler (optional). The AC adaptor (optional) cannot be used by itself.
Digital Camera Accessory Order Form Please photocopy this form when placing an order. 1. Digital Camera Model # 2. Items Ordered Accessory # Description Price Each Quantity Shipping & Handling Subtotal Your State & Local Sales Tax Total Total Price $6.95 3. Method of payment (check one) American Express VISA Credit Card # MasterCard Expiration Date Discover Customer Signature (Please do not send cash) 4.
Limited Warranty (ONLY FOR U.S.A.
Mail-In Service For assistance in the U.S.A. and Puerto Rico in obtaining repairs, please ship the product prepaid to: Panasonic Exchange Center 4900 George McVay Drive Suite B McAllen, TX 78503 panacare@us.panasonic.com Online Repair Request To submit a new repair request and for quick repair status visit our Web Site at www.panasonic.com/repair.
THERE ARE NO EXPRESS WARRANTIES EXCEPT AS LISTED UNDER “LIMITED WARRANTY COVERAGE”. THE WARRANTOR IS NOT LIABLE FOR INCIDENTAL OR CONSEQUENTIAL DAMAGES RESULTING FROM THE USE OF THIS PRODUCT, OR ARISING OUT OF ANY BREACH OF THIS WARRANTY. (As examples, this excludes damages for lost time, travel to and from the servicer, loss of or damage to media or images, data or other memory or recorded content. The items listed are not exclusive, but for illustration only.
Customer Services Directory (United States and Puerto Rico) Obtain Product Information and Operating Assistance; locate your nearest Dealer or Service Center; purchase Parts and Accessories; or make Customer Service and Literature requests by visiting our Web Site at: http://www.panasonic.com/help or, contact us via the web at: http://www.panasonic.
•• HDMI, the HDMI Logo, and High-Definition Multimedia Interface are trademarks or registered trademarks of HDMI Licensing LLC in the United States and other countries. •• HDAVI Control™ is a trademark of Panasonic Corporation. •• “AVCHD”, “AVCHD Progressive” and the “AVCHD Progressive” logo are trademarks of Panasonic Corporation and Sony Corporation. •• Manufactured under license from Dolby Laboratories. Dolby and the double-D symbol are trademarks of Dolby Laboratories.
•• App Store is a service mark of Apple Inc. •• Android and Google Play are trademarks or registered trademarks of Google Inc. •• The Wi-Fi CERTIFIED Logo is a certification mark of the Wi-Fi Alliance. •• The Wi-Fi Protected Setup Mark is a mark of the Wi-Fi Alliance. •• “Wi-Fi”, “Wi-Fi Protected Setup”, “Wi-Fi Direct”, “WPA” and “WPA2” are marks or registered marks of the Wi-Fi Alliance.