
Operating Instruction


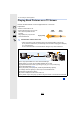

Table Of Contents
- Finding the information you need
- How to use this manual
- Quick Start Guide
- Contents
- 1. Before Use
- 2. Getting Started/Basic Operations
- Attaching the Shoulder Strap
- Charging the Battery
- Inserting and Removing the Card (optional)/ the Battery
- Changing the Lens
- Setting Date/Time (Clock Set)
- Diopter adjustment
- Basic Operations
- Tips for taking good pictures
- Extending/retracting the lens [when the interchangeable lens (H-FS12032/H-FS35100) is attached]
- Shutter button (Taking pictures)
- Motion picture button (Recording motion pictures)
- Mode dial (Selecting a Recording Mode)
- Rear Dial
- Cursor buttons/[MENU/SET] button
- [DISP.] button (Switching the displayed information)
- [LVF] button (Switching the Monitor/Viewfinder)
- Touch screen (Touch operations)
- Taking Pictures Using the Touch Function
- Setting menu items
- Calling frequently-used menus instantly (Quick Menu)
- Assigning frequently used functions to the buttons (function buttons)
- Configuring basic settings of this unit (Setup Menu)
- Entering Text
- 3. Recording Modes
- Taking Pictures using the Automatic Function (Intelligent Auto Mode)
- Taking Pictures with Your Favourite Settings (Programme AE Mode)
- Taking Pictures by Specifying the Aperture/ Shutter Speed
- Taking panorama pictures (Panorama Shot Mode)
- Taking Pictures that match the Scene being recorded (Scene Guide Mode)
- Taking Pictures with different image effects (Creative Control Mode)
- Recording motion pictures with manually set aperture value/shutter speed (Creative Video Mode)
- Registering your preferred settings (Custom Mode)
- 4. Picture Quality and Colour Tone Settings
- 5. Focus and Brightness (Exposure) Settings
- 6. Shutter and Drive Settings
- 7. Functions Customised for Various Subjects and Purposes
- Taking Pictures Automatically at Set Intervals ([Time Lapse Shot])
- Creating Stop Motion Pictures ([Stop Motion Animation])
- Making Multiple Exposures on One Picture ([Multi Exp.])
- Disabling Operational Sounds and the Output of Light at once ([Silent Mode])
- Taking Clear Pictures by Registering Faces ([Face Recog.])
- Recording Profiles of Babies and Pets on Images
- Using screens and displays suitable for recording
- 8. Stabiliser, Zoom and Flash
- 9. Recording Motion Pictures
- 10. Playing Back and Editing Images
- 11. Using the Wi-Fi function
- Wi-Fi function
- What you can do with the Wi-Fi function
- Controlling with a Smartphone/Tablet
- Installing the smartphone/tablet app “ Image App ”
- Connecting to a smartphone/tablet
- Taking images via a smartphone/tablet (remote recording)
- Playing back images in the camera
- Saving images stored in the camera
- Sending images in the camera to an SNS
- Adding location information to images stored in the camera from a smartphone/tablet
- Combining motion pictures recorded with Snap Movie according to your preference on a smartphone/tablet
- Sending images to a smartphone/tablet by controlling the camera
- Displaying pictures on a TV
- Printing Wirelessly
- When sending images to AV device
- When sending images to PC
- Using Web services
- Registering to the “LUMIX CLUB”
- About Connections
- [Wi-Fi Setup] Menu
- 12. Connecting to other equipment
- 13. Others

301
11. Using the Wi-Fi function
A picture can be automatically sent to a specified device every time you take it.
•
Since the camera gives priority to recording, sending may take longer during the recording.
• When connected with [Send Images While Recording], [ ]
is displayed on the recording screen, and [ ] is displayed
while sending a file.
• If you turn off this unit or the Wi-Fi connection before sending
is complete, unsent pictures will not be resent.
• You may not be able to delete files or use the playback menu
while sending.
Not available in these cases:
•
Motion pictures cannot be sent.
Images can be selected and sent after recording.
•
Details of the playback menu [Favorite] or [Print Set] settings will not be sent.
Not available in these cases:
•
Some images taken with a different camera may not be able to be sent.
• Images that have been modified or edited with a computer may not be able to be sent.
Send Images While Recording
Send Images Stored in the Camera
5
5