
Operating instructions
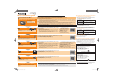

[Smart Transfer]
Transfer recorded images to a PC, Cloud Folder or AV devices automatically.
You can take, play back, and send images using the smartphone application “LUMIX LINK”.
You can send recorded images to PC, Cloud Folder or AV devices or upload them to SNS.
You can display recorded pictures on a DLNA-compatible TV.
[Remote Control]
Record
Live Control Remote Operation
Playback Send
You can print recorded pictures wirelessly from a PictBridge (wireless LAN-compatible) printer.
[Send Image]
[Wireless TV Playback]
[Wireless Print]
Create a folder that receives images on the PC in advance. Refer to the •
“Operating Instructions for advanced features (PDF format)” for details.
Turn the computer on.•
Create a folder that receives images on the PC in advance. Refer to the •
“Operating Instructions for advanced features (PDF format)” for details.
Turn the computer on.•
The destination AV device must be set up in advance. Refer to the AV •
device instruction manual for details.
The destination AV device must be set up in advance. Refer to the AV •
device instruction manual for details.
To send images to a Panasonic AV device compatible with “LUMIX •
CLUB” *, register the AV device on the “LUMIX CLUB” in advance, and
also register the AV device’s address number on the camera in advance.
Refer to the “Operating Instructions for advanced features (PDF format)”
and the AV device instruction manual for details.
The list of compatible devices is available on the website below:*
http://panasonic.jp/support/global/cs/dsc/ (This site is English only.)
Read the [Help] in the “LUMIX LINK” menu for further details on how to operate.•
A DLNA-compatible TV is required.•
A PictBridge (wireless LAN-compatible) printer is required.•
In addition to the above, location information acquired on the smartphone can be written to images taken on the camera or camera menus can be set
up on the smartphone. Refer to “Operating Instructions for advanced features (PDF format)” for details.
The screen differs depending on the operating system.*
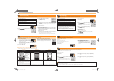
You can perform the camera's picture-taking
operation from a smartphone.
This feature is useful when taking group photos •
or when taking pictures with the camera left at a
location away from you.
Pictures that are taken are saved on the camera.•
Number of
recordable pictures
Camera battery
indication
Zoom
Shutter
Menu display
Name of the
connected device
Pictures in the camera can be played back on the
smartphone screen.
You can post images to SNS by operating the
smartphone or save them on the smartphone.
The destination confi rmation screen is displayed. •
Select [Yes].
The confi rmation screen is displayed only when •
the connection destination is already set. When
[Yes] is selected, the camera image is displayed
on the TV.
The confi rmation screen is displayed only when •
the connection destination is already set. Select
[Yes].
The screen that shows the camera is waiting to •
be connected with the smartphone is displayed.
Confi rm that the connection destination of the •
smartphone is set to this unit.
Image transmission is executed after charging ends.•
Depending on the specifi cations of the PC, [Smart Transfer] may fail.•
Only the images you recorded when [Auto Transfer] is set to [ON] are •
transferred.
When sending images to a PC When sending images to a PC
When sending images to AV device
When sending images to an AV device in your home
When sending images to AV device outside your home
Press [Wi-Fi].
1)
Press and hold the [Wi-Fi].
1)
Operations you can perform on a smartphone
Press 2)
/
/
/
to select [Smart Transfer],
and press [MENU/SET].
Start the “LUMIX LINK”.2)
When the connection between the camera and the
smartphone is complete, the smartphone screen displays
images in the camera. The LCD monitor of the camera
turns off after displaying the remote control message.
Press
3)
/
to select [Auto Transfer],
and press [MENU/SET].
Press
4)
/
to select [ON], and press [MENU/SET].
Turn off the camera.
5)
(When using a power outlet)
6)
Connect the AC adaptor (supplied) and this camera with the
USB connection cable (supplied), and insert the AC adaptor
(supplied) into the power outlet.
(When using a PC)
Connect this unit to a PC with the USB connection cable (supplied).
LUMIX LINK
9
9
2
3
4
5
6
1
100-0001
1/9
Press [Wi-Fi].
1)
Preparation:
Set the TV to DLNA waiting mode.
Select the image.
4)
When [SINGLE] is selected
Press
/
to select the image.
When [MULTI] is selected
Press
/
/
/
to select the image, and press [DISP.].
(repeat this step)
Press [MENU/SET].
5)
Press 2)
/
/
/
to select [Send Image],
and press [MENU/SET].
Press
3)
/
to select an image, and press [MENU/SET].
Press
4)
to select [Print start], and press [MENU/SET].
Press 2)
/
/
/
to select [Wireless TV
Playback], and press [MENU/SET].
Press 2)
/
/
/
to select [Wireless Print],
and press [MENU/SET].
Press
3)
/
to select [SINGLE] or [MULTI],
and press [MENU/SET].
Refer to the operating instructions for your TV.•
Press [Wi-Fi].
1)
Press [Wi-Fi].
1)
Let’s use the Wi-Fi functions
Android and Google Play are trademarks or registered trademarks of Google Inc.•
App Store is a service mark of Apple Inc.•
“Wi-Fi”, “Wi-Fi Protected Setup”, “WPA” and “WPA2” are marks or registered marks of the Wi-Fi Alliance.•
Note
Switch to Playback Mode.•
Switch to Playback Mode.•
Switch to Playback Mode.•
You can connect with this unit to a smartphone via a wireless access •
point (broadband router) by pressing [DISP.] on the waiting-screen for a
connection with a smartphone.
_DMC-SZ5_VQC9095_WiFi_Guide_eng.indd 2_DMC-SZ5_VQC9095_WiFi_Guide_eng.indd 2 2012/07/17 17:05:202012/07/17 17:05:20