
Operating Instructions
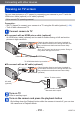

Table Of Contents
- Contents
- Before use
- Preparations
- Basics
- Sequence of operations
- Taking pictures with your own settings [Program AE] Mode
- How to adjust focus
- Touching the screen and recording (Touch Shutter function)
- Touching the screen and adjusting the focus and exposure (Touch AF/AE function)
- Taking pictures with automatic settings [Intelligent Auto] Mode
- Recording motion pictures
- Viewing your pictures
- Viewing motion pictures
- Deleting pictures
- Setting the menu
- Using the [Setup] menu
- [Clock Set]
- [Auto Clock Set] DMC-TZ40/DMC-TZ41
- [World Time]
- [Travel Date]
- [Airplane Mode]
- [Beep]
- [Speaker Volume]
- [Cust.Set Mem.]
- [Monitor Display]
- [Calibrate compass] DMC-TZ40/DMC-TZ41
- [Monitor Luminance]
- [Guide Line]
- [Histogram]
- [Video Rec Area]
- [Remaining Disp.]
- [Zoom Resume]
- [Economy]
- [Auto Review]
- [No.Reset]
- [Reset]
- [Reset Wi-Fi Settings]
- [USB Mode]
- [Output]
- [VIERA Link]
- [3D Playback]
- [Rotate Disp.]
- [Version Disp.]
- [Format]
- [Language]
- [Demo Mode]
- Application (Record)
- Switching the display of recording information, etc.
- Using the level gauge DMC-TZ40/DMC-TZ41
- Using Zoom
- Taking pictures with flash
- Taking close-up pictures
- Taking pictures with self-timer
- Taking pictures with Exposure Compensation
- Determine aperture and shutter speed and record
- Taking Pictures with different picture effects [Creative Control] mode
- Recording panorama pictures [Panorama Shot] Mode
- Taking pictures according to the scene [Scene Mode]
- Register your own settings and record [Custom] Mode
- Burst function
- Recording with the Face Recognition function [Face Recog.]
- Useful features for travel
- Entering Text
- Using the [Rec] menu
- [Aspect Ratio]
- [Picture Size]
- [Quality]
- [Sensitivity]
- [Extended ISO]
- [White Balance]
- [AF Mode]
- [Quick AF]
- [Face Recog.]
- [Metering Mode]
- [i.Exposure]
- [Min. Shtr Speed]
- [i.Resolution]
- [Digital Zoom]
- [Burst]
- [Color Mode]
- [AF Assist Lamp]
- [Red-Eye Removal]
- [Motion Deblur]
- [iHandheld Nite Shot]
- [iHDR]
- [Stabilizer]
- [Date Stamp]
- [Clock Set]
- Using the [Motion Picture] menu
- Application (View)
- Changing the picture information display, etc.
- Playing back still pictures recorded using the burst function
- Different playback methods [Playback Mode]
- Selecting pictures to play back [Filtering Play]
- Narrowing down by selecting picture type
- Narrowing down by selecting place name or landmark name of the location where the pictures were taken DMC-TZ40/DMC-TZ41
- Narrowing down by selecting the location where the pictures were taken DMC-TZ40/DMC-TZ41
- Narrowing down by selecting pictures recorded at a destination
- Narrowing down by selecting picture category or a person in the picture
- Narrowing down by selecting recording date
- Narrowing down by selecting favourite pictures
- Playing back pictures in order automatically [Slide Show]
- Searching by recording date [Calendar]
- Retouching pictures
- Using the [Playback] menu
- GPS and map functions DMC-TZ40/DMC-TZ41
- Using the GPS function to record the location of a picture
- Changing the place name information to be recorded
- Changing the recorded GPS information
- Adjusting the time using GPS
- Reducing the time required for positioning
- Using the map function
- Using the map data on the disc (supplied)
- Registering my landmark
- Using the compass
- Using the GPS log
- Wi-Fi
- Wi-Fi® function
- What you can do with the Wi-Fi function
- Sequence of connecting operation
- Remote Shooting
- Easily connect to a smartphone (NFC)
- Connecting via a wireless access point
- Connecting directly
- Playback on TV
- Send Images While Recording
- Send Images Stored in the Camera
- Connecting with a setting you used before (Connect from History)
- Connect with frequently used settings (Connect from Favourites)
- Transferring pictures automatically [Smart Transfer]
- Using “LUMIX CLUB”
- How to Use the [Wi-Fi Setup] Menu
- Connecting with other devices
- Others

Connecting with other devices
Viewing on TV screen
VQT4T12
- 258 -
●
On the LCD monitor of this camera, 3D still pictures will be played back in 2D
(conventional pictures).
●
If you switch between 3D still pictures and normal still pictures while playing back
pictures, a black screen will be displayed for a few seconds.
●
If you select a thumbnail of 3D still pictures or display a thumbnail after playing back
3D still pictures, it may take a few seconds to start playing back or displaying the
pictures.
●
Viewing 3D still pictures too close to a TV may cause eyestrain.
●
When a TV has not been converted for viewing 3D still pictures, do necessary
preparation on the TV. (For details about the necessary preparation of the TV, read
the manual for the TV.)
●
When an image is not suitable for 3D viewing (due to excessive parallax, etc.)
• During Slide Show playback: The image is displayed in 2D.
• During [Filtering Play]: A message appears confirming whether to display the image
in 3D or not.
●
When a 3D image is played back on a TV that is not 3D-capable, 2 pictures may
appear side-by-side on the screen.
●
During 3D playback, the [Wi-Fi] menu, [Setup] menu, [Playback] menu, [GPS] menu
DMC-TZ40
DMC-TZ41
, [Map] menu
DMC-TZ40
DMC-TZ41
, Playback Zoom, and
delete operation cannot be used.
●
You can store 3D still pictures on a computer or Panasonic recorder. (→259)
■
To switch the playback method for the still pictures recorded in 3D
Select the picture recorded in 3D
Select [2D/3D Settings] on the [Playback Mode] menu and then press [MENU/SET]
(→132)
• Playback method will switch to 3D if it is playing back in 2D (conventional image), or it
will switch to 2D if it is playing back in 3D.
• If you feel tired, uncomfortable or otherwise strange when playing back pictures
recorded in 3D, set to 2D.