
Operating Instructions
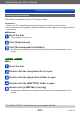
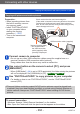
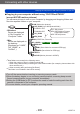
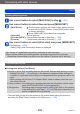
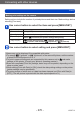
Table Of Contents
- Contents
- Before use
- Preparations
- Basics
- Sequence of operations
- Taking pictures with your own settings [Program AE] Mode
- How to adjust focus
- Touching the screen and recording (Touch Shutter function)
- Touching the screen and adjusting the focus and exposure (Touch AF/AE function)
- Taking pictures with automatic settings [Intelligent Auto] Mode
- Recording motion pictures
- Viewing your pictures
- Viewing motion pictures
- Deleting pictures
- Setting the menu
- Using the [Setup] menu
- [Clock Set]
- [Auto Clock Set] DMC-TZ40/DMC-TZ41
- [World Time]
- [Travel Date]
- [Airplane Mode]
- [Beep]
- [Speaker Volume]
- [Cust.Set Mem.]
- [Monitor Display]
- [Calibrate compass] DMC-TZ40/DMC-TZ41
- [Monitor Luminance]
- [Guide Line]
- [Histogram]
- [Video Rec Area]
- [Remaining Disp.]
- [Zoom Resume]
- [Economy]
- [Auto Review]
- [No.Reset]
- [Reset]
- [Reset Wi-Fi Settings]
- [USB Mode]
- [Output]
- [VIERA Link]
- [3D Playback]
- [Rotate Disp.]
- [Version Disp.]
- [Format]
- [Language]
- [Demo Mode]
- Application (Record)
- Switching the display of recording information, etc.
- Using the level gauge DMC-TZ40/DMC-TZ41
- Using Zoom
- Taking pictures with flash
- Taking close-up pictures
- Taking pictures with self-timer
- Taking pictures with Exposure Compensation
- Determine aperture and shutter speed and record
- Taking Pictures with different picture effects [Creative Control] mode
- Recording panorama pictures [Panorama Shot] Mode
- Taking pictures according to the scene [Scene Mode]
- Register your own settings and record [Custom] Mode
- Burst function
- Recording with the Face Recognition function [Face Recog.]
- Useful features for travel
- Entering Text
- Using the [Rec] menu
- [Aspect Ratio]
- [Picture Size]
- [Quality]
- [Sensitivity]
- [Extended ISO]
- [White Balance]
- [AF Mode]
- [Quick AF]
- [Face Recog.]
- [Metering Mode]
- [i.Exposure]
- [Min. Shtr Speed]
- [i.Resolution]
- [Digital Zoom]
- [Burst]
- [Color Mode]
- [AF Assist Lamp]
- [Red-Eye Removal]
- [Motion Deblur]
- [iHandheld Nite Shot]
- [iHDR]
- [Stabilizer]
- [Date Stamp]
- [Clock Set]
- Using the [Motion Picture] menu
- Application (View)
- Changing the picture information display, etc.
- Playing back still pictures recorded using the burst function
- Different playback methods [Playback Mode]
- Selecting pictures to play back [Filtering Play]
- Narrowing down by selecting picture type
- Narrowing down by selecting place name or landmark name of the location where the pictures were taken DMC-TZ40/DMC-TZ41
- Narrowing down by selecting the location where the pictures were taken DMC-TZ40/DMC-TZ41
- Narrowing down by selecting pictures recorded at a destination
- Narrowing down by selecting picture category or a person in the picture
- Narrowing down by selecting recording date
- Narrowing down by selecting favourite pictures
- Playing back pictures in order automatically [Slide Show]
- Searching by recording date [Calendar]
- Retouching pictures
- Using the [Playback] menu
- GPS and map functions DMC-TZ40/DMC-TZ41
- Using the GPS function to record the location of a picture
- Changing the place name information to be recorded
- Changing the recorded GPS information
- Adjusting the time using GPS
- Reducing the time required for positioning
- Using the map function
- Using the map data on the disc (supplied)
- Registering my landmark
- Using the compass
- Using the GPS log
- Wi-Fi
- Wi-Fi® function
- What you can do with the Wi-Fi function
- Sequence of connecting operation
- Remote Shooting
- Easily connect to a smartphone (NFC)
- Connecting via a wireless access point
- Connecting directly
- Playback on TV
- Send Images While Recording
- Send Images Stored in the Camera
- Connecting with a setting you used before (Connect from History)
- Connect with frequently used settings (Connect from Favourites)
- Transferring pictures automatically [Smart Transfer]
- Using “LUMIX CLUB”
- How to Use the [Wi-Fi Setup] Menu
- Connecting with other devices
- Others

Connecting with other devices
Keeping the still pictures and motion pictures on your PC
VQT4T12
- 265 -
■
Copying to your computer without using “PHOTOfunSTUDIO”
(except AVCHD motion pictures)
You can save pictures to use on your computer by dragging and dropping folders and
files into separate folders on your computer.
DCIM (Still/motion pictures)
100_PANA (Up to 999 pictures/folder)
P1000001.JPG
:
P1000999.JPG
101_PANA
:
999_PANA
MISC (DPOF files, Favourite)
AD_LUMIX
*
2
DMC-TZ40
DMC-TZ41
GPSLOG
KML (Save folder for converted GPS logs)
NMEA (Save folder for GPS logs)
PRIVATE
*
2
AVCHD (Motion pictures in AVCHD)
*
1
●
Windows
Drives are displayed
in “My Computer” or
“Computer” folder.
●
Mac
Drives are displayed on
the desktop.
(Displayed as “LUMIX”,
“NO_NAME”, or
“Untitled”.)
JPG: Still pictures
MP4: [MP4] Motion Pictures
[High Speed Video]
MPO: 3D still pictures
*
1
New folders are created in the following cases:
• When the number of files in a folder exceeds 999.
• When using cards already containing the same folder number (for example, pictures taken with
other cameras, etc.).
• When recording after performing [No.Reset].
*
2
This folder is not created in the built-in memory.
●
Turn off the camera before inserting or removing memory cards.
●
When the battery begins to run out during communication, a warning beep sounds.
Cancel communication via your computer immediately.
●
Setting the [USB Mode] to [PC] removes the need to make the setting each time the
camera is connected to the computer.
●
For more details, consult your computer operating manual.