
Operating instructions


Application (Record)
Using the level gauge
VQT5E85- 79 -
■
Recording mode:
If you want to make sure that the camera is not slanted or tilted, for example, when you
take a picture of a landscape, use the level gauge indication as a reference.
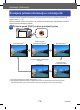
Press [DISP.] button to switch the display
Press the button to switch the display. Press the button until the level gauge is
displayed.
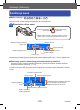
Correct camera angle
■
Using the level gauge
The yellow line indicates the current angle. Correct the angle of the camera so that it
matches the white line.
Tilting up or down
• In this case, it is facing
upward.
Tilting left or right
• In this case, the right side has
dropped.
• When the camera is tilted very little or not at all, the level gauge will turn green.
• When pictures are taken in portrait orientation, the level gauge is automatically
switched to one for portrait orientation.
●
Even when angle is more or less corrected, there may be an error of about ±1 degree.
●
When the camera is being moved, the level gauge may not be displayed correctly.
●
The level gauge may not be displayed correctly or the direction detect function may
not operate correctly if the pictures are taken with the camera pointing sharply up or
down.
Application (Record)
Using the level gauge
VQT5E85- 79 -
■
Recording mode:
If you want to make sure that the camera is not slanted or tilted, for example, when you
take a picture of a landscape, use the level gauge indication as a reference.
Press [DISP.] button to switch the display
Press the button to switch the display. Press the button until the level gauge is
displayed.
Correct camera angle
■
Using the level gauge
The yellow line indicates the current angle. Correct the angle of the camera so that it
matches the white line.
Tilting up or down
• In this case, it is facing
upward.
Tilting left or right
• In this case, the right side has
dropped.
• When the camera is tilted very little or not at all, the level gauge will turn green.
• When pictures are taken in portrait orientation, the level gauge is automatically
switched to one for portrait orientation.
●
Even when angle is more or less corrected, there may be an error of about ±1 degree.
●
When the camera is being moved, the level gauge may not be displayed correctly.
●
The level gauge may not be displayed correctly or the direction detect function may
not operate correctly if the pictures are taken with the camera pointing sharply up or
down.
- 79 -
VQT5E85
■Način snimanja:
Koristite mjerač razine kao referencu tijekom snimanja, na primjer krajolika, da biste
osigurali da fotoaparat nije nagnut ili nakošen.
Pritisnite [DISP.] (prikaz) za promjenu prikaza
Pritisnite gumb za promjenu prikaza. Pritisnite gumb dok se ne prikaže mjerač
razine.
Ispravljanje nagiba fotoaparata
■Uporaba mjerača razine
Žuta linija označava ispravan kut nagiba. Ispravite nagib fotoaparata kako bi ju
poravnali s bijelom linijom.
• Mjerač razine promijenit će boju u zelenu ako je fotoaparat nagnut vrlo malo ili nije
uopće.
• Kod okomitog snimanja fotograja, mjerač razine se automatski prilagodi okomitom
snimanju.
● Greška od ±1 stupnja postoji čak i kad je kut nagiba više-manje ispravljen.
● Mjerač razine neće se ispravno prikazivati kod premještanja fotoaparata.
● Ako snimate dok je fotoaparat usmjeren izravno prema gore ili dolje, mjerač razine
neće ispravno se prikazivati ili funkcija prepoznavanja usmjerenja neće prikazivati
ispravne vrijednosti.
Aplikacija (Snimanje)
Korištenje mjerača razine
Nagnuti lijevo ili desno
• U tom je slučaju desna strana
previše spuštena.
Nagnuti gore ili dolje
• U tom slučaju, okrenuta je
prema gore.