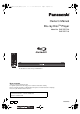
DMP-BDT110_115_210_VQT3B58_eng.book 1 ページ 2010年12月2日 木曜日 午前9時18分 Owner’s Manual Blu-ray DiscTM Player Model No. DMP-BDT210 DMP-BDT110 The illustration shows the image of DMP-BDT210. Dear customer Thank you for purchasing this product. For optimum performance and safety, please read these instructions carefully. Before connecting, operating or adjusting this product, please read the instructions completely. Please keep this manual for future reference. If you have any questions contact U.S.A.
DMP-BDT110_115_210_VQT3B58_eng.book 2 ページ 2010年12月2日 木曜日 午前9時18分 Getting star ted IMPORTANT SAFETY INSTRUCTIONS Read these operating instructions carefully before using the unit. Follow the safety instructions on the unit and the applicable safety instructions listed below. Keep these operating instructions handy for future reference. 1 Read these instructions. 2 Keep these instructions. 3 Heed all warnings. 4 Follow all instructions. 5 Do not use this apparatus near water. 6 Clean only with dry cloth.
VQT3B58_engTOC.fm 3 ページ 2010年12月7日 火曜日 午前9時38分 IMPORTANT SAFETY INSTRUCTIONS . . . . . . . . . . . . . . . . Accessories. . . . . . . . . . . . . . . . . . . . Unit and media care . . . . . . . . . . . . . Control reference guide . . . . . . . . . . Playable discs/Cards/USB devices . . Playback menu. . . . . . . . . . . . . . . . . 27 Setup menu . . . . . . . . . . . . . . . . . . . 29 Connections & Settings STEP 1 : Connecting to a TV . . . . . . 8 STEP 2 : Connecting to an amplifier/ receiver . . . .
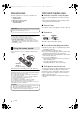
DMP-BDT110_115_210_VQT3B58_eng.book 4 ページ 2010年12月8日 水曜日 午後4時39分 Accessories Unit and media care Check the supplied accessories before using this unit. ∫ Clean this unit with a soft, dry cloth 1 ≥ Never use alcohol, paint thinner or benzine to clean this unit. ≥ Before using chemically treated cloth, carefully read the instructions that came with the cloth.
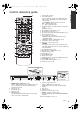
VQT3B58~Body_eng.fm 5 ページ 2010年12月14日 火曜日 午前10時57分 1 2 9 1 10 2 11 12 3 13 3 4 5 6 7 8 14 15 4 5 9 10 16 17 18 6 11 12 13 14 15 16 17 18 19 20 19 20 7 8 Turn the unit on and off TV operation buttons You can operate the Panasonic TV through the unit’s remote control. (Depending on the TV these buttons may not work.) [Í TV POWER] : Turn the television on and off [AV] : Switch the input select [i j VOL] : Adjust the volume Select title numbers, etc.
DMP-BDT110_115_210_VQT3B58_eng.
ページ 2010年12月9日 木曜日 ∫ Discs that cannot be played in this unit Any other disc that is not specifically supported or previously described. ≥ DVD-RAM ≥ Super Audio CD ≥ Photo CD ≥ DVD-Audio ≥ Video CD and Super Video CD ≥ WMA discs ≥ [BDT210_for_U.S.A.
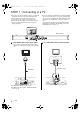
VQT3B58~Body_eng.fm 8 ページ 2010年12月8日 水曜日 午後4時53分 STEP 1 : Connecting to a TV ≥ Do not place the unit on amplifiers/receivers or equipment that may become hot. The heat can damage the unit. ≥ Before making any connections we suggest you temporarily disconnect all the units from AC power. ≥ Do not connect video signals through a video recorder. Due to copy guard protection the picture may not be displayed properly. ≥ Please use High Speed HDMI Cables that have the HDMI logo (as shown on the back cover).
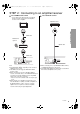
DMP-BDT110_115_210_VQT3B58_eng.book 9 ページ 2010年12月8日 水曜日 午後4時39分 STEP 2 : Connecting to an amplifier/receiver ∫ Via an HDMI AV OUT terminal ∫ Via an OPTICAL terminal – It is possible to play back 3D videos and 3D still pictures when the connected TV and amplifier/ receiver are 3D compatible.
DMP-BDT110_115_210_VQT3B58_eng.book 10 ページ 2010年12月6日 月曜日 午前10時16分 STEP 3 : Connecting to a broadband network The following services can be used when this unit is connected to broadband. ≥ Firmware can be updated ( 15) ≥ You can enjoy BD-Live ( 19) ≥ You can enjoy VIERA CAST ( 23) ≥ You can access other devices (Home Network) ( 24) For details about connection method, refer to the instructions supplied with the connected equipment.
2010年12月2日 Precautions of Wireless LAN connection The following limits are in place regarding the usage of this unit or Wireless LAN adaptor. You must be aware of these limits before using these devices. Panasonic will in no way be responsible for any incidental damage which may arise due to a failure to obey these limits, or to any condition of use or disuse of these devices. ≥ Data transmitted and received over radio waves may be intercepted and monitored.
VQT3B58~Body_eng.fm 12 ページ 2010年12月10日 金曜日 STEP 4 : Connecting to an AC power source 10BASE-T/100BA COMMUNICATION CAMERA 午後9時1分 STEP 5 : Settings Easy Setting After connecting your new player for the 1st time and pressing the power button, a screen for the basic settings will appear. Preparation LAN AC power supply cord (supplied) To a household AC outlet ≥ This unit consumes a small amount of AC power (“Quick Start”: “Off”, approx. 0.1 W) even when turned off.
VQT3B58~Body_eng.fm 13 ページ 2010年12月10日 金曜日 Network Easy Setting The configuration of your network is about to begin. If you failed to make the settings, refer to page 14. Wired connection 午後9時1分 ∫ “Search for wireless network” The available wireless networks will be displayed. 1 Select your network name and press [OK]. ≥ If your network name is not displayed search again by pressing the [R] button on the remote control. Stealth SSID will not be displayed, in this case enter manually.
VQT3B58~Body_eng.fm 14 ページ 2010年12月10日 金曜日 When you experience problems with settings 午後9時1分 Network Easy Setting (Home Network Connection Check) Network Easy Setting (Home Network Connection Check) Complete. 1. LAN cable connection 2. IP address setting 3. Connection to gateway Wireless Settings : Fail : Fail : Fail LAN cable is not connected. Please check the connection. Select “Yes” and press [OK] to check network connection again. Select “No” and press [OK] to finish Network Easy Setting.
ページ 2010年12月9日 木曜日 ≥ Refer to the operating instructions of the hub or router. ≥ WPS (Wi-Fi Protected Setup) is a standard that facilitates settings relating to the connection and security of wireless LAN devices. To see whether your Wireless router supports WPS, check the Wireless router operating instructions. ≥ You can perform this setup anytime by selecting “Network Easy Setting” in the Setup menu. (> 32) ≥ You can redo these settings individually using “Network Settings”.
VQT3B58~Body_eng.fm 16 ページ 2010年12月7日 火曜日 Inserting or removing media Playback 午前9時40分 HOME menu Major functions of this unit can be operated from the HOME menu. Preparation Turn on the television and select the appropriate video input on the television. CALL SD CARD 1 [BDT210] ≥ When inserting a media item, ensure that it is facing the right way up. ≥ When removing the SD card, press on the center of the card and pull it straight out.
DMP-BDT110_115_210_VQT3B58_eng.book 17 ページ 2010年12月2日 Playing video contents SD USB Stop If the menu is displayed, press [3, 4, 2, 1] to select the item. ( 16) 2 Press [3, 4] to select the title and press [OK]. When a message screen is displayed while playing back 3D compatible video software, play back in accordance with the instructions. ∫ To show menus You can show Top Menu, Direct Navigator or Pop-up Menu. Press [POP-UP MENU/TOP MENU]. ≥ Press [3, 4, 2, 1] to select the item and press [OK].
DMP-BDT110_115_210_VQT3B58_eng.book 18 ページ 2010年12月6日 Useful functions 1 Press [SUB MENU]. 2 Select an item, then press [OK]. While Direct Navigator screen is displayed Properties To display the titles properties (recording date, etc.). View Chapters To select the chapter. View Playlists To play playlists. View Titles To select the title. Select Folder To switch to another folder.
DMP-BDT110_115_210_VQT3B58_eng.book 19 ページ 2010年12月8日 Enjoying BD-Live or picture-in-picture in BD-Video Enjoying BD-Live discs with Internet BD-Live allows you to enjoy more functions such as subtitles, exclusive images and online games by connecting this unit to the Internet. Since most of the BD-Live compatible discs are played back using the BD-Live function, additional contents are required to be downloaded into the external memory (local storage).
VQT3B58~Body_eng.fm 20 ページ 2010年12月9日 木曜日 午後12時10分 Enjoying 3D video You can enjoy powerful 3D videos with realistic sensations by connecting this unit with a High Speed HDMI Cable to a 3D compatible TV. Useful functions 1 While playing Press [ ]. 2 Select an item, then press [OK]. Signal Format The image is an illustration. Original Keep original picture format. Side by side 3D picture format comprising of left and right screens. 2D to 3D Converts 2D pictures to 3D effect.
ページ 2010年12月10日 金曜日 Playing still pictures BD DVD CD SD USB (BD-RE, DVD-R/-R DL, CD-R/RW, SD Card, USB device) In order to play back 3D still pictures (MPO), this unit should be connected to a Full HD 3D compatible TV via an HDMI terminal. 午後9時5分 Useful functions 1 Press [SUB MENU]. 2 Select an item, then press [OK]. While Photo View screen is displayed 1 Insert the media. If the menu is displayed, press [3, 4, 2, 1] to select the item. (> 16) 2 Press [3, 4] to select the folder and press [OK].
DMP-BDT110_115_210_VQT3B58_eng.book 22 ページ 2010年12月2日 Playing music DVD CD USB (DVD-R/-R DL, music CD, CD-R/RW, USB device) 1 Insert the media. If the menu is displayed, press [3, 4, 2, 1] to select the item. ( 16) 2 Press [3, 4] to select the track and press [OK]. DIRECT NAVIGATOR CD No. 01 02 03 04 05 0.09 Track1 5 Tracks / Total Play Time 20min54sec Music list Track Name Track1 Track2 Track3 Track4 Track5 4.
VQT3B58~Body_eng.fm 23 ページ 2010年12月9日 木曜日 Enjoying VIERA CASTTM You can access a selection of Internet services from the Home screen with VIERA CAST, for example YouTube, Picasa Web Albums. (Current as of December 2010) Preparation ≥ Network connection (> 10) ≥ Network setting (> 13) To enjoy video communication (ex. SkypeTM) : ≥ Connect this unit with optional Communication Camera (TY-CC10W or compatible equipment). Depending on the area, this optional camera may not be available.
DMP-BDT110_115_210_VQT3B58_eng.book 24 ページ 2010年12月8日 Playing contents saved on other equipment You can enjoy viewing a content saved on other equipment (Windows 7 operating system, smartphone, etc.) connected to the home network with this unit. Preparation 1 Perform network connection and network settings of this unit. ( 10, 13) 2 Perform Home Network settings of the connected equipment.
VQT3B58~Body_eng.fm 25 ページ 2010年12月7日 火曜日 Play back the contents in the DLNA server using DMC It is possible to play back the video or still pictures in the shared folder of the DLNA server by controlling with DLNA DMC (Digital Media Controller) compatible equipment. ≥ Windows Media® Player and a smartphone that has the compatible application serve as the DLNA server and the DMC. 午前9時42分 ≥ Ensure that the router for your home network has adequate security system to prevent unauthorized access.
DMP-BDT110_115_210_VQT3B58_eng.book 26 ページ 2010年12月2日 Linked operations with the TV (VIERA Link “HDAVI Control TM TM ”) What is VIERA Link “HDAVI Control”? VIERA LinkTM is a new name for EZ SyncTM. VIERA Link “HDAVI Control” is a convenient function that offers linked operations of this unit, and a Panasonic TV (VIERA) or amplifier/receiver under “HDAVI Control”. You can use this function by connecting the equipment with an HDMI cable.
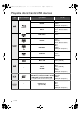
DMP-BDT110_115_210_VQT3B58_eng.book 27 ページ 2010年12月2日 Playback menu 木曜日 午前9時18分 Settings Disc 1 Press [DISPLAY]. Signal Type e.g., BD-Video Subtitle Subtitle Style Menus Items Off - Main 1ENG Angle The recording method of original video appears. Soundtrack Select the type of audio or language. Video Select on/off of images. The recording method of original video appears. Soundtrack Select on/off of audio and the language.
DMP-BDT110_115_210_VQT3B58_eng.book 28 ページ 2010年12月2日 木曜日 午前9時18分 Progressive Play Select the method of conversion for progressive output to suit the type of material being played. Repeat Play (Only when the elapsed time is being displayed on the unit’s display.) Select the item which you want to repeat. The items displayed differ depending on the type of media. Select “Off” to cancel. ≥ When the content is distorted change the settings from “Auto” to “Video”.
DMP-BDT110_115_210_VQT3B58_eng.book 29 ページ 2010年12月8日 Setup menu Change the unit’s settings if necessary. The settings remain intact even if you switch the unit to standby. 1 Press [HOME]. 2 Press [OK] to select “Setup”. 3 Press [4] to select “Player Settings”. Player Settings Disc Video 水曜日 午後4時39分 Disc DVD-Video Ratings Set a ratings level to limit DVD-Video play. ≥ Follow the on-screen instructions. Enter a 4-digit password with the number buttons when the password screen is shown.
VQT3B58~Body_eng.fm 30 ページ 2010年12月7日 火曜日 午前9時43分 Video Still Mode (paused video) Select the type of picture shown when you pause playback. Auto Automatically selects the type of picture shown. Field Select if jittering occurs when “Auto” is selected. Frame Select if small text or fine patterns cannot be seen clearly when “Auto” is selected. Seamless Play The chapter segments in playlists are played seamlessly.
DMP-BDT110_115_210_VQT3B58_eng.book 31 ページ 2010年12月2日 Display Status Messages 木曜日 午前9時18分 TV Aspect Set to match the type of television connected. When connected to a 4:3 aspect television and playing 16:9 ratio image: Choose whether to show status messages automatically. Choose the language for menus and on-screen messages. 4:3 Pan & Scan The sides are cut off so the picture fills the screen. When playing BD-Video, video is output as “4:3 Letterbox”.
DMP-BDT110_115_210_VQT3B58_eng.book 32 ページ 2010年12月6日 HDMI Audio Output This setting selects whether or not to output audio from HDMI. ≥ Select “Off” when the TV is connected to this unit via an HDMI terminal, and this unit is also connected to other devices, such as an amplifier/receiver via an OPTICAL terminal. Set to use “HDAVI Control” function when connected with an HDMI cable to a device that supports “HDAVI Control”. ≥ Select “Off” when you do not want to use “HDAVI Control”.
VQT3B58~Body_eng.fm 33 ページ 2010年12月10日 金曜日 Remote Device Settings (> 25) Press [OK] to show the following settings: Remote Device Operation Enable to operate by DMC. ≥ If “On” is selected, “Quick Start” is fixed to “On”. Setting Unit Name Set the name of this unit to be displayed on the connected equipment. Registration Type Automatic Allow connection to all the equipment that is accessing this unit.
DMP-BDT110_115_210_VQT3B58_eng.book 34 ページ 2010年12月2日 木曜日 午前9時18分 Troubleshooting guide General operation Before requesting service, please perform the following steps. To return to the factory preset. R eference Do you have the latest firmware installed? Firmware updates may be released to correct operating irregularities that are discovered with certain movies. ( 15) 4 Make the following checks and visit our website for more information. For USA : www.panasonic.com/help Enter the model number.
DMP-BDT110_115_210_VQT3B58_eng.book 35 ページ 2010年12月8日 This unit does not recognize the USB connection correctly. ¾ If USB device is connected to this unit while playing a disc or in a video communication the connection will not be recognized. Press [HOME] and reconnect USB device. ¾ [BDT210] : USB memory and USB HDD are not recognized via the rear USB port of this unit. ¾ Disconnect and reconnect the USB cable. If it still does not recognize the connection, turn the power of this unit off and on again.
DMP-BDT110_115_210_VQT3B58_eng.book 36 ページ 2010年12月2日 Playback 木曜日 午前9時18分 Network Disc cannot be played. I can’t connect to the network. ¾ The disc is dirty. ( ¾ Confirm the network connection and settings. ( 10, 13, 32) ¾ Check the operating instructions for each device and connect accordingly. 4) Still pictures (JPEG) do not play back normally. ¾ The images that were edited on the PC, such as Progressive JPEG, etc., may not play back. I can’t play back BD-Live.
ページ 2010年12月10日 金曜日 Messages The following messages or service numbers appear on the television or unit’s display when something unusual is detected during startup and use. On the television Cannot play. ¾ You inserted an incompatible disc (Discs recorded in PAL video, etc.). Cannot display on this unit. ¾ You tried to play a non-compatible image. ¾ Confirm “SD” on the unit’s display is not displayed and re-insert the card. No disc is inserted. ¾ The disc may be upside down.
DMP-BDT110_115_210_VQT3B58_eng.
ページ 2010年12月10日 金曜日 午後1時29分 Specifications Signal system: NTSC Operating temperature range: i5 oC to i35 oC (i41 oF to i95 oF) Operating humidity range: 10 % to 80 % RH (no condensation) Video output: 1.0 Vp-p (75 ≠)/Pin jack:1 system Audio output: 2 Vrms (1 kHz, 0 dB)/Pin jack Number of connectors : 2 channel:1 system Digital audio output: Optical digital output (Optical terminal) HDMI AV output: Type A (19 pin) : 1 system This unit supports “HDAVI Control 5” function.
VQT3B58~Body_eng.fm 40 ページ 2010年12月13日 月曜日 午後5時36分 Java and all Java-based trademarks and logos are trademarks or registered trademarks of Sun Microsystems, Inc. in the United States and other countries. Windows is a trademark or a registered trademark of Microsoft Corporation in the United States and other countries. Manufactured under license from Dolby Laboratories. Dolby and the double-D symbol are trademarks of Dolby Laboratories. YouTube and Picasa are trademarks of Google, Inc.
DMP-BDT110_115_210_VQT3B58_eng.book 41 ページ 2010年12月8日 水曜日 午後4時39分 Limited Warranty (ONLY FOR U.S.A.
VQT3B58~Body_eng.fm 42 ページ 2010年12月10日 金曜日 午前9時29分 Limited Warranty (Only for CANADA) Panasonic Canada Inc. 5770 Ambler Drive, Mississauga, Ontario L4W 2T3 PANASONIC PRODUCT - LIMITED WARRANTY Panasonic Canada Inc.
VQT3B58~Body_eng.fm 43 ページ 2010年12月8日 水曜日 Referencia rápida en español (Spanish Quick Reference) Reproducción básica Preparación Encienda el televisor y seleccione la entrada de vídeo adecuada en el televisor. Conexiones básicas 1 Pulse [Í POWER] para encender la unidad. Conexión a un televisor compatible con HDMI Después de conectar su nuevo reprodutor y pulsar el botón de encendido, aparecerá la pantalla de la configuración básica. 2 Inserte el medio.
VQT3B58~BCover_eng.fm 44 ページ 2010年12月14日 火曜日 午前10時20分 Index A Audio Changing audio . . . . . . . . . . . . 17 Language . . . . . . . . . . . . . . 27, 29 B BD-Live . . . . . . . . . . . . . . . . . . . . 19 C Chapter . . . . . . . . . . . . . . . . . . . . 18 D DivX . . . . . . . . . . . . . . . . . . . . 18, 39 DLNA . . . . . . . . . . . . . . . . . . . . . . 24 F File format. . . . . . . . . . . . . . . . . . 39 Firmware update . . . . . . . . . . . . 15 L LAN . . . . . . . . . . . . . . . . . . . . .