Operating Instructions Blu-ray DiscTM Player Model No. DMP-BDT570 Firmware updates Panasonic is constantly improving the unit’s firmware to ensure that our customers are enjoying the latest technology. Panasonic recommends updating your firmware as soon as you are notified. For details, refer to “Firmware updates” (> 15) or http://panasonic.jp/support/global/cs/ (This site is in English only.) Thank you for purchasing this product.
Precautions WARNING Unit To reduce the risk of fire, electric shock or product damage, ≥ Do not expose this unit to rain, moisture, dripping or splashing. ≥ Do not place objects filled with liquids, such as vases, on this unit. ≥ Use only the recommended accessories. ≥ Do not remove covers. ≥ Do not repair this unit by yourself. Refer servicing to qualified service personnel. ≥ Do not let metal objects fall inside this unit. ≥ Do not place heavy items on this unit.
Wireless LAN connection To dispose or transfer this unit The following limits are in place regarding the usage of this unit. You must be aware of these limits before using this unit. Panasonic will in no way be responsible for any incidental damage which may arise due to a failure to obey these limits, or to any condition of use or disuse of this unit. ≥ Data transmitted and received over radio waves may be intercepted and monitored. ≥ This unit contains delicate electronic components.
Table of contents Precautions . . . . . . . . . . . . . . . . . 2 Playback Getting started Inserting or removing media . . . . 16 HOME menu . . . . . . . . . . . . . . . . 16 Playback . . . . . . . . . . . . . . . . . . . 17 Enjoying Network Service . . . . . . 20 Home Network feature . . . . . . . . 21 VIERA Link . . . . . . . . . . . . . . . . . 23 Accessories . . . . . . . . . . . . . . . . . Unit and media care . . . . . . . . . . . Playable media. . . . . . . . . . . . . . .
Getting started Accessories Unit and media care Check the supplied accessories before using this unit. 1 Remote control (N2QAYB001060) 2 Batteries for remote control 1 AC mains lead 1 CD-ROM ∫ Clean this unit with a soft, dry cloth Getting started ≥ Never use alcohol, paint thinner or benzine to clean this unit. ≥ Before using chemically treated cloth, carefully read the instructions that came with the cloth. ∫ This unit’s lens Use the lens cleaner (not supplied) to clean the unit’s lens.
Getting started Playable media Device Media markings Device types BD-Video BD-RE BD BD-R DVD-Video DVD-R DVD DVD-R DL Contents format Video Video, JPEG, MPO Video, MKV, Xvid Video Video, AVCHD, MKV, Xvid, JPEG, MPO, AAC, ALAC, DSD(DFF, DSF), FLAC, MP3, WAV, WMA DVD-RW Video, AVCHD — +R/+RW/+R DL Music CD CD — MKV, Xvid, JPEG, MPO, AAC, ALAC, FLAC, MP3, Music [CD-DA], WAV, WMA SD Memory Card (from 8 MB to 2 GB) SDHC Memory Card (from 4 GB to 32 GB) AVCHD, AVCHD 3D, SDXC Memory Card (48 GB, 64
Getting started ∫ Types of discs that cannot be played by this unit ∫ SD card Any other disc that is not specifically supported or previously described.
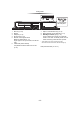
Getting started Control reference guide When other Panasonic devices respond to the remote control of the unit, change the remote control code. (> 33) 1 2 11 1 2 3 3 ㄈㄉㄊ pqrs 4 5 abc ㄅㄆㄇ 12 jkl mno 13 wxyz 14 tuv 15 6 7 16 17 18 8 19 9 10 20 4 5 6 7 8 9 10 11 12 13 14 15 16 17 18 19 20 -8- Turn the unit on and off TV operation buttons You can operate the Panasonic TV using this unit’s remote control. Some buttons may not work depending on the TV.
Getting started 7 8 9 Pull to flip down the front panel. 1 1 2 3 4 5 6 2 3 4 5 6 Disc tray (> 16) Display USB port (> 16) SD card slot (> 16) Remote control signal sensor Distance: Within approx. 7 m Angle: Approx. 20e up and down, 30e left and right V.OFF LED (Video off LED) It is possible to set the LED to turn on/off.
Connections and settings Connecting to a TV Connections and settings Connect the AC mains lead after making all connections. ≥ Before making any connections, we recommend that you temporarily disconnect all the units from AC power. ≥ Insert the AC mains lead up to A, a point just before the round hole. To a household mains socket HDMI IN AC mains lead (supplied) HDMI cable ≥ Use HDMI AV OUT MAIN terminal. ≥ To enjoy 4K output, you need to connect this unit to a 4K compatible TV.
Connections and settings Connecting to an amplifier/receiver Perform either one of the following connections in accordance with your amplifier/receiver input terminal. HDMI AV OUT HDMI cable HDMI cable HDMI IN HDMI OUT (ARC) HDMI IN (ARC) Amplifier/receiver ≥ Use HDMI AV OUT MAIN terminal. ≥ Set “Digital Audio Output” (> 29). ≥ To enjoy images in 4K (50p/60p), you need to connect a 4K (50p or 60p) compatible amplifier and a TV with a High Speed HDMI Cable.
Connections and settings DIGITAL AUDIO OUT (OPTICAL or COAXIAL) Coaxial cable COAXIAL IN OR OPTICAL IN Optical digital cable Amplifier/receiver ≥ Set “HDMI Audio Output” to “Off” (> 29). ≥ Set “Digital Audio Output” (> 29). 2ch AUDIO OUT L AUDIO IN R Amplifier/receiver Audio cable ≥ Connect terminals of the same colour. 7.1ch AUDIO OUT Connect Audio cables to terminals corresponding to the speakers you have connected.
Connections and settings Connecting to the network The following services can be used when this unit is connected to broadband. ≥ Firmware can be updated (> 15) ≥ You can enjoy BD-Live (> 18) ≥ You can enjoy Network Service (> 20) ≥ You can access other devices (Home Network) (> 21) ≥ This unit supports Wi-Fi Direct® and can make a wireless connection to wireless devices without router. You can use this function when enjoying Home Network feature, etc.
Connections and settings Settings Wireless Settings The following settings can be performed anytime in the Setup menu. (> 31, 32) Select a connection method to wireless access point. Please refer to the operating instructions of your wireless access point about connection methods. Easy Settings Search for wireless network After connecting your new player for the first time and pressing [Í], the basic settings screen will appear. Preparation Turn on the TV and select the appropriate video input.
Connections and settings Firmware updates ≥ Refer to the operating instructions of the hub or router. ≥ Do not use this unit to connect to any wireless network for which you do not have usage rights. Using these networks may be regarded as illegal access. ≥ If you have trouble getting online on your PC after performing network settings on this unit, perform the network settings on your PC.
Playback Inserting or removing media HOME menu Playback Major functions of this unit can be operated from the HOME menu. Preparation Turn on the TV and select the appropriate video input. 1 2 Press [Í] to turn on the unit. Press [OK] or [2, 1] to select the item. ≥ Press [OK] or [3, 4] to select the item if necessary Notes ≥ When inserting a media item, ensure that it is facing the correct way, which is the right side facing up.
Playback Playback 1 Search/Slow motion Insert the media. Playback starts depending on the media. 2 Select the item to play and press [OK]. Repeat this step if necessary. ≥ DISCS CONTINUE TO ROTATE WHILE MENUS ARE DISPLAYED. Press [∫STOP] when you have finished playback to protect the unit’s motor, your TV screen and so on. ≥ When the following conditions are met, a still picture will be played back in 4K. The resolution of the still picture will be changed automatically.
Playback Show the status messages Enjoying 3D video and photos While playing, press [STATUS]. The status messages give you information about what is currently being played. Each time you press [STATUS], the display information may change or disappear from the screen. ≥ Depending on media and contents, the display may change or not appear. e.g.
Playback Slideshow Play a slideshow of photos and adjust various settings during the playback. 1 2 3 Insert the media. Select “Photos”. Select an item and press the green button. The following items can be set. Start Slideshow Start the slideshow. You can display still pictures in the selected folder one by one at a constant interval. Interval Change the display interval. Transition Effect Select the effect when sliding pictures. Repeat Play Set whether to repeat the slideshow.
Playback Enjoying Network Service 1 ≥ Netflix can be accessed directly by pressing [NETFLIX] button even when this unit is off. Network Service allows you to access some specific websites supported by Panasonic. 2 Network Service provides a variety of selected Internet services such as the following. ≥ Online movie rental service ≥ Video browsing service Select the item and press [OK]. To exit from Network Service Press [HOME].
Playback Home Network feature Playing back contents on the DLNA server Before using the following features, be sure to configure the connected equipment on your Home Network. Using MiracastTM You can enjoy the content you are viewing on a Miracast-compatible smartphone, etc. on the big screen of your TV. ≥ Compatible with AndroidTM devices, ver. 4.2 and above and Miracast certified. For information on whether the smartphone, etc. supports Miracast, contact the manufacturer of the device.
Playback Using the Digital Media Controller You can use a smartphone or tablet as the Digital Media Controller (DMC) to playback contents from DLNA server on the Renderer (this unit). Possible applications: Renderer Controller Renderer * Server * Server i Controller To exit from Media Renderer screen Press [HOME]. About DLNA and Media Renderer For more details, refer to the following website and the operating instructions for each of the equipment. http://panasonic.
Playback VIERA Link Power off link What is VIERA Link? All connected equipment compatible with “VIERA Link”, including this unit, automatically turns off when you switch the television off. VIERA Link is a convenient function which will link the operations of this unit and a Panasonic TV (VIERA) or other device under “VIERA Link”. You can use this function by connecting the equipment with an HDMI cable*. See the operating instructions for connected equipment for operational details.
Settings Option menu Settings Operation Menu A variety of playback operations and settings can be performed from this menu. Available options differ depending on the playing contents and the condition of the unit. ∫ Soundtrack (> 17) This setting is also able to switch by pressing [AUDIO]. 1 ∫ Audio Channel Select the audio channel number. Press [OPTION]. ≥ When playing music, select “Playback Settings” and press [OK]. e.g.
Settings ∫ Playback Information Window You can check the detailed disc playback status. Picture Settings Audio/video attribute information of disc. Picture Settings Set 1 Settings status of “Digital Audio Output” (> 29). Display Picture Type Sharpness Adjustment entt Noise Reduction Bandwidth Limitationn 24p / 25p Conversionn Progressive Press [RETURN] to exit. e.g., Press [RETURN] to hide the Control Panel. ∫ Top Menu Display Top Menu. ∫ Pop-up Menu Display Pop-up Menu. ∫ Menu Display Menu.
Settings ∫ 24p / 25p Conversion Play back videos with film-like motion. ≥ When this unit is connected to a TV compatible with 4K/24p or 4K/25p: If “HDMI Video Format” (> 28) is set to “Automatic”, videos will be output in 4K/24p or 4K/25p. ≥ When this unit is connected to a TV compatible with 1080/24p or 1080/25p: If “HDMI Video Format” (> 28) is set to “Automatic”, “1080i” or “1080p”, videos will be output in 1080/24p or 1080/25p. ≥ Noise may appear on the image when you switch the setting.
Settings ∫ Manual Settings Sound Settings ∫ Dialogue Enhancer* The volume of the centre channel is raised to make dialog easier to hear. ∫ High Clarity Sound Stop processing signals that affect the audio quality or turn off the unit’s display to make the audio quality clearer. (> 30) Select whether or not to output images. This setting is able to switch by pressing green button on the remote control during music playback.
Settings Setup menu Change the unit’s settings if necessary. The settings remain intact even if you switch the unit to standby. Some items are common to the Option menu. You can get the same effect with both menus. 1 2 3 Press [HOME] Select “Setup” . Select “Player Settings” . ¾ 24p Output Movies and other material recorded at 24p*2 are output at 24p. ≥ When this unit is connected to TV compatible with 4K/24p and “HDMI Video Format” is set to “Automatic”, images will be output in 4K/ 24p.
Settings ∫ Still Mode ¾ BD-Video Secondary Audio Select whether or not to mix the primary and secondary audio (including the button click sound). If “Off” is selected, the unit outputs the primary audio only. Select the type of picture shown when you pause playback. Automatic Automatically selects the type of picture shown. Field Select if jittering occurs when “Automatic” is selected. Frame Select if small text or fine patterns cannot be seen clearly when “Automatic” is selected.
Settings ∫ HDMI Output Settings of Music Playback 3D Minimise the audio noise during music playback by automatically switching the video output to 1080i. ∫ 3D BD-Video Playback Select the playback method of 3D compatible video software. ∫ 7.1ch Audio Reformatting Surround sound with 6.1ch or less is automatically expanded and played back at 7.1ch. ≥ If “Off” is selected, sound is played over the original number of channels. (Note that in the case of 6.1ch audio, playback will be at 5.1ch.
Settings ¾ Network Service Settings (> 20) Network Press [OK] to show the following settings: ∫ Easy Network Setting (> 14) ∫ Network Settings Perform network-related settings individually. Press [OK] to show the following settings: ¾LAN Connection Mode Select the LAN connection method. ≥ When not using wireless LAN (when turning it off), select “Wired”. ¾Wireless Settings This allows the wireless router and connection settings to be set up.
Settings Registration Type ∫ TV Settings Press [OK] to show the following settings: Automatic Allow connections to all the equipment accessing this unit. Manual Set the permission for individual equipment connections accessing this unit. ¾ TV Aspect Remote Device List Registering/deregistering of the displayed equipment can be performed when “Manual” in “Registration Type” is selected. ¾BD-Live Internet Access (> 18) You can restrict Internet access when BD-Live functions are used.
Settings ¾VIERA Link Set to use “VIERA Link” function when connected via HDMI cable to a device that supports “VIERA Link”. ≥ Select “Off” when you do not want to use “VIERA Link”. ∫ Firmware Update (> 15) Press [OK] to show the following settings: ¾ Automatic Update Check When this equipment remains connected to the Internet, it will check for the latest firmware version when it is turned on and you can update it if necessary.
Reference Troubleshooting guide Reference Before requesting service, please perform the following checks. If the problem remains unresolved, consult your dealer for instructions. ∫ Unit does not respond to remote control or unit’s buttons. Touch and hold [Í/I] on the main unit for 3 seconds. – If still unable to turn the unit off, disconnect the AC mains lead, wait 1 minute, then reconnect the AC mains lead.
Reference You have forgotten your ratings password. You want to cancel the ratings level. ¾ The ratings level returns to the factory defaults. 1 Turn the unit on. 2 Press and hold [OK], the yellow button and the blue button on the remote control at the same time for more than 5 seconds. – “00 RET” is displayed on the unit’s display. 3 Press [1] (right) repeatedly on the remote control until “03 VL” is displayed on the unit’s display. 4 Press [OK]. The TV screen turns black.
Reference ¾ PAL discs cannot be correctly viewed on an NTSC TV. ¾ When “3D BD-Video Playback” in the Setup menu is set to “Automatic”, images may not be output depending on the connection method. After removing the disc from this unit, select “Set before play” in the Setup menu, and select “2D Playback” in the setup screen displayed when playing 3D discs. (> 30) ¾ When outputting in 4K, images may be distorted depending on the HDMI cable. Video is not output.
Reference Playback Disc cannot be played. ¾ The disc is dirty. (> 5) ¾ The disc is not finalized. (> 7) Still pictures (JPEG) do not play back normally. ¾ The images that were edited on the PC, such as Progressive JPEG, etc., may not be played back. I can’t play back BD-Live. ¾ The SD card is write-protected. (> 7) ¾ Confirm that this unit is connected to the broadband Internet. (> 13) ¾ Confirm the “BD-Live Internet Access” settings. (> 32) ¾ Confirm an SD card is inserted into the SD card slot.
Reference Messages on the unit’s display F99 ¾ The unit fails to operate properly. Touch [Í/I] on the main unit for 3 seconds to switch the unit to standby, then switch back on. NET ¾ While connecting to a network. NoPLAY ¾ There is a viewing restriction on a BD-Video or DVD-Video. (> 32) NoREAD ¾ The media is dirty or badly scratched. The unit cannot play. Remove ¾ The USB device is drawing too much power. Remove the USB device. Setcode (“ ” stands for a number.
Reference Specifications File format File format General Extension Reference “.MKV”, “.mkv” Signal system PAL/NTSC Operating temperature range i5 oC to i35 oC Operating humidity range 10 % to 80 % RH (no condensation) AUDIO OUT (Pin jack) Analogue Audio output (L/R, 7.1ch): Standard : 0.5 Vrms, Full scale : 2.0 Vrms at 1 kHz (<500 ≠) Audio performance Frequency response: 4 Hz to 88 kHz MKV Xvid ≥ The video file and subtitles text file are Subtitles text file inside the same folder, “.
Reference Audio information Supported format for DLNA The audio output differs depending on which terminals are connected to the amplifier/receiver, and the settings on the unit. (> 29, “Digital Audio Output”) ≥ File formats that are not supported by your DLNA server cannot be played. Video ≥ The number of channels listed is the maximum possible number of output channels when connected to amplifier/ receiver compatible with the respective audio format.
Reference Language code list Language Code Language Abkhazian: 6566 Afar: 6565 Afrikaans: 6570 Albanian: 8381 Amharic: 6577 Arabic: 6582 Armenian: 7289 Assamese: 6583 Aymara: 6589 Azerbaijani: 6590 Bashkir: 6665 Basque: 6985 Bengali; Bangla: 6678 Bhutani: 6890 Bihari: 6672 Breton: 6682 Bulgarian: 6671 Burmese: 7789 Byelorussian: 6669 Cambodian: 7577 Catalan: 6765 Chinese: 9072 Corsican: 6779 Croatian: 7282 Czech: 6783 Danish: 6865 Dutch: 7876 English: 6978 Esperanto: 6979 Estonian: 6984 Faroese: 7079 Fij
Reference “AVCHD”, “AVCHD 3D”, “AVCHD Progressive” and “AVCHD 3D/ Progressive” are trademarks of Panasonic Corporation and Sony Corporation. Java is a registered trademark of Oracle and/or its affiliates. Manufactured under license from Dolby Laboratories. Dolby and the double-D symbol are trademarks of Dolby Laboratories. For DTS patents, see http://patents.dts.com. Manufactured under license from DTS Licensing Limited.
Reference - 43 -
NORSK FORSIKTIG ADVARSEL Produkt For å redusere faren for brann, elektrisk støt eller skade på apparatet: ≥ Utsett ikke produktet for regn, fukt, drypping eller sprut. ≥ Ikke plasser objekter som er fylt med væske, som vaser, på apparatet. ≥ Bruk kun anbefalt tilbehør. ≥ Fjern ikke deksler. ≥ Reparer ikke denne enheten selv, overlat service til kvalifisert servicepersonell. Vekselstrømnett Nettstøpselet er trukket ut fra denne enheten.