
Operation Manual


Recording
SQT0807
37
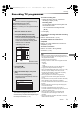
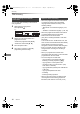
1 Press [PROG/CHECK].
2 Select “New Timer Programme”, then press
[OK].
To confirm and edit the timer programme
Refer to “To confirm and edit a timer programme”.
(> 39)
Operation during Recording
Refer to “Operation during Recording”. (> 32)
• When recording from the external equipment, “Mode”
(recording mode) is XP, SP, LP, EP or FR.
• Signal Supported Recording is disabled when a manually
programmed timer recording is set.
Select the items and change the items.
Channel
• You can select Category/AV with the red button.
Start/Stop
• Press and hold [3, 4] to alter in 15-minute
increments.
Mode/Conv.
Refer to step 2. (> 31)
Subtitles
You can choose whether or not to record the
subtitle at conversion.
(Only when item other than “OFF” is selected in
“Conv.”)
Title Name
1 Select “Title Name”, then press [OK].
2 Refer to “Entering text”. (> 103)
To use Signal Supported Recording
You can choose whether or not to use the Signal
Supported Recording function by pressing the
blue button.
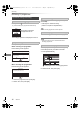
Manually programming timer
recording
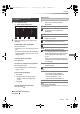
3 Select the items and change the items.
(> right, Timer recording options)
4 Press [OK].
The timer programme is stored.
Channel Name
Schedule
Mode
Space
Timer Recording
30:30 DRHDD TUE 06.01.2015 8:05
New Timer Programme
Channel Name
Schedule
Mode
Space
Timer Recording
30:30 DRHDD TUE 06.01.2015 8:05
New Timer Programme
OK
Programme Name
WED 07.01
8:00 - 9:00
DR
Timer recording options
Day/Date
• You can select “Date” or “Weekly” by pressing
the green button.
• Auto Renewal Recording
(Only daily/weekly timer recording)
The unit will record the new programme over
the old one.
Press the yellow button.
“Renew : ON” is displayed.
Timer Recording TUE 06.01.2015 8:05
30:24 DR
Channel
1 WED 07.01
Day/Date Stop
8:00 9:00
Start
RETURN
Title Name
DR OFF
Mode
OFF
Conv. Subtitles
OK
Category/AV
HDD
Signal Supported Rec
Date or Weekly?
Signal Supported : OFF
e.g.,
DMR-BST_BCT855EG_eng.book 37 ページ 2015年6月4日 木曜日 午後2時58分