DVD VIDEO RECORDER Operating Instructions Model No. Before connecting, operating or adjusting this product, please read these instructions completely. Please keep this manual for future reference. DMR-E20 This unit responds to the region number information on DVD-Video. The unit can only play DVD-Video if the region number of the disc matches the region number of this unit. See page 6 for details. [For\U.S.A.] The servicenter list and warranty can be found on pages 103 and 105.
Dear customer Thank you for purchasing this product. For optimum performance and safety, please read these instructions carefully. THE FOLLOWING APPLIES ONLY IN THE U.S.A. CAUTION! Getting started THIS PRODUCT UTILIZES A LASER. USE OF CONTROLS OR ADJUSTMENTS OR PERFORMANCE OF PROCEDURES OTHER THAN THOSE SPECIFIED HEREIN MAY RESULT IN HAZARDOUS RADIATION EXPOSURE. DO NOT OPEN COVERS AND DO NOT REPAIR YOURSELF. REFER SERVICING TO QUALIFIED PERSONNEL.
IMPORTANT SAFETY INSTRUCTIONS Read these operating instructions carefully before using the unit. Follow the safety instructions on the unit and the applicable safety instructions listed below. Keep these operating instructions handy for future reference. 2) Keep these instructions. 3) Heed all warnings. 4) Follow all instructions. 5) Do not use this apparatus near water. 6) Clean only with dry cloth. 7) Do not block any ventilation openings. Install in accordance with the manufacturer’s instructions.
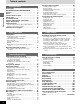
Table of contents Using the direct navigator . . . . . . . . . . . . . . . . 156 Getting started Getting started Accessories . . . . . . . . . . . . . . . . . . . . . . . . . . . . IMPORTANT SAFETY INSTRUCTIONS . . . . . . Features . . . . . . . . . . . . . . . . . . . . . . . . . . . . . . . Discs . . . . . . . . . . . . . . . . . . . . . . . . . . . . . . . . . . Control reference guide . . . . . . . . . . . . . . . . . . Set up steps . . . . . . . . . . . . . . . . . . . . . . . . . . . .
Features This unit allows recording of high quality video on DVD-RAM, the compact and durable digital media with fast random access. This media also outdoes past tape formats in ease of operation. Chasing play You can watch a program from the start while you are still recording ➡ page 28). it (➡ Simultaneous rec and play You can record a program while watching one you recorded previ➡ page 28).
Discs !? Discs you can use for recording and play This unit cannot record onto CD-R, CD-RW or authoring DVD-R. Logos for discs you can record on and play Getting started DVD-RAM [4.7 GB/9.4 GB, 12 cm (5q)] [2.8 GB, 8 cm (3q)] DVD-R (➡ page 7) [4.7 GB for General Ver. 2.
DVD-R !? You can play DVD-R by finalizing (➡ pages 55 and 96) them on this unit, effectively making them into DVD-Video. You can record onto the available space on the disc and perform editing functions, such as giving titles to discs and programs and erasing programs. ³You cannot record to or edit DVD-R with this unit if it was recorded with another unit, whether it is finalized or not. ³You cannot record over parts that have been recorded. ³Erasing programs will not increase the disc’s available time.
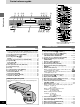
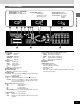
Control reference guide C Getting started NA DI VIG RE AT O TOP ME NU U TIME SLIP : DISPLAY EN 6 789 POWER OPEN/CLOSE CT R ENTER PROG / CHECK RETURN STATUS TOP WINDOW FRAME SKIP SLOW/SEARCH STOP PAUSE PLAY 1 2 3 4 5 6 7 VCR Plus + 8 9 0 100 POWER REC MODE CH REC OPEN/CLOSE /I TOP WINDOW RETURN ENTER ; < = >?@ A B I 2 4 J K L M N DVD REC REC MODE CANCEL CH INPUT TIME SLIP CM SKIP SELECT ADD/DLT DVD IST 5 O VOL TV/AV M 2 34 TV CH POWER L AY PL 1 D E 1 F
The unit’s display Rotating (REC): recording Stopped (REC): recording paused 1 2 : 3 4 Rotating (PLAY): playing Stopped (PLAY): play paused “PLAY” flashes: the resume function is working Rotating (REC, PLAY): Chasing play or simultaneous rec and play is in progress 5 67 ; 1 Disc type DVD-RAM: DVD-RAM DVD-R: DVD-R DVD VIDEO: DVD-Video VIDEO CD: Video CD CD: Audio CD 2 Play mode PGM: program play RND: random play A-B : A-B repeat play : repeat play PGM : program repeat play 3 Multi-angle (➡ page
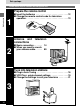
Set up steps Follow these steps to connect and set-up this unit Getting started Prepare the remote control 1 º Insert the batteries . . . . . . . . . . . . . . . . . . . . . . . . . . . 12 º Change the remote control code for television operation . . . . . . . . . . . . . . . . . . . . . . . . . . . . . . . . . . . 13 Antenna and connections 2 television º Basic connection . . . . . . . 14 º When you need to rework your antenna cable . . . . . .
Ways to use this unit º Playing discs (➡ page 22) º Using the direct navigator (➡ page 56) Recording and Playing at the same time º Chasing play (➡ page 28) º Simultaneous rec and play (➡ page 28) º Reviewing the recorded images while recording (Time Slip) (➡ page 29) Recording programs º Recording television programs (➡ page 26) Editing recordings º Using play lists to edit programs (➡ page 65) Using DVD-R Timer recording º DVD-R (➡ page 7) º Recording television programs (➡ page 26) º Playing discs
The remote control A A » Batteries !? ³Insert so the poles (i and j) match those in the remote control. ³Do not use rechargeable type batteries. R6, AA 1 Do not: Getting started 2 Push in and down on the (j) end. B ³mix old and new batteries. ³use different types at the same time. ³heat or expose to flame. ³take apart or short circuit. ³attempt to recharge alkaline or manganese batteries. ³use batteries if the covering has been peeled off.
2 TV CH POWER VOL TV , , ,CH TV , , ,VOL The remote control TV/AV TV , TV/AV POWER OPEN/CLOSE NA DI VIG RE AT O EN IST M U TOP ME You can control televisions by entering the remote control code. L AY PL DISPLAY NU ENTER PROG / CHECK Preparation ³Turn on the television. ³Switch [DVD, TV] to “TV”. RETURN STATUS TOP WINDOW FRAME SKIP SLOW/SEARCH STOP PAUSE PLAY 1 2 3 4 5 6 7 VCR Plus + 8 9 0 100 2 1 Refer to the chart below for the code for your television.
Antenna and television connections Preparation ³Refer to the television’s operating instructions. ³Turn the television off and disconnect its AC power supply cord.
S VIDEO IN Getting started Connecting to a TV with S-video or component video input terminals COMPONENT VIDEO Y PB PR S-video cable (not included) Video cable (not included) COMPONENT VIDEO OUT OUT1 OUT2 R AUDIO L VIDEO S-VIDEO R AUDIO L VIDEO R AUDIO L R AUDIO S-VIDEO Y PB PR RF-IN VIDEO S-VIDEO IN1 AC INT (L1) OPTICAL L VIDEO S-VIDEO IN3 RF-OUT (L3) VHF/UHF DIGITAL AUDIO OUT (PCM/BITSTREAM) Connect the audio cables as well (➡ pages 14 and 78).
Plug-in Auto Tuning TV CH POWER VOL After you purchase the unit, plug it into your household AC outlet, and turn it on for the first time, the unit automatically tunes in all the channels it can receive and sets the clock. TV/AV 1 POWER OPEN/CLOSE CT R U NA DI VIG RE AT O TOP ME EN IST M 2·3 L AY PL DISPLAY NU ENTER PROG / CHECK RETURN STATUS TOP WINDOW RETURN Preparation ³Confirm that the antenna is connected correctly.
Plug-in Auto Tuning , ,CH ENTER Note ³Plug-in Auto Tuning does not work if you turn the unit on by pressing [<, OPEN/CLOSE] or [1, PLAY]. ³After the unit sets the clock automatically, it then adjusts the clock everyday. ³If the unit sets the time incorrectly, use “Time Zone Adjust” to correct it (➡ page 89). ³You can give the stations captions (➡ page 92). ³If you connect the unit through a cable TV box or DSS receiver (➡ page 76), tune to your local PBS station before starting auto clock setting.
Channel settings TV CH POWER VOL TV/AV Using the remote control to add and delete channels POWER OPEN/CLOSE CT R NA DI VIG RE AT O Remote control only U TOP ME EN IST M L AY PL DISPLAY NU ENTER PROG / CHECK RETURN Use this function if: ³Channels were not set correctly using automatic tuning. ³A channel that should have been set wasn’t. ³A channel’s reception is poor and you want to delete it.
Channel settings TV CH POWER VOL TV/AV VCR Plusr guide channel settings POWER OPEN/CLOSE NA DI VIG RE AT O Set these guide channels so you can use VCR Plusi codes for timer recording. Before starting the settings, prepare a chart showing the channels, the station’s name, and the guide channel.
Channel settings TV CH POWER VOL 4 TV/AV POWER OPEN/CLOSE CT R U NA DI VIG RE AT O TOP ME EN For example, when the current antenna system is CATV. IST M 4·5·6 L AY PL DISPLAY NU ENTER PROG / CHECK RETURN ACTION STATUS TOP WINDOW Use the joystick [3, 4] to select “VCR Plusr CH Setting” and press [ENTER].
TV CH POWER Selecting TV screen TOP type VOL !? TV/AV The aspect ratio is factory set to 4:3 for a regular television. You do not have to change this setting if you have a regular 4:3 aspect television.
Playing discs 2 3 1 TOP [RAM] [DVD-R] [DVD-V] [CD] [VCD] Preparation Switch [DVD, TV] to “DVD”. ∫ ; TV CH POWER 1 2 NA DI VIG RE AT O EN U TOP ME Press [1, PLAY]. The disc tray closes and play begins. (The unit takes some time to read the disc before play starts.) IST M NU 3 L AY PL DISPLAY ENTER PROG / CHECK Basic operations 2 POWER OPEN/CLOSE CT R Press [<, OPEN/CLOSE] to open the tray and insert a disc. ³Insert inside the tray’s guides. ³Insert one disc only.
Playing discs TV CH VOL A » POWER OPEN/CLOSE CT R MENU U TOP ME EN IST Joystick M NA DI VIG RE AT O DISPLAY NU L AY PL TOP MENU ENTER PROG / CHECK RETURN STATUS TOP WINDOW RETURN FRAME SKIP 1 SLOW/SEARCH STOP PAUSE PLAY 1 2 3 4 5 6 7 VCR Plus + 8 9 0 100 Numbered buttons CH INPUT TIME SLIP CM SKIP SELECT ADD/DLT DVD V.S.S.
Playing discs A » Fast forward and rewind—SEARCH [RAM] [DVD-R] [DVD-V] [CD] [VCD] During play 1 TV CH POWER 6, 5 Press [6, SLOW/SEARCH] or [5, SLOW/SEARCH].
Playing discs A » Skipping [RAM] [DVD-R] [DVD-V] [CD] [VCD] :, 9 TV CH POWER VOL You can skip to the beginning of tracks (CD and Video CD ➡ page 97) and chapters (DVD-Video ➡ page 97) and restart play from there. On DVD-RAM and DVD-R, you can skip to the start of a program or to a marker and start play from there. TV/AV During play or while paused POWER OPEN/CLOSE CT R [:]: backward [9]: forward Each press increases the number of skips.
1 4 35 Recording television programs 2∫; [RAM] [DVD-R] TV CH POWER TV , TV/AV TV , CT R NA DI VIG RE AT O EN IST M 1 2 U ENTER PROG / CHECK FRAME SKIP SLOW/SEARCH STOP PAUSE PLAY 1 2 3 4 5 6 7 VCR Plus + 8 9 0 100 ∫, STOP ;, PAUSE Numbered buttons 3 4 DVD 5 REC REC MODE CANCEL CH INPUT TIME SLIP CM SKIP SELECT ADD/DLT DVD V.S.S. TV LAST MARKER AUDIO ACTION DVD, TV MARKER WRITE 3 4 POWER 1 POWER Press [[DVD], W, X, CH] to select the channel.
Recording television programs ¥, REC ∫ º Re-inserting double-sided discs 3 RETURN TOP WINDOW Reverse ENTER 2 1 TV CH POWER Front VOL TV/AV You can get up to 12 hours recording when you use double-sided discs and use the “EP” mode. POWER OPEN/CLOSE CT R ENTER NA DI VIG RE AT O PROG / CHECK RETURN STATUS TOP WINDOW STATUS FRAME SKIP SLOW/SEARCH STOP PAUSE PLAY 1 2 3 4 5 6 7 VCR Plus + 8 9 0 100 DVD REC REC MODE CANCEL DVD A CH INPUT TIME SLIP CM SKIP SELECT ADD/DLT V.
TV CH POWER Playing while you are recording VOL TV/AV POWER Í POWER OPEN/CLOSE CT R EN U TOP ME A » IST M NA DI VIG RE AT O DISPLAY NU L AY PL 1 2 ENTER PROG / CHECK RETURN STATUS TOP WINDOW Playing from the beginning of the program you are recording— Chasing play FRAME SKIP STOP [RAM] SLOW/SEARCH PAUSE PLAY ∫, STOP 1, PLAY 1 2 3 4 5 6 7 VCR Plus + 8 9 0 100 Preparation Switch [DVD, TV] to “DVD”. During recording or timer recording Press [1, PLAY].
Playing while you are recording ∫ TIME SLIP Í/I,POWER Reviewing the recorded images while recording (Time Slip) TOP WINDOW RETURN [RAM] ENTER TV CH POWER You can play the program being recorded to check that it is being recorded correctly. You can also check parts that were recorded previously. VOL TV/AV Preparation Switch [DVD, TV] to “DVD”. POWER OPEN/CLOSE EN TOP ME U Press [TIME SLIP].
Using the top window TV CH POWER VOL TV/AV About the top window POWER OPEN/CLOSE CT R U NA DI VIG RE AT O TOP ME EN IST M ENTER PROG / CHECK 1 L AY PL DISPLAY NU RETURN STATUS TOP WINDOW FRAME SKIP 2·3 Most of the features and functions of this unit can also be controlled with icons. The examples show the top window when a DVD-RAM is being used. Actual menus depend on the type of disc being used.
Top window icons Features and functions described on other pages that can be controlled with the top window are indicated with Icon Items DISC SETTING DISC SETTING TIMER RECORDING te Da Time CH TIMER RECORDING ACTION Discs TOP .
Convenient features 1·2 A » Skipping a minute forward— CM skip [RAM] [DVD-R] TOP WINDOW RETURN Remote control only ENTER Use this feature to skip past short parts of recordings, commercials, for example. TV CH POWER VOL Preparation Switch [DVD, TV] to “DVD”. TV/AV POWER OPEN/CLOSE CT R During play U NA DI VIG RE AT O TOP ME EN Press [CM SKIP]. IST M L AY PL DISPLAY NU ENTER PROG / CHECK Play restarts from approximately a minute later.
Convenient features TV CH POWER VOL A » TV/AV POWER OPEN/CLOSE EN Preparation ³Switch [DVD, TV] to “DVD”. ³Press [DISPLAY] ➡ [DISPLAY] to display the on-screen menu icons and use the joystick [1] to highlight the repeat play icon (➡ pages 40 and 42).
Convenient features TV CH POWER !? VOL TV/AV Changing audio POWER OPEN/CLOSE CT R NA DI VIG RE AT O EN IST M Remote control only U TOP ME [RAM] [DVD-V] [VCD] L AY PL DISPLAY NU ENTER PROG / CHECK RETURN You can change the audio being received or played with the following procedure. STATUS TOP WINDOW FRAME SKIP Preparation Switch [DVD, TV] to “DVD”. SLOW/SEARCH STOP PAUSE PLAY During reception or play 1 2 3 Press [AUDIO] to select the audio type.
Convenient features For your reference ³You can also use the on-screen menu icons to change the audio type. ³You can change the audio for the images being played with simultaneous rec and play and Time Slip. º When you have connected the unit to other equipment with an optical digital cable You cannot change the audio type when you have used only an optical digital cable for connection in the following cases: ³While playing stereo broadcasts recorded on DVD-RAM.
Convenient features TV CH POWER VOL TV/AV Marking places to play again— MARKER POWER OPEN/CLOSE CT R NA DI VIG RE AT O EN [RAM] [DVD-R] [DVD-V] [CD] [VCD] U TOP ME DISPLAY IST M 1·2·3 L AY PL DISPLAY NU ENTER PROG / CHECK RETURN Remote control only STATUS TOP WINDOW FRAME SKIP Preparation Switch [DVD, TV] to “DVD”. SLOW/SEARCH STOP PAUSE PLAY 1 2 3 4 5 6 7 VCR Plus + 8 9 0 100 A » [RAM] [DVD-R] You can mark up to 999 points on a disc to return to later.
Convenient features TV CH POWER VOL TV/AV To mark points using the marker icon POWER OPEN/CLOSE NA DI VIG RE AT O EN U TOP ME DISPLAY IST M 1·2·3 L AY PL DISPLAY NU ENTER PROG / CHECK RETURN STATUS TOP WINDOW RETURN 1 FRAME SKIP SLOW/SEARCH STOP PAUSE PLAY 1 2 3 4 5 6 7 VCR Plus + 8 9 0 100 Preparation Press [DISPLAY] ➡ [DISPLAY] to display the on-screen menu icons and use the joystick [1] to highlight the marker icon (➡ pages 40 and 42).
Convenient features TV CH POWER VOL TV/AV TOP Program play POWER OPEN/CLOSE CT R U NA DI VIG RE AT O TOP ME EN IST M 2 1 [CD] [VCD] L AY PL DISPLAY NU ENTER PROG / CHECK You can select up to 100 tracks to play in the order you choose. RETURN STATUS TOP WINDOW RETURN FRAME SKIP STOP SLOW/SEARCH PAUSE PLAY ∫, STOP 1 2 3 4 5 6 7 VCR Plus + 8 9 0 100 6, 5, SLOW/SEARCH 4 3 Preparation Switch [DVD, TV] to “DVD”. 1 Press [TOP WINDOW].
Convenient features TV CH POWER VOL A » TV/AV POWER OPEN/CLOSE CT R U NA DI VIG RE AT O TOP ME EN 1 IST M ENTER PROG / CHECK RETURN STATUS TOP WINDOW FRAME SKIP TOP [CD] [VCD] L AY PL DISPLAY NU Random play 2 The unit plays the tracks on a disc in random order. RETURN Preparation Switch [DVD, TV] to “DVD”. SLOW/SEARCH STOP PAUSE PLAY 1 2 3 4 5 6 7 VCR Plus + 8 9 0 100 ∫, STOP 3 1 Press [TOP WINDOW].
Using on-screen menu icons TV CH POWER VOL [RAM] [DVD-R] [DVD-V] [CD] [VCD] TV/AV POWER OPEN/CLOSE CT R U NA DI VIG RE AT O TOP ME EN IST M 2·3·4 Remote control only 1 L AY PL DISPLAY NU ENTER PROG / CHECK RETURN RETURN STATUS TOP WINDOW On-Screen Menu Icons are menus that contain information about the disc or unit. These menus allow you to perform operations by changing this information.
Icons for disc information e.g. DVD-Video C 2 1 : 46 : 50 2 Icon Î Digital 1 ENG 3/2.1 ch ON 1 ENG 1 Content 2 Program number [RAM] [DVD-R] Select the number and press [ENTER]. 2 Play list number [RAM] Select the number and press [ENTER]. PRG PL Icon 2 Chapter number [DVD-V] Select the number and press [ENTER]. C 2 Elapsed play time [RAM] [DVD-R] [DVD-V] Press the numbered buttons to select a time to play from.
Using on-screen menu icons Icons for unit information Play menu AB Video menu OFF ––– Icon Content A-B repeat (➡ page 33) [RAM] [DVD-R] [DVD-V] You can repeat a section between points A and B within a program, title or chapter. AB N Icon N Repeat play (➡ page 33) You can play a program, play list, chapter, title, or track repeatedly. OFF Advanced operations 1 2 3 ✱✱ Play mode [CD] [VCD] Cannot be changed here.
Timer recording TV CH POWER VOL TV/AV Using VCR Plusr codes to make timer recording POWER OPEN/CLOSE CT R U NA DI VIG RE AT O TOP ME EN [RAM] [DVD-R] IST M Joystick L AY PL DISPLAY NU ENTER PROG / CHECK RETURN Remote control only STATUS TOP WINDOW FRAME SKIP 1 SLOW/SEARCH STOP PAUSE PLAY 1 2 3 4 5 6 7 VCR Plus + 8 9 0 100 DVD REC REC MODE CANCEL CH INPUT TIME SLIP CM SKIP SELECT ADD/DLT DVD DVD, TV V.S.S.
Timer recording TV CH POWER VOL 3 TV/AV R EN U 4 IST TOP ME DISPLAY NU M NA DI VIG RE AT O CT L AY PL POWER Í ENTER PROG / CHECK Press [ENTER]. The timer recording setting screen appears which allows you to confirm the program and make corrections if necessary. POWER OPEN/CLOSE RETURN TIMER RECORDING 3 CHANNEL STATUS TOP WINDOW FRAME SKIP SLOW/SEARCH PAUSE 4 PLAY SELECT 1 2 3 4 5 6 7 VCR Plus + 8 9 0 100 ENTER DVD REC REC MODE CANCEL DVD V.S.S.
Timer recording TV CH POWER VOL TV/AV To change the timer recording program !? POWER OPEN/CLOSE CT R U NA DI VIG RE AT O TOP ME EN ENTER PROG / CHECK Timer recording setting screen (from step 3 on page 44) IST M 1·2·3 L AY PL DISPLAY NU RETURN TIMER RECORDING Remaining Recording Time 0:17 SP ate STATUS TOP WINDOW Time DCH FRAME CHANNEL SKIP SLOW/SEARCH STOP PAUSE PLAY 1 2 3 4 5 6 7 VCR Plus + 8 9 0 100 DATE ON OFF MODE 63 TSN 1/ 1 SAT 12:00 AM 1:00 AM SP CANCE
Timer recording TV CH POWER VOL TV/AV Manually programming the unit to make timer recording POWER OPEN/CLOSE CT R U NA DI VIG RE AT O TOP ME EN IST M 1 NU L AY PL DISPLAY ENTER PROG / CHECK RETURN STATUS TOP WINDOW 2·3·4 TOP [RAM] [DVD-R] You can set your own programming conditions (up to 16 programs). FRAME SKIP SLOW/SEARCH STOP PAUSE PLAY 1 2 3 4 5 6 7 VCR Plus + 8 9 0 100 Preparation ³Switch [DVD, TV] to “DVD”. ³Ensure that this unit’s clock is set correctly.
Timer recording TV CH POWER º To continue programming VOL After selecting an available line, repeat steps 2, 3, and 4 on page 46. TV/AV º To end programming POWER OPEN/CLOSE U TOP ME EN ENTER PROG / CHECK PROG/CHECK RETURN 1·2 STATUS TOP WINDOW RETURN FRAME SKIP STOP IST NU M NA DI VIG RE AT O DISPLAY SLOW/SEARCH PAUSE 2 3 4 5 6 7 VCR Plus + 8 9 0 100 ADD/DLT DVD V.S.S.
Timer recording TV CH POWER VOL A » TV/AV POWER OPEN/CLOSE CT R U TOP ME EN ENTER PROG / CHECK PROG/CHECK RETURN STATUS TOP WINDOW FRAME SKIP STOP Press [PROG/CHECK]. The timer recording list appears. IST M NA DI VIG RE AT O DISPLAY NU L AY PL POWER Í RETURN TIMER RECORDING PAUSE W W X PLAY CANCEL 1 2 3 4 5 6 7 VCR Plus + 8 9 0 100 DVD REC REC MODE CANCEL V.S.S.
TV CH POWER Recording from a video cassette recorder VOL TV/AV [RAM] [DVD-R] POWER OPEN/CLOSE U NA DI VIG RE AT O TOP ME EN You can record audio and video being played on a video cassette recorder or video camera connected to the input terminals. IST M L AY PL DISPLAY NU ENTER PROG / CHECK RETURN STATUS TOP WINDOW FRAME SKIP SLOW/SEARCH STOP PAUSE PLAY 1 2 3 4 5 6 7 VCR Plus + 8 9 0 100 ∫, STOP ;, PAUSE 3 V.S.S.
Disc setting TV CH POWER VOL TV/AV About DISC SETTING POWER OPEN/CLOSE CT R U NA DI VIG RE AT O TOP ME EN ENTER PROG / CHECK RETURN STATUS TOP WINDOW FRAME SKIP SLOW/SEARCH STOP PAUSE PLAY 1 2 3 4 5 6 7 VCR Plus + 8 9 0 100 DVD REC REC MODE CANCEL CH INPUT TIME SLIP CM SKIP SELECT ADD/DLT DVD V.S.S.
Disc setting TV CH POWER VOL TV/AV Entering characters for titles POWER OPEN/CLOSE CT R U NA DI VIG RE AT O TOP ME EN IST M 1·2 L AY PL DISPLAY NU ENTER PROG / CHECK RETURN [RAM] [DVD-R] 1 STATUS TOP WINDOW FRAME SKIP SLOW/SEARCH STOP PAUSE PLAY 1 2 3 4 5 6 7 VCR Plus + 8 9 0 100 After the titling screen appears Use the joystick [3, 4, 2, 1] to select the character you want to enter and press [ENTER]. You can enter the following characters.
Disc setting TV CH POWER VOL TV/AV TOP Disc Protection POWER OPEN/CLOSE CT R U NA DI VIG RE AT O TOP ME EN IST M 2·3·4 1 [RAM] L AY PL DISPLAY NU ENTER PROG / CHECK STATUS TOP WINDOW FRAME SKIP STOP SLOW/SEARCH PAUSE This allows you protect discs from accidental erasure. RETURN PLAY 1 2 3 4 5 6 7 VCR Plus + 8 9 0 100 RETURN Preparation ³Switch [DVD, TV] to “DVD”. ³Insert the disc you want to protect. 1 Press [TOP WINDOW].
Disc setting TV CH POWER VOL TV/AV Releasing disc protection POWER OPEN/CLOSE CT R U NA DI VIG RE AT O TOP ME EN ENTER PROG / CHECK FRAME SKIP !? RETURN STATUS TOP WINDOW TOP [RAM] IST M 2·3·4 1 NU L AY PL DISPLAY SLOW/SEARCH STOP PAUSE PLAY 1 2 3 4 5 6 7 VCR Plus + 8 9 0 100 RETURN Preparation ³Switch [DVD, TV] to “DVD”. ³Insert the disc you want to release protection. 1 While stopped Press [TOP WINDOW].
Disc setting TV CH POWER VOL U NA DI VIG RE AT O TOP ME EN IST M NU L AY PL DISPLAY ENTER PROG / CHECK RETURN STATUS TOP WINDOW All recordings are irretrievably erased when a disc is formatted. Check the disc carefully before formatting to ensure it doesn’t contain any programs you want to keep. RETURN FRAME SKIP !? [RAM] Some DVD-RAM are unformatted. You must format these discs before you can use them in this unit. Formatting also allows you to erase the entire contents of a disc.
Disc setting TV CH POWER For your reference VOL TV/AV POWER OPEN/CLOSE CT R U NA DI VIG RE AT O TOP ME EN IST M 2·3·4·5 1 L AY PL DISPLAY NU ENTER PROG / CHECK RETURN STATUS TOP WINDOW FRAME SKIP RETURN ³The disc cannot be formatted if the disc is protected with the write-protect tab. Release the protection to continue (➡ page 99). ³Formatting cannot be performed on DVD-R or CD-R/RW. ³The message “Unable to format” appears when you try to format discs this unit cannot use.
Using the direct navigator TV CH POWER VOL TV/AV Selecting programs to play POWER OPEN/CLOSE CT R U NA DI VIG RE AT O TOP ME EN IST M 2·3 1 L AY PL DISPLAY NU ENTER PROG / CHECK TOP MENU, DIRECT NAVIGATOR RETURN TOP [RAM] [DVD-R] A list of programs is created as you record them. You can use this list to find the programs you want to watch.
Using the direct navigator TV CH POWER VOL TV/AV About the program list POWER OPEN/CLOSE U STATUS NA DI VIG RE AT O TOP WINDOW FRAME SKIP SLOW/SEARCH STOP PAUSE PLAY 1 2 3 4 5 6 7 VCR Plus + 8 9 0 100 DVD REC REC MODE CANCEL CH INPUT TIME SLIP CM SKIP SELECT DVD ENTER h RETURN V.S.S.
Using the direct navigator TV CH POWER VOL TV/AV TOP Erasing programs !? POWER OPEN/CLOSE CT R 2·3·4 5·6·7 U NA DI VIG RE AT O TOP ME EN IST M ENTER PROG / CHECK 1 [RAM] [DVD-R] L AY PL DISPLAY NU RETURN STATUS TOP WINDOW FRAME SKIP SLOW/SEARCH STOP PAUSE PLAY 1 2 3 4 5 6 7 VCR Plus + 8 9 0 100 RETURN Preparation ³Switch [DVD, TV] to “DVD”. ³Insert a disc you have recorded on. 1 2 CH INPUT TIME SLIP CM SKIP SELECT ADD/DLT DVD DVD, TV V.S.S.
Using the direct navigator TV CH POWER VOL TV/AV Entering and editing program titles POWER OPEN/CLOSE CT R U NA DI VIG RE AT O TOP ME EN ENTER PROG / CHECK 1 IST M NU L AY PL DISPLAY RETURN STATUS TOP WINDOW FRAME SKIP 2·3·4·5 TOP [RAM] [DVD-R] Preparation ³Switch [DVD, TV] to “DVD”. ³Insert a disc you have recorded on. SLOW/SEARCH STOP PAUSE PLAY 1 2 3 4 5 6 7 VCR Plus + 8 9 0 100 1 While stopped Press [TOP WINDOW].
Using the direct navigator TV CH POWER VOL TV/AV Protecting programs TOP POWER OPEN/CLOSE CT R U NA DI VIG RE AT O TOP ME EN 1 IST M ENTER PROG / CHECK RETURN STATUS TOP WINDOW FRAME SKIP [RAM] L AY PL DISPLAY NU SLOW/SEARCH STOP PAUSE PLAY 1 2 3 4 5 6 7 VCR Plus + 8 9 0 100 2·3·4· 5·6 RETURN You can prevent accidental erasure of programs by write-protecting them. Preparation ³Switch [DVD, TV] to “DVD”. ³Insert a disc you have recorded on. 1 Press [TOP WINDOW].
Using the direct navigator TV CH POWER VOL TV/AV Releasing program protection POWER OPEN/CLOSE R EN U ENTER PROG / CHECK 1 IST M TOP ME DISPLAY NU L AY PL NA DI VIG RE AT O CT RETURN STATUS TOP WINDOW FRAME SKIP SLOW/SEARCH STOP PAUSE PLAY 1 2 3 4 5 6 7 VCR Plus + 8 9 0 100 2·3·4· 5·6 RETURN TOP !? [RAM] Preparation ³Switch [DVD, TV] to “DVD”. ³Insert a disc you have recorded on. 1 While stopped Press [TOP WINDOW].
Using the direct navigator TV CH POWER VOL TV/AV Checking program contents TOP POWER OPEN/CLOSE CT R U NA DI VIG RE AT O TOP ME EN 1 IST M ENTER PROG / CHECK RETURN STATUS TOP WINDOW FRAME SKIP [RAM] [DVD-R] L AY PL DISPLAY NU 2·3·4· 5 1 SLOW/SEARCH STOP PAUSE PLAY 1 2 3 4 5 6 7 VCR Plus + 8 9 0 100 Preparation ³Switch [DVD, TV] to “DVD”. ³Insert a disc you have recorded on. While stopped Press [TOP WINDOW].
Using the direct navigator TV CH POWER VOL TV/AV Erasing parts of a program— Shorten Segment POWER OPEN/CLOSE CT R U NA DI VIG RE AT O TOP ME EN ENTER PROG / CHECK 1 RETURN STATUS TOP WINDOW FRAME SKIP STOP IST M NU L AY PL DISPLAY 2·3·4· 5·6 [RAM] The specified parts of the program are erased completely when you use this procedure and cannot be retrieved. Check the program carefully to ensure it isn’t one you want to keep.
Using the direct navigator TV CH POWER 7 VOL TV/AV POWER OPEN/CLOSE CT R U NA DI VIG RE AT O TOP ME EN IST M 7·8·9 L AY PL DISPLAY NU ENTER PROG / CHECK RETURN STATUS TOP WINDOW Use search functions such as fastforward and slow-motion to find the end point of the part you want to erase and press [ENTER].
TV CH POWER Using play lists to edit programs VOL TV/AV U NA DI VIG RE AT O TOP ME EN ENTER PROG / CHECK MENU, PLAY LIST RETURN STATUS TOP WINDOW 1 IST M 2 L AY PL DISPLAY NU FRAME SKIP TOP Displaying play lists POWER OPEN/CLOSE CT R SLOW/SEARCH STOP PAUSE PLAY 1 2 3 4 5 6 7 VCR Plus + 8 9 0 100 RETURN [RAM] Preparation ³Switch [DVD, TV] to “DVD”. ³Insert a disc you have recorded on. 1 While stopped Press [TOP WINDOW].
Using play lists to edit programs TV CH POWER VOL POWER OPEN/CLOSE CT R U NA DI VIG RE AT O TOP ME EN IST M NU L AY PL DISPLAY ENTER PROG / CHECK 1 RETURN STATUS TOP WINDOW FRAME SKIP SLOW/SEARCH STOP PAUSE PLAY 1 2 3 4 5 6 7 VCR Plus + 8 9 0 100 2·3·4· 5 RETURN [RAM] You can specify start and end points to create a scene, then specify the order in which these scenes are played. These scenes are not recorded separately so this doesn’t use up much of the disc’s capacity.
Using play lists to edit programs VOL MENU, PLAY LIST POWER OPEN/CLOSE CT R U NA DI VIG RE AT O TOP ME EN RETURN STATUS TOP WINDOW FRAME SKIP SLOW/SEARCH STOP PAUSE PLAY 1 2 3 4 5 6 7 VCR Plus + 8 9 0 100 ∫, STOP DVD REC REC MODE CANCEL CH INPUT TIME SLIP CM SKIP SELECT ADD/DLT DVD IST M ENTER PROG / CHECK 1 L AY PL DISPLAY NU V.S.S. TV DVD, TV LAST MARKER AUDIO ACTION MARKER WRITE 2·3 º To clear the play list screen Press [MENU, PLAY LIST].
Using play lists to edit programs TV CH POWER VOL Playing play list scenes TV/AV POWER OPEN/CLOSE CT R U NA DI VIG RE AT O TOP ME EN ENTER PROG / CHECK 1 IST M NU L AY PL DISPLAY RETURN STATUS TOP WINDOW FRAME SKIP 2·3·4· 5 SLOW/SEARCH STOP PAUSE PLAY 1 2 3 4 5 6 7 VCR Plus + 8 9 0 100 [RAM] Preparation ³Switch [DVD, TV] to “DVD”. ³Insert a disc you created play lists on. 1 While stopped 2 Press [TOP WINDOW].
Using play lists to edit programs TV CH POWER 3 VOL TV/AV POWER OPEN/CLOSE CT R U NA DI VIG RE AT O TOP ME EN IST M L AY PL DISPLAY NU ENTER PROG / CHECK RETURN STATUS TOP WINDOW FRAME SKIP SLOW/SEARCH STOP PAUSE PLAY 1 2 3 4 5 6 7 VCR Plus + 8 9 0 100 3·4· 5·6·7· 8·9 4 Play Scenes Edit Scenes PL Copy PL Erase Enter Title Properties RETURN DVD REC REC MODE CANCEL Use the joystick [3, 4] to select the play list you want to edit and use the joystick [1].
Using play lists to edit programs TV CH POWER VOL Preparation Do steps 1 to 4 of “Editing play list scenes” (➡ pages 68 and 69). TV/AV POWER OPEN/CLOSE CT R U NA DI VIG RE AT O TOP ME EN IST M ENTER PROG / CHECK Moving a scene L AY PL DISPLAY NU RETURN 5·6·7 5 STATUS TOP WINDOW FRAME SKIP SLOW/SEARCH STOP PAUSE PLAY 1 2 3 4 5 6 7 VCR Plus + 8 9 0 100 PLAY LIST Edit Scenes Select Page 3 10/21 0:02 004 Dinosaur Add Move Re-edit Erase 001 00:00.
Using play lists to edit programs 7 VOL TV/AV POWER OPEN/CLOSE CT R U NA DI VIG RE AT O TOP ME EN IST M L AY PL DISPLAY NU ENTER PROG / CHECK RETURN STATUS TOP WINDOW FRAME SKIP SLOW/SEARCH STOP PAUSE PLAY 1 2 3 4 5 6 7 VCR Plus + 8 9 0 100 DVD REC REC MODE CANCEL CH 7·8·9 5·6·7 PLAY LIST PLAY LIST No.3 Dinosaur Re-edit Scenes 1 DVD V.S.S. TV 8 MARKER WRITE 9 0 : 00 . 10 3 SELECT ENTER LAST MARKER AUDIO ACTION Scene No. 2 Prev.
Using play lists to edit programs TV CH POWER VOL [RAM] TV/AV Preparation ³Switch [DVD, TV] to “DVD”. ³Insert a disc you created play lists on. POWER OPEN/CLOSE R EN U ENTER PROG / CHECK 1 IST M TOP ME DISPLAY NU L AY PL NA DI VIG RE AT O CT RETURN 2·3·4·5 STATUS TOP WINDOW FRAME SKIP SLOW/SEARCH STOP PAUSE PLAY 1 2 3 4 5 6 7 VCR Plus + 8 9 0 100 DVD REC REC MODE CANCEL CH RETURN 1 While stopped 2 Press [TOP WINDOW].
Using play lists to edit programs 4 VOL TV/AV POWER OPEN/CLOSE CT R U NA DI VIG RE AT O TOP ME EN 1 IST M ENTER PROG / CHECK RETURN STATUS TOP WINDOW FRAME SKIP Play Scenes Edit Scenes PL Copy PL Erase Enter Title Properties L AY PL DISPLAY NU SLOW/SEARCH STOP PAUSE PLAY 1 2 3 4 5 6 7 VCR Plus + 8 9 0 100 Use the joystick [3, 4] to select “PL Erase” and press [ENTER]. 4·5 2·3·4 RETURN 5 Use the joystick [2, 1] to select “Erase” and press [ENTER].
Using play lists to edit programs TV CH POWER VOL TV/AV Checking play list contents TOP POWER OPEN/CLOSE CT R NA DI VIG RE AT O 2·3·4 U TOP ME EN IST M ENTER PROG / CHECK 1 [RAM] L AY PL DISPLAY NU RETURN STATUS TOP WINDOW FRAME SKIP 1 SLOW/SEARCH STOP PAUSE PLAY 1 2 3 4 5 6 7 VCR Plus + 8 9 0 100 Preparation ³Switch [DVD, TV] to “DVD”. ³Insert a disc you created play lists on. While stopped Press [TOP WINDOW].
Expanding your home theater system Refer to the relevant pages for details. Enjoying CATV broadcasts What you want to do Enjoying CATV broadcasts Reference pages How to do it Connect a cable TV box. 76 [A] Settings Tune to channels correctly. Reference pages 16, 18, 91 Change the necessary settings on the equipment you have connected. — ACTION settings—Audio ³Set PCM Down Conversion to On. ³Set Dolby Digital and DTS to suit the equipment. 86 Change speaker settings on the amplifier.
Expanding your home theater system Select channel 3 or 4 to see the output from the cable TV box or DSS receiver. Select the appropriate video input if your television has more than one. » A Connecting a cable TV box You need to have a cable TV box and a contract with a cable TV company to enjoy CATV broadcasts. ³Consult your cable TV company for an appropriate cable TV box.
º With two cable boxes Television (not included) AUDIO IN VIDEO IN To household cable TV jack 2-way splitter (not included) VHF/UHF RF IN OUT1 OUT2 IN Audio/Video cable (not included) IN OUT IN OUT Rear of this unit COMPONENT VIDEO OUT OUT1 OUT2 R AUDIO L VIDEO S-VIDEO R AUDIO L VIDEO R AUDIO L Y S-VIDEO PB Cable TV box (not included) PR RF-IN IN2 VIDEO S-VIDEO IN1 (L1) AUDIO VIDEO L S-VIDEO IN1 IN3 RF-OUT (L3) VHF/UHF Switch box (not included) Connect with 75 coax
Expanding your home theater system B » Connecting to a digital amplifier or system component C » !? !? Connecting an analog amplifier or system component Audio cable Red (R) Rear of this unit White (L) OUT1 OUT2 Rear panel of this unit IN1 AC INT OPTICAL IN3 OUT1 DIGITAL AUDIO OUT (PCM/BITSTREAM) OUT2 R AUDIO L VIDEO S-VIDEO R AUDIO L VIDEO R AUDIO L S-VIDEO VIDEO S-VIDEO IN1 AC INT (L1) OPTICAL R AUDIO L VIDEO IN3 (L3) Insert fully, with this side facing up.
» D Connecting a video cassette recorder When connecting to the L2 input terminals on the front of the unit When connecting to the input terminals on the rear of the unit Audio/Video cable Yellow (VIDEO) Audio/Video cable Yellow (VIDEO) White (L) White (L) Red (R) Red (R) Rear panel of this unit COMPONENT VIDEO OUT OUT1 POWER CH OUT2 REC MODE REC R AUDIO L VIDEO S-VIDEO R AUDIO L VIDEO R AUDIO L S-VIDEO Y PB PR /I VIDEO S-VIDEO IN1 (L1) OPTICAL R AUDIO L VIDEO S-VIDEO
Expanding your home theater system When you can’t directly connect the antenna you disconnected from your television to the unit Check the type of antenna input on your television and make the appropriate connection. º If it is a twin lead When you can’t directly connect the included 75 coaxial cable to the television Use the connection that suits the type of terminal.
Expanding your home theater system TV CH POWER VOL TV/AV Operating other Panasonic DVD equipment with the remote control POWER OPEN/CLOSE CT R !? U TOP ME EN IST NU M NA DI VIG RE AT O DISPLAY L AY PL POWER Í ENTER PROG / CHECK RETURN STATUS TOP WINDOW FRAME SKIP SLOW/SEARCH STOP PAUSE PLAY 1 2 3 4 5 6 7 VCR Plus + 8 9 0 100 Numbered buttons Be sure to set the same remote control code on the main unit as you did for the remote control itself (➡ page 82, ACTION—Set Up— Re
Changing the unit’s settings Summary of settings This chart shows the initial settings for this unit. See page 85 for details on menu operation. ³Underlined items are the factory presets. Main menus Set Up Menus Options ³2 hr ³6 hr ³Set Code 1 ³Set Code 2 ³Set Code 3 ³j1 ³0 ³TV ³CATV Re-initialize Setting This returns all values in the ACTION menus, except for the clock, channels, ratings level, and display language, to the default settings.
Audio Menus Audio during Search [RAM] [DVD-R] [DVD-V] [VCD] Choose whether to have sound during the first level of fast-forward. ³On ³Off D. Range Compression [DVD-V] (Dolby Digital only) Change the dynamic range for late night viewing. ³On ³Off ³Main ³SAP PCM Down Conversion (➡ page 86) Choose whether to convert 96-kHz LPCM signals to 48-kHz/16 bit.
Changing the unit’s settings Summary of settings º Disc—Audio, Subtitle and Menus [DVD-V] º Video—Black Level Control Original: The original language of each disc will be selected. Other ¢¢¢¢: Input a code number with the numbered buttons (➡ see below). Automatic: If the language selected for “Audio” is not available, subtitles of that language will automatically appear if available on that disc. ³Some discs are designed to start in a certain language despite any changes you make here.
Changing the unit’s settings TV CH POWER VOL TV/AV TOP Common procedures POWER OPEN/CLOSE CT R U NA DI VIG RE AT O TOP ME EN IST M 1·2·3·4 1 Refer to the summary of settings table on page 82 and use the following procedure to change the settings if necessary. L AY PL DISPLAY NU ENTER PROG / CHECK RETURN STATUS TOP WINDOW RETURN FRAME SKIP 1 SLOW/SEARCH STOP PAUSE PLAY 1 2 3 4 5 6 7 VCR Plus + 8 9 0 100 Preparation Switch [DVD, TV] to “DVD”.
Changing the unit’s settings Entering a password !? You can limit play of DVDs unsuitable for some audiences. Play and changes to the settings are not possible unless you enter a password. Digital output Change these settings when you have connected equipment through this unit’s OPTICAL DIGITAL AUDIO OUT terminal. PCM Down Conversion When setting ratings The password screen is shown when you select levels 0 to 7. 1. Input a 4-digit password with the numbered buttons.
Changing the unit’s settings TV CH POWER Preparation VOL Switch [DVD, TV] to “DVD”. TV/AV Clock Settings POWER OPEN/CLOSE CT R ENTER NA DI VIG RE AT O PROG / CHECK RETURN STATUS TOP WINDOW RETURN 1 While stopped The ACTION screen appears. SLOW/SEARCH STOP PAUSE PLAY 1 2 3 4 5 6 7 VCR Plus + 8 9 0 100 2 3 DVD REC REC MODE CANCEL Use the joystick [2, 1] to select the Set Up tab. Use the joystick [3, 4] to select “Clock Settings” and press [ENTER].
Changing the unit’s settings TV CH POWER VOL Preparation Switch [DVD, TV] to “DVD”. TV/AV POWER OPEN/CLOSE CT R U NA DI VIG RE AT O TOP ME EN IST M ENTER PROG / CHECK Clock Settings L AY PL DISPLAY NU RETURN 2·3·4·5·6 FRAME SKIP 1 2 SLOW/SEARCH STOP PAUSE PLAY 1 2 3 4 5 6 7 VCR Plus + 8 9 0 100 TOP Manual Clock Setting STATUS TOP WINDOW 3 !? Press [ACTION]. The ACTION screen appears. Use the joystick [2, 1] to select the Set Up tab.
Changing the unit’s settings TV CH POWER VOL TV/AV TOP Time Zone Adjust POWER OPEN/CLOSE CT R U NA DI VIG RE AT O TOP ME EN IST M L AY PL DISPLAY NU ENTER PROG / CHECK RETURN 2·3·4·5 1 STATUS TOP WINDOW FRAME SKIP Adjust the time zone (j1 or i1) if it was not set correctly with auto clock setting. You cannot change this setting if you set the clock manually. Press [ACTION]. The ACTION screen appears.
Changing the unit’s settings TV CH POWER VOL Preparation Switch [DVD, TV] to “DVD”. TV/AV POWER OPEN/CLOSE CT R U NA DI VIG RE AT O TOP ME EN IST M L AY PL DISPLAY NU ENTER PROG / CHECK RETURN Channel Settings 2·3·4·5 Antenna System FRAME SKIP SLOW/SEARCH STOP PAUSE PLAY 1 2 3 4 5 6 7 VCR Plus + 8 9 0 100 The following settings must be reset when you change the antenna system.
Changing the unit’s settings TV CH POWER VOL You can use the ACTION menus to start Auto Channel Setting if Plug-in Auto Tuning (➡ page 16) fails for some reason. POWER OPEN/CLOSE CT R U NA DI VIG RE AT O TOP ME EN IST M NU L AY PL DISPLAY ENTER PROG / CHECK RETURN STATUS TOP WINDOW 2·3·4·5 RETURN 1 2 FRAME SKIP 3 SLOW/SEARCH STOP PAUSE PLAY 1 2 3 4 5 6 7 VCR Plus + 8 9 0 100 Press [ACTION]. The ACTION screen appears. Use the joystick [2, 1] to select the Set Up tab.
Changing the unit’s settings TV CH POWER VOL Preparation Switch [DVD, TV] to “DVD”. TV/AV POWER OPEN/CLOSE CT R NA DI VIG RE AT O Channel Settings U TOP ME EN IST M 2·3·4·5 ENTER PROG / CHECK TOP L AY PL DISPLAY NU RETURN STATUS TOP WINDOW Channel Caption FRAME SKIP SLOW/SEARCH STOP PAUSE PLAY 1 2 3 4 5 6 7 VCR Plus + 8 9 0 100 You can give stations captions. You can use the Preset Captions, or manually enter new ones yourself.
Changing the unit’s settings TV CH POWER VOL Use the joystick [3, 4] to select the channel corresponding to the caption and then move the joystick [2]. TV/AV POWER OPEN/CLOSE CT R U NA DI VIG RE AT O TOP ME EN IST M L AY PL DISPLAY NU ENTER PROG / CHECK RETURN 5·6 STATUS TOP WINDOW Up Caption ACTION Set Preset FRAME SKIP STOP PAUSE PLAY 1 2 3 4 5 6 7 VCR Plus + 8 9 0 100 SELECT ENTER CH INPUT TIME SLIP CM SKIP SELECT ADD/DLT DVD V.S.S.
!? On-screen displays TV CH POWER VOL TV/AV A » POWER OPEN/CLOSE CT R NA DI VIG RE AT O Displays appear on the television when you operate the unit to let you know what operation was performed and what condition the unit is in. ³You can change the setting in the ACTION menu so these displays do not appear automatically (➡ page 83, Display—Status Messages).
Specifications Optical pick-up: Recordable discs: Recording time: Discs played: Video system TV system: Recording system: Input: Output: Component video output 525i: Antenna reception input: AC 120 V, 60 Hz 35 W DVD video recording standards (DVD-RAM), DVD video standards (DVD-R) System with 1 lens, 2 integration units (662 nm wavelength for DVDs, 790 nm wavelength for CDs) 12 cm 4.7 GB DVD-RAM discs 12 cm 9.4 GB DVD-RAM discs 8 cm 2.8 GB DVD-RAM discs 12 cm 4.7 GB DVD-R discs (for General Ver. 2.
Glossary Bitstream Dolby Pro Logic This is the compressed form of digital signals. A decoder decodes these signals into 5.1 surround and multi-channel signals. A surround system where a 4-channel audio track is recorded as 2 channels and then is restored to 4 channels for play. The surround channel is monaural. Channel (when referring to DVD) Sound is divided into channels based on the sound’s role. For example, 5.
Pan&Scan/Letterbox Sampling frequency In general, DVD-Video are produced with the intention that they be viewed on a widescreen television with an aspect ratio of 16:9. This means you can view most material with the intended aspect ratio on a widescreen television. Material with this ratio will not fit onto a standard television with an aspect ratio of 4:3. Two styles of picture, “Pan&Scan” and “Letterbox”, deal with this problem. Pan&Scan: The sides are cut off so the picture fills the screen.
Disc handling º Handling precautions Do not use irregularly shaped discs, such as heart-shaped. (These can damage the unit.) ³Do not write on the label side with a ball-point pen or other writing instrument. ³Do not use cleaning sprays, benzine, thinner, static electricity prevention liquids or any other solvent. ³Do not attach labels or stickers to discs. (Do not use discs with exposed adhesive from tape or left over peeled-off stickers.) ³Do not use scratch-proof protectors or covers.
Error messages Reference pages are shown as black circled numbers F. Possible solutions are indicated with “ !? Error messages ” on the relative pages in the operating instructions. Causes and solutions No Disc. ³You haven’t inserted a disc. Correctly insert a disc that this unit can use. F J ³The disc is upside down. If it is a single-sided disc, insert it so the label is facing up. F J This is non-recordable disc. This disc is not formatted properly.
Troubleshooting guide Before requesting service, make the below checks. If you are in doubt about some of the check points, or if the remedies indicated in the chart do not solve the problem: In the U.S.A., contact the Panasonic Customer Call Center at 1-800-211-7262, or e-mail consumerproducts@panasonic.com, or web site (http://www.panasonic.com). In Canada, contact Panasonic Canada Inc. Customer Care Centre at 1-800-561-5505, web site (www. panasonic.ca), or an authorized Servicentre closest to you.
Play Play fails to start even when [1, PLAY] is pressed. Play starts but then stops immediately. “U11”, “NO DISC”, or “NO PLAY” appears on the unit’s display. ³Insert the disc correctly with the label facing up. F ³This unit cannot play discs other than DVD-RAM, DVD-R, DVD-Video, Video CD, and CD. 6 ³The disc is dirty. Clean it. ³ ³The disc may be badly scratched. ³ ³You inserted a blank DVD-RAM or DVD-R. ³Condensation has formed: Wait 1 to 2 hours for it to evaporate. No response when buttons pressed.
Troubleshooting guide Recording and timer recording Cannot record. ³You haven’t inserted a disc or the disc you inserted cannot be recorded on. Insert a disc the unit can record onto. 6 ³The disc is unformatted. Format the disc so this unit can record on it. f ³The disc is protected with the write-protect tab. Use a ballpoint pen or similar to release the write protection. ´ ³The disc is protected with DISC SETTING. Release the disc protection. e ³The disc is full or nearly full.
For U.S.A. Panasonic Consumer Electronics Company, Division of Matsushita Electric Corporation of America One Panasonic Way Secaucus, New Jersey 07094 Panasonic Sales Company, Division of Matsushita Electric of Puerto Rico, Inc Ave. 65 de Infanteria, Km. 9.5 San Gabriel Industrial Park, Carolina, Puerto Rico 00985 PANASONIC DVD RECORDER Limited Warranty Parts—New or rebuilt parts in exchange for defective parts for one (1) year from the date of original purchase.
For CANADA Panasonic Canada Inc. 5770 Ambler Drive, Mississauga, Ontario L4W 2T3 PANASONIC/TECHNICS PRODUCT—LIMITED WARRANTY Panasonic Canada Inc. warrants this product to be free from defects in material and workmanship and agrees to remedy any such defect for a period as stated below from the date of original purchase.
Servicenter List (ONLY FOR U.S.A.) For Product Information, Operating Assistance, Literature Request, Dealer Locations, and all Customer Service inquiries please contact: 1-800-211-PANA (7262), MondayFriday 9 am9 pm; SaturdaySunday 9 am7 pm, EST. Web Site: http://www.panasonic.com You can purchase parts, accessories or locate your nearest servicenter by visiting our Web Site.
Guía de referencia rápida en español Conexiones de antena y televisor AUDIO IN VIDEO IN A la antena VHF/UHF RF IN TV por cable Antena exterior Antena interior (Rojo)(Blanco)(Amarillo) Televisor o Cable coaxial de 75 (suministrado) Cable de audio/vídeo (suministrado) Cable de antena desconectado del televisor (Rojo)(Blanco)(Amarillo) Este aparato COMPONENT VIDEO OUT OUT1 OUT2 R AUDIO L VIDEO S-VIDEO R AUDIO L VIDEO R AUDIO L R AUDIO S-VIDEO Y PB PR RF-IN VIDEO S-VIDEO IN1
TV CH POWER Cuando una pantalla de menús aparece en el televisor VOL TV/AV EN U ENTER PROG / CHECK , , FRAME :, 9, SKIP ∫, STOP Función de reanudación RETURN STATUS TOP WINDOW 3 4 Pulse los botones numerados para seleccionar un elemento. IST NU M TOP ME DISPLAY L AY PL NA DI VIG RE AT O R [DVD-V] [VCD] 1·1 POWER OPEN/CLOSE CT Cuando pulse [1, PLAY], el aparato recordará la posición.
Index antenna protection, disc advanced . . . . . . . . . . . . . . . . . . . . . . . . . . . . . . . . . . . . . . . . . . 80 basic . . . . . . . . . . . . . . . . . . . . . . . . . . . . . . . . . . . . . . . . . . . . . 14 CATV . . . . . . . . . . . . . . . . . . . . . . . . . . . . . . . . . . . . . . . . . . . . . 76 audio connections . . . . . . . . . . . . . . . . . . . . . . . . . . . . . . . . . . . . . . . . 75 during search . . . . . . . . . . . . . . . . . . . . . . . . . . . . . . . . . . .