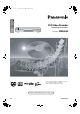
B.book 1 ページ 2003年2月4日 火曜日 午後2時50分 DVD Video Recorder Operating Instructions Model No. DMR-E50 Before connecting, operating or adjusting this product, please read these instructions completely. Please keep this manual for future reference. Web Site: http://www.panasonic-europe.
B.book 2 ページ 2003年2月4日 火曜日 午後2時50分 Contents Contents ...................................................................................... 2 Disc Protection ............................................................................ 38 Releasing disc protection ............................................................ 38 Erase all programmes ................................................................. 39 Format...................................................................................
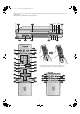
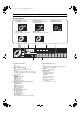
B.book 3 ページ 2003年2月4日 火曜日 午後2時50分 Keep this page open as you read through the Operating Instructions. Refer to it for the control and component names and numbers which appear in the text. The illustration shows DMR-E50EB for the United Kingdom. J 1 B @ N< OPEN/CLOSE OPEN/CLOSE CH CH REC MODE VIDEO IN S-VIDEO IN AUDIO IN L/MONO R REC TIME SLIP TIME SLIP ERASE TIMER REC EXT LINK /a1.
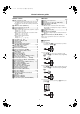
ページ 2003年2月4日 火曜日 午後2時50分 Control reference guide Remote control Main unit Page (1) DVD on/off button (Í, DVD) . . . . . . . . . . . . . . . . . . . . . . 17 ≥To switch the unit from on to standby mode or vice versa. In the standby mode, the unit is still connected to the mains. ≥In standby mode, the unit is still consuming a small amount of power. (2) VIDEO Plus+ button (VIDEO Plus+) . . . . . . . . . . . . . . . . 32 (3) Television input mode selector (AV). . . . . . . . . . . . . . . .
B.
B.book 6 ページ 2003年2月4日 火曜日 午後2時50分 Warning and Important Information CAUTION! Notes on these instructions THIS PRODUCT UTILIZES A LASER. USE OF CONTROLS OR ADJUSTMENTS OR PERFORMANCE OF PROCEDURES OTHER THAN THOSE SPECIFIED HEREIN MAY RESULT IN HAZARDOUS RADIATION EXPOSURE. DO NOT OPEN COVERS AND DO NOT REPAIR YOURSELF. REFER SERVICING TO QUALIFIED PERSONNEL. Displays These operating instructions describe operations mainly using the remote control.
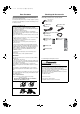
B.book 7 ページ 2003年2月4日 火曜日 午後2時50分 Dear Customer Checking the Accessories Check that you have the accessories shown May we take this opportunity to thank you for purchasing this Panasonic DVD Video Recorder. We would particularly advise that you carefully study the Operating Instructions before attempting to operate the unit and that you note the listed precautions. Tick off as you unpack the accessories.
B.book 8 ページ 2003年2月4日 火曜日 午後2時50分 The remote control Batteries Use ≥Insert so the poles (- and +) match those in the remote control. ≥Do not use rechargeable type batteries. Aim at the sensor, avoiding obstacles, at a maximum range of 7 m directly in front of the unit. ≥Keep the transmission window and the unit’s sensor free from dust. ≥Operation can be affected by strong light sources, such as direct sunlight, and the glass doors on cabinets.
B.book 9 ページ 2003年2月4日 火曜日 午後2時50分 The remote control (continued) Television operation Operation: On and off: Video input mode: Channels: Volume: Numeric: You can control televisions by changing the remote control code. Preparation ≥Turn on the television. ≥Switch [DVD, TV] (15) to “TV”. 1 Refer to the chart below for the code for your television.
B.book 10 ページ 2003年2月4日 火曜日 午後2時50分 Discs The features you can use with the different types of discs are indicated as follows. ≥This unit cannot record to discs containing both PAL and NTSC signals. Play of discs recorded with both PAL and NTSC on another unit is not guaranteed.
B.book 11 ページ 2003年2月4日 火曜日 午後2時50分 Discs (continued) Discs that cannot be played Audio format logos ≥DVD-Video with a region number other than the number for this unit or “All” ≥Some DVD-R ≥DVD-RAM (2.6 GB/5.2 GB) ≥DVD-ROM ≥DVD-RW ≥DVD-Audio ≥iRW ≥CD-ROM ≥CDV ≥CD-G ≥CVD ≥SVCD ≥SACD ≥MV-Disc ≥PD ≥Photo CD ≥Divx Video Disc, etc. ≥Play of non-standard Video CDs and Super Video CDs is not guaranteed. Dolby Digital (pages 54 and 70) This unit can play Dolby Digital in stereo (2 channels).
B.book 12 ページ 2003年2月4日 火曜日 午後2時50分 Connections (with Scart leads) Follow the step-by-step guide below.
B.book 13 ページ 2003年2月4日 火曜日 午後2時50分 Connections (without Scart leads) If you do not have any scart leads and your TV is not Q Link type, you can connect your DVD Recorder to a TV and Satellite Receiver using RF leads. Using this connection method may however be difficult to obtain a clear picture from the Satellite Receiver. For this reason it is not recommended for inexperienced users. (See preferred connection on page 12.
B.book 14 ページ 2003年2月4日 火曜日 午後2時50分 Connections (with S-Video cable) Connections and preparations for a TV with S-Video socket. The conventional video sockets of DVD Recorder’s output (input) a combination of the luminance signal (Y) and colour signal (C) which are recorded on the disc. The S (Separate)-Video socket allows separate transmission of signals in order to obtain clearer pictures. The connection with S-Video Cable can also be used for playback of any disc.
B.book 15 ページ 2003年2月4日 火曜日 午後2時50分 Recording from Set Top Boxes (STB) or other Satellite Receivers (SAT) ª Recording video signal by “Sky personal Planner” and “External Link 1” Functions To record programmes from satellite receiver using “Sky Personal Planner” function together with the “External Link1” function of this DVD Recorder: ≥Make connections as shown. ≥Change the settings in the SETUP menu as follows (page 61).
B.book 16 ページ 2003年2月4日 火曜日 午後2時50分 Auto Setup (with Q Link Functions) If you do not have a Q Link TV, ignore this page and go to page 17. The Preset Download function can automatically copy the tuning position of all available TV stations into the DVD Recorder’s memory when you connect the DVD Recorder using a fully-wired 21-pin Scart lead to a TV equipped with the Q Link function.
B.book 17 ページ 2003年2月4日 火曜日 午後2時50分 Auto Setup (with Q Link Functions) (continued) To Set Up this DVD Recorder with an existing Q Link TV 1 2 3 4 Switch the TV on. Select the AV input on your TV. Switch [DVD, TV] (15) to “DVD”. Press [Í] (1) to switch the DVD Recorder on. Downloading of the setup data starts automatically. Download Pos 4 Download in progress, please wait. RETURN : to abort RETURN 5 To set up the Owner ID, repeat the steps 3-8 on the previous page.
B.book 18 ページ 2003年2月4日 火曜日 午後2時50分 Video Plus+ Codes for Satellite Receivers/Cable TV Auto Setup (without Q Link Functions) (continued) Removing Interference For the United Kingdom: This unit is not designed to control (switch on or change channel) your satellite receiver or Cable TV box, however, it can be taught to recognise Video Plus+ Codes for Satellite stations. The Satellite receiver or Cable TV box must be switched on and the correct station selected.
B.book 19 ページ 2003年2月4日 火曜日 午後2時50分 Selecting TV screen type The aspect ratio is factory set to 4:3 for a regular television. You do not have to change this setting if you have a regular 4:3 aspect television. Preparation ≥Turn on the television and select the appropriate video input to suit the connections to this unit. ≥Switch [DVD, TV] (15) to “DVD”. 1 Press [DVD, Í] (1) to turn this unit on. 2 Press [FUNCTIONS] (11) to show the FUNCTIONS window.
B.book 20 ページ 2003年2月4日 火曜日 午後2時50分 Playing discs [RAM] [DVD-R] [DVD-V] [CD] [VCD] [MP3] When a menu screen appears on the television [DVD-V] [VCD] Operate menus with the following operations. Actual operations depend on the disc. Press the numeric buttons (4) to select an item, or move [3, 4, 2, 1] (10) to select an item and press [ENTER] (10). ≥You can return to menus after you start play by pressing [TOP MENU] (9) or [MENU] (22) (DVD-Video), or [RETURN] (23) (Video CD).
B.book 21 ページ 2003年2月4日 火曜日 午後2時50分 Playing discs (continued) Quick View (Play t1.3) Fast forward and rewind—SEARCH [RAM] [RAM] [DVD-R] [DVD-V] [CD] [VCD] [MP3] During play During play or Time Slip, you can play faster than the normal play to save time by Quick View function. Press [6, SLOW/SEARCH] or [5, SLOW/SEARCH] (20). During play [6]: backward [5]: forward Press and hold [1] (21) for about 1 second. DVD-RAM DVD-RAM PLAY x1.3 • • • • L R L R ≥Press [1] (21) to return to normal play.
B.book 22 ページ 2003年2月4日 火曜日 午後2時50分 Playing discs (continued) Skipping Manual Skip [RAM] [DVD-R] [DVD-V] [CD] [VCD] [MP3] [RAM] [DVD-R] You can skip to the beginning of tracks (page 71) and chapters (page 71) and restart play from there. On DVD-RAM and DVD-R, you can skip to the start of a programme and start play from there. The section between the point where recording is started and the point where it is stopped is called a “programme”.
B.book 23 ページ 2003年2月4日 火曜日 午後2時50分 Playing discs (continued) ªWhen you have connected the unit to other equipment with an optical digital cable Changing audio [RAM] [DVD-V] [VCD] You cannot change the audio type when you have used only an optical digital cable for connection in the following cases: ≥While playing stereo or bilingual broadcasts recorded on DVDRAM. ≥While playing something recorded from other equipment.
B.book 24 ページ 2003年2月4日 火曜日 午後2時50分 Playing discs (continued) Marking places to play again — MARKER Note [RAM] ≥This feature doesn’t work while using a play list. ≥Markers cannot be added to or removed from discs that are protected (pages 38, 73). [RAM] [DVD-R] You can mark up to 999 points on a disc to return to later. These marks are recorded directly onto DVD-RAM, but are cleared when you removed or finalized DVD-R. [RAM] [DVD-R] ≥The markers are ordered by time.
ページ 2003年2月4日 火曜日 午後2時50分 Playing discs (continued) ªNaming folders and files Using menus to play MP3 discs At the time of recording, give folder and file names a 3-digit numeric prefix in the order you want them to play (this may not work at times). [MP3] This unit can play MP3 files recorded on CD-R/RW with a computer. Files are treated as tracks and folders are treated as groups. “Total” means total number of all MP3 files (all tracks in all groups) recorded in the disc.
B.book 26 ページ 2003年2月4日 火曜日 午後2時50分 Recording television programmes ªRe-inserting double-sided discs [RAM] [DVD-R] Preparation Switch [DVD, TV] (15) to “DVD”. 1 Press [DVD, Í] (1) to turn the unit on. 2 Press [<, OPEN/CLOSE] (39) to open the tray and 3 insert a disc. ≥Insert one disc only within the tray’s guides. ≥Use a disc that can be recorded on and that has enough space available. ≥Press [<, OPEN/CLOSE] (39) to close the tray.
B.book 27 ページ 2003年2月4日 火曜日 午後2時50分 Recording television programmes (continued) Flexible recording mode (FR) One Touch Recording—Specify a time to stop recording The unit calculates a recording rate that enables the recording to fit in the time you set (within the remaining time on the disc) and with the best possible picture quality. 1 [RAM] [DVD-R] Main unit only While stopped This is a simple way of making timer recordings when you are in a hurry or before you go to bed.
B.book 28 ページ 2003年2月4日 火曜日 午後2時50分 Recording television programmes (continued) ªTo immediately record the same TV programme that you are viewing on the TV (Direct TV Recording) For your reference ≥To switch TV automatically to the picture from the unit in playback mode, connect the AV1 socket of this unit to the TV by a 21-pin cable. ≥This function does not work with some equipment. Refer to the equipment’s operating instructions.
ページ 2003年2月4日 火曜日 午後2時50分 Playing while you are recording Playing from the beginning of the programme you are recording—Chasing play Simultaneous recording and play [RAM] You can start play of the programme you are recording or play a programme previously recorded. [RAM] Preparation Switch [DVD, TV] (15) to “DVD”. You can start play from the beginning of a programme while continuing to record it. During recording or timer recording Preparation Switch [DVD, TV] (15) to “DVD”.
B.book 30 ページ 2003年2月4日 火曜日 午後2時50分 Using the FUNCTIONS window Playing while you are recording (continued) Checking the recording during recording (TIME SLIP) About the FUNCTIONS window Most of the features and functions of this unit can also be controlled with icons. The examples show the FUNCTIONS window when a DVD-RAM is being used. Actual menus depend on the type of disc being used. [RAM] You can play the programme being recorded to check that it is being recorded correctly.
B.
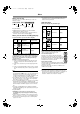
B.book 32 ページ 2003年2月4日 火曜日 午後2時50分 Timer recording Using VIDEO Plus+ number to make timer recording 4 If the programme is correct Press [ENTER] (10). ≥The Timer Programme List screen appears. VIDEO Plus+ are different trademarks used to represent the same easy recording feature. However, for simplicity, only the term VIDEO Plus+ will be used. TIMER RECORDING Remain 1:58 SP 1:19:00 16.7 TUE Disc No.
B.book 33 ページ 2003年2月4日 火曜日 午後2時50分 Timer recording (continued) ªIf “– –” appears under “Name” after entering a VIDEO Plus+ number ªTo change the programme TIMER RECORDING Remain 1:58 SP Name stands for Programme Position/TV Station Name. Normally, the name of the TV station or the number of the programme position is displayed under “Name”.
B.book 34 ページ 2003年2月4日 火曜日 午後2時50分 Timer recording (continued) Manual programming To put the unit on recording standby Press [ , TIMER] (12). Ensure “ ” lights on the unit’s display. [RAM] [DVD-R] Remote control only To change the timer recording programme You can set your own programming conditions (up to 16 programmes).
B.book 35 ページ 2003年2月4日 火曜日 午後2時50分 Timer recording (continued) To check programmes Starting and canceling programmes [RAM] [DVD-R] [RAM] [DVD-R] Press [PROG/CHECK] (13). ªTo put the unit on recording standby Press [ , TIMER] (12). The Timer Programme List screen appears. TIMER RECORDING A No. Name 01 BBC 1 BBC 1 BBC 1 04 BBC 1 X 05 BBC 1 W 02 F 03 The unit turns off and “ Remain 1:58 SP 1:19:00 16.
B.book 36 ページ 2003年2月4日 火曜日 午後2時50分 Recording from a video cassette player When connected to the other equipment [RAM] [DVD-R] You can record audio and video being played on a video cassette player or a video camera connected to the input terminals. Preparation ≥Before connecting any cables, first make sure that the power for both units is off. Then after connecting any cable, turn on the both units. ≥Connect the other equipment to this unit’s input terminals (page 57). ≥Switch [DVD, TV] (15) to “DVD”.
B.book 37 ページ 2003年2月4日 火曜日 午後2時50分 Entering titles DISC INFORMATION [RAM] [DVD-R] About DISC INFORMATION [RAM] [DVD-R] You can: ≥Title discs with the DISC INFORMATION in the FUNCTIONS window. ≥Title programmes with the Timer recording (page 32). ≥Title programmes with the DIRECT NAVIGATOR (page 42). ≥Title play lists with the PLAY LIST screen (page 50).
B.book 38 ページ 2003年2月4日 火曜日 午後2時50分 DISC INFORMATION (continued) Disc Protection Releasing disc protection [RAM] [RAM] This allows you to protect discs from accidental erasure. This allows you to release disc protection. Preparation ≥Switch [DVD, TV] (15) to “DVD”. ≥Insert the disc you want to protect. Preparation ≥Switch [DVD, TV] (15) to “DVD”. ≥Insert the disc you want to release protection. 1 1 While stopped Press [FUNCTIONS] (11).
B.book 39 ページ 2003年2月4日 火曜日 午後2時50分 DISC INFORMATION (continued) Erase all programmes 1 2 Use [3, 4, 2, 1] (10) to select “DISC All programmes and play lists created from them will be erased irretrievably when you use this procedure. INFORMATION” and press [ENTER] (10). Preparation ≥Switch [DVD, TV] (15) to “DVD”. ≥Insert a disc you have recorded on. 1 While stopped Press [FUNCTIONS] (11). [RAM] DISC INFORMATION 3 Use [3, 4] (10) to select “Format” and press While stopped [ENTER] (10).
B.book 40 ページ 2003年2月4日 火曜日 午後2時50分 DISC INFORMATION (continued) Finalize — Creating DVD-Video [DVD-R] You can play DVD-R on compatible DVD players by finalizing them on this unit, effectively making them into DVD-Video. The menus you create with this unit can also be used on the player. Preparation ≥Switch [DVD, TV] (15) to “DVD”. ≥Insert the disc you want to finalize. 1 While stopped Press [FUNCTIONS] (11). 2 Use [3, 4, 2, 1] (10) to select “DISC INFORMATION” and press [ENTER] (10).
ページ 2003年2月4日 火曜日 午後2時50分 Using the DIRECT NAVIGATOR Selecting programmes to play About the programme list [RAM] [DVD-R] DIRECT NAVIGATOR NAVIGATOR DIRECT A list of programmes is created as you record them. You can use this list to find the programmes you want to watch. i) Preparation ≥Switch [DVD, TV] (15) to “DVD”. ≥Insert a disc you have recorded on. a) b) c) 1 Press [DIRECT NAVIGATOR] (9). d) e) ≥The programme list appears.
B.book 42 ページ 2003年2月4日 火曜日 午後2時50分 Using the DIRECT NAVIGATOR (continued) Erasing programmes Entering and editing programme titles [RAM] [DVD-R] [RAM] [DVD-R] The programme is erased completely when you use this procedure and cannot be retrieved. Check the programme carefully before erasing it to ensure it isn’t one you want to keep. Preparation ≥Switch [DVD, TV] (15) to “DVD”. ≥Insert a disc you have recorded on. Preparation ≥Switch [DVD, TV] (15) to “DVD”. ≥Insert a disc you have recorded on.
ページ 2003年2月4日 火曜日 午後2時50分 Using the DIRECT NAVIGATOR (continued) Protecting programmes Releasing programme protection [RAM] [RAM] You can prevent accidental erasure of programmes by writeprotecting them. Preparation ≥Switch [DVD, TV] (15) to “DVD”. ≥Insert a disc you have recorded on. Preparation ≥Switch [DVD, TV] (15) to “DVD”. ≥Insert a disc you have recorded on.
B.book 44 ページ 2003年2月4日 火曜日 午後2時50分 Using the DIRECT NAVIGATOR (continued) Erasing parts of a programme Dividing programmes [RAM] [RAM] The specified parts of the programme are erased completely when you use this procedure and cannot be retrieved. Check the programme carefully to ensure it isn’t one you want to keep. You can divide a selected programme into two. You must be sure you wish to divide a programme because once a programme has been divided it cannot be returned to its original form.
ページ 2003年2月4日 火曜日 午後2時50分 Using PLAY LIST to edit programmes Displaying PLAY LIST About the PLAY LIST Scene screen [RAM] a) Preparation ≥Switch [DVD, TV] (15) to “DVD”. ≥Insert a disc you have recorded on. PLAY LIST Play Scenes SELECT PAGE PLAY LIST ENTER 004 3 No. 0 – 9 SELECT ENTER RETURN No.
ページ 2003年2月4日 火曜日 午後2時50分 Using PLAY LIST to edit programmes (continued) Creating PLAY LIST For your reference ≥You can fast-forward, rewind, pause, and slow-motion while playing scenes just as you can during normal play. ≥One disc can have a maximum of 99 play lists and 999 scenes. These numbers may be reduced under some conditions. ≥You cannot specify an end point before a start point or a start point after an end point.
ページ 2003年2月4日 火曜日 午後2時50分 Using PLAY LIST to edit programmes (continued) Playing PLAY LIST Playing Scenes [RAM] [RAM] Preparation ≥Switch [DVD, TV] (15) to “DVD”. ≥Insert a disc you created play lists on. Preparation ≥Switch [DVD, TV] (15) to “DVD”. ≥Insert a disc you created play lists on. 1 Press [PLAY LIST] (22). 2 Use [3, 4] (10) to select the play list you want to 1 Press [PLAY LIST] (22). 2 Use [3, 4] (10) to select the play list that contains play and press [ENTER] (10).
B.book 48 ページ 2003年2月4日 火曜日 午後2時50分 Using PLAY LIST to edit programmes (continued) Adding Scenes to a PLAY LIST Moving a Scene [RAM] Preparation ≥Switch [DVD, TV] (15) to “DVD”. ≥Insert a disc you created play lists on. [RAM] Preparation ≥Switch [DVD, TV] (15) to “DVD”. ≥Insert a disc you created play lists on. 1 Press [PLAY LIST] (22). 2 Use [3, 4] (10) to select the desired play list and After performing steps 1 to 3 of “Adding Scenes to PLAY LIST”, perform the following steps: press [1] (10).
B.book 49 ページ 2003年2月4日 火曜日 午後2時50分 Using PLAY LIST to edit programmes (continued) To re-edit a PLAY LIST Scene Erasing a Scene from a PLAY LIST [RAM] [RAM] Preparation ≥Switch [DVD, TV] (15) to “DVD”. ≥Insert a disc you created play lists on. Preparation ≥Switch [DVD, TV] (15) to “DVD”. ≥Insert a disc you created play lists on.
B.book 50 ページ 2003年2月4日 火曜日 午後2時50分 Using PLAY LIST to edit programmes (continued) Copying PLAY LIST Titling PLAY LIST [RAM] [RAM] Preparation ≥Switch [DVD, TV] (15) to “DVD”. ≥Insert a disc you created play lists on. Preparation ≥Switch [DVD, TV] (15) to “DVD”. ≥Insert a disc you created play lists on.
B.book 51 ページ 2003年2月4日 火曜日 午後2時50分 Using DISPLAY menus [RAM] [DVD-R] [DVD-V] [CD] [VCD] [MP3] Disc menu Remote control only [RAM] [DVD-R] [DVD-V] [VCD] DISPLAY menus contain information about the disc or unit. These menus allow you to perform operations by changing this information. Disc Play Picture Sound Common procedures Preparation Switch [DVD, TV] (15) to “DVD”. Soundtrack Î Digital 2/0ch OFF Audio channel LR Soundtrack language [DVD-V] (See [A] below.
B.book 52 ページ 2003年2月4日 火曜日 午後2時50分 Using DISPLAY menus (continued) Play menu Sound menu [RAM] [DVD-R] [DVD-V] [CD] [VCD] [MP3] [RAM] [DVD-R] [DVD-V] Disc Play Picture Sound Repeat Play Marker Disc Play Picture Sound OFF 1s10 †††††††††† (Only with Dolby Digital with 2 or more channels) Enjoy a surround-like effect if you are using two front speakers only. The effect is broadened and sound seems to come from virtual speakers on either side if the disc has surround signals recorded on it.
B.book 53 ページ 2003年2月4日 火曜日 午後2時50分 Using DISPLAY menus (continued) Repeat play [RAM] [DVD-R] [DVD-V] [CD] [VCD] [MP3] During play Use [3, 4] (10). Disc Play Picture Sound Repeat Play Marker OFF 1s10 †††††††††† The display changes as illustrated. [RAM] [DVD-R] PRG (PROGRAMME),-.All,-.OFF ^--------------------------------------------------J [DVD-V] Chapter,-.Title,-.OFF ^--------------------------J [CD] [VCD] Track,-.All,-.OFF ^---------------------J [MP3] Track,-.Group,-.
B.book 54 ページ 2003年2月4日 火曜日 午後2時50分 Child Lock The Child Lock deactivates all buttons on the unit and remote control. Use it to prevent other people from operating the unit. Remote control only To activate the Child Lock Hold down [ENTER] (10) and [RETURN] (23) simultaneously until “X HOLD” appears on the unit’s display. ≥If you press a button while the Child Lock is on, “X HOLD” appears on the unit’s display and operation is impossible.
B.
B.book 56 ページ 2003年2月4日 火曜日 午後2時50分 Connecting external equipments (continued) Connecting a Decoder Connecting a satellite receiver or digital receiver Decoder here refers to the device used to decode scrambled broadcasts (Pay TV).
B.
B.book 58 ページ 2003年2月4日 火曜日 午後2時50分 Changing the unit’s settings Common procedures Refer to the summary of settings table on page 59 and use the following procedure to change the settings if necessary. Preparation ≥Switch [DVD, TV] (15) to “DVD”. 1 While stopped Press [FUNCTIONS] (11) to show the FUNCTIONS window. 2 Use [3, 4, 2, 1] (10) to select “SETUP” and press [ENTER] (10).
B.book 59 ページ 2003年2月4日 火曜日 午後2時50分 Changing the unit’s settings (continued) Summary of settings ª Disc [DVD-V] This description shows the initial settings for this unit. See page 58 for details on menu operation. ≥Underlined items are the factory presets. Setting the language of disc menu, audio and subtitles for playing the DVD-Video. ≥Some discs are designed to start in a certain language despite any changes you make here.
B.book 60 ページ 2003年2月4日 火曜日 午後2時50分 Changing the unit’s settings (continued) ≥Underlined items are the factory presets. ª Sound ª Picture PLAY t1.3 & Audio during Search (PLAY) (page 21) [RAM] [DVD-R] [DVD-V] [VCD] Rec Resolution (REC) Choose whether to operate the Quick View (Play k1.3) or not and whether to have sound during search. [On] [Off] Select the picture sharpness when recording. [Fine] [Normal] Fine Pictures become clear and vivid. Normally, use this setting.
B.book 61 ページ 2003年2月4日 火曜日 午後2時50分 Changing the unit’s settings (continued) ≥Underlined items are the factory presets. Norm (4:3) TV Settings (DVD-Video) ª Display You can select how to reflect the image on the TV, when you watch 16:9 images (DVD-Video) on 4:3 TV. [Pan & Scan] [Letterbox] On-Screen Messages Choose whether to show on-screen messages automatically or not.
B.book 62 ページ 2003年2月4日 火曜日 午後2時50分 Changing the unit’s settings (continued) Entering a password (Ratings) Digital output You can limit play of DVDs unsuitable for some audiences, children, for example. Play and changes to the settings are not possible unless you enter a password. Change these settings when you have connected equipment through this unit’s OPTICAL DIGITAL AUDIO OUT terminal.
B.book 63 ページ 2003年2月4日 火曜日 午後2時50分 Changing the unit’s settings (continued) Remote Setting Operating other Panasonic DVD equipment with the remote control Preparation ≥Switch [DVD, TV] (15) to “DVD”. ≥Press [FUNCTIONS] (11) to show the FUNCTIONS window. By changing the remote control code, you can operate other DVD Recorders and players manufactured by Panasonic.
B.book 64 ページ 2003年2月4日 火曜日 午後2時50分 Changing the unit’s settings (continued) Clock Settings Auto Clock Setting Usually, the units Auto Setup or Download function automatically adjusts the clock to correct time. Under some reception conditions, however, the unit cannot set the clock automatically. In this case, follow the operation steps below to manually set the clock.
B.book 65 ページ 2003年2月4日 火曜日 午後2時50分 Changing the unit’s settings (continued) Channel Settings Handling the TUNING BOX screen Use [3, 4, 2, 1] (10) to select the desired field and press [ENTER] (10). Preparation ≥Switch [DVD, TV] (15) to “DVD”. ≥Press [FUNCTIONS] (11) to show the FUNCTIONS window. Pos: To change the order in which the TV stations are assigned to the programme positions. Press the numeric buttons (4) to enter the number of the desired programme position.
B.book 66 ページ 2003年2月4日 火曜日 午後2時50分 Changing the unit’s settings (continued) Adding, deleting and moving channels Auto-Setup Restart, Download Use this function if: ≥Channels were not set correctly using automatic tuning. ≥A channel that should have been set wasn’t. ≥A channel’s reception is poor and you want to delete it. You can use the SETUP menus to start Auto Channel setting if Auto Setup (page 17) fails for some reason. Preparation ≥Switch [DVD, TV] (15) to “DVD”.
B.book 67 ページ 2003年2月4日 火曜日 午後2時50分 Changing the unit’s settings (continued) Changing the Owner ID Shipping Condition You can change the [PIN number], [Name], [House No.] and [Postcode]. The all settings in the SETUP screen return to the factory settings. (except for the ratings level and the password, and owner ID settings) Preparation ≥Switch [DVD, TV] (15) to “DVD”. ≥Press [FUNCTIONS] (11) to show the FUNCTIONS window. Preparation ≥Switch [DVD, TV] (15) to “DVD”.
B.book 68 ページ 2003年2月4日 火曜日 午後2時50分 Status displays Changing the information displayed Display examples Displays appear on the television when you operate the unit to let you know what operation was performed and what condition the unit is in. (1) (2) (3) (4) Remote control only (1) Current media (2) Current recording or play status, input channel ≥Shows the current state of the unit, and the input channel. REC: Recording PAUSE: Recording paused PLAY: Playing PLAY t1.3: Quick Viewing (Playing k1.
B.book 69 ページ 2003年2月4日 火曜日 午後2時50分 Maintenance and Handling Maintenance To clean this unit, wipe with a soft, dry cloth. ≥Never use alcohol, paint thinner or benzine to clean this unit. ≥Before using chemically treated cloth, read the instructions that came with the cloth carefully. Dust and dirt may adhere to the unit’s lenses over time, possibly making it impossible to record or play discs.
B.book 70 ページ 2003年2月4日 火曜日 午後2時50分 Glossary Bitstream Linear PCM This is the compressed form of digital signals. A decoder decodes these signals into 5.1 surround and multi-channel signals. This is a form of signal that has been digitized without compressing it. CDs are recorded with 44.1 kHz/16 bit PCM, while DVDs use PCM between 48 kHz/16 bit and 96 kHz/24 bit, allowing reproduction of greater quality sound.
B.book 71 ページ 2003年2月4日 火曜日 午後2時50分 Glossary (continued) Q Link This function works only if the unit is connected via a fully-wired 21-pin Scart cable to a TV featuring the Q Link or similar function. Q Link offers the following functions: 1) Download from the TV* When you connect the unit to a TV, the station list data is automatically copied from the TV to the unit, and the TV stations are assigned to the programme positions on the unit in the same order as on the TV.
B.book 72 ページ 2003年2月4日 火曜日 午後2時50分 Self-diagnosis The self-diagnosis displays appear if a problem occurs with the unit. The service numbers in the table appear when a problem occurs. ≥The service numbers are a “U” followed by two digits. Service number Service number Unit status Solutions The disc is dirty or badly scratched. ≥Follow the instructions in “Maintenance and Handling” to clean the disc if it is dirty.
B.book 73 ページ 2003年2月4日 火曜日 午後2時50分 Error displays Error messages Causes and solutions No Disc. ≥You haven’t inserted a disc. Correctly insert a disc that this unit can play. (page 20) ≥The disc is upside down. If it is a single-sided disc, insert it so the label is facing up. (page 20) This is a non-recordable disc. ≥The unit cannot record on the disc you inserted. The unit cannot record onto finalized DVD-R, DVD-Video, CDs or video CDs. Insert a DVD-RAM or unfinalized DVD-R.
B.book 74 ページ 2003年2月4日 火曜日 午後2時50分 Troubleshooting guide Before requesting service, make the below checks. If you are in doubt about some of the check points, or if the remedies indicated in the chart do not solve the problem, consult your dealer for instructions. Power No power. ≥Insert the AC mains lead securely into the household mains socket. The unit is on but cannot be operated. ≥The unit is hot (“U14” appears on the display). Wait for “U14” to disappear.
B.book 75 ページ 2003年2月4日 火曜日 午後2時50分 Troubleshooting guide (continued) Play Play fails to start even when [1] (21) is pressed. Play starts but then stops immediately. “NO READ”, “UN SUPPORT”, “NO DISC” or “NO PLAY” appears on the unit’s display. ≥Insert the disc correctly with the label facing up. (page 20) ≥This unit cannot play discs other than DVD-RAM, DVD-R, DVD-Video, Video CD, CD and MP3 disc. (page 10) ≥The disc is dirty. Clean it. (page 69) ≥The disc may be badly scratched.
B.book 76 ページ 2003年2月4日 火曜日 午後2時50分 Troubleshooting guide (continued) Recording and timer recording Cannot record. ≥You haven’t inserted a disc or the disc you inserted cannot be recorded on. Insert a disc the unit can record onto. (page 10) ≥The disc is unformatted. Format the disc so this unit can record on it. (page 39) ≥The write protect tab on the cartridge is set to “PROTECT”. Use a ballpoint pen or similar to release the write protection.
B.book 77 ページ 2003年2月4日 火曜日 午後2時50分 Specifications Power supply: Power consumption: AC 220-240 V, 50 Hz 29 W Recording system: DVD video recording standards (DVD-RAM), DVD video standards (DVD-R) 12 cm 4.7 GB DVD-RAM 12 cm 9.4 GB DVD-RAM 8 cm 2.8 GB DVD-RAM 12 cm 4.7 GB DVD-R (for General Ver.2.0) Maximum 360 min (with 4.7 GB disc) XP:Approx. 60 min SP:Approx. 120 min LP:Approx. 240 min EP:Approx. 360 min 12cm 4.7GB DVD-RAM 12cm 9.4GB DVD-RAM 8cm 2.8GB DVD-RAM 12cm 4.7GB DVD-R (for General Ver.2.
B.book 78 ページ 2003年2月4日 火曜日 午後2時50分 Index ªA ªO Audio ......................................................................................... 23 Auto Setup ................................................................... 16, 17, 66 Owner ID .................................................................................... 67 ªC PDC .................................................................................... 33, 71 PLAY .................................................................