CAUTION! THE FOLLOWING APPLIES ONLY IN THE U.S.A. THIS PRODUCT UTILIZES A LASER. USE OF CONTROLS OR ADJUSTMENTS OR PERFORMANCE OF PROCEDURES OTHER THAN THOSE SPECIFIED HEREIN MAY RESULT IN HAZARDOUS RADIATION EXPOSURE. DO NOT OPEN COVERS AND DO NOT REPAIR YOURSELF. REFER SERVICING TO QUALIFIED PERSONNEL. CAUTION! DO NOT INSTALL OR PLACE THIS UNIT IN A BOOKCASE, BUILT-IN CABINET OR IN ANOTHER CONFINED SPACE. ENSURE THE UNIT IS WELL VENTILATED.
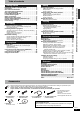
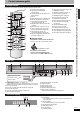
Table of contents Editing IMPORTANT SAFETY INSTRUCTIONS . . . . . . . . . . . . . . .2 Accessories. . . . . . . . . . . . . . . . . . . . . . . . . . . . . . . . . . . . .3 Disc and card information . . . . . . . . . . . . . . . . . . . . . . . . .4 The remote control information. . . . . . . . . . . . . . . . . . . . .6 Disc and card handling . . . . . . . . . . . . . . . . . . . . . . . . . . .6 Inserting/Removing SD card . . . . . . . . . . . . . . . . . . . . . . .6 Control reference guide . . . . . .
Disc and card information Discs you can use for recording and play Disc type DVD-RAM Indication in these instructions RAM DVD-R DVD-R DL*1 (dual layer on single side) DVD-RW +R*2 +R DL*1 (double layer on single side) +RW -R -R DL -RW(V) +R +R DL Before finalization Before finalization Before finalization Before finalization Before finalization DVD-V DVD-V DVD-V DVD-V DVD-V After finalization After finalization After finalization After finalization After finalization –––– ––––
Disc type DVD-Video DVD-Audio DVD-RW (VR format) CD Video CD DVD-V DVD-A -RW(VR) CD VCD Indication in these instructions Logo –––– Instructions High quality movie and music discs High fidelity music discs • Played on this unit in 2 channels. DVD-RW recorded on another DVD Recorder* • You can play programs that allow “One time only recording” if they have been recorded to a CPRM compatible disc. • By formatting (Ô page 40) the disc, you can record to it in DVDVideo format.
The remote control information n Batteries n Use • Insert so the poles (+ and –) match those in the remote control. • Do not use rechargeable type batteries. • Do not mix old and new batteries. • Do not use different types at the same time. • Do not heat or expose to flame. • Do not take apart or short circuit. • Do not attempt to recharge alkaline or manganese batteries. • Do not use batteries if the covering has been peeled off.
Control reference guide Remote control bo 1 Turn the unit on (Ô page 14) 2 Select the drive (DVD or SD) bn Change recording mode (Ô page 20) bo Transmission window bp Television operations (Ô page 17) bq Channel select (Ô page 20) br Add/delete channel (Ô page 15) bs Input select (IN1 or IN2 or DV) bt Delete items (Ô page 39) ck Skip a minute forward (Ô page 25) cl Show scheduled recording list (Ô page 20, 24) 3 Select channels and title numbers, etc.
STEP 1 Connection This section includes diagrams of four common methods of connections (A-D, pages 8-9). Please connect using the one that best suits you. • Visit Panasonic’s homepage for more information about connection methods. (This is in English only.) http://www.panasonic.com/consumer_electronics/dvd_recorder/dvd_connection.asp • Before doing any connection, turn off all equipment and read the appropriate operating instructions.
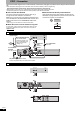
C Connection with a television and a cable box or satellite receiver Television Cable from the wall or antenna signal AUDIO IN VIDEO R L IN • If your television does not have AUDIO/VIDEO terminals (Ô page 10, c). • If you would like to enjoy higher picture quality (Ô page 11). 75 Ω coaxial cable 2 STEP 1 Connection • You need to subscribe to a cable TV service to enjoy viewing their programming. • Consult your service provider regarding an appropriate cable TV box or satellite receiver.
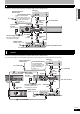
STEP 1 Connection If your television does not have Audio/Video terminals, RF Modulator is necessary a Connection with a television (Ô page 8, A) IN AUDIO R L VIDEO S-VIDEO RQT8327 10 OUT RF VHF/UHF RF IN RF b Connection with a television and a video cassette recorder (Ô page 8, B) c Connection with a television and a cable box or satellite receiver (Ô page 9, C) d Connection with a television, a video cassette recorder and a cable box or satellite receiver (Ô page 9, D)
To enjoy higher picture quality Connecting to the S VIDEO IN terminal The S VIDEO OUT terminal achieves a more vivid picture than the VIDEO OUT terminal. (Actual results depend on the television.) Connecting to the COMPONENT VIDEO IN terminal These terminals can be used for either interlace or progressive output (Ô page 53) and provide a purer picture than the S VIDEO OUT terminal. • Connect to terminals of the same color.
STEP 1 Connection Connecting an amplifier or system component n Connecting an amplifier with a digital input terminal • When connecting this unit to a television with an HDMI cable, set “HDMI Audio Output” to “Off” in the Setup menu (Ô page 45). • To enjoy multi-channel surround on a DVD-Video, connect an amplifier with a built-in decoder displaying these logo marks using an optical digital audio cable and change the settings in Digital Audio Output (Ô page 44).
HDMI is the next-generation interface for digital devices. When connected to an HDMI compatible unit, an uncompressed digital audio and video signal is transmitted. You can enjoy high quality, digital video and audio with just one cord. When connecting to an HDMI-compatible HDTV (High Definition Television), the output can be switched to 1080i or 720p HD video. Set the following: From the Setup menu (Ô page 45), set “HDMI Video Output” and “HDMI Audio Output” to “On”.
STEP 2 Plug-in Auto Tuning Preparation Turn on the television and select the appropriate video input to suit the connections to this unit. CH DV IN POWER 8 1 IN2 2 CH 1 Press [^ DVD POWER]. Select Language Seleccione el idioma Sélection de Langue English Español ^ DVD POWER Numbered buttons Français Press ENTER Pulse ENTER Appuyer sur ENTER 1 2 CH 2 Press [e,r] to select the language and press [ENTER]. If you make a mistake, press [RETURN] to return to an earlier screen.
Press [ENTER] to start Plug-in Auto Tuning. Set Channels Automatically Ch. 1 Adding and deleting channels After channel setting on this unit completed, you can add or delete channels if necessary channels are not set or unnecessary channels are set. 1 Set Channels Automatically Proceeding . . . The unit then proceeds with Auto Clock Setting. The time is displayed when finished. Set Clock Automatically Auto Clock Setting is complete. 4/4/2006 12:15 AM DST.....................On Time Zone ........
Channel captions/Selecting television type 3 4 5 Press [e,r] to select “Manual Channel Captions” and press [ENTER]. Press [e,r] to select the channel and press [q]. • Channels are only displayed if they contain a station and if preset captions have not been added. Press [e,r] to select the first character and press [q]. • You can choose from the following characters: A–Z, 0–9, -, &, !, /, (space) • To delete the caption, press [CANCEL ]. • Repeat this step to enter the other characters.
Remote control settings Clock settings Refer to the control reference on page 16. Refer to the control reference on page 16. Television operation You can operate the TV through the unit’s remote control. Point the remote control at the television While pressing [^ POWER TV], enter the code with the numbered buttons. e.g., 0250: [0] Ô [2] Ô [5] Ô [0] Manufacturer and Code No.
Important notes for recording RAM -R Both main and secondary audio can be recorded You can change the audio during playback. (Ô page 25, Changing audio) Main Hello Recording of MTS broadcasting SAP Hola If you record from external equipment – Select both “Main” and “SAP” on the external equipment. RAM Recording of Widescreen broadcasting -R DL -RW(V) +R +R DL +RW Select the main or secondary audio before recording (Ô page 44, “Multi-channel TV Sound ( MTS )”) The selected audio only is recorded.
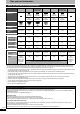
Depending on the content being recorded, the recording times may become shorter than indicated. DVD-RAM 9.4 GB (Double4.7 GB sided*1) Recording Mode XP (High picture quality) SP (Standard) LP (Long recording) EP (Extra long recording) FR (Flexible Recording) DVD-R, DVD-RW, +R, +RW 4.7 GB 1 h. 2 h. 1 h. 2 h. 4 h. 2 h. 4 h. 8 h. 4 h. 8 h. (6 h.*2) 16 h. 8 h. (12 h.*2) (6 h.*2) 8 h. maximum 8 h. maximum 8 h.
Recording television programs ; OPEN/CLOSE 1 Press [DRIVE SELECT] to select the DVD drive. 2 Press [; OPEN/CLOSE] on the main unit to open the tray and insert a disc. CH DV IN IN2 2 CH 1 g q * REC • Press the button again to close the tray. • When using 8 cm (3″) DVD-RAM, or 8 cm (3″) DVD-R, remove the disc from the cartridge. g Cartridge disc Insert label-up. DRIVE SELECT Numbered buttons 1 2 CH Insert label-up with the arrow facing in. Insert fully. 3 g Press [1 2 CH] to select the channel.
To specify a time to stop recording –One Touch Recording RAM -R -R DL -RW(V) +R +R DL +RW During recording Press [* REC] to select the recording time. • The unit display changes as shown below. OFF 0:30 OFF 1:00 Counter (cancel) OFF 1:30 OFF 4:00 Press [q] (PLAY) during recording. OFF 2:00 OFF 3:00 • This does not work during scheduled recordings (Ô page 22) or while using Flexible Recording (Ô below).
Scheduled recording 1 Press [SCHEDULE]. 2 Press [e,r] to select “New Scheduled Recording” and press [ENTER]. 3 Press [q] to move through the items and change the items with [e,r]. • Press and hold [e,r] to alternate On (Start time) and Off (Finish time) in 30-minute increments. • You can also set Channel, Date, On (Start time), and Off (Finish time) with the numbered buttons. • You can also press [REC MODE] to change the recording mode.
1 2 When the unit is on The confirmation screen appears. Press [w,q] to select “Stop recording” and press [ENTER]. Release program from recording standby 3 Press [SCHEDULE]. Press [e,r] to select the program and press [SUB MENU]. Press [e,r] to select “Schedule set to Off” and press [ENTER]. Canceled icon is displayed in left column. Schedule List No Channel 01 64 ABC • Be sure to select “Schedule set to On” in step 3 before the scheduled time to put the unit on recording standby.
Playing discs Selecting recorded titles to play –Direct Navigator DRIVE SELECT RAM Numbered buttons t,y u,i q x1.3 g h TIME SLIP -R DL -RW(V) +R +R DL +RW -RW(VR) 1 Press [DRIVE SELECT] to select the DVD drive. 2 Insert a disc (Ô page 20). 3 Press [DIRECT NAVIGATOR]. 4 RAM Press [A] to select “Video”.
Operations during play Press [g]. The stopped position is memorized. Resume play function Press [q] (PLAY) to restart from this position. • VCD Depending on the disc, resume play function may not be effective. • The stopped position is cleared when: – You press [g] several times. – You open the tray. – DVD-A CD VCD You turn the unit off. Stop Press [h]. Pause Press again or press [q] (PLAY) to restart play. Press [t] or [y]. • The speed increases up to 5 steps ( +R +R DL +RW up to 3 steps).
Using menus to play still pictures (JPEG/TIFF) 1 Press [DIRECT NAVIGATOR]. Album View screen is displayed (Ô go to step 2). * Depending on the digital camera, the editing software on the PC etc., the information about the recording date may not be displayed. In this case, the date will appear as “--/--/--”. n When the Title View screen is displayed Press [B] to switch to the Album View screen. Picture View screen is displayed (Ô go to step 3).
RAM SD Useful functions during still picture play You can display still pictures one by one with constant interval. RAM SD While the Album View screen is displayed Press [e,r,w,q] to select the album and press [q] (PLAY). You can also start Slideshow with the following steps. While the Album View screen is displayed 1 Press [e,r,w,q] to select desired album and press [SUB MENU]. 2 Press [e,r] to select “Start Slideshow” and press [ENTER].
Using menus to play MP3 CD • You can play CD-R, CD-RW discs which contain MP3 files that have been recorded on a computer. • You may not be able to playback MP3 files which contain still pictures. Preparation • Press [DRIVE SELECT] to select the DVD drive. • Insert a disc (Ô page 20). DRIVE SELECT The screen shown at right is displayed when you insert a disc containing MP3 files and still pictures (JPEG/TIFF). Press [ENTER], and follow the steps below.
Using on-screen menus Refer to control reference on page 28. This function works only when the elapsed play time is displayed. Select the item for repeat play. Depending on the disc, the items that can be selected will differ. 1 Press [DISPLAY]. Disc Play Video Audio Other Soundtrack Digital 2/0 ch 1 Subtitle Off Audio channel Stereo Item Setting • Depending on the condition of the unit (playing, stopped, etc.) and disc contents, there are some items that you cannot select or change.
Editing titles/chapters 1 2 3 4 Title/Chapter Programs are recorded as a single title consisting of one chapter. Press [A] to select “Video”. Press [e,r,w,q] to select the title. Press [SUB MENU], then press [e,r] to select the operation and press [ENTER]. Press [e,r,w,q] to select the chapter. To start play Ô Press [ENTER]. To edit Ô Step 6. You can change the order of chapters and create a playlist (Ô page 32). minute ( (Ô page 41). Press [DIRECT NAVIGATOR].
Title operations Delete Title* RAM -R -R DL -RW(V) +R +R DL +RW Properties RAM -R -R DL -RW(V) Editing titles/chapters After performing steps 1–4 (Ô page 30) Press [w,q] to select “Delete” and press [ENTER]. • Once deleted, the recorded contents are lost and cannot be restored. Make certain before proceeding. • -R -R DL +R +R DL The available recording space does not increase when you delete titles. • -RW(V) +RW Available recording space increases only when the last recorded title is deleted.
Creating, editing and playing playlists 1 2 3 4 5 While stopped Press [FUNCTIONS]. Press [e,r] to select “Other Functions” and press [ENTER]. Press [e,r] to select “Playlists” and press [ENTER]. Press [e,r,w,q] to select “Create” and press [ENTER]. Press [w,q] to select the source title and press [r]. Press [ENTER] to select all the chapters in the title, then skip to step 7. You can arrange the chapters (Ô page 30) to create a playlist.
Editing and playing playlists/chapters -RW(VR) (play only) 2 3 4 While stopped Press [FUNCTIONS]. Press [e,r] to select “Other Functions” and press [ENTER]. Press [e,r] to select “Playlists” and press [ENTER]. Press [e,r,w,q] to select the playlist. To start play Ô Press [ENTER]. To edit Ô Step 5 PLAYLISTS DVD-RAM -- 10/30 Mon 0:30 Create -- -- Previous Play 5 Next No.
Editing still pictures • You can edit still pictures or albums. • You can use SD Memory Cards with capacities from 8 MB to 2 GB (Ô page 5). • You cannot edit still pictures recorded on CD-R/CD-RW.
Album and picture operations Delete Album* Delete Picture* RAM SD Album Name RAM SD Protection Setup* Set Protection* Cancel Protection* RAM SD Print Order (DPOF)* SD Press [w,q] to select “Delete” and press [ENTER]. • Once deleted, the recorded contents are lost and cannot be restored. Make certain before proceeding. • When deleting an album, files other than still picture files inside the album will also be deleted. (This does not apply to albums under the album concerned.
Copying still pictures 1 2 3 4 • You can use SD Memory Cards with capacities from 8 MB to 2 GB (Ô page 5). • You cannot copy still pictures recorded on CD-R/CD-RW. Preparation • Turn on the television and select the appropriate video input to suit the connections to this unit. • Turn the unit on. • Insert a disc (Ô page 20) or card (Ô page 6). • Release protection (Ô page 40, Setting the protection).
Copying settings After performing steps 1–3 (Ô page 36, “Copying using the copying list”) Copying Direction Create List Press [e,r] to select “Source” and press [ENTER]. Press [e,r] to select the drive and press [ENTER]. Press [e,r] to select “Destination” and press [ENTER]. Press [e,r] to select the drive and press [ENTER]. The same drive as the copying source can be selected. 5 Press [w] to confirm.
Copying from a video cassette recorder 1 DRIVE SELECT While stopped Press [FUNCTIONS]. Press [e,r] to select “Other Functions” and press [ENTER]. Press [e,r] to select “DV Camcorder Rec.” and press [ENTER]. Press [w,q] to select “Record” and press [ENTER]. 2 Numbered buttons INPUT SELECT CANCEL DELETE u,i 3 4 g Recording starts. h e,r,w,q ENTER FUNCTIONS RETURN SUB MENU A B * REC REC MODE e.g.
Entering text Delete Navigator Refer to the control reference on page 38. Refer to the control reference on page 38. You can give names to recorded titles, etc. The maximum number of characters: 3001 T0-0.0008 Tw[()20.6((Y)14wTm0 Thef)9.7ilr)r)20.6(cord Tw[0.6()5r(cop0.007 * Scheduled recording If a name is long, parts of it may not be shown in some screens. 1 Show Enter Name screen. 2 Press [e,r,w,q] to select a character and press [ENTER]. 3 Repeat this step to enter other characters.
DVD and card Management Deleting all titles and playlists –Delete All Titles DRIVE SELECT RAM FUNCTIONS Preparation • Press [DRIVE SELECT] to select the DVD drive. • Release protection (Ô left). After performing steps 1–3 (Ô left) e,r,w,q ENTER 1 4 RETURN 5 While stopped Press [FUNCTIONS]. Press [e,r] to select “Other Functions” and press [ENTER]. Press [e,r] to select “DVD Management” or “Card Management” and press [ENTER]. 2 3 To return to the previous screen Press [RETURN].
-R -R DL -RW(V) +R +R DL +RW You can select whether to show the top menu after finalizing. Make selections before finalizing the disc. Preparation • Press [DRIVE SELECT] to select the DVD drive. After performing steps 1–3 (Ô page 40) 4 5 +RW +RW discs contain no Top Menu data. Top Menu is a convenient function. We recommend you to create the menu before playing a +RW disc on other equipment. • You cannot use the top menu for playing on this unit.
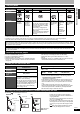
Changing the unit’s settings Common procedures 1 Numbered buttons While stopped Press [SETUP]. Tabs Menus Setup Signal Source (RF IN) Options Cable TV Set Channels Automatically Channel Channel Captions Setup Preset Channel Captions Disc Manual Channel Captions Video 2 3 e,r,w,q ENTER RETURN SETUP 4 A di Press [e,r] to select the tab and press [q]. Press [e,r] to select the menu and press [ENTER]. Press [e,r] to select the option and press [ENTER].
Menus Options (Underlined items are the factory presets.) Settings for Playback Press [ENTER] to show the following settings. Ratings Set a ratings level to limit DVD-Video play. Follow the on-screen instructions. Enter a 4-digit password with the numbered buttons when the password screen is shown. • Do not forget your password. • 8 No Limit: All DVD-Video can be played. • 1 to 7: Prohibits play of DVD-Video with corresponding ratings recorded on them. • 0 Lock All: Prohibits play of all DVD-Video.
Changing the unit’s settings Tabs Audio Menus Dynamic Range Compression DVD-V (Dolby Digital only) Change the dynamic range for late night viewing. Multi-channel TV Sound ( MTS ) -R -R DL -RW(V) +R +R DL +RW Select whether to record the main or secondary audio program (SAP) when recording to a disc. Options (Underlined items are the factory presets.
Menus TV Type (Ô page 16) Options (Underlined items are the factory presets.) • Aspect 4:3 & 480i • Aspect 16:9 & 480i • Aspect 4:3 & 480p • Aspect 16:9 & 480p Functions of HDMI Press [ENTER] to display the menu. HDMI Video Output HDMI Resolution You can only select items compatible with the connected equipment. This setting normally does not need to be changed. However if you are concerned about output picture quality, it may be improved by changing the setting.
Changing the unit’s settings Refer to the control reference on page 42. Changing the speaker setting to suit your speakers For connection with an HDMI cable to an amplifier, use the following settings on this unit if you cannot set the speaker size, presence and delay effect on the amplifier. 1 2 3 4 5 While stopped Press [SETUP]. Press [e,r] to select “TV Screen” and press [q]. Press [e,r] to select “Functions of HDMI” and press [ENTER].
Messages On the television Cannot finish recording completely. • The program was copy-protected. • The disc may be full. • The maximum number of times you can record the program is exceeded. — — — Cannot play. • You inserted an incompatible disc (Discs recorded in PAL video, etc.). — Cannot record on the disc. • The disc may be dirty or scratched. 6 Unable to format. Please check the disc. Cannot play back on this DVD- • You tried to play a non-compatible image. Recorder.
Frequently asked questions Set up Page Do I need to connect Audio/video cables from the unit to the TV? • To enjoy vision and sounds from this unit to the TV, always use AV cables for connection. If your television does not have AUDIO/VIDEO terminals, an RF modulator is necessary. Consult your local dealer for more information. 8–10 What equipment is necessary to play multi channel surround sound? • You cannot playback multi-channel sound on this unit without other equipment.
Troubleshooting guide Before requesting service, make the following checks. If you are in doubt about some of the check points, or if the remedies indicated in the chart do not solve the problem, refer to “Customer Services Directory” on page 55 if you reside in the U.S.A., or refer to “Product information” on page 52 if you reside in Canada. The following do not indicate a problem with this unit: • • • • Regular disc rotating sounds. Poor reception due to atmospheric conditions.
Troubleshooting guide Sound Page No sound • Check the connections and settings. Check the input mode on the amplifier if you have Low volume. connected one. Distorted sound. • Press [AUDIO] to select the audio. Cannot hear the desired audio • Turn off V. Surround Sound in the following cases. type. – When using discs that do not have surround sound effects such as Karaoke discs. – When playing Multi-channel TV Sound (MTS) broadcast programs.
Cannot record. Cannot record from external equipment. • You haven’t inserted a disc or the disc you inserted cannot be recorded on. Insert a disc the unit can record onto. • RAM -RW(V) +R +R DL +RW The disc is unformatted. Format the disc using DVD Management. • RAM The write-protect tab on the cartridge is set to “PROTECT”, or the disc is protected with DVD Management. • Some programs have limitations on the number of times they can be recorded. (CPRM) • The disc is full or nearly full.
Troubleshooting guide Edit Page Cannot format. • The disc is dirty. Wipe with a damp cloth and then wipe dry. • You tried formatting a disc that is not compatible with this unit. Cannot create chapters. • The unit writes the chapter division information to the disc when you turn it off or remove the disc. The information is not written if there is an interruption to the power before this. • These operations are not possible with still pictures.
Glossary Bitstream This is the digital form of multi-channel audio data (e.g., 5.1 channel) before it is decoded into its various channels. CPPM (Content Protection for Prerecorded Media) A copy protection system used for DVD-Audio files. This unit supports CPPM. CPRM (Content Protection for Recordable Media) CPRM is technology used to protect broadcasts that are allowed to be recorded only once. Such broadcasts can be recorded only with CPRM compatible recorders and discs.
Specifications Recordable discs: DVD-RAM: Ver. 2.0 Ver. 2.1/3X–SPEED DVD-RAM Revision 1.0 Ver. 2.2/5X–SPEED DVD-RAM Revision 2.0 DVD-R: For General Ver. 2.0 For General Ver. 2.0/4X–SPEED DVD-R Revision 1.0 For General Ver. 2.x/8X–SPEED DVD-R Revision 3.0 For General Ver. 2.x/16X–SPEED DVD-R Revision 6.0 For DL Ver. 3.0 For DL Ver. 3.x/4X–SPEED DVD-R for DL Revision 1.0 DVD-RW: Ver. 1.1 Ver. 1.x/2X–SPEED DVD-RW Revision 1.0 Ver. 1.x/4X–SPEED DVD-RW Revision 2.0 Ver. 1.x/6X–SPEED DVD-RW Revision 3.0 +R: Ver.
Limited Warranty (ONLY FOR U.S.A.) Panasonic Puerto Rico, Inc. Ave. 65 de Infantería, Km. 9.5 San Gabriel Industrial Park, Carolina, Puerto Rico 00985 Panasonic DVD Recorder Limited Warranty Limited Warranty Coverage If your product does not work properly because of a defect in materials or workmanship, Panasonic Consumer Electronics Company or Panasonic Puerto Rico, Inc.
Instalación básica • Visite la página inicial de Panasonic para obtener más información acerca de los métodos de conexión. (Sólo está en inglés.) http://www.panasonic.com/consumer_electronics/dvd_recorder/dvd_connection.asp • Antes de hacer la conexión, apague todos los equipos y lea los manuales de instrucciones apropiados. • El equipo periférico y los cables opcionales se venden por separado a menos que se indique lo contrario.
6 7 Pulse [ENTER] para empezar la sintonización automática. A continuación, la unidad procederá con el ajuste automático del reloj. Cuando acabe, aparecerá la hora. Pulse [ENTER]. n Si el reloj va una hora adelantado o retrasado 1 2 3 4 Pulse [SETUP]. Pulse [e,r] para seleccionar “Configuración” y pulse [q]. Pulse [e,r] para seleccionar “Fecha y Hora” y pulse [ENTER]. Pulse [e,r] para seleccionar “Ajustar del huso horario” y pulse [ENTER]. 5 Pulse [e,r] para seleccionar “–1” o “+1” y pulse [ENTER].
Grabación de programas de televisión n Para hacer una pausa en la grabación Pulse [h]. Pulse de nuevo para reiniciar la grabación. También puede pulsar [* REC] para reiniciar. (El título no se divide en títulos separados.) n Para detener la grabación Pulse [g]. • La grabación, desde el principio hasta el final, se denomina título. Durante la grabación Pulse [* REC] para seleccionar el tiempo de grabación.
Reproducción de discos DRIVE SELECT Botones numerados t,y u,i q x1.3 g h TIME SLIP CM SKIP DIRECT NAVIGATOR e,r,w,q ENTER w h, h q SUB MENU RETURN AUDIO 1 CREATE CHAPTER Pulse [DRIVE SELECT] para seleccionar la unidad DVD. Inserte un disco (Ô página 58). 2 3 Pulse [q] (PLAY). RAM -R -R DL -RW(V) +R +R DL +RW -RW(VR) La reproducción se inicia a partir del título grabado más recientemente. DVD-V DVD-A CD VCD La reproducción se inicia desde el principio del disco.
Index Angle. . . . . . . . . . . . . . . . . . . . . . . . . . . . .29 Audio attribute . . . . . . . . . . . . . . . . . . . . . . .29 language . . . . . . . . . . . . . . . . . . . . . .43 receiving, recording . . . . . . . . . . . . . .21 Change Thumbnail . . . . . . . . . . . . . . . . .31 Channel adding, deleting . . . . . . . . . . . . . . . . .15 audio . . . . . . . . . . . . . . . . . . . . . . . . .29 captions . . . . . . . . . . . . . . . . . . . . . . .16 Set Channels Automatically . . . . . . . .