月曜日 午後5時40分 Operating Instructions DVD Recorder Model No. DMR-EZ49VEB IN 2 S VIDEO VIDEO L /MONO AUDIO R Dear customer Thank you for purchasing this product. For optimum performance and safety, please read these instructions carefully. Before connecting, operating or adjusting this product, please read the instructions completely. Please keep this manual for future reference. DVB and the DVB logos are trademarks of the DVB Project.
DMR-EZ49VEB_VQT2J51.book 2 ページ 2009年12月21日 Getting started 月曜日 午後5時40分 Features Convenient Functions! Linked operations with the TV Easy access to various functions You can enjoy linked operations with the TV and receiver by using VIERA Link or Q Link. ≥ Linked Operations with the TV (VIERA Link “HDAVI ControlTM”/Q Link) (> 46) You can access the main function quickly and easily from FUNCTION MENU. ≥ FUNCTION MENU Display (> 45) Select a function and an item.
DMR-EZ49VEB_VQT2J51.book 3 ページ 2009年12月21日 月曜日 午後5時40分 Accessories Please check and identify the supplied accessories. Use numbers indicated in parentheses when asking for replacement parts. (Product numbers correct as of December 2009. These may be subject to change.) ∏ 1 Remote control (N2QAYB000466) ∏ 1 AC mains lead (K2CT2YY00003) ≥For use with this unit only. Do not use it with other equipment. Also, do not use cords for other equipment with this unit.
DMR-EZ49VEB_VQT2J51.book 4 ページ 2009年12月21日 月曜日 午後5時40分 Safety Precautions Placement Set the unit up on an even surface away from direct sunlight, high temperatures, high humidity, and excessive vibration. These conditions can damage the cabinet and other components, thereby shortening the unit’s service life. Do not place heavy items on the unit. Voltage Do not use high voltage power sources. This can overload the unit and cause a fire. Do not use a DC power source.
月曜日 午後5時40分 GUIDE Plus+ system. . . . . . . . . . . . . . . . . . . . . . . . . . . . . 36 Using the GUIDE Plus+ list . . . . . . . . . . . . . . . . . . . . . . . . . . . View advertisement . . . . . . . . . . . . . . . . . . . . . . . . . . . . . . . . . Selecting the programme from the desired programme type or category . . . . . . . . . . . . . . . . . . . . . . . . . . . . . . . . . . . . . . . Searching desired programmes on GUIDE Plus+ list by words. . . . . . . . . . . . . . . . . . . . . . . . .
DMR-EZ49VEB_VQT2J51.book 6 ページ 2009年12月21日 月曜日 午後5時40分 Remote Control Information/Unit Care Remote Control Information About batteries ≥Insert so the poles (i and j) match those in the remote control. Using the remote control Aim at the sensor, avoiding obstacles, up to a maximum range of 7 m directly in front of the unit. Remote control signal sensor R6/LR6, AA ≥Use alkaline or manganese batteries. ≥Do not mix old and new batteries. ≥Do not use different types at the same time.
DMR-EZ49VEB_VQT2J51.book 7 ページ 2009年12月21日 月曜日 午後5時40分 Media Handling Disc Care Inserting/Removing the USB memory Inserting the USB memory Holding a disc Handle discs by the edges to avoid inadvertently scratching or getting oil from your fingers on the disc. Do not touch the signal surface of discs (the shiny side). Cleaning discs Discs are not indestructible and occasionally dirt or condensation may appear.
DMR-EZ49VEB_VQT2J51.book 8 ページ 2009年12月21日 午後5時40分 Location of Parts/Controls Remote Control TV VOL DRIVE SELECT CH AV TRACKING/V-LOCK/PAGE 1 2 3 CH 4 5 6 PROG/CHECK 7 8 9 DELETE INPUT CHAPTER 0 SELECT RESET SLOW/SEARCH SKIP/INDEX REW STOP PAUSE STATUS FF PLAY EXIT OPTION MENU CTION FUN OK RETURN MANUAL SKIP -10s +60s REC TEXT REC MODE EXT LINK DIRECT TV REC STTL DISPLAY TIME SLIP JET REW 8 VQT2J51 1 Turn the unit on or off ..................................................
DMR-EZ49VEB_VQT2J51.book 9 ページ 2009年12月21日 月曜日 午後5時40分 STEP 1 The Unit’s Display 5 Digital broadcast indicator 1 Timer recording indicator .......................... (> 23) On: When a timer recording programme is registered and a recordable disc or video cassette is inserted. Flashes: When the unit cannot record a timer recording programme (e.g., there is no disc or video cassette, etc.). Lights when the unit is receiving digital broadcast.
DMR-EZ49VEB_VQT2J51.book 10 ページ 2009年12月21日 月曜日 午後5時40分 Basic Connection Use of the RF coaxial cable ≥ Keep the RF coaxial cables as far away as possible from other cables. ≥ Do not roll up the RF coaxial cables. Using a fully wired 21-pin Scart cable – You can use a variety of Q Link functions by connecting the unit to a Q Link compatible television (> 46). – You can enjoy high-quality viewing by connecting the unit to an RGB compatible television.
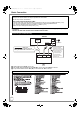
月曜日 午後5時40分 Adding a Digital Satellite Receiver: Connecting to a Television and a Digital Satellite Receiver Digital satellite antenna To the aerial Digital satellite receiver HDMI OUT DISH INPUT RF IN AV/VCR RF OUT STEP 2 DMR-EZ49VEB_VQT2J51.book 11 ページ 2009年12月21日 1 AV/TV This unit 4 HDMI AV OUT AV2 (EXT) 2 RF IN AV1(TV) RF OUT 6 TV 3 5 HDMI IN AV HDMI IN AV The RF coaxial cable cannot be used for showing pictures from the unit.
DMR-EZ49VEB_VQT2J51.book 12 ページ 2009年12月21日 月曜日 午後5時40分 Basic Connection ≥ You can enjoy high-quality picture by adding the HDMI cable connection to the 21-pin Scart cable connection between this unit and your TV. Connecting to a TV with an HDMI (High Definition Multimedia Interface) Cable (not included) When connected to an HDMI compatible unit, an uncompressed digital audio and video signal is transmitted, enabling you to enjoy high quality, digital video and audio with just one cable.
DMR-EZ49VEB_VQT2J51.book 13 ページ 2009年12月21日 月曜日 午後5時40分 Preparation: ≥ Turn on the mains for the television (and connected equipment) and select the appropriate AV input to suit the connections to this unit. ≥ These are the first settings you make upon buying the unit. You don’t need to make these settings again. TV’s remote control to turn the unit on.
DMR-EZ49VEB_VQT2J51.book 14 ページ 2009年12月21日 月曜日 午後5時40分 Setting the Channels and Clock 4 The Owner ID settings screen appears. 1 and press the numbered buttons to enter your choice of a 4digit PIN number. 5 6 OK Owner ID PIN number Name House No. With the unit stopped 2 3, 4 to select “Others”, then 3 3, 4 to select “Setup”, then 4 5 3, 4 to select “Others”, then 1 6 3, 4 to select Automatic “Off”, Postcode RETURN : leave to store the PIN number.
DMR-EZ49VEB_VQT2J51.book 15 ページ 2009年12月21日 月曜日 午後5時40分 Disc Handling Disc type DVD-RAM DVD-R DVD-R DL Logo Data that can be recorded and played Rewritable Play on other players§1 Recording 16:9 aspect picture§2 Video Still picture ≤ ≤ ≤ Video Video – – ≤ Copy-once recording (CPRM) (> 27) ≤ CPRM (> 92) [RAM] compatible discs only.
DMR-EZ49VEB_VQT2J51.book 16 ページ 2009年12月21日 月曜日 午後5時40分 Disc Handling Play-only Discs Disc type Logo DVD-Video DVD-RW (DVD Video Recording format) Standard symbol [DVD-V] [-RW‹VR›] Uses High quality movie and music discs DVD-RW§ video recorded on another DVD recorder ≥You can play programmes that allow One time only recording if they have been recorded onto a CPRM compatible disc. ≥By formatting (> 64) the disc, you can record onto it in DVD-Video format.
DMR-EZ49VEB_VQT2J51.book 17 ページ 2009年12月21日 月曜日 午後5時40分 USB Memory Handling USB memories you can use on this unit Compatible USB memories Format Standard symbol USB memories which are defined as USB mass storage class, and digital cameras that use PTP protocol: – USB memories that support USB 1.0/1.1 and USB 2.0 Full Speed/High Speed. ≥USB memories of up to 128 GB can be used. ≥USB memories that support bulk only transfer. CBI (Control/Bulk/Interrupt) is not supported.
DMR-EZ49VEB_VQT2J51.book 18 ページ 2009年12月21日 月曜日 午後5時40分 Music files and Still Pictures (JPEG) MP3 File Information Playable media [-R] [-R]DL] [CD] [USB] File format MP3 ≥Files must have the extension “.mp3” or “.MP3”.
DMR-EZ49VEB_VQT2J51.book 19 ページ 2009年12月21日 午後5時40分 Watching Television Refer to “GUIDE Plus+ system” (> 36) for detail information. This DVD recorder has a tuner which allows it to directly receive and record digital terrestrial channels. Preparation: ≥ Turn on the television and select the appropriate video input to suit the connections to this unit. Important: This unit does not have an analogue broadcast tuner.
DMR-EZ49VEB_VQT2J51.book 20 ページ 2009年12月21日 月曜日 午後5時40分 Playback Preparation: ≥ Turn on the television and select the appropriate video input to suit the connections to this unit. Playing play-only discs Refer to “Advanced Disc Playback” (> 38 to 39) for detailed information on playback of discs. [RAM] [-R] [-R]DL] [-RW‹V›] [+R] [+R]DL] [+RW] [DVD-V] [-RW‹VR›] [VCD] [CD] 1 to turn the unit on. 2 e.g. DRIVE SELECT to select the DVD drive.
DMR-EZ49VEB_VQT2J51.book 21 ページ 2009年12月21日 月曜日 午後5時40分 Notes Playing a Video Cassette Refer to “Advanced Video Cassette Playback” (> 40 to 41) for detailed information on playback of video cassette. [VHS] 1 2 DRIVE SELECT to turn the unit on. ≥Tapes are automatically rewound once they reach the end (except during Timer recording, fast forwarding, etc.). ≥You may have to adjust the tracking for tapes recorded on other VCRs (> 41).
DMR-EZ49VEB_VQT2J51.book 22 ページ 2009年12月21日 月曜日 午後5時40分 Recording Television Programmes Refer to “Notes for Recording” (> 27) and “Advanced Recording” (> 28– 30) for detail information on recording. [RAM] [-R] [-R]DL] [-RW‹V›] [+R] [+R]DL] [+RW] [VHS] Preparation: ≥ Turn on the television and select the appropriate video input to suit the connections to this unit. ≥ [RAM] If the disc is protected, release protection (> 64). ≥ [VHS] Ensure accidental erasure tab is intact.
DMR-EZ49VEB_VQT2J51.book 23 ページ 2009年12月21日 月曜日 午後5時40分 Timer Recording What is FREEVIEWTM? FREEVIEW is the function that enables timer recordings to be controlled by the signal sent from the broadcaster. “Guide Link” is available. “Guide Link” – If you set a timer recording from the TV Guide, the recording’s start and stop times can be controlled by the broadcaster, e.g. delayed start. This is indicated by “Guide Link” in the Timer Recording screen in step 2 (> below).
DMR-EZ49VEB_VQT2J51.book 24 ページ 2009年12月21日 月曜日 午後5時40分 Copying Titles (One Touch Copy) Refer to “Copying Titles or Playlists” (> 57 to 59) for detail information on copying. Copying Titles (VHS J DVD) Programmes are automatically copied onto the disc from the location of playback at the time when the copying of the tape starts.
DMR-EZ49VEB_VQT2J51.book 25 ページ 2009年12月21日 月曜日 午後5時40分 Copying Titles or Playlists (DVD J VHS) All titles on the disc are automatically copied onto the tape. [RAM] [-R] [-R]DL] [-RW‹V›] [-RW‹VR›] [+R] [+R]DL] [+RW] > [VHS] Preparation: ≥ Turn on the television and select the appropriate video input to suit the connections to this unit. ≥ [VHS] Ensure accidental erasure tab is intact. ≥ Insert a video cassette with enough space for recording. Stop the tape at the point where you want to start copying to.
DMR-EZ49VEB_VQT2J51.book 26 ページ 2009年12月21日 月曜日 午後5時40分 Deleting Titles Preparation: ≥ Turn on the television and select the appropriate video input to suit the connections to this unit. ≥ [RAM] If the disc is protected, release protection (> 64). ≥ Insert the disc containing the programme to be deleted. Important: Once deleted, contents cannot be recovered.
DMR-EZ49VEB_VQT2J51.book 27 ページ 2009年12月21日 Advanc ed Featur es 月曜日 午後5時40分 Notes for Recording Broadcast in multi-channel sound: Selecting audio for recording About the aspect when recording a programme You can select audio language when received audio in multichannel broadcast (“Multi Audio” appears at the bottom of digital channel information display). However, audio cannot be switched after recording.
DMR-EZ49VEB_VQT2J51.book 28 ページ 2009年12月21日 月曜日 午後5時40分 Advanced Recording DVD Recording Modes and Durations Depending on the content being recorded, the recording times may become shorter than indicated. (The times provided on this table are an estimate.) Single-sided (4.7 GB) Doublesided§1 (9.4 GB) DVD-R DVD-RW +R +RW (4.
DMR-EZ49VEB_VQT2J51.book 29 ページ 2009年12月21日 月曜日 午後5時40分 When the format confirmation screen is displayed Formatting is the process of making media such as DVDRAM recordable on recording equipment. Important: Formatting permanently deletes all disc contents (including the contents that have been recorded on a PC), regardless of protection status of disc. During recording On the main unit only repeatedly until the desired time is reached.
DMR-EZ49VEB_VQT2J51.book 30 ページ 2009年12月21日 月曜日 午後5時40分 Advanced Recording Flexible Recording Playing while you are recording [RAM] [-R] [-R]DL] [-RW‹V›] [+R] [+R]DL] [+RW] The unit sets the best possible picture quality that fits the programme within the remaining disc space. The recording mode becomes FR mode. Refer to “FR (Flexible recording mode)” (> 28). Preparation: ≥ Select the channel or the external input to record. ≥ Press [DRIVE SELECT] to select the DVD drive.
DMR-EZ49VEB_VQT2J51.book 31 ページ 2009年12月21日 月曜日 午後5時40分 Recording from a Digital Satellite Receiver [RAM] [-R] [-R]DL] [-RW‹V›] [+R] [+R]DL] [+RW] [VHS] Manual Recording Preparation: ≥ [RAM] If the disc is protected, release protection (> 64). ≥ [VHS] Ensure accidental erasure tab is intact. ≥ Connect a digital satellite receiver to this unit’s AV2 input terminals (> 11). ≥ Set the “AV2 Input” to match the connected equipment in the Setup menu (> 71).
DMR-EZ49VEB_VQT2J51.book 32 ページ 2009年12月21日 月曜日 午後5時40分 Recording from an External Device [RAM] [-R] [-R]DL] [-RW‹V›] [+R] [+R]DL] [+RW] [VHS] ≥Turn off the unit and other video equipment before connecting. ≥Refer to “Adding a VCR: Connecting to a Television and a Video Cassette Recorder” when connecting to the AV2 input terminals on the rear panel. (> 75) IN 2 S VIDEO VIDEO [RAM] [-R] [-R]DL] [-RW‹V›] [+R] [+R]DL] [+RW] Perform steps 1 - 3 (> left).
DMR-EZ49VEB_VQT2J51.book 33 ページ 2009年12月21日 月曜日 午後5時40分 Advanced Timer Recording [RAM] [-R] [-R]DL] [-RW‹V›] [+R] [+R]DL] [+RW] [VHS] 4 Manual timer recordings OK – The timer icon is displayed in the left column. Preparation: ≥ Turn on the television and select the appropriate video input to suit the connections to this unit. ≥ [RAM] If the disc is protected, release protection (> 64). ≥ [VHS] Ensure accidental erasure tab is intact.
DMR-EZ49VEB_VQT2J51.book 34 ページ 2009年12月21日 月曜日 午後5時40分 Advanced Timer Recording If the “Overlapped Timer Recording” screen appears 2a If you set a timer recording that will overlap with other timer recordings using the GUIDE Plus+ system, the “Overlapped Timer Recording” screen appears to help you eliminate the overlapping. Follow the on-screen instructions. 2b The timer recording list can be viewed even when the unit is off. 1 2c then 3, 4 to select the programme.
VQT2J51-Body1.fm 35 ページ 2009年12月22日 火曜日 午後8時14分 Making timer recordings on the television [RAM] [-R] [-R]DL] [-RW‹V›] [+R] [+R]DL] [+RW] To make a timer recording with your television, connect to a television with a Q Link function (> 46) that you can use for setting timer recordings using a fully wired 21-pin Scart cable (> 10,11). 1 2 Make timer programming on the TV. to turn the unit off. – The start and end of recording is controlled by TV. Tips To stop recording Press [∫].
DMR-EZ49VEB_VQT2J51.book 36 ページ 2009年12月21日 月曜日 午後5時40分 GUIDE Plus+ system What is the GUIDE Plus+ system? The GUIDE Plus+ system gives you an overview of digital television and radio programmes up to 7 days in advance. For many of these programmes, you can select additional information provided by the stations. You can search the programme preview according to various topics such as sport, films etc., according to categories such as TV or radio.
DMR-EZ49VEB_VQT2J51.book 37 ページ 2009年12月21日 月曜日 午後5時40分 Selecting the programme from the desired programme type or category This function lets you display a GUIDE Plus+ list sorted by programme type (e.g. Movie, Sport) or category (e.g. Free Channels, Radio). 1 By entering words, you can search for programmes from the GUIDE Plus+ list using the programme information. 1 GUIDE 2 Type to display the list of programme type.
DMR-EZ49VEB_VQT2J51.book 38 ページ 2009年12月21日 月曜日 午後5時40分 Advanced Disc Playback Selecting Titles to Play Search You can easily select and play recorded programmes by using DIRECT NAVIGATOR. [RAM] [-R] [-R]DL] [-RW‹V›] [+R] [+R]DL] [+RW] [-RW‹VR›] DIRECT NAVIGATOR Title View DVD-RAM DIRECT NAVIGAT OR 1 07 BBC 1 10/10 FRI BBC 1 11/10 SAT -- -- Previous PICTURE -- 08 OK VIDEO Tips Depending on the disc, search may not be possible.
DMR-EZ49VEB_VQT2J51.book 39 ページ 2009年12月21日 月曜日 午後5時40分 Slow-motion Play Manual Skip [RAM] [-R] [-R]DL] [-RW‹V›] [+R] [+R]DL] [+RW] [DVD-V] [-RW‹VR›] [VCD] [RAM] [-R] [-R]DL] [-RW‹V›] [+R] [+R]DL] (This function does not work with finalised discs.) [+RW] [-RW‹VR›] 1-minute skip function: Skips approx. 1 minute forward with each press. While paused or – There are 5 slow-motion speeds. Each press increases the speed. – Press [1] (PLAY) to restart normal playback.
DMR-EZ49VEB_VQT2J51.book 40 ページ 2009年12月21日 月曜日 午後5時40分 Advanced Video Cassette Playback Fast-forward/Rewind While stopped to fast-forward the tape. to rewind the tape. VHS Index Search System (VISS) The unit automatically records special index signals on a tape every time a recording is started (via [¥ REC], or a timer recording). The index search function makes use of these index signals to help you find the beginning of a desired programme quickly and easily.
DMR-EZ49VEB_VQT2J51.book 41 ページ 2009年12月21日 月曜日 午後5時40分 Adjusting the Playback Picture On-screen Display Indicators Manual Tracking STATUS to display on-screen indicators. The unit usually makes tracking adjustments automatically, but you may need to do it manually if noise appears on a tape recorded on other equipment. VHS During playback CH or LR SP CH Press and hold until the picture noise disappears. 0:00.22 To return to auto tracking: CH (simultaneously).
DMR-EZ49VEB_VQT2J51.book 42 ページ 2009年12月21日 月曜日 午後5時40分 Playing Music files and Still Pictures (JPEG) Showing the menu screen Playing music files [-R] [-R]DL] [CD] [USB] You can play MP3 files recorded with a computer onto a DVD-R, DVD-R DL, CD-R/CD-RW and USB memory. (> 18) ≥ You cannot play MP3 files on the USB memory while recording or copying. [-R] [-R]DL] [CD] 1 2 Insert the disc. If the menu screen appears 3, 4 to select the item, then Playback OK Show MP3 Menu screen. 1 e.g.
DMR-EZ49VEB_VQT2J51.book 43 ページ 2009年12月21日 月曜日 午後5時40分 Playing still pictures Start Slideshow [RAM] [-R] [-R]DL] [CD] [USB] For more information on still picture files that can be played on this unit (> 18) Show Album View screen. 1 [-R] [-R]DL] [CD] [USB] (> 42, Showing the menu screen) [RAM] While stopped 1 Press [DRIVE SELECT] to select the drive. 2 Press [DIRECT NAVIGATOR]. When “PICTURE” is not selected, press the “Green” button to select “PICTURE”.
DMR-EZ49VEB_VQT2J51.book 44 ページ 2009年12月21日 月曜日 午後5時40分 Playing Music files and Still Pictures (JPEG) Picture Settings Zoom Picture Settings Please set the following functions. Display Interval Normal Repeat Play On Random Off 1 While playing a picture 2 To zoom in: OPTION Cancel Set Set SELECT RETURN Display Interval: Selects the desired interval. (“Normal”, “Long” or “Short”) The display interval may vary depending on the picture data size.
DMR-EZ49VEB_VQT2J51.book 45 ページ 2009年12月21日 月曜日 午後5時40分 Convenient Functions FUNCTION MENU Display By using the FUNCTION MENU you may access the main functions quickly and easily. ≥ If “FUNCTION MENU Display” is set to “On” in the Setup menu, FUNCTION MENU automatically appears when you turn the power on. (> 69) 1 With the unit stopped ≥ Playlists (> 53) ≥ Flexible Rec (> 30) ≥ DVD Management (> 64)≥ Setup (> 66) Drive Select Change which drive is used.
DMR-EZ49VEB_VQT2J51.book 46 ページ 2009年12月21日 月曜日 午後5時40分 Linked Operations with the TV (VIERA Link “HDAVI ControlTM”/Q Link) You can enjoy linked operations with the TV and receiver by using “VIERA Link” or Q Link. (When the TV is on) Easy playback [VIERA]Link] [Q]Link] What is VIERA Link “HDAVI Control”? [VIERA]Link] VIERA Link “HDAVI Control” is a convenient function that offers linked operations of this unit, and a Panasonic TV (VIERA) or receiver under “HDAVI Control”.
DMR-EZ49VEB_VQT2J51.book 47 ページ 2009年12月21日 月曜日 午後5時40分 Easy control only with VIERA remote control Using the Control Panel If you connect this unit to the TV that supports “HDAVI Control 2” or later with an HDMI cable, you can enjoy using more convenient functions. You can operate this unit using buttons on the TV remote control. The buttons that you can use for this unit vary depending on the TV. For details, refer to the operating instructions of the TV.
DMR-EZ49VEB_VQT2J51.book 48 ページ 2009年12月21日 月曜日 午後5時40分 Information Messages Listening to the Audio Description Digital Channel Information You can display the information about programmes (programme name, broadcast time, etc.). With the unit stopped STATUS to show the screen information. When the digital channel information is being displayed – Press [STATUS ] again and detailed information will be displayed (only when “info ” is displayed).
DMR-EZ49VEB_VQT2J51.book 49 ページ 2009年12月21日 月曜日 午後5時40分 Entering Text Changing the Category You can select one of your favourite channels by changing the category [such as Free Channels, Radio and Registered Favourites (> 66)]. When digital channel information is displayed to change the category. (Blue) You can give names to recorded titles, etc. Also, you can search for desired programmes on GUIDE Plus+ list by entering key words or the programme name.
DMR-EZ49VEB_VQT2J51.book 50 ページ 2009年12月21日 Advanc ed Editing 月曜日 午後5時40分 Titles—Editing [RAM] [-R] [-R]DL] [-RW‹V›] [+R] [+R]DL] (You can not edit finalised discs.) [+RW] [-RW‹VR›] You can edit titles on the DIRECT NAVIGATOR screen: deleting unwanted parts of titles such as commercials, changing Thumbnail, dividing and deleting titles, etc.
VQT2J51-Body1.fm 51 ページ 2009年12月21日 月曜日 午後4時53分 Set up Protection/Cancel Protection Change Thumbnail [RAM] [+R] [+R]DL] [+RW] Use to prevent accidental erasure of titles. [RAM] [-R] [-R]DL] [-RW‹V›] [+R] [+R]DL] [+RW] Changes the thumbnail picture shown in the Title View screen. Perform steps 1 – 4 of “Accessing the Title View” (> 50). 5 Press [3, 4] to select “Edit”, then press [OK]. 6 Press [3, 4] to select “Set up Protection” or “Cancel Protection”, then press [OK].
DMR-EZ49VEB_VQT2J51.book 52 ページ 2009年12月21日 月曜日 午後5時40分 Chapters—Creating and Editing [RAM] When creating chapters in your favourite scenes, you can easily reach the head of scene using [:, 9] (SKIP) or play on Chapter View. Tips ≥ Chapter Each section between the division points becomes a chapter. Title Chapter Chapter Chapter Chapter ≥ [RAM]: You can change the order of chapters and create a playlist (> 53).
DMR-EZ49VEB_VQT2J51.book 53 ページ 2009年12月21日 月曜日 午後5時40分 Creating, Editing and Playing Playlists [RAM] [-RW‹VR›] (play only) You can create playlists by grouping your favourite scenes (chapters) from the recorded titles and edit the created playlists. Tips [RAM] A playlist is a compilation of your favourite chapters as shown in the chart below. Title Title Chapter Chapter Playlist Chapter Chapter Chapter Chapter Chapter ≥Editing playlists doesn’t modify titles.
DMR-EZ49VEB_VQT2J51.book 54 ページ 2009年12月21日 月曜日 午後5時40分 Creating, Editing and Playing Playlists Chapter Operations Edit [RAM] You can create and copy playlists, and change the thumbnail. Add Chapter 1 Press [3, 4] to select “Add Chapter”, then press [OK]. (> 53, Creating Playlists) Perform steps 1 – 4c of “Accessing the Playlist View” (> 53). 5 Press [3, 4] to select “Edit”, then press [OK]. 6 Press [3, 4] to select desired operation from the menu displayed location, then press [OK] (> below).
DMR-EZ49VEB_VQT2J51.book 55 ページ 2009年12月21日 月曜日 午後5時40分 Still Pictures—Editing Accessing the Album (still picture)/Picture View Notes [RAM] You can edit pictures and albums. Preparation: ≥ Press [DRIVE SELECT] to select the DVD drive. ≥ Release protection (> 64, Setting Protection) 1 Press [DIRECT NAVIGATOR]. When “PICTURE” is not selected, press the “Green” button to select “PICTURE”. Editing an album: 2 Press [3, 4, 2, 1] to select the album.
DMR-EZ49VEB_VQT2J51.book 56 ページ 2009年12月21日 月曜日 午後5時40分 Still Pictures—Editing Set up Protection/Cancel Protection [RAM] Set protection to prevent pictures from being accidentally deleted. Perform steps 1 – 3 of “Accessing the Album (still picture)/ Picture View” (> 55). ≥ When editing an album, press [3, 4] to select “Edit Album”, then press [OK] after step 3. 4 Press [3, 4] to select “Set up Protection” or “Cancel Protection”, then press [OK]. 5 Press [2] to select “Yes”, then press [OK].
DMR-EZ49VEB_VQT2J51.book 57 ページ 2009年12月21日 月曜日 午後5時40分 Copying Titles or Playlists Preparation: ≥ Insert a disc and video cassette that you can use for copying (> 7). ≥ Confirm that there is enough remaining disc or tape space. ≥ When copying an NTSC tape to a DVD, change the “TV System” to “NTSC” in the Setup Menu (> 70). This unit cannot record NTSC signals to discs that already have PAL signal recordings.
DMR-EZ49VEB_VQT2J51.book 58 ページ 2009年12月21日 月曜日 午後5時40分 Copying Titles or Playlists Copying Titles or Playlists (DVD > VHS) [RAM] [-RW‹VR›] [+RW] > [VHS] 1 Press [FUNCTION MENU]. 2 Press [3, 4] to select “Copy”, then press [OK]. 3 Press [3, 4] to select “Advanced Copy”, then press [OK]. 7 Press [3, 4] to select “Start Copying”, then press [OK]. 8 Press [2] to select “Yes”, then press [OK] to start copying. Edit the copying list Select the item in step 6–5 (> left) Press [OPTION].
DMR-EZ49VEB_VQT2J51.book 59 ページ 2009年12月21日 月曜日 午後5時40分 Copying list icons and functions The following icons give more information about copy restrictions of the title. – Setting the unit to copy according to the set time 3 Press [3, 4] to select “On”, then press [OK]. 4 Press [3, 4] to select “Copy Time”, then press [OK].
DMR-EZ49VEB_VQT2J51.book 60 ページ 2009年12月21日 月曜日 午後5時40分 Copying Still Pictures [RAM] > [RAM] After performing steps 1–3 (> 58, Copying Titles or Playlists (DVD > VHS)) 1 Set “Source” and “Destination” to “DVD”. (> step 4) Edit the copying list Select the item in step 4–4 (for a still picture) (> left) or 4–6 (for a folder) (> left) Delete All Press [OPTION]. [USB] > [RAM] 1 While stopped Insert the USB memory (> 7). The menu is automatically displayed.
DMR-EZ49VEB_VQT2J51.book 61 ページ 2009年12月21日 月曜日 午後5時40分 Tips To stop copying Press and hold [RETURN ] for 3 seconds. To return to the previous screen Press [RETURN ]. To view other pages Press [3, 4, 2, 1] to select “Previous” or “Next”, then press [OK]. – You can also press [:, 9] to view other pages. To select another folder After performing step 4–2 (> 60, To register individual still pictures) 1 Press [3, 4, 2, 1] to select “Folder”, then press [OK].
DMR-EZ49VEB_VQT2J51.book 62 ページ 2009年12月21日 Setting Menus 月曜日 午後5時40分 Setting On-Screen Display Accessing the On-Screen Display When playing discs (except for JPEG discs), you can display and set the options including disc audio, subtitle, image quality, sound effect, Repeat Play, etc. In addition, when receiving the multi-audio broadcast, you can change the audio settings. Menu options will differ based on disc type and contents. 1 Press [DISPLAY].
DMR-EZ49VEB_VQT2J51.book 63 ページ 2009年12月21日 月曜日 午後5時40分 Play Menu [RAM] [-R] [-R]DL] [-RW‹V›] [+R] [+R]DL] [+RW] [DVD-V] [-RW‹VR›] [CD] [VCD] Repeat Play This function works only when the elapsed play time is displayed. Select the item for repeat play. Depending on the disc, the items that can be selected will differ. Select “Off” to cancel.
DMR-EZ49VEB_VQT2J51.book 64 ページ 2009年12月21日 月曜日 午後5時40分 DVD Management You can manage discs through formatting, finalising and other operations. Accessing the Management Menus Preparation: ≥ [RAM] Release protection (> below, “Setting Protection”). ≥ Insert a disc. With the unit stopped 1 Press [DRIVE SELECT] to select the DVD drive. 2 Press [FUNCTION MENU]. 3 Press [3, 4] to select “Others”, then press [OK].
DMR-EZ49VEB_VQT2J51.book 65 ページ 2009年12月21日 月曜日 午後5時40分 Finalising [-R] [-R]DL] [-RW‹V›] [+R] [+R]DL] You can play these discs on compatible DVD players by finalising it on the unit, effectively making it into DVD-Video that complies with DVD-Video standards. The menu you create with the unit can also be used on most DVD players. Perform preparation steps 1–4 of “Accessing the Management Menus” (> 64). 5 Press [3, 4] to select “Finalise”, then press [OK]. 6 Press [2] to select “Yes”, then press [OK].
DMR-EZ49VEB_VQT2J51.book 66 ページ 2009年12月21日 月曜日 午後5時40分 Channel Settings Setup Menu You can change the unit’s settings using Setup menu. With the unit stopped 1 Press [FUNCTION MENU]. 2 Press [3, 4] to select “Others” and press [OK].
DMR-EZ49VEB_VQT2J51.book 67 ページ 2009年12月21日 月曜日 午後5時40分 Signal Condition DVB Auto Setup by Signal Quality DVB Auto Setup by Region You can check the quality and strength of digital broadcast signals. You can restart auto channel setting for digital terrestrial channels if the setup (> 13) fails for some reason. If you want to set the channel list best suited to your region, select “DVB Auto Setup by Region”. Follow the on-screen instructions to select the region you live in.
DMR-EZ49VEB_VQT2J51.book 68 ページ 2009年12月21日 月曜日 午後5時40分 Playback/Recording and Picture Settings ON MENU NCT FU > Others > Setup Settings for Recording ≥Press [OK] to show the following settings. Recording time in EP mode (> 66, Accessing the Setup Menu) All factory default settings are indicated with “Underlined” text. Select the maximum number of hours for recording in EP mode. [EP ( 6 hours )] You can record for 6 hours on an unused 4.7 GB disc. You can record for 8 hours on an unused 4.
DMR-EZ49VEB_VQT2J51.book 69 ページ 2009年12月21日 月曜日 午後5時40分 Sound and Display Settings ON MENU NCT FU > Others > Audio Mode for XP Recording Setup Choose the audio type when recording or copying with XP mode. [Dolby Digital] (> 92) [LPCM] (> 92) ≥The picture quality of LPCM recordings may be lower than that of normal XP mode recordings. ≥The audio recording becomes Dolby Digital even if you selected LPCM when using a recording mode other than XP.
DMR-EZ49VEB_VQT2J51.book 70 ページ 2009年12月21日 月曜日 午後5時40分 Connection Settings ON MENU NCT FU > Others > Setup Connection 3, 4 select “Connection” > 1 > 3, 4 select item > OK Tuning Disc Picture Sound Display Connection VHS Others ≥Press [OK] to show the following settings. HDMI Video Format§2 (> 66, Accessing the Setup Menu) All factory default settings are indicated with “Underlined” text.
DMR-EZ49VEB_VQT2J51.book 71 ページ 2009年12月21日 月曜日 午後5時40分 VHS Settings Set according to the terminal of the connected TV. [Video] Select when a TV that can receive a composite signal is connected. [RGB 1] Select when a TV that can receive an RGB signal is connected. If you always would like to view the picture from the unit in RGB signal, select this mode. The TV screen will automatically switch to display the picture from the unit when the unit is turned on.
DMR-EZ49VEB_VQT2J51.book 72 ページ 2009年12月21日 月曜日 午後5時40分 System Settings ON MENU NCT FU > Others > Setup Standby Settings ≥Press [OK] to show the following settings. Power Save in Standby [On] It will go into the Power Save in Standby mode when the unit is in standby mode. [On Timer] (> 66, Accessing the Setup Menu) All factory default settings are indicated with “Underlined” text. “Power Save in Standby” is set to activate during the setting time period.
DMR-EZ49VEB_VQT2J51.book 73 ページ 2009年12月21日 月曜日 午後5時40分 System Update In order to update this unit, the TV Guide download, and support system changes made by broadcasts, this unit periodically performs software updates. ≥Press [OK] to show the following settings. ≥Update data and TV Guide download information are sent by an unscheduled digital broadcast. In order to receive these updates, you must be able to receive digital broadcasts. ≥An update will take approximately 60 minutes.
DMR-EZ49VEB_VQT2J51.book 74 ページ 2009年12月21日 Other Setting s 月曜日 午後5時40分 Other Settings Child Lock The Child Lock deactivates all buttons on the unit and remote control. Use it to prevent other people from operating the unit. Press and hold [OK] and [RETURN ] at the same time until “X HOLD” appears on the unit’s display. If you press a button while the Child Lock is on, “X HOLD” appears on the unit’s display and operation is impossible.
DMR-EZ49VEB_VQT2J51.book 75 ページ 2009年12月21日 Refere nce 月曜日 午後5時40分 Additional Connections Using a fully wired 21-pin Scart cable – You can use a variety of Q Link functions by connecting the unit to a Q Link compatible television (> 46). – You can enjoy high-quality viewing by connecting the unit to an RGB compatible television. “AV1 Output” in the Setup menu is set to “RGB 1” or “RGB 2” (> 71). Make “AV2 Input” settings in the Setup menu (> 71).
DMR-EZ49VEB_VQT2J51.book 76 ページ 2009年12月21日 月曜日 午後5時40分 Additional Connections Connecting to a Television with Audio/ Video Cable (not included) ≥ You can connect this unit to a TV using the audio/video (AV) cable, instead of the HDMI cable or 21-pin Scart cable (> 10, 11, 75). ≥ Using a Scart or HDMI cable gives a higher quality picture than this connection. ≥ Connect to terminals of the same colour.
DMR-EZ49VEB_VQT2J51.book 77 ページ 2009年12月21日 月曜日 午後5時40分 Connecting with an HDMI (High Definition Multimedia Interface) Terminal When connected to an HDMI compatible unit, an uncompressed digital audio and video signal is transmitted, enabling you to enjoy high quality, digital video and audio with just one cable. When connecting to an HDMI-compatible HDTV (High Definition Television), the output can be switched to 1080p, 1080i or 720p HD video.
DMR-EZ49VEB_VQT2J51.book 78 ページ 2009年12月21日 月曜日 午後5時40分 Frequently Asked Questions Setup DVB-T How can I enjoy High Quality Video up-converted to 1080p? Which aerial is suitable for receiving digital terrestrial broadcasts? ¾ Connect the unit to 1080p compatible HDTV using an HDMI cable. Set “HDMI Video Format” in the Setup menu to “1080p”. (> 12, 70) ¾ Any (terrestrial) roof aerial can be used. However, depending on the area where you live, a new aerial may be necessary.
DMR-EZ49VEB_VQT2J51.book 79 ページ 2009年12月21日 月曜日 午後5時40分 Recording Can I record from a commercially purchased video cassette or DVD? ¾ Most commercially sold video cassettes and DVDs are copy protected; therefore, recording is usually not possible. Can DVD-R, DVD-R DL, DVD-RW (DVD-Video format), +R, +R DL, and +RW recorded on the unit be played on other equipment? ¾ You can play these discs on compatible equipment such as DVD players after finalising the disc on this unit.
DMR-EZ49VEB_VQT2J51.book 80 ページ 2009年12月21日 月曜日 午後5時40分 Messages On the Unit’s Display H∑∑, F∑∑ (“∑” stands for a service number.) ≥ An error has occurred. The number following “H” or “F” depends on the status of the unit. Check the items below and in the Troubleshooting Guide. If the service number still does not disappear after the check, reset the unit (> 82, To restore the unit if it freezes). ≥ If the service numbers fail to clear, note the service numbers and contact a qualified service person.
DMR-EZ49VEB_VQT2J51.book 81 ページ 2009年12月21日 月曜日 午後5時40分 On the Unit’s Display (Continued) F74 ≥ The HDMI connection could not be authenticated due to a transfer malfunction. If you have another HDMI cable, try to use it. If it remains displayed, consult the dealer where the unit was purchased. F75 ≥ The HDMI connection could not be authenticated due to an internal data malfunction. If you have another HDMI cable, try to use it. If it remains displayed, consult the dealer where the unit was purchased.
DMR-EZ49VEB_VQT2J51.book 82 ページ 2009年12月21日 月曜日 午後5時40分 Troubleshooting Guide When Other Panasonic Products Respond to this Remote Control To Reset This Unit Use this function to synchronize the codes for the remote control and the main unit when there are other Panasonic products close to your unit. With the unit stopped 1 Press [FUNCTION MENU]. 2 Press [3, 4] to select “Others”, then press [OK]. 3 Press [3, 4] to select “Setup”, then press [OK]. 4 Press [3, 4] to select “Others”, then press [1].
DMR-EZ49VEB_VQT2J51.book 83 ページ 2009年12月21日 月曜日 午後5時40分 Before requesting service, make the following checks. If you are in doubt about some of the check points, or if the solutions indicated in the chart do not solve the problem, consult your dealer for instructions. The following does not indicate a problem with the unit: ≥ Regular disc/video cassette rotating sound. ≥ Poor reception due to atmospheric conditions. ≥ Image disturbance during search.
DMR-EZ49VEB_VQT2J51.book 84 ページ 2009年12月21日 月曜日 午後5時40分 Troubleshooting Guide General Issues: Operation Cannot operate the TV with unit’s remote control. ¾ Change the manufacturer code on the remote control. (> 74) ¾ It may be necessary to set the code on the remote control again after changing the batteries. (> 82) Cannot operate the DVD. ¾ Press [DRIVE SELECT] to select the DVD drive when operating DVDs or CDs. (> 20) Cannot operate the VHS.
DMR-EZ49VEB_VQT2J51.book 85 ページ 2009年12月21日 General Issues: 月曜日 午後5時40分 DVB-T The digital channel information does not appear. ¾ Check the connections. (> 10, 11, 75) ¾ Digital broadcast may not have started in your region yet. ¾ Perform “DVB Auto Setup by Signal Quality” in the Setup menu. (> 67) ¾ Select the length of time (3–10 sec.) in the “On-Screen Messages” in the Setup menu. (> 69) ¾ The digital channel information will not appear during playback or recording.
DMR-EZ49VEB_VQT2J51.book 86 ページ 2009年12月21日 月曜日 午後5時40分 Troubleshooting Guide General Issues: USB The contents of the USB memory cannot be read. ¾ Remove the USB memory from the USB port and then insert again. If this does not solve the problem, turn off and turn on the unit again. ¾ Check that the USB memory is inserted correctly. (> 7) ¾ The format of the USB memory or of its contents is not compatible with the unit. (The contents on the USB memory may be damaged.
DMR-EZ49VEB_VQT2J51.book 87 ページ 2009年12月21日 Playback Issues: 月曜日 午後5時40分 Sound DVD-Video is not played. No sound. Low volume. Distorted sound. Cannot hear the desired audio type. ¾ Ensure the DVD-Video region number for the disc is correct, and the disc is not defective. (> Cover) ¾ You have set a ratings level to limit DVD-Video play. Change this setting. (> 68) ¾ Check the connections and the “Digital Audio Output” settings. Check the input mode on the amplifier if you have connected one.
DMR-EZ49VEB_VQT2J51.book 88 ページ 2009年12月21日 月曜日 午後5時40分 Troubleshooting Guide Playback Issues: Music ID3 tag of a MP3 file is not completely displayed. ¾ Only the track name ([USB]) can be displayed with this unit. Playback Issues: Still Pictures Cannot display DIRECT NAVIGATOR screen. ¾ This screen cannot be displayed during recording or copy or while the unit is standing by for linked timer recording with external equipment. Still pictures (JPEG) do not playback normally.
DMR-EZ49VEB_VQT2J51.book 89 ページ 2009年12月21日 月曜日 午後5時40分 Part or all of a recorded title has been lost. ¾ If the power shuts down or the AC mains lead is disconnected from the household mains socket while recording or editing, the title may be lost or the disc may become unusable. We cannot offer any guarantee regarding lost titles or discs. You will have to format the disc ([RAM] [-RW‹V›] [+RW]) or use a new disc. (> 64) Cannot copy VHS to DVD.
DMR-EZ49VEB_VQT2J51.book 90 ページ 2009年12月21日 月曜日 午後5時40分 Troubleshooting Guide Editing Issues: DVD Cannot format. ¾ The disc is dirty. Wipe with a damp cloth and then wipe dry. (> 7) ¾ Disc may be defective or of poor quality. ¾ You tried formatting a disc that is not compatible with the unit. (> 15, 16, 64) Cannot create chapters. Cannot mark the start point or the end point during “Partial Delete” operation.
DMR-EZ49VEB_VQT2J51.book 91 ページ 2009年12月21日 月曜日 午後5時40分 Specifications Power supply: AC 220 V to 240 V, 50 Hz Power consumption: Approx. 34 W Standby mode: (“Power Save in Standby” is activated and “RF OUT ( Aerial Signal )” is set to “Off”) Approx. 0.5 W (“Power Save in Standby” is not activated) Approx. 14 W VHS Recordable discs: DVD-RAM: 2X SPEED (Ver. 2.0), 2–3X SPEED (Ver. 2.1) 2–5X SPEED (Ver. 2.2) DVD-R (SL): 1X SPEED (Ver. 2.0), 1–4X SPEED (Ver. 2.0) 1–8X SPEED (Ver. 2.
DMR-EZ49VEB_VQT2J51.book 92 ページ 2009年12月21日 月曜日 午後5時40分 Glossary Bitstream This is a signal compressed and converted into digital form. It is converted back to a multi-channel audio signal, e.g., 5.1-channel, by a decoder. CPRM (Content Protection for Recordable Media) CPRM is technology used to protect broadcasts that are allowed to be recorded only once. Such broadcasts can be recorded only with CPRMcompatible recorders and discs.
DMR-EZ49VEB_VQT2J51.book 93 ページ 2009年12月21日 月曜日 午後5時40分 Protection You can prevent accidental erasure by setting writing protection or erasure protection. RGB This refers to the three primary colours of light, red (R), green (G), and blue (B) and also the method of producing video that uses them. By dividing the video signal into the three colours for transmission, noise is reduced for even higher quality images.
DMR-EZ49VEB_VQT2J51.book 94 ページ 2009年12月21日 月曜日 午後5時40分 CAUTION! THIS PRODUCT UTILIZES A LASER. USE OF CONTROLS OR ADJUSTMENTS OR PERFORMANCE OF PROCEDURES OTHER THAN THOSE SPECIFIED HEREIN MAY RESULT IN HAZARDOUS RADIATION EXPOSURE. DO NOT OPEN COVERS AND DO NOT REPAIR YOURSELF. REFER SERVICING TO QUALIFIED PERSONNEL. CAUTION! ≥DO NOT INSTALL OR PLACE THIS UNIT IN A BOOKCASE, BUILT-IN CABINET OR IN ANOTHER CONFINED SPACE. ENSURE THE UNIT IS WELL VENTILATED.
DMR-EZ49VEB_VQT2J51.book 95 ページ 2009年12月21日 月曜日 午後5時40分 Information for Users on Collection and Disposal of Old Equipment and used Batteries These symbols on the products, packaging, and/or accompanying documents mean that used electrical and electronic products and batteries should not be mixed with general household waste.
VQT2J51-IX.fm 96 ページ 2009年12月22日 火曜日 午後1時3分 Index A Adjust the audio quality (Sound menu) . . . . . . . . . . . . . . . . . . . 63 Adjust the picture quality (Picture menu) . . . . . . . . . . . . . . . . . . 63 Album (Still picture) Edit . . . . . . . . . . . . . . . . . . . . . . . . . . . 55 Play . . . . . . . . . . . . . . . . . . . . . . . . . . . 43 Angle . . . . . . . . . . . . . . . . . . . . . . . . . . . 62 Aspect . . . . . . . . . . . . . . . . . . . . . . . . . .