
Operating instructions


VQT2J51
11
STEP 2
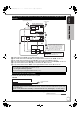
1 Aerial cable to the “RF IN” on the digital satellite receiver.
2 RF coaxial cable from the “RF OUT” on the digital satellite receiver to the “RF IN” on the unit.
3 RF coaxial cable (included) from the “RF OUT” on the unit to the “RF IN” on the TV.
4 21-pin Scart cable from the “AV/VCR” on the digital satellite receiver to the “AV2 (EXT)” on the unit.
5 21-pin Scart cable from the “AV1 (TV)” on the unit to the “AV” on the TV.
6 21-pin Scart cable from the “AV/TV” on the digital satellite receiver to the “AV” on the TV.
Connect only after all other connections are complete.
After completing the above connections, proceed to the TV Tuning (> 13).
Adding a Digital Satellite Receiver: Connecting to a Television and a Digital Satellite
Receiver
To view digital satellite programmes
Refer to “Watching Digital Satellite Programmes” (> 19)
To record digital satellite programmes
Refer to “Recording from a Digital Satellite Receiver” (> 31)
Connecting AC mains lead (included)
When the unit is not to be used for a long time
To save power, unplug it from the household mains socket. This unit consumes a small amount of power, even
when it is turned off.
[Approx. 0.5 W (“Power Save in Standby” is activated and “RF OUT ( Aerial Signal )” is set to “Off”.)
]
Additional Connections 112, 75
AV1(TV)
TV
RF IN/
AERIAL
RF IN
AV2 (EXT)
RF OUT
RF IN
DISH
INPUT
RF OUT
AV
AV/TV
AV/VCR
AV
HDMI IN
HDMI OUT
HDMI cable
HDMI
AV OUT
HDMI IN
This unit
5
3
4
1
2
6
Digital satellite receiver
To the aerial
Digital satellite antenna
The RF coaxial cable cannot be
used for showing pictures from the
unit. The unit must be connected
using another method, e.g. 21-pin
Scart cable to show pictures from
the unit on the television set.
You can enjoy high-quality picture by adding
the HDMI cable connection > 12
This unit
AC IN
To household mains
socket
DMR-EZ49VEB_VQT2J51.book 11 ページ 2009年12月21日 月曜日 午後5時40分