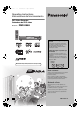
7664en.book 1 ページ 2004年6月8日 火曜日 午後6時0分 Operating Instructions Instrucciones de funcionamiento DVD Video Recorder Grabadora de DVD vídeo Model No. DMR-E85H Region number supported by this unit Region numbers are allocated to DVD players and software according to where they are sold. ≥The region number of this unit is “2”. ≥The unit will play DVDs marked with labels containing “2” or “ALL”.
7664en.book 2 ページ 2004年6月8日 火曜日 午後6時0分 SUOMI CAUTION! VAROITUS! THIS PRODUCT UTILIZES A LASER. USE OF CONTROLS OR ADJUSTMENTS OR PERFORMANCE OF PROCEDURES OTHER THAN THOSE SPECIFIED HEREIN MAY RESULT IN HAZARDOUS RADIATION EXPOSURE. DO NOT OPEN COVERS AND DO NOT REPAIR YOURSELF. REFER SERVICING TO QUALIFIED PERSONNEL. LAITTEEN KÄYTTÄMINEN MUULLA KUIN TÄSSÄ KÄYTTÖOHJEESSA MAINITULLA TAVALLA SAATTAA ALTISTAA KÄYTTÄJÄN TURVALLISUUSLUOKAN 1 YLITTÄVÄLLE NÄKYMÄTTÖMÄLLE LASERSÄTEILYLLE.
7664en.book 3 ページ 2004年6月8日 火曜日 午後6時0分 Table of contents Getting started Editing Useful features . . . . . . . . . . . . . . . . . . . . . . . . . . . . . 3 Accessories . . . . . . . . . . . . . . . . . . . . . . . . . . . . . . . 4 The remote control. . . . . . . . . . . . . . . . . . . . . . . . . . 4 Control reference guide. . . . . . . . . . . . . . . . . . . . . . 5 STEP 1 Connection . . . . . . . . . . . . . . . . . . . . . . . . . 6 STEP 2 Channel reception settings . . . . . . . . . . .
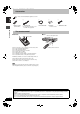
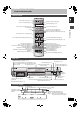
7664en.book 4 ページ 2004年6月8日 火曜日 午後6時0分 Accessories Getting started Please check and identify the supplied accessories. ∏ ∏ ∏ ∏ ∏ 1 Remote control (EUR7721KH0) 1 AC mains lead ≥For use with this unit only. Do not use it with other equipment. 1 RF coaxial cable 2 Batteries for remote control 1 Audio/video cable The remote control ∫ Batteries ∫ Use R6/LR6, AA, UM-3 Remote control signal sensor 20˚ 30˚ 20˚ 30˚ ≥Insert so the poles (i and j) match those in the remote control.
7664en.book 5 ページ 2004年6月8日 火曜日 午後6時0分 Control reference guide Remote control DVD TV Turn the unit on (➡ page 10, 11) Television operations (➡page 13) VOLUME CH DIRECT TV REC AV HDD 1 2 3 Select channels and title numbers etc.
7664en.book 6 ページ 2004年6月8日 火曜日 午後6時0分 STEP 1 Connection ≥The equipment connections described are examples. ≥Before connection, turn off all equipment and read the appropriate operating instructions. ≥Peripheral equipment and optional cables sold separately unless otherwise indicated. ∫ Recommended connection for your television Required cable(s) Page No. for connections Highly recommended connection. ≥You can enjoy high-quality RGB video from this unit by connecting to an RGB compatible television.
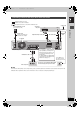
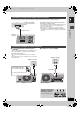
664en.book 7 ページ 2004年6月8日 火曜日 午後6時0分 Connecting a television with 21-pin Scart terminal and VCR When there is no 21-pin Scart terminal on the television (➡ page 8) indicates included accessories. indicates accessories not included. 1 4 are required connections. Connect in the numbered order. To household mains socket (AC 220–240 V, 50 Hz) To the aerial Television’s rear panel AV IN VHF/UHF RF IN AC mains lead Connect only after all other connections are complete.
7664en.book 8 ページ 2004年6月8日 火曜日 午後6時0分 STEP 1 Connection Connecting a television with AUDIO/VIDEO, S-VIDEO or COMPONENT VIDEO terminals and VCR Connecting to the television using the 21-pin Scart cables (➡ page 7) indicates included accessories. indicates accessories not included. 1 4 are required connections. Connect in the numbered order. Getting started When making this connection, ensure you connect the audio cables to the corresponding audio input terminals on the television.
7664en.book 9 ページ 2004年6月8日 火曜日 午後6時0分 Connecting a satellite receiver, digital receiver or decoder ≥Decoder here means the device used to decode scrambled broadcasts (Pay TV). ≥Change the “AV2 Input” and “AV2 Connection” settings in the SETUP menu to match the connected equipment (➡page 41).
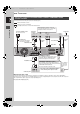
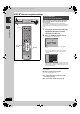
7664en.book 10 ページ 2004年6月8日 火曜日 午後6時0分 STEP 2 Channel reception settings Preset Download (Setup with Q Link functions) Í/ l OPEN/CLOSE REC TIME SLIP HDD DVD TIME SLIP DRIVE SELECT CH X CH W DVD TV Í DVD VOLUME CH DIRECT TV REC Getting started DRIVE SELECT 1 2 3 4 5 6 7 8 When connecting to a television that has the Q Link function (➡page 47) with a fully wired 21-pin Scart cable (➡page 7). You can download the tuning positions from the television.
7664en.book 11 ページ 2004年6月8日 火曜日 午後6時0分 Auto-Setup (Setup without Q Link functions) ≥When connecting to a television with the VIDEO OUT, S-VIDEO OUT or COMPONENT VIDEO OUT terminal (➡ page 8). ≥When connecting to a television that does not have the Q Link function (➡page 47). 1 2 Getting started This unit’s Auto-Setup function automatically tunes all available TV stations and synchronizes the time when the TV channel that is broadcasting time and date information is tuned.
7664en.book 12 ページ 2004年6月8日 火曜日 午後6時0分 STEP 3 Set up to match your television and remote control 3 Press [3, 4] to select “Connection” and press [1]. Press [3, 4] to select “TV Aspect” and press [ENTER]. DVD TV VOLUME CH DIRECT TV REC AV HDD Numbered buttons DRIVE SELECT 1 2 3 4 5 6 7 8 TV operation buttons 4 DVD 5 CH Press [3, 4] to select the TV aspect and press [ENTER].
7664en.book 13 ページ 2004年6月8日 火曜日 午後6時0分 Television operation You can configure the remote control TV operation buttons to turn the television on/off, change the television input mode, select the television channel and change the television volume. Point the remote control at the television While pressing [Í TV], enter the code with the numbered buttons. e.g.
7664en.book 14 ページ 2004年6月8日 火曜日 午後6時0分 HDD and Disc information HDD and discs you can use for recording and play Type Logo Instructions Temporary storage Hard disk drive (HDD) ≥80 GB Indicated in these instructions with [HDD] — ≥You can record up to 142 hours [in EP (8 Hour) mode] (➡ page 17, Recording modes and approximate recording times). ≥You can perform chasing playback or Time Slip (➡ page 17). ≥You can record digital broadcasts that allow “One time only recording”.
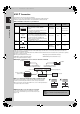
2004年6月8日 火曜日 午後6時0分 Types of disc or title recorded on HDD for the type of connected TV When you use the discs recorded either PAL or NTSC, or playback a title recorded on HDD using PAL or NTSC, refer to this table. (Y: Possible, t: Impossible) TV type Disc/Titles recorded on HDD Yes/No PAL Y NTSC Y§1 PAL t NTSC Y§2 PAL Y NTSC Y§3 (PAL60) Multi-system TV NTSC TV PAL TV §1 If you select “NTSC” in “TV System” (➡ page 43), the picture may be clearer.
7664en.book 16 ページ 2004年6月8日 火曜日 午後6時0分 Recording television programmes 2 Time Slip indicator 3 15 Press [W X CH] to select the channel. XP SP REC PLAY LP EP HDD EXT Link OPEN/CLOSE REC TIME SLIP HDD PULL OPEN DVD DRIVE SELECT TIME SLIP HDD AV3 S-VIDEO IN VIDEO IN L/MONO AUDIO IN /x1.3 DVD To select with the numbered buttons: e.g.
2004年6月8日 火曜日 午後6時0分 Recording modes and approximate recording times Playing while you are recording [HDD] [RAM] Depending on the content being recorded, the recording times may become shorter than indicated. (Unit: hour) DVD-RAM HDD DVD-R SingleDoubleMode (80 GB) (4.7 GB) sided sided (4.7 GB) (9.
7664en.book 18 ページ 2004年6月8日 火曜日 午後6時0分 Recording television programmes Refer to the control reference on page 16. Recording from an external equipment Flexible Recording [HDD] [RAM] [DVD-R] The unit sets the best possible picture quality that fits the recording within the remaining disc space. e.g.
7664en.book 19 ページ 2004年6月8日 火曜日 午後6時0分 Timer recording 4 DVD VOLUME CH DIRECT TV REC AV HDD Numbered buttons DVD DRIVE SELECT 1 2 3 4 5 6 7 8 HDD, DVD ShowView 9 ¢ CANCEL ShowView 0 SLOW/SEARCH STOP PAUSE PLAY/x1.
7664en.book 20 ページ 2004年6月8日 火曜日 午後6時0分 Timer recording Refer to the control reference on page 19. [HDD] [RAM] [DVD-R] You can enter up to 32 programmes up to a month in advance. (Each daily or weekly programme is counted as one programme.) Manually programming timer recordings Recording 1 Press [PROG/CHECK]. TIMER RECORDING Remain HDD 30:24 SP DVD 1:58 SP No. Name 01 ARD Date Start Stop Mode PDC DVD space 15/ 7 TUE 19:00 20:00 SP OFF OK New Timer Programme 12:56:00 15. 7.
2004年6月8日 火曜日 午後6時0分 Check, change or delete a programme ≥Even when the unit is turned off, you can display the timer recording list by pressing [PROG/CHECK]. Press [PROG/CHECK]. Icons [ This programme is currently recording. W The times overlap those in another programme. Recording of the programme with the later start time starts when the earlier programme finishes recording. F The disc was full so the programme failed to record. The material was copy-protected so it was not recorded.
7664en.book 22 ページ 2004年6月8日 火曜日 午後6時0分 Playing discs 1∫ 3 2 ∫ Selecting recorded programmes (titles) to play [HDD] [RAM] [DVD-R] 1 Press [DIRECT NAVIGATOR]. OPEN/CLOSE REC HDD TIME SLIP DVD TIME SLIP HDD DRIVE SELECT /x1.
7664en.book 23 ページ 2004年6月8日 火曜日 午後6時0分 Operations during play Press [∫]. Stop Pause XP SP REC PLAY LP EP HDD The stopped position is memorized. The indicator on the right appears in the unit’s display. (Excluding when playing from the Direct Navigator and when playing a play list.) Resume play function Press [1] (PLAY) to restart from this position. EXT Link Press [;]. Press again to restart play. Press [6] or [5]. Skip Press [:] or [9].
7664en.book 24 ページ 2004年6月8日 火曜日 午後6時0分 Playing discs Refer to the control reference on page 22. Editing operations during play 1 Press [ERASE]. 2 Press [2, 1] to select “Erase” and press [ENTER]. Erase [HDD] [RAM] [DVD-R] ≥A title cannot be restored once it is erased. Make certain before proceeding. ≥You cannot erase while recording or transferring (dubbing). Create Chapter Press [CREATE CHAPTER]. [HDD] [RAM] ≥Press [:, 9] to skip to the start of a chapter.
7664en.book 25 ページ 2004年6月8日 火曜日 午後6時0分 Using menus to play MP3 Using the tree screen to find a group DVD While the file list is displayed TV 1 VOLUME CH DIRECT TV REC AV HDD 1 2 3 4 5 6 DVD Selected group no. /Total group no. If the group has no track, “– –” is displayed as group number. CH ShowView 7 8 9 CANCEL MENU G 8 T 14 TOTAL 40/111 INPUT SELECT MANUAL SKIP 0 SKIP SLOW/SEARCH STOP PAUSE PLAY/x1.3 DIRECT NAVIGATOR No.
7664en.book 26 ページ 2004年6月8日 火曜日 午後6時0分 Using on-screen menus and Status messages Disc menu—Setting the disc content DVD TV Soundtrack§ VOLUME CH DIRECT TV REC AV HDD DRIVE SELECT 1 2 3 4 5 6 7 8 [HDD] [RAM] [DVD-R] The disc’s audio attributes appear. [DVD-A] [DVD-V] Select the audio and language (➡ below, Audio attribute, Language).
7664en.book 27 ページ 2004年6月8日 火曜日 午後6時0分 Play menu—Change the play sequence This function works only when the elapsed play time is displayed. Repeat Play Status messages Status messages appear on the television when you operate the unit to show the condition of the unit. Press [STATUS]. [VCD] [CD] (excluding MP3 discs) [HDD] [RAM] [DVD-R] [DVD-V] [DVD-A] [CD] (MP3 discs only) [HDD] [RAM] [HDD] [RAM] [DVD-R] [DVD-V] [DVD-A] [VCD] [CD] Select “OFF” to cancel.
7664en.book 28 ページ 2004年6月8日 火曜日 午後6時0分 Editing titles/chapters Editing titles/chapters and playing chapters DVD TV Preparation ≥Press [HDD] or [DVD] to select the drive. ≥Release protection (cartridge ➡page 14, disc ➡ page 37). [RAM] VOLUME CH DIRECT TV REC AV HDD DRIVE SELECT 1 2 3 4 5 6 7 8 DVD HDD, DVD 1 2 CH ShowView 9 CANCEL INPUT SELECT MANUAL SKIP SKIP 007 SLOW/SEARCH STOP PAUSE PLAY/x1.
7664en.book 29 ページ 2004年6月8日 火曜日 午後6時0分 Title operations Erase§ [HDD] [RAM] [DVD-R] Press [2, 1] to select “Erase” and press [ENTER]. ≥Once erased, the recorded contents are lost and cannot be restored. Make certain before proceeding. ≥The available recording time on DVD-R does not increase when you erase titles. Information (e.g., time and date) is shown. Properties Properties Dinosaur No.
7664en.book 30 ページ 2004年6月8日 火曜日 午後6時0分 Creating, editing and playing play lists 2 DVD TV PLAY LIST HDD VOLUME CH DIRECT TV REC AV HDD Press [3, 4, 2, 1] to select “PLAY LIST” and press [ENTER]. PLAY LIST VIEW -- DRIVE SELECT HDD, DVD DVD 2 -- -- -- Create -- 1 -- 3 CH 4 5 6 7 8 9 Previous ShowView CANCEL INPUT SELECT MANUAL SKIP 3 0 SKIP SLOW/SEARCH STOP PAUSE PLAY/x1.
7664en.book 31 ページ 2004年6月8日 火曜日 午後6時0分 Editing and playing play lists/chapters 1 2 3 Play list operations Press [FUNCTIONS]. Erase§ Press [3, 4, 2, 1] to select “PLAY LIST” and press [ENTER]. Press [3, 4, 2, 1] to select the play list. Press [2, 1] to select “Erase” and press [ENTER]. Play list information (e.g., time and date) is shown. Properties Properties Dinosaur No. 10 Chapters 002 To start play ➡ Press [ENTER]. To edit ➡ Step 4.
7664en.book 32 ページ 2004年6月8日 火曜日 午後6時0分 Entering text 1 DVD VOLUME CH DIRECT TV REC AV HDD Numbered buttons ¢ CANCEL DRIVE SELECT 1 2 3 4 5 6 7 8 9 Title Select “Enter Name” in step 3 on page 28. DVD Play list Select “Enter Name” in step 4 on page 31. CH Disc Select “Disc Name” in step 3 on page 36. ShowView CANCEL Show Enter Name screen. Title (timer recording) Select “Programme Name” in step 3 on page 19, 20.
7664en.book 33 ページ 2004年6月8日 火曜日 午後6時0分 Transferring (dubbing) titles or play lists [HDD] [RAM] [DVD-R] You can select from a variety of methods to transfer (dub) on this unit. ∫ Transferring (dubbing) direction You can transfer (dub) your favorite titles and play lists to an archive disc. ≥Transferring (dubbing) a play list will create a title. When you want to re-edit finalized content on a DVD-R etc.
7664en.book 34 ページ 2004年6月8日 火曜日 午後6時0分 Transferring (dubbing) titles or play lists Transferring (dubbing) using the transferring (dubbing) list DVD TV [HDD] ,-. [RAM] [HDD] > [DVD-R] You can order titles and play lists for transfer (dubbing) as desired as well as select the speed and picture quality. VOLUME CH DIRECT TV REC AV HDD Numbered buttons DRIVE SELECT 1 2 3 4 5 6 DVD CH ShowView 7 8 9 CANCEL INPUT SELECT MANUAL SKIP 0 SKIP :, 9 SLOW/SEARCH STOP PAUSE ; PLAY/x1.
7 2004年6月8日 火曜日 午後6時0分 Press [3, 4] to select “Start Dubbing” and press [ENTER]. Press [2, 1] to select “Yes” and press [ENTER] to start transferring (dubbing). Transferring (dubbing) list indicators Titles and play lists that can be transferred (dubbed) in high speed mode to DVD-R (➡page 39) Title with “One time only recording” restriction Titles erased from the HDD after transferring (dubbing) by recording restrictions. ≥Operations and on screen displays during transfer (dubbing) are also recorded.
7664en.book 36 ページ 2004年6月8日 火曜日 午後6時0分 FUNCTIONS window DISC MANAGEMENT [HDD] [RAM] [DVD-R] DVD TV VOLUME CH DIRECT TV REC AV HDD DRIVE SELECT 1 2 3 4 5 6 DVD HDD, DVD Preparation ≥Press [HDD] or [DVD] to select the drive. ≥Release protection.
7664en.book 37 ページ 2004年6月8日 火曜日 午後6時0分 Disc Name Top Menu [RAM] [DVD-R] ➡ page 32, Entering text The disc name is displayed in the FUNCTIONS window. FUNCTIONS HDD Documentary Disc Protection Of Cartridge Protectio DVD DVD-RAM Playback DIRECT NAVIGATOR Disc Protection [DVD-R] Prior to finalizing, you can select the background that will be displayed as the DVD-Video top menu after finalizing. ≥You can change thumbnails displayed in the Top menu.
7664en.book 38 ページ 2004年6月8日 火曜日 午後6時0分 Changing the unit’s settings Common procedures < OPEN/CLOSE ∫ 1 While stopped 2 Press [FUNCTIONS]. Press [3, 4, 2, 1] to select “SETUP” and press [ENTER]. OPEN/CLOSE REC HDD TIME SLIP DVD TIME SLIP DRIVE SELECT /x1.
7664en.book 39 ページ 2004年6月8日 Tabs 午後6時0分 Menus Language Choose the language for audio, subtitle and disc menus. [DVD-V] ≥Press [ENTER] to show the following settings. ≥Some discs start in a certain language despite any changes you make here. ≥In case of English/French/German/Italian/Spanish languages, when you make download from TV, and Country setting of AutoSetup in plug-in, the language (“Soundtrack”/“Menus”) will be same and “Subtitle” will set to “Automatic”.
7664en.book 40 ページ 2004年6月8日 火曜日 午後6時0分 Changing the unit’s settings Tabs Sound Menus Options (Underlined items are the factory presets.) PLAY k1.3 & Audio during Search You may hear sound regardless of this setting with some discs. ≥On: Audio is heard during first level search forward. ≥Off: Audio is not heard during search. Quick View (➡page 23) does not work. Dynamic Range Compression [DVD-V] (Dolby Digital only) Change the dynamic range for late night viewing.
7664en.book 41 ページ 2004年6月8日 Tabs 火曜日 午後6時0分 Menus Options (Underlined items are the factory presets.) ≥16:9 Connection TV Aspect (➡ page 12) ≥4:3 Progressive (➡ page 12) ≥On ≥Off TV System (➡page 43) ≥PAL ≥NTSC AV1 Output Selects the output from the AV1 terminal. Select “RGB (without component)” for RGB output. Select “Video (with component)” or “S-Video (with component)” for component output.
7664en.book 42 ページ 2004年6月8日 火曜日 午後6時0分 Changing the unit’s settings Refer to the control reference on page 38. ∫ To change the tuning settings for individual programme position Tuning 1 5 While stopped Press [FUNCTIONS]. Press [3, 4, 2, 1] to select “SETUP” and press [ENTER]. Press [3, 4] to select “Tuning” and press [1]. 2 3 SETUP Press [3, 4, 2, 1] to select a programme position and press [ENTER].
2004年6月8日 火曜日 午後6時0分 Auto-Setup Restart, Download TV System You can restart auto channel setting if Preset Download or AutoSetup (➡ page 10, 11) fails for some reason. ∫ Auto-Setup Restart 4 Press [3, 4] to select “Auto-Setup Restart” and press [ENTER]. 5 Press [2, 1] to select “Yes” and press [ENTER]. The country setting menu appears. 6 Press [3, 4, 2, 1] to select a country and press [ENTER]. 2 3 5 ∫ Download 5 1 4 Auto-Setup starts.
7664en.book 44 ページ 2004年6月8日 火曜日 午後6時0分 Changing the unit’s settings Refer to the control reference on page 38. Clock settings Usually, the unit’s Preset Download or Auto-Setup function (➡ page 10, 11) automatically adjusts the clock to correct time. Under some reception conditions, however, the unit cannot set the clock automatically. In this case, follow the operation steps below to manually set the clock.
7664en.book 45 ページ 2004年6月8日 火曜日 午後6時0分 Specifications DVD Video Recording format (DVD-RAM), DVD-Video format (DVD-R) Recordable discs DVD-RAM: 12 cm 4.7 GB, 12 cm 9.4 GB, 8 cm 2.8 GB 12 cm 4.7 GB (Ver. 2.1/3k-SPEED DVD-RAM Revision 1.0) DVD-R: 12 cm 4.7 GB, 8 cm 1.4 GB (for General Ver. 2.0) 12 cm 4.7 GB (for General Ver. 2.0/4k-SPEED DVD-R Revision 1.0) Recording time Maximum 8 hours (with 4.7 GB disc) XP: Approx. 1 hour, SP: Approx. 2 hours LP: Approx. 4 hours, EP: Approx.
7664en.book 46 ページ 2004年6月8日 火曜日 午後6時0分 Glossary Bitstream This is the digital form of multi-channel audio data (e.g., 5.1 channel) before it is decoded into its various channels. CPRM (Content Protection for Recordable Media) CPRM is technology used to protect broadcasts that are allowed to be recorded only once. Such broadcasts can be recorded only with CPRM compatible recorders and discs. Dolby Digital This is a method of coding digital signals developed by Dolby Laboratories.
7664en.book 47 ページ 2004年6月8日 火曜日 午後6時0分 Q Link This function works only if the unit is connected via a fully wired 21pin Scart cable to a TV featuring the Q Link or similar function. Q Link offers the following functions: ≥Download from the TV§ When you connect the unit to a TV, the station list data is automatically copied from the TV to the unit, and the TV stations are assigned to the programme positions on the unit in the same order as on the TV.
7664en.book 48 ページ 2004年6月8日 火曜日 午後6時0分 Frequently asked questions Set up What equipment is necessary to play multi channel surround sound? Page ≥DVD-Video: You can play DVD-Video multi channel surround by digitally connecting an amplifier equipped with a Dolby Digital, DTS or MPEG decoder. ≥DVD-Audio: This unit plays DVD-Audio in 2 channels. You cannot play multi channel surround sound. 9 — Are the headphones and speakers directly connected to the unit? ≥You cannot directly connect to the unit.
7664en.book 49 ページ 2004年6月8日 火曜日 午後6時0分 Error messages On the television Page Cannot finish recording completely. ≥The programme was copy-protected. ≥The HDD or disc may be full. — — Cannot playback this title. TV system is different from the setting. To playback this title, please change the TV System in SETUP. ≥You tried to play a title recorded using a different encoding system from that of the TV system currently selected on the unit. Alter the “TV System” setting on this unit to suit.
7664en.book 50 ページ 2004年6月8日 火曜日 午後6時0分 Troubleshooting guide Before requesting service, make the following checks. If you are in doubt about some of the check points, or if the remedies indicated in the chart do not solve the problem, consult your dealer for instructions. The following do not indicate a problem with this unit: ≥Regular disc rotating sounds. The sound of the disc rotating may become louder especially when finalizing a DVD-R. ≥Poor reception due to atmospheric conditions.
7664en.book 51 ページ 2004年6月8日 火曜日 午後6時0分 Sound No sound. Low volume. Distorted sound. Cannot hear the desired audio type. Cannot switch audio. Page ≥Check the connections and settings. Check the input mode on the amplifier if you have connected one. ≥Press [AUDIO] to select the audio. ≥Turn off V.S.S. in the following cases. –When using discs that do not have surround sound effects such as Karaoke discs. –When playing bilingual broadcast programmes.
7664en.book 52 ページ 2004年6月8日 火曜日 午後6時0分 Troubleshooting guide Recording, timer recording and transferring (dubbing) (Continued) Timer recording does not work properly. SHOWVIEW programming does not work properly. Page ≥The timer programme is incorrect or different timer programme times overlap. Correct the programme. ≥The unit is not on timer recording standby. (“F” on the unit’s display is not on.) Press [F TIMER]. ≥Set the clock.
7664en.book 53 ページ 2004年6月8日 火曜日 午後6時0分 Edit Page Cannot format. ≥The disc is dirty. Use a special cleaner and wipe clean. ≥You tried formatting a disc that is not compatible with this unit. Cannot create chapters. ≥The unit writes the chapter information to the disc when you turn it off or remove the disc. The information is not written if there is an interruption to the power before this. ≥These operations are not possible with still pictures.
7664en.book 54 ページ 2004年6月8日 火曜日 午後6時0分 Index Angle . . . . . . . . . . . . . . . . . . . . . . . . . . . 26 Aspect . . . . . . . . . . . . . . . . . . . . . . . . . . 12 Audio Attribute . . . . . . . . . . . . . . . . . . . . . . . 26 Language . . . . . . . . . . . . . . . . . . . . . . 39 Playback . . . . . . . . . . . . . . . . . . . . . . 24 Receiving . . . . . . . . . . . . . . . . . . . . . . 27 Auto Renewal Recording . . . . . . . . . . . 20 Change Thumbnail . . . . . . . . . . . . . . . .