RQT8320-B.book Page 1 Friday, January 6, 2006 7:08 PM Operating Instructions DVD Recorder Model No. DMR-ES15EB/EBL (Model suffix: “EB” for UK model, “EBL” for Ireland model) Region number supported by this unit Web Site: http://www.panasonic-europe.com Region numbers are allocated to DVD players and DVD-Video according to where they are sold. • The region number of this unit is “2”. • The unit will play DVD-Video marked with labels containing “2” or “ALL”.
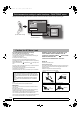
RQT8320-B.book Page 2 Friday, January 6, 2006 8:07 PM Quick access to a variety of useful functions–“FUNCTIONS” menu Display the FUNCTIONS menu to view all functions on this unit and select function for timer recording etc. FUNCTIONS DVD-RAM Cartridge Protection Off Disc Protection Off Cartridge Protection Off Disc Protection Off Playlists ENTER RETURN (on the remote control) Select “To Others” to view more functions.
RQT8320-B.book Page 3 Friday, January 6, 2006 7:08 PM Table of contents Playing back Playing discs. . . . . . . . . . . . . . . . . . . . . . . . . . . . . . . . . . .24 Changing audio during play . . . . . . . . . . . . . . . . . . . . .24 Operations during play . . . . . . . . . . . . . . . . . . . . . . . . .25 Using menus to play MP3 and still pictures (JPEG/TIFF) . . . . . . . . . . . . . . . . . . . . . . .26 Playing MP3 . . . . . . . . . . . . . . . . . . . . . . . . . . . . . . . . .
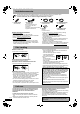
RQT8320-B.book Page 4 Thursday, January 12, 2006 9:10 AM Included accessories Please check and identify the supplied accessories. Use numbers when asking for replacement parts. (Product numbers correct as of December 2005. These may be subject to change.) To order accessories, refer to “Sales and Support Information” (➔ below). 1 Remote control (EUR7659Y50) 2 1 AC mains lead (RJA0044-3C) • For use with this unit only. Do not use it with other equipment.
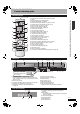
RQT8320-B.book Page 5 Friday, January 6, 2006 7:08 PM Control reference guide Remote control 1 bp bq 2 br bs bt 3 4 5 6 ck cl cm 7 8 9 bk bl bm bn cn co cp cq cr cs 1 Turn the unit on/off (➔ page 12) 2 Select channels and title numbers etc.
RQT8320-B.
RQT8320-B.book Page 7 Friday, January 6, 2006 7:08 PM Disc type Indication in these instructions DVD-Video DVD-Audio DVD-RW (VR format) DVD-V DVD-A -RW(VR) High fidelity music discs • Played on this unit in 2 channels. DVD-RW recorded on another DVD Recorder 1 • You can play programmes that allow “One time only recording” if they have been recorded to a CPRM compatible disc. • By formatting (➔ page 36) the disc, you can record to it in DVD-Video format.
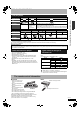
RQT8320-B.book Page 8 Wednesday, January 11, 2006 7:47 PM Connection Use of the supplied RF coaxial leads To prevent interference patterns from appearing on your TV, use only the supplied RF coaxial leads when you connect this unit to your TV and aerial outlet or aerial lead, as shown in connection types A-C. • Keep the RF coaxial leads as far away as possible from other leads. • Do not roll up the RF coaxial leads.
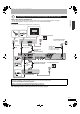
RQT8320-B.book Page 9 Friday, January 6, 2006 7:08 PM Connecting to a television and Satellite/Digital terrestrial receiver Using a fully wired 21-pin Scart lead Connection • You can use a variety of Q Link functions by connecting the unit to a Q Link compatible television (➔ page 38). • You can enjoy high-quality viewing by connecting the unit to an RGB compatible television.
RQT8320-B.book Page 10 Friday, January 6, 2006 7:08 PM Connection Connecting to a television and VCR Using a fully wired 21-pin Scart lead • You can use a variety of Q Link functions by connecting the unit to a Q Link compatible television (➔ page 38). • You can enjoy high-quality viewing by connecting the unit to an RGB compatible television.
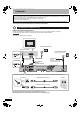
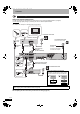
RQT8320-B.book Page 11 Friday, January 6, 2006 7:08 PM Other connections Television’s rear panel COMPONENT VIDEO IN Connecting to a television with S VIDEO terminals The S VIDEO OUT terminal achieves a more vivid picture than the VIDEO OUT terminal. (Actual results depend on the television.
RQT8320-B.book Page 12 Wednesday, January 11, 2006 7:47 PM TV Tuning (Auto Setup) 3 When setup has completed, the confirmation screen appears. Press [ENTER]. 4 The Owner ID settings screen appears. Press [q] and press the numbered buttons to enter your choice of a 4digit PIN number. 8 Owner ID ^ DVD PIN number Name House No. RETURN Numbered buttons RETURN : leave VIDEO Plus+ Make a note of the PIN number (don’t forget), as it is not possible to return to the factory preset.
RQT8320-B.book Page 13 Friday, January 6, 2006 7:08 PM This unit is not designed to control (turn on or change channels on) your satellite receiver. However, you can use VIDEO Plus+ Recording by making the satellite receiver’s VIDEO Plus+ numbers available for recognition on this unit. Take the following steps to make all satellite stations available for recognition on this unit.
RQT8320-B.book Page 14 Friday, January 6, 2006 7:08 PM Set up to match your television and remote control 5 Press [e,r] to select “TV Aspect” and press [ENTER]. Press [e,r] to select the TV aspect and press [ENTER].
Page 15 Friday, January 6, 2006 7:08 PM Television operation When other Panasonic products respond to this remote control You can operate the TV through the unit’s remote control. Volume Turn TV on/off Input Select Channel Select When other Panasonic products placed nearby affect this unit’s remote control, change the remote control code on the main unit and the remote control (the two must match). Under normal circumstances use the factory set code “DVD 1”.
RQT8320-B.book Page 16 Friday, January 6, 2006 7:08 PM Important notes for recording RAM -R Both main and secondary audio can be recorded You can change the audio during playback. (➔ page 24, “Changing audio during play”) Recording of bilingual programme M1 Hello M2 Hallo M1 Hello If you record from external equipment –Select both “M 1” and “M 2” on the external equipment.
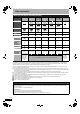
RQT8320-B.book Page 17 Friday, January 6, 2006 7:08 PM Recording modes and approximate recording times Recording Mode XP (High quality) SP (Standard) LP (Long play) EP (Extra long play) FR (Flexible Recording) DVD-RAM 9.4 GB (Double4.7 GB sided 1) 1 h. 2 h. 2 h. 4 h. 4 h. 8 h. 8 h. 16 h. (6 h. 2) (12 h. 2) 8 h. 8 h. maximum for maximum one side Recording Mode XP (High quality) SP (Standard) LP (Long play) EP (Extra long play) FR (Flexible Recording) DVD-R, DVD-RW, +R, +RW 4.7 GB 1 h. 2 h. 4 h. 8 h.
RQT8320-B.book Page 18 Friday, January 6, 2006 7:08 PM Recording television programmes ; OPEN/CLOSE EXT LINK DV IN 2 CH AV3 2 CH 1 g q * REC 8 Press [1 2 CH] to select the channel. 3 To select with the numbered buttons: e.g., 5: [0] ➔ [5] 15: [1] ➔ [5] Press [REC MODE] to select the recording mode (XP, SP, LP or EP).
Page 19 Friday, January 6, 2006 7:08 PM To specify a time to stop recording–One Touch Recording During recording Press [* REC] on the main unit to select the recording time. • The unit’s display changes as shown below. OFF 0:30 OFF 1:00 OFF 1:30 OFF 4:00 OFF 2:00 OFF 3:00 Counter (cancel) • This does not work during timer recordings (➔ page 20) or while using Flexible Recording (➔ below).
RQT8320-B.book Page 20 Friday, January 6, 2006 7:08 PM Timer recording Using VIDEO Plus+ system to make timer recordings ^ DVD Numbered buttons VIDEO Plus+ Entering VIDEO Plus+ number is an easy way of timer recording. You can find these numbers in TV listings in newspapers and magazines. • You can enter up to 16 programmes up to a month in advance.
Page 21 Friday, January 6, 2006 7:08 PM To cancel recording when recording has already begun Manually programming timer recordings You can enter up to 16 programmes up to a month in advance. (Each daily or weekly programme is counted as one programme.) 1 Press [PROG/CHECK]. Timer Recording 1 2 2 3 CANCEL A Timer Off Press [e,r] to select “New Timer Programme” and press [ENTER]. Press [q] to move through the items and change the items with [e,r].
RQT8320-B.book Page 22 Friday, January 6, 2006 7:08 PM Timer recording Refer to the control reference on page 20. Making timer recordings on the television Check, change or delete a programme Even when the unit is turned off, you can display the timer recording list by pressing [PROG/CHECK]. Press [PROG/CHECK]. Icons W F X Timer recording standby is activated. This programme is currently recording. The times overlap those in another programme.
RQT8320-B.book Page 23 Friday, January 6, 2006 7:08 PM EXT LINK DV IN Linked timer recordings with external equipment (SKY Digital STB/digital terrestrial receiver)– EXT LINK CH AV3 EXT LINK g * REC INPUT SELECT g h To record programmes from a SKY Digital STB/digital terrestrial receiver using timer programming Preparation • Make sure you connect the AV2 input terminal of this unit to “VCR Scart Terminal” of a SKY Digital STB/digital terrestrial receiver with a 21-pin scart lead (➔ page 9).
RQT8320-B.book Page 24 Friday, January 6, 2006 7:08 PM Playing discs Selecting recorded programmes (titles) to play– Direct Navigator Simply select the recorded programmes (titles) you want to play from the menu. RAM -R -R DL -RW(V) +R +R DL +RW -RW(VR) 1 Press [DIRECT NAVIGATOR].
RQT8320-B.book Page 25 Friday, January 6, 2006 7:08 PM Operations during play The stopped position is memorized. Resume play function Press [q] (PLAY) to restart from this position. The stopped position is cleared when: –you press [g] several times. –you open the tray. – DVD-A CD VCD and MP3 you turn the unit off. Stop Press [h]. Pause Playing discs Press [g]. Press again or press [q] (PLAY) to restart play. Press [t] or [y]. • The speed increases up to 5 steps ( +R +R DL +RW up to 3 steps).
RQT8320-B.book Page 26 Friday, January 6, 2006 7:08 PM Using menus to play MP3 and still pictures (JPEG/TIFF) Regarding MP3 and still pictures (JPEG/TIFF) • Compatible formats: ISO9660 level 1 or 2 (except for extended formats) and Joliet • Maximum number of files (tracks) and folders (groups) recognizable: 3000 files 1 (tracks) and 300 (including the root folder) folders (groups) 1 Total number of recognizable file including MP3, JPEG and other type of files is 4000.
Page 27 Friday, January 6, 2006 7:08 PM Playing still pictures (JPEG/TIFF) You can play CD-R/RW and DVD-R discs which contain still pictures (JPEG/TIFF) that have been recorded on a computer. The screen shown at right is displayed when you insert a disc containing MP3 files and still pictures (JPEG/TIFF). Press [ENTER], and follow the steps below. ENTER While the JPEG Menu is displayed 1 Press [e,r,w,q] to select “Folder” and press [SUB MENU]. RETURN JPEG Menu CD(JPEG) Folder Menu Select file type.
RQT8320-B.book Page 28 Friday, January 6, 2006 7:08 PM Using on-screen menus/FUNCTIONS window and Status message Audio channel RAM -RW(VR) VCD ➔ page 24, Changing audio during play Angle DVD-V DVD-A Change the number to select an angle. FUNCTIONS e,r,w,q ENTER RETURN STATUS DISPLAY Using on-screen menus Common procedures 1 Press [DISPLAY].
Page 29 Friday, January 6, 2006 7:08 PM FUNCTIONS window Picture menu–Change the picture quality Playback NR Reduces noise and picture degradation. On ↔ Off Progressive (➔ page 49) Select “On” to enable progressive output. Select “Off” if the picture is stretched horizontally. By using the FUNCTIONS window you may access the main functions quickly and easily. 1 While stopped Press [FUNCTIONS]. Functions displayed depend on the type of disc.
RQT8320-B.book Page 30 Friday, January 6, 2006 7:08 PM Editing titles/chapters Editing titles/chapters and playing chapters 1 2 u,i q During play or while stopped Press [DIRECT NAVIGATOR]. Press [e,r,w,q] to select the title. DIRECT NAVIGATOR Title View DVD-RAM h 07 08 BBC1 -- e,r,w,q ENTER DIRECT NAVIGATOR RAM -R -R DL -RW(V) +R Previous -- Page Next 02/02 Select No. Previous Title/Chapter Programmes are recorded as a single title consisting of one chapter.
RQT8320-B.book Page 31 Friday, January 6, 2006 7:08 PM Title operations After performing steps 1–3 (➔ page 30) Delete RAM +R -R -R DL -RW(V) +R DL +RW Properties RAM +R -R • Once deleted, the recorded contents are lost and cannot be restored. Make certain before proceeding. • -R -R DL +R +R DL The available recording time on a disc does not increase when you delete titles. • -RW(V) +RW Available recording space on a disc increases only when the last recorded title is deleted.
RQT8320-B.book Page 32 Friday, January 6, 2006 7:08 PM Creating, editing and playing playlists 3 4 Press [e,r] to select “Playlists” and press [ENTER]. Press [e,r,w,q] to select “Create” and press [ENTER]. Playlists DVD-RAM Playlist View -- -- -- -- -- Create -- Previous Page ENTER S SUB MENU RETURN e,r,w,q ENTER FUNCTIONS 5 Next No. 0 -- 9 Press [w,q] to select the source title and press [r]. • Press [ENTER] to select all the chapters in the title, then skip to step 7.
Page 33 Friday, January 6, 2006 7:08 PM Editing and playing playlists/ chapters RAM -RW(VR) 1 2 3 4 RAM While stopped Press [FUNCTIONS]. Press [e,r] to select “To Others” and press [ENTER]. Press [e,r] to select “Playlists” and press [ENTER]. Press [e,r,w,q] to select the playlist. To start play ➔ Press [ENTER]. To edit ➔ Step 5. -- 7/ 5 SUN 0:30 Create -- -- Properties Properties Dinosaur No.
RQT8320-B.book Page 34 Friday, January 6, 2006 7:08 PM Copying from a video cassette recorder Refer to the control reference on page 35. e.g., Connecting other video equipment to the AV3 or DV IN terminals You can also connect to the AV2 input terminal on the rear. • Turn off the unit and other video equipment before connecting.
RQT8320-B.book Page 35 Friday, January 6, 2006 7:08 PM Deleting titles Using DELETE Navigator to delete titles CH AV3 2 CH 1 g * REC Preparation • Turn on the television and select the appropriate video input to suit the connections to this unit. • Turn the unit on. • Insert the disc (➔ page 18). 1 2 Numbered buttons While stopped Press [FUNCTIONS]. Press [e,r] to select “Delete” and press [ENTER].
RQT8320-B.book Page 36 Friday, January 6, 2006 7:08 PM DVD Management Refer to the control reference on page 35. Deleting all titles and playlists –Delete all titles Common procedures Preparation • RAM Release protection (➔ below). 1 RAM After performing steps 1–3 (➔ left) While stopped Press [FUNCTIONS]. Press [e,r] to select “To Others” and press [ENTER]. Press [e,r] to select “DVD Management” and press [ENTER]. 2 3 Select which step 4 to perform depending on what you want to do next.
Page 37 Friday, January 6, 2006 7:08 PM Selecting whether to show the Top Menu first –Auto-Play Select -R -R DL -RW(V) +R +R DL +RW You can select whether to show the top menu after finalizing. Make selections before finalizing the disc. After performing steps 1–3 (➔ page 36) 4 5 Press [e,r] to select “Auto-Play Select” and press [ENTER]. Press [e,r] to select items and press [ENTER]. Top Menu:The top menu appears first. Title 1: The disc content is played without displaying the top menu.
RQT8320-B.book Page 38 Friday, January 6, 2006 7:08 PM Linked operations with the TV (Q Link) What is Q Link? Q Link enables you to connect this unit to a Q Link-equipped Panasonic TV and perform various linked functions. The following systems from other manufacturers have similar function to Q Link from Panasonic. For details, refer to your television’s operating instructions or consult your dealer.
RQT8320-B.book Page 39 Friday, January 6, 2006 7:08 PM Changing the unit’s settings Refer to the control reference on page 35. 1 2 3 While stopped Press [FUNCTIONS]. Press [e,r] to select “To Others” and press [ENTER]. Press [e,r] to select “Setup” and press [ENTER]. Tabs Setup Menus Options Remote Control DVD 1 Clock Tuning Disc 4 Press [e,r] to select the tab and press [q]. Press [e,r] to select the menu and press [ENTER]. Press [e,r] to select the option and press [ENTER].
RQT8320-B.book Page 40 Friday, January 6, 2006 7:08 PM Changing the unit’s settings Refer to the control reference on page 35. Tabs Sound Menus Options (Underlined items are the factory presets.) • On • Off (Dolby Digital Dynamic Range Compression only) Change the dynamic range for late night viewing. Bilingual Audio Selection DVD-V -R -R DL -RW(V) +R +R DL +RW Select whether to record the main or secondary audio type when recording to a disc.
Page 41 Friday, January 6, 2006 7:08 PM Tabs Menus Connection AV2 Settings (Continued) Set to match the connected equipment. • Press [ENTER] to show the following setting. AV2 Input This setting is according to the output signal of the connected equipment. Ext Link This setting cannot be made when the “TV System” is set to “NTSC” (➔ page 43).
RQT8320-B.book Page 42 Friday, January 6, 2006 7:08 PM Resetting channel setting Refer to the control reference on page 35. You can add or delete channels, or change programme positions. 1 2 3 4 Pos To change the programme position in which the TV stations are assigned Press [e,r] or the numbered buttons to select the number of the desired programme position and press [ENTER]. Name To enter or change the name of a TV station Press [e,r,w,q] to enter station name and press [ENTER].
Page 43 Friday, January 6, 2006 7:08 PM TV System Entering text RAM -R -R DL -RW(V) +R +R DL +RW You can give names to recorded titles, etc. The maximum number of characters: Numbered buttons -R Characters RAM -R DL -RW(V) +R Characters +R DL +RW Title Playlist Disc u,i g Title Disc 64 (44 ) 64 64 44 40 Title name for timer recording h If a name is long, parts of it may not be shown in some screens. e,r,w,q ENTER FUNCTIONS 1 Show Enter Name screen.
RQT8320-B.book Page 44 Friday, January 6, 2006 7:08 PM Messages On the television Page Cannot finish recording completely. • The programme was copy-protected. • The disc may be full. • The maximum number of times you can record the programme is exceeded. — — — Cannot record on the disc. • The disc may be dirty or scratched. 4 Unable to format. Please check the disc. Cannot record. Disc is full. 31, 35, 36 Cannot record. Maximum numbers of titles exceeded.
RQT8320-B.book Page 45 Friday, January 6, 2006 7:08 PM Frequently asked questions What equipment is necessary to play multi channel surround sound? Page • DVD-Video: You can play DVD-Video multi channel surround by digitally connecting an amplifier equipped with a Dolby Digital, DTS or MPEG decoder. • DVD-Audio: This unit plays DVD-Audio in 2 channels. You cannot play multi channel surround sound.
RQT8320-B.book Page 46 Friday, January 6, 2006 7:08 PM Troubleshooting guide Before requesting service, make the following checks. If you are in doubt about some of the check points, or if the remedies indicated in the chart do not solve the problem, consult your dealer for instructions. The following do not indicate a problem with this unit: • • • • Regular disc rotating sounds. Poor reception due to atmospheric conditions. Image disturbance during search.
Page 47 Friday, January 6, 2006 7:08 PM Operation Cannot operate the television. The remote control doesn’t work. Page • Change manufacturer code. Some televisions cannot be operated even if you change the code. • The remote control and main unit are using different codes. Change the code on the remote control. Press and hold [ENTER] and the indicated number button at the same time for more than 2 seconds. • The batteries are depleted. Replace them with new ones.
RQT8320-B.book Page 48 Friday, January 6, 2006 7:08 PM Troubleshooting guide Play Page Play fails to start even when [q] (PLAY) is pressed. Play starts but then stops immediately. • • • • • Audio and video momentarily pause. • This occurs between playlist chapters. • This occurs as scenes change during Quick View. — — Insert the disc correctly with the label facing up. The disc is dirty. You tried to play a blank disc or disc unplayable on this unit.
RQT8320-B.book Page 49 Friday, January 6, 2006 7:08 PM Glossary Bitstream This is the digital form of multi-channel audio data (e.g., 5.1 channel) before it is decoded into its various channels. Frames and fields Frames refer to the single images that constitute the video you see on your television. Each frame consists of two fields. Component signal outputs the colour difference signals (PB/PR) and luminance signal (Y) separately in order to achieve high fidelity in reproducing colours.
RQT8320-B.book Page 50 Friday, January 6, 2006 8:25 PM Specifications Recording System DVD-RAM: DVD Video Recording format DVD-R: DVD-Video format DVD-R DL (Dual Layer): DVD-Video format DVD-RW: DVD-Video format +R +R DL (Double Layer) +RW Recording time Maximum 8 hours (using 4.7 GB disc) XP: Approx. 1 hour SP: Approx. 2 hours LP: Approx. 4 hours EP: Approx. 6 hours/8 hours Recordable discs DVD-RAM: Ver. 2.0 Ver. 2.1/3x–SPEED DVD-RAM Revision 1.0 Ver. 2.2/5x–SPEED DVD-RAM Revision 2.
RQT8320-B.book Page 51 Friday, January 6, 2006 7:08 PM THIS PRODUCT UTILIZES A LASER. USE OF CONTROLS OR ADJUSTMENTS OR PERFORMANCE OF PROCEDURES OTHER THAN THOSE SPECIFIED HEREIN MAY RESULT IN HAZARDOUS RADIATION EXPOSURE. DO NOT OPEN COVERS AND DO NOT REPAIR YOURSELF. REFER SERVICING TO QUALIFIED PERSONNEL. CAUTION! • DO NOT INSTALL OR PLACE THIS UNIT IN A BOOKCASE, BUILT-IN CABINET OR IN ANOTHER CONFINED SPACE. ENSURE THE UNIT IS WELL VENTILATED.
RQT8320-B.book Page 52 Friday, January 6, 2006 7:08 PM Index Angle . . . . . . . . . . . . . . . . . . . . . Audio attribute . . . . . . . . . . . . . . . . language . . . . . . . . . . . . . . . playback . . . . . . . . . . . . . . . . AV-in NR . . . . . . . . . . . . . . . . . . 28 28 28 24 29 Change Thumbnail. . . . . . . . . . 31 Channel audio . . . . . . . . . . . . . . . . . . 28 settings. . . . . . . . . . . . . . 12, 42 Chapter . . . . . . . . . . . . . . . . 25, 30 Chasing playback. . . . . .