
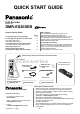
Operating Instructions EB Model Quick Start Guide
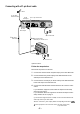
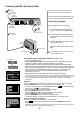

Y
PB
PR
OPTICAL
COMPONENT
VIDEO OUT
(PROGRESSIVE/
INTERLACE)
DIGITAL AUDIO OUT
(PCM/BITSTREAM)
S VIDEO OUT
S VIDEO
AV4 IN
AV4 IN
OUT
AUDIO
R
R
L L
VIDEO
AC IN
AV1 (TV)
AV2 (EXT)
RF OUT
RF IN
- 5 -
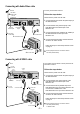
AC IN
AC mains socket
AC mains lead
Connect DVD Recorder and TV set to
the AC mains socket.
You can connect the DVD Recorder to your
TV set by using a RF cable (Aerial cable).
2
Follow the steps below.
3
1
Connect aerial to the RF IN (Aerial
input) connector of the DVD Recorder.
Connect the DVD Recorder´s RF OUT
(Aerial output) to the TV set’s Aerial in
connector.
Disconnect the power from all units.
Follow the steps for Auto-Setup on this
page.
2
Connecting with RF cable (Aerial cable)
Aerial
RF IN
Aerial input
RF OUT
Aerial output
AC mains lead
RF cable /
Aerial cable
erialA
input
3
3
TV
S
1
DVD Recorder
AC IN~
= Extra equipment for the connection shown:
RF cable (aerial cable)
S
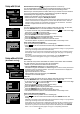
Auto-Setup with RF cable (Aerial cable) (Automatic tuning)
!
Turn on your television set.
!
With the Standby/on switch turn on the DVD recorder. Automatic tuning for all
available TV stations begins. Approximate duration is 5 minutes.
- While Auto-Setup is running, the first digit of the DVD Recorder display will flash.
After a while it will stop flashing and the RF output channel number will be displayed.
- Select an unused channel pre-set on your TV and tune it to the RF output channel
number shown on the DVD Recorder display (or until you can clearly see the
Auto-Setup screen). Store the new DVD playback channel (refer to the
instructions for your TV).
In some cases, the RF output channel may interfere with the TV stations transmitted in your
area. This may prevent you from seeing the On-Screen Display clearly. Please see page 6
for removing the interference before restarting Auto-Setup. See page 71 of Operating
Instructions.
You can complete the Owner ID now or skip this step and do it later. To do it later,
press the RETURN button. Your DVD Recorder is now ready to use.
!
To set the Owner ID now, press the Numeric buttons or to enter a four-digit
PIN number. Press , to correct the digit.
!
Be sure to remember the PIN number (write it down).
!
Press the ENTER button twice to confirm.
!
Enter the [Name], [House No] and [Postcode] in the same way.
!
Press the ENTER button to confirm each entry.
!
Press the RETURN button to leave the Owner ID screen.
!
You will now see the TV picture. Your DVD Recorder is now ready to use.
Owner ID
!
Press to set the correct time and date and press ENTER to finish this
setting.
If the clock setting menu appears
(Auto clock set was not possible due to a weak signal)
Mind that a wrong date or time will influence the programmed recording of TV programmes
(don't forget to change summer time and winter time).
DVD Display
Owner ID
RETURN
Name
House No.
Postcode
PIN number
* * * *
RETURN : leave
Clock
OffAutomatic
0
00 00
1 1
2005
: : . .
Time Date
CHANGE
ENTER
RETURN
Clock cannot be set automatically.
Please set the clock manually.
ENTER: store RETURN: leave
SELECT
0
9
No
Auto-Setup
Ch
4
Suche Sender, bitte warten.
RETURN: abbrechen
35
Auto-Setup in progress, please wait.
RETURN: to abort
RETURN
RF cable /
Aerial cable
Since optimal picture quality cannot be achieved, the
connection with the RF cable is not recommended.
!
After Automatic tuning has finished, the Owner ID screen will appear.