
Operating Instructions
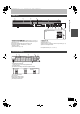


7
RQT9193
You can enjoy high-quality picture by adding the HDMI cable connection to the 21-pin Scart cable connection between this unit and your TV.
(> 6)
When connected to an HDMI compatible unit, an uncompressed digital audio and video signal is transmitted. You can enjoy high quality, digital
video and audio with just one cord. When connecting to an HDMI-compatible HDTV (High Definition Television), the output can be switched to
1080p, 1080i or 720p HD video.
≥This unit incorporates HDMI
TM
(V.1.3 with Deep Colour) technology (> 84).
≥Video sources converted to 1920k1080 resolution, while of high quality, will exhibit somewhat lower subjective image resolution than true,
native 1080p full-HD sources. See dealer for details.
≥Please use High Speed HDMI Cables that have the HDMI logo (as shown on the cover).
≥When setting video output to “1080p”, please use the HDMI cables 5.0 meters or less.
[Note]
≥If you are connecting to a TV that is only compatible with 2 channel audio output, audio with 3 channels or more will be down mixed (> 84) and
output as 2 channels, even if connecting with an HDMI cable. (Some discs cannot be down mixed.)
≥You cannot connect this unit to DVI devices that are incompatible with HDCP.
For units compatible with HDCP (High-Bandwidth Digital Content Protection) copyright protection that are equipped with a digital DVI input
terminal (PC monitors, etc.):
Depending on the unit, images may not display properly or at all when connecting with a DVI/HDMI switching cable. (Audio cannot be output.)
You need a Conditional Access Module together with a valid Smart Card and a subscription with the corresponding broadcaster.
The Smart Card is inserted in the commercially available Conditional Access Module (CAM).
When a CAM with a certified Smart Card is inserted, TV service scrambling is automatically cancelled and the service can be viewed or recorded.
[Note]
≥Set this unit to standby mode before you insert or remove the CAM. Remove the CAM slowly.
≥Do not insert the CAM and Smart Card up side down.
≥For more details, see the manual of the CAM and Smart Card, or check with the broadcaster.
≥The Common Interface supports the modules according to DVB Specification for encryption systems as for example Cryptoworks, Viaccess,
Nagravision, Conax or Irdeto.
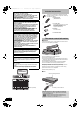
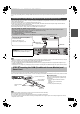
Connecting to a TV with an HDMI (High Definition Multimedia Interface) cable
Regarding VIERA Link “HDAVI Control
TM
” function
When connecting with a Panasonic TV (VIERA) or a receiver equipped with the “HDAVI Control” function, linked operations would be
possible. [> 36, Linked operations with the TV (VIERA Link “HDAVI Control
TM
”/Q Link)]
≥Non-HDMI-compliant cables cannot be utilised.
≥It is recommended that you use Panasonic’s HDMI cable.
Recommended part number:
RP-CDHG10 (1.0 m), RP-CDHG15 (1.5 m), RP-CDHG20 (2.0 m), RP-CDHG30 (3.0 m), RP-CDHG50 (5.0 m), etc.
AV2
(
EXT
)
AV1
(
TV
)
OPTICAL
DIGIDIGITAL AL AUDIO OUUDIO OUT
(PCM/BITSTREAM)
(PCM/BITSTREAM)
COMPONENTCOMPONENT
VIDEO OUTVIDEO OUT
S VIDEOVIDEO
R-AUDIO-L
PR
PB
Y
OUTOUT
AAV OUV OUTT
LNB
OUT
LNB
IN
COMMON INTERFACECOMMON INTERFACE
AV
HDMI IN
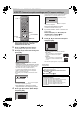
Fully wired
21-pin Scart cable
This unit’s rear panel
HDMI cable
Television’s rear
panel
Connecting with a Panasonic TV (VIERA)
If the 21-pin Scart cable is connected, the following
functions are available.
≥Direct TV Recording (> 36)
≥Pause live TV programme (> 37)
[Required]setting]
≥Set “Digital Audio Output” to “HDMI and Optical”
(> 65).
(The default setting is “HDMI and Optical”.)
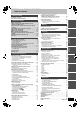
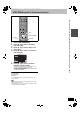
STEP 2 Inserting the CAM (Conditional Access Module) and
Smart Card
AV2
(
EXT
)
AV1
(
TV
)
OPTICAL
DIGIDIGITAL AL AUDIO OUUDIO OUT
(PCM/BITSTREAM)
(PCM/BITSTREAM)
COMPONENTCOMPONENT
VIDEO OUTVIDEO OUT
S VIDEOVIDEO
R-AUDIO-L
PR
PB
Y
OUTOUT
AAV OUV OUTT
LNB
OUT
LNB
IN
COMMON INTERFACECOMMON INTERFACE
AC IN
CI (Common Interface) slot
2
1
CAM (Conditional
Access Module)
Smart Card
This unit’s rear panel
Adjust the position
marks.
Label facing
upwards
∫ Password query
When you turn the unit on after inserting the card,
depending on the card provider, a password may
be demanded.
1 Enter the 4-digit code with the numbered
buttons.
Delete an incorrect numbered with
[DELETE ¢].
2 Confirm your password with [OK].
STEP 1 Connection/STEP 2 Inserting the CAM (Conditional Access Module) and Smart Card
DMR-EX81SEG_RQT9193.book 7 ページ 2008年7月28日 月曜日 午後5時29分