DMR-UBC&UBS80EG_eng.book 1 ページ 2018年5月28日 月曜日 午後3時15分 Operating Instructions Blu-ray Disc™ Recorder Model No. DMR-UBC80 DMR-UBS80 Getting started Watching broadcasts Recording Playing back video Editing video Copying video Thank you for purchasing this product. Please read these instructions carefully before using this product, and save this manual for future use.
DMR-UBC&UBS80EG_eng.book 2 ページ 2018年5月28日 月曜日 午後3時15分 Features Safety precautions Watch UHD/HDR broadcasts WARNING You can watch UHD/HDR broadcasts. This unit supports HLG, which is one of HDR formats. Unit • To reduce the risk of fire, electric shock or product damage, - Do not expose this unit to rain, moisture, dripping or splashing. - Do not place objects filled with liquids, such as vases, on this unit. - Use only the recommended accessories. - Do not remove covers.
DMR-UBC&UBS80EG_eng.book 3 ページ 2018年5月28日 CAUTION Unit • This unit utilizes a laser. Use of controls or adjustments or performance of procedures other than those specified herein may result in hazardous radiation exposure. • Do not place sources of naked flames, such as lighted candles, on this unit. • This unit may receive radio interference caused by mobile telephones during use. If such interference occurs, please increase separation between this unit and the mobile telephone.
DMR-UBC&UBS80EG_eng.book 4 ページ 2018年5月28日 月曜日 午後3時15分 Table of contents Features . . . . . . . . . . . . . . . . . . . . . . . . . . . . . 2 Safety precautions . . . . . . . . . . . . . . . . . . . . 2 Supplied accessories . . . . . . . . . . . . . . . . . . 3 Getting started Unit care . . . . . . . . . . . . . . . . . . . . . . . . . . . . . 5 Main unit . . . . . . . . . . . . . . . . . . . . . . . . . . . . . 6 Remote Control . . . . . . . . . . . . . . . . . . . . . . .
DMR-UBC&UBS80EG_eng.book 5 ページ 2018年5月28日 Unit care HDD/USB HDD handling care • The HDD is a high precision recording instrument and is easily susceptible to damage. Therefore, be careful of the following points while the unit is turned on, especially during operation, otherwise the HDD and the recorded content may be damaged: - Do not subject the unit to any vibration and shock. - Do not remove the AC mains lead from the household mains socket.
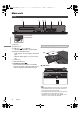
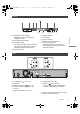
DMR-UBC&UBS80EG_eng.book 6 ページ 2018年5月28日 月曜日 午後3時15分 Main unit Front Getting started Pull to flip down the front panel. 1 Disc tray 2 Display (> 7) 3 USB port ( DC 5 V 900 mA) • This port supports USB 3.0 Super Speed. 4 Remote control signal sensor • Angle: Approx. 20° up and down, 30° left and right • Distance: Within approx. 7 m in front of the unit 5 CI slot (> 9) 6 Open/close disc tray 7 Standby/on switch (Í/I) Press to switch the unit from on to standby mode or vice versa.
DMR-UBC&UBS80EG_eng.book 7 ページ 2018年5月28日 月曜日 午後3時15分 Display 1 Main display section indicator • Messages and other information are displayed. (> 106) 2 Drive (HDD or BD) indicator 3 Recording indicator • The indicator will light up while recording. • The indicator will blink while recording is paused and before recording starts.
DMR-UBC&UBS80EG_eng.book 8 ページ 2018年5月28日 月曜日 午後3時15分 Remote Control Instructions for operations are generally described using the remote control. TV 1 Getting started CH 2abc 3def REC 4ghi 5jkl 7 p qrs VOL INPUT AV 10s CH w 8tuv 9xyz RADIO/ PROG/CHECK TV LAST VIEW INTERNET +60s REWIND LIVE T V PAGE 6mno 0 x1.
DMR-UBC&UBS80EG_eng.book 9 ページ 2018年5月28日 月曜日 午後3時15分 CI (Common Interface) module Encrypted programmes and broadcasts cannot be viewed with the unit by using standard connections and settings. An appropriate CI module is required to view or record them. You need a CI module, CAM (Conditional Access Module) together with a certified Smart Card, and a subscription with the corresponding broadcaster. • If not viewing/recording an encrypted broadcast, you do not need to insert the CI module.
DMR-UBC&UBS80EG_eng.book 10 ページ 2018年5月28日 About CI Plus compatible broadcast “CI Plus” is a technical specification that imposes contents protection, etc. CI Plus contents protection When the CI Plus compatible broadcast is recorded, the programme may be contents protected.
DMR-UBC&UBS80EG_eng.book 11 ページ 2018年5月28日 月曜日 午後3時15分 Connection 3D programmes or 4K images can be played back when this unit is connected to 3D or 4K compatible terminal of a 3D or 4K compatible TV. • Before making any connections, please disconnect all the units from AC power. (Connect the AC mains lead after making all connections.) • Use the High Speed HDMI cables. Non-HDMI-compliant cables cannot be utilized.
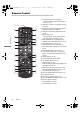
DMR-UBC&UBS80EG_eng.book 12 ページ 2018年5月28日 月曜日 午後3時15分 [UBC80] Antenna connections To the CATV terminal or the Aerial CATV coaxial cable or Aerial cable This unit’s rear panel RF coaxial cable (supplied) Getting started AC mains lead (supplied) • Connect only after all other connections are complete. VHF/UHF RF IN Household mains socket (AC 220 to 240 V, 50 Hz) HDMI cable connection (> 14, 15) • Keep the RF coaxial cables as far away as possible from other cables.
DMR-UBC&UBS80EG_eng.book 13 ページ 2018年5月28日 月曜日 午後3時15分 [UBS80] Antenna connections Satellite dish Multi switcher Satellite dish Getting started The following three connection methods are available. Choose a method suited to your environment. A Using a multi switcher: You can record two programmes simultaneously. • Connect both LNB IN 1 and LNB IN 2 to the satellite dish. B Using a single cable router: You can record two programmes simultaneously. • Connect satellite cable to LNB IN 1 terminal.
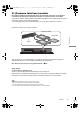
DMR-UBC&UBS80EG_eng.book 14 ページ 2018年5月28日 月曜日 午後3時15分 Enjoying video and audio with a 4K-compatible TV e.g., [UBC80] This unit’s rear panel Getting started HDMI cable (18 Gbps) HDMI Enjoying video with a 4K-compatible TV and audio with a 4K-compatible amplifier e.g.
DMR-UBC&UBS80EG_eng.book 15 ページ 2018年5月28日 月曜日 午後3時15分 Enjoying audio with an amplifier connected to the COAXIAL terminal e.g., [UBC80] Coaxial digital cable COAXIAL IN Amplifier/receiver Getting started • To enjoy audio with an amplifier connected to the COAXIAL terminal Set “Audio Output” to “Off” in “Advanced Settings”. (> 94) Connecting an amplifier to a 4K-compatible TV 3D or 4K images can be played back when this unit is connected to a 3D or 4K compatible TV.
DMR-UBC&UBS80EG_eng.book 16 ページ 2018年5月28日 When this unit is connected to the network, you can enjoy network functions (Ultra HD Blu-ray Playback, DLNA function, Network Service, TV Anywhere, etc.). For details about connection method, refer to the instructions supplied with the connected equipment. After you make the LAN cable/Wireless LAN connection, the network setting is needed.
DMR-UBC&UBS80EG_eng.book 17 ページ 2018年5月28日 3 4 5 • Network ID Auto The preset Network ID will be automatically used. Manual Enter the Network ID specified by your cable provider with number buttons. Turn on the TV, then select the appropriate AV input to suit the connections to this unit. Press [Í] on the remote control or [Í/I] on this unit. • The Easy Setting will start at the initial power on. • Frequency and Network ID settings may be necessary depending on the cable provider.
DMR-UBC&UBS80EG_eng.book 18 ページ 2018年5月28日 When connected to a 4K (50p or 60p)-compatible TV When connected to a 4K (50p or 60p)-compatible TV, you can set the video output format. 1 2 Press OK. OK Getting started RETURN Follow the on-screen instructions to set the format. 3 4 5 6 • To reconnect this unit to a 4K (50p or 60p)-compatible TV after connecting this unit to a 2K-compatible TV and completing “Easy Setting”, set “4K(50p/60p) Output” to “4K(50p/60p) 4:4:4” or “4K(50p/60p) 4:2:0”.
When selecting “Single Cable System” in Step 6. 1 Select the “Single Cable Version”. Single Cable Version Single Cable Single Cable 2.0 (JESS) Single Cable - EN50494: Allow up to 8 user bands Single Cable 2.0 (JESS) - EN50607: Allow up to 32 user bands Select Confirm RETURN • Select the setting that matches the version of your equipment. • Check the Single Cable Version setting in advance. e.g., Unicable II 2 Make the settings of user band.
DMR-UBC&UBS80EG_eng.book 20 ページ 2018年5月28日 Easy Network Setting After completing “Easy Setting”, you can continue with “Easy Network Setting”. Follow the on-screen instructions to establish your connection settings. Select “Wired” or “Wireless”, then press [OK]. Easy Network Setting Select a connection mode. 月曜日 午後3時15分 Then follow the on-screen instructions and apply the settings. Search for wireless network: The available wireless networks will be displayed. Select your network name and press [OK].
To restart Easy Network Setting 1 Press [FUNCTION MENU]. (> 27) 2 Select “Basic Settings” in “Setup”, then press [OK]. 3 Select “Easy Network Setting” in “Network”, then press [OK]. To redo settings individually If “Easy Network Setting” did not work properly or when you change the settings individually, perform the following steps: 1 Press [FUNCTION MENU]. (> 27) 2 Select “Basic Settings” in “Setup”, then press [OK]. 3 Select “Network Settings” in “Network”, then press [OK]. 4 Refer to “Network Settings”.
DMR-UBC&UBS80EG_eng.book 22 ページ 2018年5月28日 月曜日 午後3時15分 HDD and media information For more details, refer also to the specifications.
DMR-UBC&UBS80EG_eng.
DMR-UBC&UBS80EG_eng.book 24 ページ 2018年5月28日 Information about contents Maximum programmes HDD 3000 BD-RE, BD-R 200 DVD-RAM, DVD-R, DVD-RW 99 +R, +RW 49 Media File format MKV (Compression methods Video: H.264, HEVC Audio: AAC, PCM, Vorbis, FLAC) MP4 (Compression methods Video: H.264, HEVC Audio: AAC, LPCM§2) Getting started • Maximum numbers of programmes are including recordings of HD CAMCORDER. MPEG2 ∫ HD CAMCORDER Recordings MPEG-4 AVC/H.
DMR-UBC&UBS80EG_eng.book 25 ページ 2018年5月28日 月曜日 午後3時15分 Recording mode (Picture Quality) Picture Quality Feature DR HG/HX/HE/HL/HM Programmes can be Recording can be done recorded in a nearly with reduced recording perfect broadcasted state. volume in High definition (HD) quality§2. XP/SP/LP/FR§1 Recording can be done with reduced recording volume in Standard definition (SD) quality.
DMR-UBC&UBS80EG_eng.book 26 ページ 2018年5月28日 Notes for the disc • Region management information The unit can play back BD-Video/DVD-Video discs of the following regions codes, including “ALL”: Getting started e.g., BD-Video DVD-Video • Disc recorded on another device • It may be necessary to finalise the disc, create Top Menu or close the session on the equipment used for recording to play on this unit. • [DVD-RW] Recorded in DVD Video Recording (DVD-VR) format - This unit can play back and copy to HDD.
DMR-UBC&UBS80EG_eng.book 27 ページ 2018年5月28日 FUNCTION MENU screen You can easily access the desired functions, such as playback, timer recording, the unit’s settings etc. via the FUNCTION MENU. FUNCTION MENU list • Keyword Recording (> 41) • TV Guide (> 31) • Timer Recording (> 38) • Network Service (> 73) Press [FUNCTION MENU].
DMR-UBC&UBS80EG_eng.book 28 ページ 2018年5月28日 Watching broadcasts Watching broadcasts Preparation To watch HLG broadcasts in their original picture quality, connect the unit to an HLG-compatible TV. (> 11) Press [CH W X] to select the channel. • You can also select the channel by the following operations. - Using number buttons - Using Channel List (> 31) - Using TV Guide (> 31) - Using channel information (> 29) 月曜日 午後3時15分 Watching UHD/HDR broadcasts You can watch UHD/HDR broadcasts with this unit.
DMR-UBC&UBS80EG_eng.book 29 ページ 2018年5月28日 月曜日 午後3時15分 Using channel information To show subtitle While watching a programme Press [STATUS ]. Channel information appears. When “ UHDTV 10:30 NEWS 9:00 - 11:00 All DVB Channels Now Set timer Change category AD Current Category TV service type e.g.
Watching broadcasts DMR-UBC&UBS80EG_eng.book 30 ページ 2018年5月28日 月曜日 午後3時15分 To listen to the Audio Description To use data service (Catch Up TV) Audio Description adds an additional soundtrack to describe events on screen (narration) and aids understanding and enjoyment, particularly for visually-impaired viewers. To use the data service function (Catch Up Service), network connection and settings are necessary. (> 16, 20) • Set “HbbTV Setting” to “On”.
DMR-UBC&UBS80EG_eng.book 31 ページ 2018年5月28日 Using Channel List 午後3時15分 Using TV Guide You can select from the list of channel names. 1 月曜日 Press [OK]. 1 Press [GUIDE]. e.g. Landscape view UHD channel TV Guide Landscape TUE 03.01.2017 8:05 Category: All DVB Channels 8:00 - 9:45 All DVB Channels TUE 03.01 Sorting 123... 1 2 3 4 5 6 7 8:30 9:00 9:30 10:00 10:30 OK OPTION RETURN GUIDE Portrait/Landscape Timer Rec.
DMR-UBC&UBS80EG_eng.book 32 ページ 2018年5月28日 月曜日 午後3時15分 REWIND LIVE TV/PAUSE LIVE TV This unit temporarily saves a live TV programme you are watching with this unit’s tuner on HDD. REWIND LIVE TV You can rewind live TV programme to the point where temporary save has started (up to 1.5 hours). While watching TV Press [6] to rewind. PAUSE LIVE TV Watching broadcasts You can pause live TV programme and restart watching from the paused position. While watching TV Press [;] to pause.
DMR-UBC&UBS80EG_eng.book 33 ページ 2018年5月28日 Recording TV programmes • This unit can record two programmes being broadcasted at the same time.§ • About CI Plus restriction (> 10) • Notes for recording of an encrypted broadcast (> 35) Preparation You can change the recording mode (picture quality) (> 34) 1 2 3 午後3時15分 • If a timer recording reaches its start time when all tuners are being used for recording, the recording (OTR) of one of the programmes terminates. • Data service will not be recorded.
DMR-UBC&UBS80EG_eng.book 34 ページ 2018年5月28日 月曜日 午後3時15分 To set the recording time 1 Select “Recording Time” or “Continuous recording” in step 3 (> 33). Recording Time: You can set the length of recording time from 30 minutes to 4 hours. • You can select the recording time with [2, 1]. 2 Press [OK].
DMR-UBC&UBS80EG_eng.book 35 ページ 2018年5月28日 When recording two programmes: Following screen appears 月曜日 午後3時15分 Notes for recording of an encrypted broadcast This unit allows you to record/view/play an encrypted programme by decryption using a supporting CI module. Stop Recording 2 recordings are in progress.
DMR-UBC&UBS80EG_eng.book 36 ページ 2018年5月28日 2 encrypted programmes simultaneous recording/viewing/playing Two programmes (e.g., “A” and “B”) which need the same CI module for decryption will be recorded/viewed/played as follows: When “Automatic” is selected Programme “A” “B” While recording programme “A”, start Record Record recording programme (Decrypted) (Encrypted) “B”. While viewing/playing Viewing/ Record programme “A”, start playing (Encrypted) timer recording possible programme “B”.
DMR-UBC&UBS80EG_eng.book 37 ページ 2018年5月28日 • You can enter up to 32 programmes within a month in advance. (Each daily or weekly programme is counted as one programme.) • This unit can record two programmes being broadcasted at the same time.§ • About CI Plus restriction (> 10) • Notes for recording of an encrypted broadcast (> 35) Preparation You can change the recording mode (picture quality) (> 34) 1 2 § Press [GUIDE]. TV Guide screen appears. Select the programme, then press the red button.
DMR-UBC&UBS80EG_eng.book 38 ページ 2018年5月28日 To use Signal Supported Recording The recording’s start and stop times can be controlled by the broadcaster, e.g. delayed start. • To use this function, set “Signal Supported” to “ON”. (> 39) • The Signal Supported Recording function may not work if you manually change the start time or the stop time over 10 minutes. • If the signal is not sent correctly, the recording may lack the beginning or the ending part of the programmes.
DMR-UBC&UBS80EG_eng.book 39 ページ 2018年5月28日 Select the items and change the settings. e.g., [UBC80] TUE 03.01.2017 8:05 Time Remaining HD 154:04 / UHD 77:02 DR Timer Recording Signal Supported : OFF Channel Day/Date 1 WED 07.01 Start 8:00 Stop 9:00 Mode DR XP Subtitles OFF Timer recording from channel information You can make timer recording of the current or next programme. 1 While watching a programme Press [STATUS ]. e.g., Programme Name 1 Channel You can select Category with the red button.
DMR-UBC&UBS80EG_eng.book 40 ページ 2018年5月28日 Recording Notes on timer recording • When the recording mode (picture quality) of a programme recorded in DR mode is changed, teletext recorded with the programme will be lost. • Data service will not be recorded. • (Only when recording broadcast in other than DR mode) This unit can record programmes in DR mode and then automatically change their recording mode (picture quality) to another setting while in standby mode.
DMR-UBC&UBS80EG_eng.book 41 ページ 2018年5月28日 Red: Timer recording standby is activated. Grey: Timer recording standby is deactivated. [ (Red) Currently recording programme A part or all of the programme will not be recorded since the programme is overlapping. The HDD is full. Copy-protected programme It was not recorded. The recording of the programme was not completed because of some reason. Auto Renewal Recording is set (> 39).
DMR-UBC&UBS80EG_eng.book 42 ページ 2018年5月28日 Recording Keyword Recording conditions Search Conditions: Keyword 1-16 Input the keyword to be registered. • Refer to “Entering text”. (> 84) • Default keyword is the programme title selected on the TV Guide screen. If the programme title includes its episode number, etc., delete the number before registering the title. Search Target Select the search target. Extra Word Settings 1 Add up to two keywords and two excluded words to refine search conditions.
DMR-UBC&UBS80EG_eng.book 43 ページ 2018年5月28日 Automatic deletion of Keyword Recording By default, when the HDD capacity is low, the unit automatically deletes programmes recorded with Keyword Recording, starting from the one with the oldest recording date. Perform the following not to delete them as necessary. (> 48) - Protect programmes. - Change automatic delete settings. - Remove programmes from “Keyword Record”. - Copy programmes before deleting them.
DMR-UBC&UBS80EG_eng.book 44 ページ 2018年5月28日 Using the external HDD (USB HDD) § § “For recorded programmes (> 25)” only If you intend to move recorded programmes to a USB HDD, the USB HDD must be registered to this unit first. Recording Limitation information • Registering of a USB HDD will format the USB HDD and all the content already recorded will be deleted. • Up to eight USB HDDs can be registered on this unit.
DMR-UBC&UBS80EG_eng.book 45 ページ 2018年5月28日 Playing programmes on the HDD 午後3時15分 Video Menu screen e.g., § Keyword Record § 1 2 “For recorded programmes (> 25)” only Time Remaining HD 154:04 / UHD 77:02 (DR) All Not Viewed Movie Date Social/Economic AVCHD Programme Name Press [FUNCTION MENU]. 29.10 Movie Select “Contents on HDD”, then press [OK]. 9:00 Duration 0:01(DR) Page Down Select Delete OK RETURN To play recorded programmes: Select “Recorded Programmes”, then press [OK].
DMR-UBC&UBS80EG_eng.book 46 ページ 2018年5月28日 月曜日 • Encrypted programme • Programme has failed to be decrypted. Screen icons [ (Red) Currently recording programme Protected programme t Playing back video § § • Programme was not recorded due to recording protection • Recording did not complete as the timer recording has started. Programme cannot be played. (When data is damaged etc.) Programme is copy protected.
DMR-UBC&UBS80EG_eng.book 47 ページ 2018年5月28日 月曜日 午後3時15分 Tab Editing the grouped programmes You can quickly find the recorded programmes by selecting the tab. 1 Select the programme or the group, then press the yellow button. • A check mark is displayed. Repeat this step. • Press the yellow button again to cancel. 2 Press [OPTION]. 3 Select the item below, then press [OK]. Create Group: Selected programmes are bundled to form a group. Release Grouping: All the programmes in the group are released.
DMR-UBC&UBS80EG_eng.book 48 ページ 2018年5月28日 e.g., Select “Keyword Record” tab. Video Menu Video Menu HDD Keyword Record Time Remaining All Not Viewed HD 154:04 / UHD 77:02 (DR) Movie Social/Economic 1: World Cup 2: Soccer 3: Premier League 4: Olympic Rec Mode (DR Folder 01 AVCHD Folder 02 HX) 5: --- (No Keyword) 6: --- (No Keyword) 0 0 Recording mode (picture quality) to change (> 34) Playing back video \ Video \ HDD Parent Folder Programme will be deleted if not enough space on HDD.
DMR-UBC&UBS80EG_eng.book 49 ページ 2018年5月28日 Playing contents on the media § 月曜日 午後3時15分 Menu screen Selecting screen for each operation is displayed when the media is inserted, and you can access the operation screen easily. e.g., [USB] USB Device Play / Copy Video 1 Insert the media. When the Video Menu screen or menu screen etc., appears: Select the item or content, then press [OK]. • Repeat this step if necessary.
DMR-UBC&UBS80EG_eng.book 50 ページ 2018年5月28日 月曜日 午後3時15分 Operation during play Video Menu screen e.g., [BD-RE] Video Menu BD-RE All All Programmes Time Remaining 10:30 (DR) Channel Date Programme Name Dogs and Cats 29.10 22:46 Duration 0:10(HM) 04.10 04.10 29.10 Birds World news Football Page Up Page 003/003 Play RETURN Delete • Discs continue to rotate while menus are displayed. Press [∫] when you have finished playback to protect the unit’s motor, your TV screen, etc.
DMR-UBC&UBS80EG_eng.book 51 ページ 2018年5月28日 月曜日 午後3時15分 Stop Pause Press [∫]. Press [;]. • Press [1 a1.3] to restart play. Resume play function Press [1 a1.3] to restart from the stopped position. • Discs: Only previous stopped position is memorised. The position may be cleared if the tray is opened or the unit is switched to standby mode. Quick View Press and hold [1 a1.3]. • Press again to return to normal speed. Slow-motion While paused, press [6] or [5]. • Press [1 a1.3] to restart play.
DMR-UBC&UBS80EG_eng.book 52 ページ 2018年5月28日 To display menu 午後3時15分 Switching subtitles [BD-V] [DVD-V] 1 Press [OPTION]. 2 Select “Playback Menu”, then press [OK]. 3 Select “Top Menu”, “Pop-up Menu” or “Menu”, then press [OK]. Skipping the content or chapter Press [:] or [9]. • [HDD] [USB_HDD] (For recorded programmes, > 25): It will not skip the programme. But the programme in the grouped programmes will be skipped.
DMR-UBC&UBS80EG_eng.book 53 ページ 2018年5月28日 You can enjoy the playback of Ultra HD Blu-ray discs with this unit. Preparation • For 4K/HDR viewing, connect to a TV and terminals that support HDCP2.2§1, 4K (50p/60p) 4:4:4 and HDR signals that meet Ultra HD Blu-ray standards. (> 11) • Network connection (> 16) • Network setting (> 20) Due to copyright restrictions, it may not be possible to play back certain discs unless this unit is connected to the Internet.
DMR-UBC&UBS80EG_eng.book 54 ページ 2018年5月28日 月曜日 4K Networking Playback menu You can save 4K videos/photos recorded with digital cameras and other 4K-compatible devices to the HDD of this unit and play them back. A variety of playback operations and settings can be performed from this menu. Available options differ depending on the playing contents and the condition of the unit. 1 Preparation • Connect a 4K-compatible TV to this unit.
DMR-UBC&UBS80EG_eng.book 55 ページ 2018年5月28日 Subtitle Settings§ Turn the subtitle on/off, and change the language depending on the media. Subtitles Subtitle Style Subtitle Position Subtitle Luminance Subtitle Language Select the subtitle language in the case of multiple languages. Angle§ Change the number to select an angle. Repeat Play Select the item which you want to repeat. Shuffle Select whether to play shuffle or not. Video The original video recording method (MPEG-4 AVC etc.) appears.
DMR-UBC&UBS80EG_eng.book 56 ページ 2018年5月28日 24p / 25p Conversion Plays back videos with film-like motion. • This function is available on the following conditions: - “Video Format” set to “Automatic”, “4K”, “1080i”§ or “1080p”§ (> 93) § Only for 24p Conversion - Connect 24p/25p compatible TV. Playing back video • Noise may appear on the image when you switch the setting. Progressive Select the method of conversion for progressive output to suit the type of content being played.
DMR-UBC&UBS80EG_eng.book 57 ページ 2018年5月28日 Deleting/Editing programmes Editing recorded programmes Once deleted, divided or partially deleted, content cannot be restored to its original state. Make certain before proceeding. • If the programme is contents protected, you may not perform editing other than deleting. (> 10) 1 § “For recorded programmes (> 25)” only § 2 3 • PIN is required to edit the programmes with Information On the Video Menu screen: Select the programme.
DMR-UBC&UBS80EG_eng.book 58 ページ 2018年5月28日 月曜日 午後3時15分 Partial deleting Picture Quality Change [HDD] [USB_HDD] [BD-RE] [BD-R] [RAM] [HDD] [USB_HDD] The Picture Quality Change function changes the recording mode of programmes in DR mode or AVCHD format. Programmes will be smaller in size after their recording mode is changed. It takes about the same amount of time as recording to change the mode. 1 Select “Partial Delete” in “Edit”, then press [OK].
DMR-UBC&UBS80EG_eng.book 59 ページ 2018年5月28日 5 Select the item below, then press [OK]. Delete: The original programme will be deleted to save the storage capacity of the HDD after the picture quality is changed. Keep: The original programme is retained even after the picture quality is changed. • The original programme will be deleted after Picture Quality Change, if the selected programme is indicated with . (> 10) 6 If you have selected “Now”: Select “Start”, then press [OK].
DMR-UBC&UBS80EG_eng.book 60 ページ 2018年5月28日 To cancel the decryption Press and hold [RETURN ] for more than 3 seconds. • For decryption, the CI module that supports the programme is necessary. • During decryption, do not remove the CI module from this unit.(> 9) • Depending on the programme, playback/decryption may not be possible. [HDD] [USB_HDD] [BD-RE] [BD-R] [RAM] • The maximum number of chapters: (Depends on the state of recording.) [HDD] [USB_HDD]: Approx.
DMR-UBC&UBS80EG_eng.book 61 ページ 2018年5月28日 午後3時15分 Copying programmes • Encrypted programmes ( §1, 2, 3 §1, 3 §1 §2 §3 “For recorded programmes (> 25)” only The programme in the source media will be deleted. The recording mode (picture quality) cannot be changed. 1 Insert or connect the media. 2 Press [FUNCTION MENU]. 3 4 Select “Recorded Programmes” or “Video ( AVCHD )” in “Contents on HDD”, then press [OK]. Select the programme. A check mark is displayed. Repeat this step.
DMR-UBC&UBS80EG_eng.book 62 ページ 2018年5月28日 2 To change the selected programmes: Select the programme, then press the yellow button. Repeat this step to select programmes. 午後3時15分 • Audio Description Automatic: Audio Description will be recorded if they are included in the programme. To change the picture quality: • Finalise On: [DVD-R] [DVD-RW] [+R] The discs become play-only and you can also play them on other DVD equipment.
DMR-UBC&UBS80EG_eng.book 63 ページ 2018年5月28日 Copying programmes with copying list [HDD] ,. [USB_HDD] [HDD] > [USB_HDD] > [BD-RE] [BD-R] [BD-RE] [BD-R] [RAM] [+RW] > [HDD] 2 午後3時15分 Register programmes for copy. 1 Select “Create List”, then press [1] (right). 2 Select “New item”, then press [OK]. 3 Select the programme, then press the yellow button. Repeat this step to select programmes. e.g., [HDD] Create List Grouped Programmes HDD Date [HDD] ,. [USB_HDD]: 1 Press [FUNCTION MENU].
DMR-UBC&UBS80EG_eng.book 64 ページ 2018年5月28日 5 Make other settings. 1 Select “Other Settings”, then press [1] (right). Delete All: All programmes that you registered to copy are deleted. Add: Add new items to the copying list. 1 Select the programmes with the yellow button. 2 Press [OK]. Copy Cancel All 2 Picture Quality 3 Create List HG Subtitles Off Finalise Off Audio Description Off 1 4 Other Settings Delete: Selected programmes are deleted.
DMR-UBC&UBS80EG_eng.book 65 ページ 2018年5月28日 Notes for copying 午後3時15分 Copy (Change Picture Quality) Copy (Keep Picture Quality) The unit copies a programme while maintaining its original picture quality and recording time. This method can perform copying faster than Copy (Change Picture Quality) can. • Copy (Keep Picture Quality) is available for the picture quality and media combinations below.
DMR-UBC&UBS80EG_eng.book 66 ページ 2018年5月28日 Copying a finalised disc 3 Copying video 4 5 6 午後3時15分 Copying Programme Playing [DVD-V] > [HDD] While playing a disc, the content being played is copied to the HDD according to the set time. 1 2 月曜日 [HDD] > [BD-RE] [BD-R] [RAM] [DVD-R] [DVD-RW] [+R] [+RW] 1 Press [FUNCTION MENU]. Select “Copy Menu” in “Copy Video”, then press [OK]. Set “Picture Quality”. 1 Select “Picture Quality”, then press [1] (right).
DMR-UBC&UBS80EG_eng.book 67 ページ 2018年5月28日 Copying HD Video (AVCHD) to the DVD-R in High Definition You can copy HD Video (AVCHD) recorded on HDD to a DVD-R in High Definition quality. [HDD] > [DVD-R] 2 3 午後3時15分 Copying video files [USB] 1 Insert an unformatted DVD-R or DVD-R DL. The menu screen appears. (> 49) > [HDD] On the video list screen: Select the file or folder. e.g., Video Menu Select “Copy Video ( AVCHD ) to Disc”, then press [OK].
DMR-UBC&UBS80EG_eng.book 68 ページ 2018年5月28日 Photo and Music Photo §2 1 2 §2 “For data files (> 25)” only (JPEG, MPO) [RAM] [DVD-R] [+R] only Playing photos 1 [HDD]: 1 Press [FUNCTION MENU]. 2 Select “Photo” in “Contents on HDD”, then press [OK]. Except [HDD]: 1 Insert or connect the media. The menu screen appears. (> 49) 2 Select “View Photos”, then press [OK]. 2 Photo and Music 3 Select the folder, then press [OK]. • Photo menu screen appears. (> 69) Select the photo, then press [OK].
DMR-UBC&UBS80EG_eng.book 69 ページ 2018年5月28日 Photo Menu screen 午後3時15分 Slideshow settings 1 e.g., [HDD] Tab Photo Menu 月曜日 On the Photo Menu screen: Press the green button. HDD All Slideshow 3D 03.01.2012 8 29.10.2012 12 25.02.2013 18 Start Slideshow 15.03.
DMR-UBC&UBS80EG_eng.book 70 ページ 2018年5月28日 Editing photos 月曜日 午後3時15分 Selecting and copying the photos [HDD] [BD-RE] [BD-R] [RAM] 1 > [BD-RE] [BD-R] [RAM] [DVD-R] [+R] [CD] > [HDD] To edit the photo: 1 Select the folder, then press [OK]. [USB_HDD] [USB] > 2 Select the photo to edit. 1 On the Photo Menu screen: To edit the folder: Select the folder. • To select multiple folders or photos Press the yellow button when selecting the folder or photo. A check mark is displayed. Repeat this step.
DMR-UBC&UBS80EG_eng.book 71 ページ 2018年5月28日 §2 §1 [USB_HDD] [BD-RE] [BD-R] [RAM] [DVD-R] [+R] [CD] [USB] > [HDD] §1 Newly added photos will automatically be copied to the HDD. 2 午後3時15分 Music Copying automatically 1 月曜日 Insert the media. The menu screen appears. (> 49) Select “Copy New Photos”, then press [OK]. e.g., [USB] §2 “For data files (> 25)” only [DVD-R] [+R] only Playing music CD (CD-DA) [CD] (CD-DA) Insert the disc. Playback will automatically start. e.g.
DMR-UBC&UBS80EG_eng.book 72 ページ 2018年5月28日 Music Move to the parent folder [USB_HDD] [DVD-R] [+R] [CD]§ [USB] > [HDD] Except [CD] (CD-DA) § 1 3 On the music list screen: Select the file or folder. e.g., Playing music file on the HDD 1 2 午後3時15分 Copying music Screen icons Folder 月曜日 USB Music Menu Press [FUNCTION MENU]. Folder 01 Select “Music” in “Contents on HDD”, then press [OK]. The music list screen appears. Folder 02 music01.mp3 music02.mp3 music03.mp3 music04.
DMR-UBC&UBS80EG_eng.book 73 ページ 2018年5月28日 午後3時15分 Network Service TV Anywhere Network Service allows you to access some specific websites supported by Panasonic, and enjoy Internet contents such as photos, videos, etc. from Network Service home screen. Operations such as the ones below can be performed from anywhere with a smartphone or tablet installed with Media Center App. - Setting a recording - Watching TV with this unit’s tuner - Playing back programmes recorded on this unit e.g.
DMR-UBC&UBS80EG_eng.book 74 ページ 2018年5月28日 DVB-via-IP Server Function (TV>IP) The DVB-via-IP Server Function allows you to stream TV broadcasts to a compatible device in the same network. You can watch broadcasts on a device provided with the DVB-via-IP Client function. • It is not possible to use the DVB-via-IP Server function and another network function (Network Service / Home Network) simultaneously. e.g.
DMR-UBC&UBS80EG_eng.book 75 ページ 2018年5月28日 Home Networking (DLNA) allows you to watch the contents and broadcasts on Server equipment connected on the same network from Client equipment. Using this unit as Server You can watch broadcasts received by this unit (Multiroom TV Streaming), videos and photos saved on HDD of this unit on DLNA (Client) compatible equipment. This unit can be used both as Server and Client.
DMR-UBC&UBS80EG_eng.book 76 ページ 2018年5月28日 Using this unit as Client 月曜日 午後3時15分 Playable contents You can share videos, photos and music stored in the DLNA Certified media server. When this unit works as a DLNA client, following contents are playable. Video (Recorded programmes) Audio codec Example of file extension MPEG2 Dolby® Digital Linear PCM – MPEG2 H.
DMR-UBC&UBS80EG_eng.book 77 ページ 2018年5月28日 Using this unit as Media Renderer This unit works as Media Renderer, which allows you to play back the contents on DLNA Server by operating a Digital Media Controller (a smartphone, etc.). 午後3時15分 Using Home Networking (DLNA) with Wi-Fi Direct® Wi-Fi Direct is a standard that enables wireless LAN devices to communicate each other directly without a wireless broadband router.
DMR-UBC&UBS80EG_eng.book 78 ページ 2018年5月28日 When no devices are found Wi-Fi Direct Connection Device not found. To connect with a Wi-Fi Direct compatible device, please check connection mode of pairing device and select “Search again”. To connect with a Wi-Fi Direct incompatible device, please select “Next”. Search again Next OK If the corresponding device is not found even after the search is run again, select “Next” and change the connection method.
DMR-UBC&UBS80EG_eng.book 79 ページ 2018年5月28日 Copying the HD Video (AVCHD) 5 6 午後3時15分 Press [OK]. Select “Start”, then press [OK]. It will automatically format the unformatted disc, such as a new disc. • It may take time for the copying to start. § video camera, etc. § To stop copying Press and hold [RETURN ] for 3 seconds. “For data files (> 25)” only Screen icons e.g., About other screen icons Refer to “Screen icons”.
DMR-UBC&UBS80EG_eng.book 80 ページ 2018年5月28日 Other functions VIERA Link What is VIERA Link? VIERA Link is a convenient function which will link the operations of this unit and a Panasonic TV (VIERA) or an amplifier/receiver. You can use this function by connecting the equipment with the HDMI cable. See the operating instructions for connected equipment.
DMR-UBC&UBS80EG_eng.book 81 ページ 2018年5月28日 You cannot operate the unit until the update is complete. Don’t remove the AC mains lead during the update. Removing the AC mains lead while the update is in progress may damage the unit. Update software (firmware) of this unit Software of this unit can be updated automatically by the following methods at the specified time. • From broadcasts (Default setting is 3 a.m.
DMR-UBC&UBS80EG_eng.book 82 ページ 2018年5月28日 Other operations Media management [BD-RE] [BD-R] [RAM] [DVD-R] [DVD-RW] [+R] [+RW] 1 Press [FUNCTION MENU]. 2 Select “Media”, then press [OK]. 3 Select the media, then press [OK]. 4 Select the item, then press [OK]. • Selectable items will change depending on the selected item and inserted media. 月曜日 午後3時15分 Disc Protection [BD-RE] [BD-R] [RAM] Select “Yes”, then press [OK]. e.g.
DMR-UBC&UBS80EG_eng.book 83 ページ 2018年5月28日 Format Disc [BD-RE] [RAM] [DVD-RW] [+RW] [BD-R] [+R] (New disc only) Formatting deletes all contents (including computer data), and they cannot be restored. Check carefully before proceeding. 1 Select “Yes”, then press [OK]. 2 Select “Start”, then press [OK]. 3 Press [OK]. [RAM] To stop formatting Press [RETURN ]. • You can cancel formatting if it takes more than 2 minutes. The disc must be reformatted if you do this.
DMR-UBC&UBS80EG_eng.book 84 ページ 2018年5月28日 Create Top Menu [+RW] You can create Top Menu for displaying on other equipment. Make selections from “Top Menu” and “Auto-Play Select” before creating Top Menu. 月曜日 午後3時15分 Entering text Preparation • Show the “Enter Programme Name” screen, etc. 1 Select a character, then press [OK]. Repeat this step to enter other characters. e.g., 1 Select “Yes”, then press [OK]. 2 Select “Start”, then press [OK]. 3 Press [OK].
DMR-UBC&UBS80EG_eng.book 85 ページ 2018年5月28日 Basic Settings 午後3時15分 [UBC80] DVB Tuning You can change the unit’s settings of DVB Tuning, Sound, Display, Connection, Network etc. in the menu. Favourites Edit 1 2 After editing as follows, save the Favourites. Press [FUNCTION MENU]. Select “Basic Settings” in “Setup”, then press [OK]. Basic Settings DVB Tuning HDD / Disc / USB HDD Picture Sound Display Connection Network Others OK RETURN 3 4 Select the menu, then press [OK].
DMR-UBC&UBS80EG_eng.book 86 ページ 2018年5月28日 月曜日 午後3時15分 Auto Setup [DVB-C] Settings for DVB-C Channels You can restart the Auto Setup. (> 17) 1 Select “Yes”, then press [OK]. • If the country selection screen appears: Select the country, then press [OK]. 2 Follow the on-screen instructions and make the following settings. [DVB-C] 1 Select “Digital Cable Channels”, then press [OK]. 2 Select “Preset Channel Number” or “Operator’s Channel Number ( LCN )”, then press [OK].
DMR-UBC&UBS80EG_eng.book 87 ページ 2018年5月28日 月曜日 午後3時15分 Update Channel List Parental Rating You can update the channel list to the latest one. Set a ratings level to limit broadcast viewing and playback. • Follow the on-screen instructions. Signal Condition You can check the quality and strength of signals. Press [CH W X] to select the channel. Preferred Language Select the language for multi broadcast. If the selected language is not available, the original language will be selected.
DMR-UBC&UBS80EG_eng.book 88 ページ 2018年5月28日 [UBS80] DVB Tuning Favourites Edit (> 85) Auto Setup You can restart the Auto Setup. (> 18) 1 Select the Auto Setup method, then press [OK]. • Search by selected satellite Transponders for the already found satellite are searched for channels. • Search all satellites All satellites and transponders are searched for channels. 2 Select “Yes”, then press [OK]. 月曜日 午後3時15分 Update Channel List You can update the channel list to the latest one.
DMR-UBC&UBS80EG_eng.book 89 ページ 2018年5月28日 You can check the quality and strength of signals. • Press [2, 1] to select the tuner. • Press [CH W X] to select the channel. • The channels you can receive are affected by weather conditions, seasons, time (day/night), region, length of the cable that is connected to the aerial, etc. • When the signal is too strong (red bar), reduce the signal amplification at your aerial. • When the signal is weak: - adjust the position and direction of the dish.
DMR-UBC&UBS80EG_eng.book 90 ページ 2018年5月28日 午後3時15分 Pure Sound mode Aspect for Recording You can enjoy movies or music in an environment more suitable for viewing by stopping the rotation of the HDD when playing back commercial BD-Videos, DVD-Videos or music CDs. • If “On” is selected, timer recording does not start while playing back BD-Video, DVD-Video or music CD. Sets the aspect ratio when recording or copying except in DR mode.
DMR-UBC&UBS80EG_eng.book 91 ページ 2018年5月28日 Delete all photos 月曜日 午後3時15分 Picture Delete all photos on the built-in HDD. Still Mode Delete all music Delete all Music on the built-in HDD. Format HDD Formatting deletes all contents on the built-in HDD, and they cannot be restored. Check carefully before proceeding. Settings for USB HDD USB HDD Registration Register the USB HDD. (> 44) Select the type of picture shown when you pause play. • Field: Select if jittering occurs when “Automatic” is selected.
DMR-UBC&UBS80EG_eng.book 92 ページ 2018年5月28日 月曜日 午後3時15分 Digital Audio Output PCM Down Conversion Select how to output audio with a sampling frequency of 96 kHz. • On: Signals are converted to 48 kHz. (Choose when the connected equipment cannot process signals with a sampling frequency of 96 kHz.) • Off: Signals are output as 96 kHz. - When the signals have a sampling frequency of over 96 kHz. • The signals will be converted to 48 kHz regardless of the setting in the following cases.
Connection 3D Settings 3D AVCHD Output If 2D AVCHD video is recognised as 3D video and cannot be played back correctly, you may be able to play it by changing the setting. 3D Playback Message Set to display or hide the 3D viewing warning screen. VIERA Link Select “Off” when you do not want to use VIERA Link. Aspect for 4:3 Video To play a 4:3 content, set how to show pictures on a 16:9 TV. • 4:3: Picture output expands left or right. • 16:9: Picture is output as original aspect with side panels.
DMR-UBC&UBS80EG_eng.book 94 ページ 2018年5月28日 HDR (High Dynamic Range) Output Output images in HDR (High Dynamic Range) format depending on the content and connected TV. HLG / PQ Conversion Set whether or not to convert HDR (High Dynamic Range) videos in HLG format to PQ format before outputting them when this unit is connected to a TV that supports only HDR (PQ) format. • When “HDR (High Dynamic Range) Output” is set to “Off”, this setting is disabled.
DMR-UBC&UBS80EG_eng.book 95 ページ 2018年5月28日 Network Service Settings Second Screen Browsing When this function is set to “On”, you can enjoy the content you are viewing on a Network Service application of smartphone, etc. with the home network on the big screen of your TV. Lock You can restrict using Network Service. • PIN is required to change. (> 30) Automatic Volume Control Volume is adjusted automatically to the standard volume while using Network Service.
DMR-UBC&UBS80EG_eng.book 96 ページ 2018年5月28日 Resolution Setting for DLNA When “Conversion Setting for DLNA” is set to “On”, select the image quality. Registration type for remote devices • Automatic: All connected devices on the same network can access this unit. • Manual: Only registered devices can access this unit. Remote device list • To register equipment manually 1 Select the device name or the MAC Address for the device you want to register, then press [OK]. 2 Select “Yes”, then press [OK].
DMR-UBC&UBS80EG_eng.book 97 ページ 2018年5月28日 Others 月曜日 午後3時15分 [UBC80] [DVB-C] RF OUT ( CATV Signal ) Quick Start • On: It is possible to start quickly from standby mode. • Off: Power consumption in standby mode is minimised. (> 108) However, startup time from standby mode will be longer. • Timer Setting for Quick Start: “Quick Start” is activated when the set time comes.
DMR-UBC&UBS80EG_eng.book 98 ページ 2018年5月28日 Remote Control 月曜日 午後3時15分 System Update Change the remote control code on the main unit and the remote control if you place other Panasonic products close together. • Use “Set Code 1”, the factory set code, under normal circumstances. 1 Select the code, then press [OK]. 2 While pressing [OK], press and hold the number button ([1] to [6]) for more than 5 seconds. 3 Press and hold [OK] for more than 5 seconds. 4 Press [OK].
DMR-UBC&UBS80EG_eng.book 99 ページ 2018年5月28日 Troubleshooting guide Before requesting service, make the following checks. If the problem still persists, consult your dealer for instructions. Updating to the latest software (firmware) may solve the problem. (> 81) The followings do not indicate a problem with this unit: • Regular disc rotating sounds or HDD rotating sounds. • Poor reception due to atmospheric conditions. • When you switch the unit on or to standby mode, there may be an unexpected sound.
DMR-UBC&UBS80EG_eng.book 100 ページ 2018年5月28日 TV screen and video Screen size is wrong. • Adjust the aspect ratio setting on TV. • Check “Aspect for Recording” before recording or picture quality change. (> 90) [UBC80] TV reception is not displayed. • Broadcast signals are not output from this unit’s RF OUT terminal. Select “On” in “RF OUT ( CATV Signal )” or “RF OUT ( Aerial Signal )”. (> 97) The black screen appears on the TV.
DMR-UBC&UBS80EG_eng.book 101 ページ 2018年5月28日 Video is not output in 4K or high-definition. • Confirm that “Video Format” in the Setup menu is set properly. (> 93) • Confirm the HDMI cable, related connections and the compatibility of TV video input. To output images in 4K, connect the HDMI cable to a 4K compatible terminal of the connected TV. (> 11) • To enjoy image in 4K (50p/60p), set “4K(50p/60p) Output” to “4K(50p/60p) 4:4:4” or “4K(50p/60p) 4:2:0”.
DMR-UBC&UBS80EG_eng.book 102 ページ 2018年5月28日 Recording, timer recording and copying Cannot record. Cannot copy. • Some broadcasts are copyright protected. • You cannot record to the disc by pressing the [REC ¥] or timer recording. • The disc is protected. (> 82) • [DVD-R] [DVD-RW] [+R] [+RW] Since it will copy to HDD temporarily, copying is not possible if there is insufficient available capacity on the HDD. • This unit cannot record/copy NTSC signals to discs that already have PAL signal recordings.
DMR-UBC&UBS80EG_eng.book 103 ページ 2018年5月28日 Play Cannot play back. • The disc is dirty. (> 26) • The disc is scratched or marked. • The disc may not be able to play back if it was not finalised or a Top Menu was not created on the equipment used for recording. • Refer to “Screen icons”. (> 46) • Depending on the encrypted service, it may not be possible to play back certain programmes if they have been recorded without being decrypted.
DMR-UBC&UBS80EG_eng.book 104 ページ 2018年5月28日 TV Guide The TV Guide information is not displayed properly. • Set the clock correctly. (> 98, Clock) • There was a programme change, or TV Guide information from a broadcast station was possibly not correctly transmitted. • If signal quality is bad, the TV Guide system may not be able to receive any data. • It may take time until the TV Guide screen is displayed correctly. Wait for about a day. Broadcast Picture regularly breaks up on some channels.
2018年5月28日 You cannot play contents properly from DLNA compatible equipment on the network. • There may be some video that cannot be played back on DLNA compatible equipment depending on the equipment.
DMR-UBC&UBS80EG_eng.book 106 ページ 2018年5月28日 Messages on the front panel display The following messages or service numbers appear on the front panel display when something unusual is detected. CAM UPGRADE 月曜日 午後3時15分 PROGRAMME FULL • There are already 32 timer programmes. Delete unnecessary timer programmes. (> 41) • You are trying to divide a programme when the maximum possible number of programmes is already stored on the media. CAM is being updated.
DMR-UBC&UBS80EG_eng.book 107 ページ 2018年5月28日 月曜日 午後3時15分 U59 The unit is hot. The unit switches to standby for safety reasons. Wait for about 30 minutes until the message disappears. Install or place this unit with good ventilation. U61 (When a disc is not inserted) A malfunction has occurred. The unit is trying to restore to the normal operation. Once the message disappears you can use the unit again. If it remains displayed, consult the dealer.
DMR-UBC&UBS80EG_eng.book 108 ページ 2018年5月28日 Specifications Specifications are subject to change without notice. ∫ General Dimensions: 430 mm (W) 62 mm (H) (including the projecting parts) 210 mm (D) Mass: Power supply: 月曜日 ∫ TV system [UBC80] Tuner System: Country: Power consumption: [UBC80] Approx. 46 W [UBS80] Approx. 66 W Power consumption in networked standby mode: “Quick Start” is not activated and “Networked Standby” is set to “On” Approx.
DMR-UBC&UBS80EG_eng.book 109 ページ 2018年5月28日 ∫ LASER specification Class 1 LASER Product ∫ HG, HX, HE, HL, HM modes 405 nm (BDs) 661 nm (DVDs) 783 nm (CDs) Laser power: Recording Mode (picture quality) HDD BD-RE, BD-R (1 TB) Dual Single Layer Layer (25 GB) (50 GB) HG 157 hours 4 hours 8 hours HX 235 hours 6 hours 12 hours HE 353 hours 9 hours 18 hours HL 472 hours 12 hours 24 hours HM 684 hours 17 hours 35 hours 30 min.
DMR-UBC&UBS80EG_eng.book 110 ページ 2018年5月28日 Audio information The audio output differs depending on which terminals are connected to the amplifier/receiver, and the setting on this unit. (> 92, Digital Audio Output) • The number of channels listed is the maximum possible number of output channels when connected to amplifier/receiver compatible with the respective audio format. Terminal HDMI AV OUT DIGITAL AUDIO OUT §1 §2 The maximum possible number of Dolby sound is 2ch PCM.
DMR-UBC&UBS80EG_eng.book 111 ページ 2018年5月28日 月曜日 午後3時15分 Disclaimer Personal information handling To provide functions and services of this unit, a device ID, device password and usage history information are stored and managed securely in an appropriate security environment of Panasonic. Please note that usage history and other information may be collected for purposes such as improving products and services in such a way that individuals cannot be identified.
DMR-UBC&UBS80EG_eng.book 112 ページ 2018年5月28日 月曜日 午後3時15分 Licenses “AVCHD”, “AVCHD 3D”, “AVCHD Progressive” and “AVCHD 3D/Progressive” are trademarks of Panasonic Corporation and Sony Corporation. Copyright 2004-2014 Verance Corporation. CinaviaTM is a Verance Corporation trademark. Protected by U.S. Patent 7,369,677 and worldwide patents issued and pending under license from Verance Corporation. All rights reserved.
DMR-UBC&UBS80EG_eng.book 113 ページ 2018年5月28日 月曜日 午後3時15分 This product incorporates the following software: (1) the software developed independently by or for Panasonic Corporation, (2) the software owned by third party and licensed to Panasonic Corporation, (3) the software licensed under the GNU General Public License, Version 2.0 (GPL V2.0), (4) the software licensed under the GNU LESSER General Public License, Version 2.1 (LGPL V2.
DMR-UBC&UBS80EG_eng.book 114 ページ 2018年5月28日 月曜日 午後3時15分 Index E A Easy setting . . . . . . . . . . . . . . . . . . . . . . . 17, 18 Entering text . . . . . . . . . . . . . . . . . . . . . . . . . . 84 Audio . . . . . . . . . . . . . . . . . . . . . . . . . 29, 52, 110 Audio Description . . . . . . . . . . . . . . . . . . 30, 52 Auto Setup . . . . . . . . . . . . . . . . . . 17, 18, 86, 88 AVCHD . . . . . . . . . . . . . . . . . . . . . 45, 49, 67, 79 B Basic Settings . . . . . . . . . . . . . . . .
DMR-UBC&UBS80EG_eng.book 115 ページ 2018年5月28日 月曜日 午後3時15分 P T PAUSE LIVE TV . . . . . . . . . . . . . . . . . . . . . . . 32 Photo . . . . . . . . . . . . . . . . . . . . . . . . . . . . . . . . 68 Picture Quality . . . . . . . . . . . . . . . . . 25, 58, 109 PIN . . . . . . . . . . . . . . . . . . . . . . . . . . . . . . . 30, 98 Playback menu . . . . . . . . . . . . . . . . . . . . . . . . 54 Protection Disc . . . . . . . . . . . . . . . . . . . . . . . . . . . . . . . . 82 Photo . . . . . . . . . . .
DMR-UBC&UBS80EG_eng.book 116 ページ 2018年5月28日 月曜日 午後3時15分 Disposal of Old Equipment and Batteries Only for European Union and countries with recycling systems These symbols on the products, packaging, and/or accompanying documents mean that used electrical and electronic products and batteries must not be mixed with general household waste.