
User manual

PRO MODE
10
٨
٨
٨
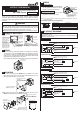
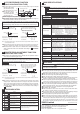
When the mode selection key is held down for four seconds in the RUN mode, the PRO mode will open.
The mode will change to the RUN mode when the mode selection key is held
down during this setting process. In this case, the changed item is entered.
The leftmost settings are the default settings (factory setting).
Changes the indication of the sub-display.
' ': Displays nothing.
''Presently selected pressure unit is displayed.
''Desired No. can be shown
''Desired alphabets, numbers and signs can be shown.
Setting item Description
Sub-display selection
Display speed selection
Changes the speed of the displayed pressure value on the main display.
Eco mode setting
Displayed color
relation selection
(Standard type only)
Hysteresis fixed
value selection
Sets hysteresis of the EASY mode and the window comparator mode.
(8 steps)
Setting check code
Current setting contents can be checked. For codes. refer to 'List of code settings'.
The setting contents set at the displayed color setting in Menu setting mode
can be related with either comparative output 1 or comparative output 2.
Current consumption can be lowered.
'': Normal operation (ECO mode is off.)
' ' :
If any key operation is not carried out for approx. 5 sec. in RUN mode,
the display becomes dark.
' ':
If any key operation is not carried out for approx. 5 sec. in RUN mode,
the display is turned off.
Press any key to return to the normal indication.
Copy mode setting
Reset setting Returns to default settings (factory settings).
The setting contents are copied.
The setting contents are copied, and the slave side sensor goes into key-lock state.
The setting of the master side sensor can be copied to the slave side sensors.
For details, refer to 'SETTING COPY FUNCTION
11
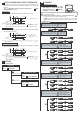
<RUN mode>
<PRO mode>
Hold down for
four seconds
MODE
MODE
High-function type
<Display speed selection>
MODE
250ms (500ms) (1,000ms)
<Sub-display selection>
MODE
(Standard) (Display OFF) (Unit display)
(Custom display)
(No. display)
Copy sending
OFF
Copy sending
ON
<Eco mode setting>
<Setting check code>
<Setting copy mode>
MODE
MODE
Copy sending
ON-L
OFF (Standard) (Max.)
Automatic
MODE
<RUN mode>
<Reset setting>
MODE
MODE MODE
Copy ready
state
MODE
<Hysteresis fixed value selection>
(Min.)(Max.)
MODE
<Sub-display selection>
When ' ' is set. When ' ' is set.
<RUN mode>
MODE MODE
MODE
MODE
MODE
MODE
Change the dis-
played details with
and .
<Displayed color relation selection>
Relating with
com-
parative output 1
Relating with
com-
parative output 2
㧙㧙㧙㧙 㧙㧙
㧙㧙 㧙㧙
㧙
㧙
㧙
㧙
Analog volt-
age output
Compara-
tive output 1
Compara-
tive output 1
Compara-
tive output 1
Compara-
tive output 1
Compara-
tive output 2
Compara-
tive output 2
Compara-
tive output 2
Compara-
tive output 2
Remote zero-
adjustment
Auto ref-
erence
N.O. OFFOFF P-1, Lo-1
N.C. N.O. Hi-1
N.O. N.C. P-2, Lo-2
N.C.
N.O.
Hi-2
ADJ.N.O.
N.C.
N.C.
N.C.
N.O.
EASY
Hysteresis
Window
comparator
EASY
Hysteresis
Window
comparator
Red when
ON
Green when
ON
Always red
Always green
First digit
N.O. / N.C.
selection
Comparative out-
put 1 output mode
Comparative out-
put 2 output mode
N.O. / N.C.
selection
Analog voltage out-
put / external input
Threshold
display
Indication color of
the main display
Displayed col-
or connection
Second digit
Standard type
High-func-
tion
type
Standard
type only
Third
digit
Fourth digit
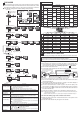
Code
Code
List of code settings
2.5ms MPa 250ms OFF
5ms kPa 500ms Std
10ms kgf/cm
2
1,000ms Full
25ms bar
㧙㧙
50ms psi
㧙㧙
100ms mmHg
㧙㧙
250ms inchHg
㧙㧙
500ms
㧙㧙㧙
1,000ms
㧙㧙㧙
5,000ms
㧙㧙㧙
Response time Unit selection Display speed Eco mode
Fifth digit 6th digit 7th digit 8th digit
SETTING COPY FUNCTION
11
٨
This can copy the settings of the master side sensor to the slave side sensor.
٨
٨
Be sure to use the setting copy function between the identical models.
This function cannot be used between different models.
Only one sensor can be connected on slave side with a master side sensor for the setting copy function.
Notes: 1)
For the high-function type, analog voltage / external input.
Ԙ
ԙ
Ԛ
Set the setting copy function of the master side sensor to 'Copy sending ON' or
'Copy sending ON-L', and then press the mode selection key so that the sensor is in
copy ready state. For details, refer to <Setting copy mode> in ' PRO MODE'.
Turn off the master side sensor.
Connect the master side sensor with the slave side sensor as shown below.
<Setting procedure>
Notes: 2)
3)
Take care that if the power is not turned on at the same time, the setting con-
tents may not be copied.
Note that when the power is on, pulse output is output to comparative output 1.
<To cancel the setting copy mode of master side sensor>
Ԙ
ԙ
Whilst the slave side sensor is disconnected, turn on the power of the
master side sensor.
Press the mode selection key for approx. two seconds.
ԛ
Ԝ
ԝ
Ԟ
̪
Turn on the master side sensor and the slave side sensor at the same
time. (Note2) (Note 3)
Set contents (16-bit coded) are shown in orange on the main display of
the master side sensor and the copying starts.
The same code explained above is shown in green on the the main display of the
slave side sensor, and ' ' is shown on the sub-display (When copying is complete.)
Turn off the power of the master side sensor and the slave side sensor
and disonnect the wire.
If copying the setting to another sensor repeatedly, follow steps Ԛ to ԝ.
10
(Brown)㧗V (Brown)㧗V
(Blue) 0V (Blue) 0V
(Black) Comparative output 1 (Black) Comparative output 1
(White) Comparative output 2 (Note 1) (White) Comparative output 2 (Note 1)
Master side sensor Slave side sensor
Power supply
Color code of cable with connector