
Operating Instructions - Scanner / Email


9
Chapter 2 Scan to Email
6
Insert the SD Memory Card.
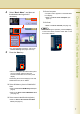
1 Push the Slot Cover to open it.
2 Insert the SD Memory Card as illustrated.
(Label side up).
7
Select “SD Card”.
z Only one storage device can be selected at
a time. When the “SD Card” is selected as a
storage device, the scanned image cannot
be saved to the PCMCIA/PC Card or Hard
Disk Drive at the same time.
8
Press the Start key.
Scanned image is saved in the following
directory of the SD Memory Card.
z Directory:
\PRIVATE\MEIGROUP\PCC\DI\IMAGE
z When scanning from the Platen Glass, place
the next original, and then follow the
instructions described on the touch panel
display.
9
Push the SD Memory Card, and then
remove it.
z Do not remove the SD Memory Card while
the Access Indicator is flashing.
10
Close the Slot Cover.
z When cancelling the operation, press the Stop key
on the Control Panel, and then select “Yes” on the
Touch Panel Display.