Installation Overview Table of Contents Installation Overview General Installation Overview ........................ 2 Setting Your Machine Network Configuration ................................... 4 Installing Printer/Fax Driver Printer Driver ................................................. 7 ● System requirements ............................ 7 ■ For Peer to Peer Connection (Direct Connection) ................................... 8 ● Installing the Printer Driver on your PC ..............................
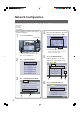
General Installation Overview Follow the guidelines in this booklet when setting up the machine and installing each software. Please read all procedures completely before attempting to setup this machine. 1 Turning the Power Switches ON. 1 Turn ON ( ) the Power Switches. 2 Main Power Switch : Rear of the machine. Power Switch : Left side of the machine. Setup the Network Configuration using the Control Panel of the machine.
Installation Overview 4 NOTE Setting up Optional Accessories. ■ Network Scanner Function Requires the installation of Network Scanner/Email Module (Order Number: DA-NS320/NS321), Hard Disk Drive Unit (Order Number: DA-HD32), Main Memory (Order Number: DA-EMN56) and Page Memory (Order Number: DA-PMN56). 1 Installing the Panasonic Document Management System on your PC. (See pages 32-35) 2 Setting up the Scanner Configuration using the Communications Utility.
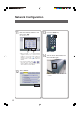
Network Configuration Follow the procedure below if your network is not configured with the DHCP server, and the TCP/IP parameters must be setup manually. - IP Address - Subnet Mask - Default Gateway Before operating the procedures, make sure the Print On Line LED is lit. 1 4 Press the Function key. Enter the Key Operator’s ID Code (4 digits), and then select "OK". Function Key 1 Print On Line LED · Please wait until the Print On Line LED is ON to press the Function key.
Enter the IP Address, and then select "OK". 9 Ex: 192.168.001.100 1 Enter the Subnet Mask, and then select "OK". Ex: 255.255.225.001 1 2 Select "27 TCP/IP Subnet Mask". 2 ● When entering a 1 or 2-digit number segment, add "00" or "0" in front of the number to scroll to the next segment of numbers, or press the " " key on the Control Panel to enter a period after the number. ● To correct a mistake, press or to move the cursor to the right side of the incorrect address.
Network Configuration 11 Enter the Gateway Address, and then select "OK". 13 Press the Reset key. 14 Turn the Power Switch OFF, and then back ON again. Ex: 192.168.001.111 1 2 ● When entering a 1 or 2-digit number segment, add "00" or "0" in front of the number to scroll to the next segment of numbers, or press the " " key on the Control Panel to enter a period after the number. ● To correct a mistake, press or to move the cursor to the right side of the incorrect address.
Printer Driver System Requirements Setting Your Machine • Personal Computer :IBM PC/AT and compatibles (CPU Pentium II or greater is required, Pentium 4 or greater is recommended) • Operating System :Windows 98*1, Windows Me *2, Windows NT 4.
Printer Driver For Peer to Peer Connection (Direct Connection) ■ Installing the Printer Driver on your PC 1 Insert the “Panasonic Document Management System” CD-ROM. The Panasonic-DMS opening screen is displayed. ● If the CD-ROM does not launch automatically, double click “My Computer” on the Desktop or on the Stratmenu, and then double click the CD-ROM icon. 2 8 3 Click “Next” on the welcome screen. 4 Click “Printer Driver / Fax Driver”. 5 Click “Printer Driver”. Click on the desired language.
Click “Install Printer Driver”. 7 The InstallShield Wizard screen is displayed. 9 ● Above screen will be displayed when you have installed the Windows XP Service Pack 2. 10 8 Select "Enable Communications (recommended)", and then click "Next". Installing Printer/Fax Driver 6 Check “Use your machine as a Network Printer”, and then click “Next”. Check “I accept the terms of the license agreement”, and then click “Next”. ● If you wish to use your machine as a Local USB printer, see pages 22-27.
Printer Driver 11 The Wizard automatically searches for machines connected to your network, and displays the found units in the Network Printer window. 13 Click “Yes” if you wish to change the current default printer to your machine. ● Above Screen will not be shown when installing the printer driver for the first time. ● Only the machines connected to the same subnet can to be used as a network printer.
For Network Print Server Connection ■ Installing the Printer Driver onto the Network Print Server ■ Printer Setup Procedure 1. Installing the Printer Driver onto the Network Print Server. 1 Insert the “Panasonic Document Management System” CD-ROM. The Panasonic-DMS opening screen is displayed. Installing Printer/Fax Driver (See pages 11-14) 2. Configure the Shared Setting. (See pages 15-20) 3. Setting up your client PC.
Printer Driver For Network Print Server Connection ■ Installing the Printer Driver onto the Network Print Server 3 4 Click “Next” on the welcome screen. Click “Printer Driver / Fax Driver”. 6 Click “Install Printer Driver”. 7 The InstallShield Wizard screen is displayed. 8 5 12 Click “Printer Driver”. Check “I accept the terms of the license agreement”, and then click “Next”.
Select "Enable Communications (Recommended)", and then click "Next". 11 The Wizard automatically searches for machines connected to your network, and displays the found units in the Network Printer window. Installing Printer/Fax Driver 9 ● Above screen will be displayed when you have installed the Windows XP Service Pack 2. 10 ● Only the machines connected to the same subnet can to be used as a network printer.
Printer Driver For Network Print Server Connection ■ Installing the Printer Driver onto the Network Print Server 13 Click “Yes” if you wish to change the current default printer to your machine. ● Above Screen will not be shown when installing the printer driver for the first time. 14 14 The setup status progress screen of the new software installation is displayed. 15 Select “Yes, I want to restart my computer now.”, and then click “Finish”.
■ Configure the Shared Setting (Windows NT Server) Click “Start”. 2 Select “Settings”. 3 4 Right-Click the printer that you want to share. 5 Click “Properties”. Installing Printer/Fax Driver 1 Click “Printers”.
Printer Driver For Network Print Server Connection ■ Configure the Shared Setting (Windows NT Server) 6 Click on the “Sharing” tab. 7 Check “Shared”, and then enter the Share Name. Ex: Panasonic 8 16 Click “OK” to close the screen.
For Network Print Server Connection ■ Configure the Shared Setting (Windows 2000 Server) Click “Start”. 2 Select “Settings”. 3 4 Right-Click the printer that you want to share. 5 Click “Properties”. Installing Printer/Fax Driver 1 Click “Printers”.
Printer Driver For Network Print Server Connection ■ Configure the Shared Setting (Windows 2000 Server) 6 Click on the “Sharing” tab. 7 Check “Shared as”, and then enter the Share Name. Ex: Panasonic 8 18 Click “OK” to close the screen.
For Network Print Server Connection ■ Configure the Shared Setting (Windows Server 2003) Click “Start”. (Category View Mode) 3 (Classic View Mode) 2 Select “Settings”. (Classic View Mode) Click “Printers & Faxes”. (Category View Mode) Installing Printer/Fax Driver 1 (Classic View Mode) 4 Right-Click the printer that you want to share.
Printer Driver For Network Print Server Connection ■ Configure the Shared Setting (Windows Server 2003) 5 Click “Properties”. 7 Check “Share this printer”, and then enter the Share Name. Ex: Panasonic 6 Click on the “Sharing” tab. 8 20 Click “OK” to close the screen.
For Network Print Server Connection ■ Setting up your client PC 2 3 Open the Printers and Faxes window. 4 Drag-and-drop the printer icon onto the Printer and Faxes window. 5 Verify that the Printer icon is copied onto the window. Installing Printer/Fax Driver 1 Click “Start”, right click “My Computer”, and then select “Explore”. Select the Printer shared on your Printer Server. ● The illustrations shown for the previous steps are for Windows XP.
Printer Driver For Local (USB) Connection ■ Installing the Printer Driver on your PC ATTENTION : Do not turn the Power Switch ON (on the left side of the machine) until you reach the step 13 (A, B ,C). Do not connect the USB Cable until notified to do so. 1 3 Click “Next” on the welcome screen. 4 Click "Printer Driver / Fax Driver". 5 Click “Printer Driver”. Insert the "Panasonic Document Management System" CD-ROM. The Panasonic-DMS opening screen is displayed.
Click “Install Printer Driver”. 7 The InstalShield Wizard screen is displayed. 9 ● Above screen will be displayed when you have installed the Windows XP Service Pack 2. 10 8 Select “Enable Communications (recommended)”, and then click “Next”. Installing Printer/Fax Driver 6 Check “Use your machine as a USB Printer”, and then click “Next”. Check “I accept the terms of the license agreement”, and then click “Next”.
Printer Driver For Local (USB) Connection ■ Installing the Printer Driver on your PC 11 Check the Printer Driver that you want to install, and then click “Next”. 13A Ex: DP-C322 12 Select a printer, and then click “Next”.
13C Click “Continue Anyway”. Installing Printer/Fax Driver 13B Click "Yes". ● When this message appears, turn the Power Switch of your machine ON and connect a USB Cable to your machine, and to an available USB Port on your computer. ● When this message does not appear, turn the Power Switch of your PC OFF and ON. Click "Yes".
Printer Driver Select “No, not this time”, and then click “Next”. If you have a previous version of the printer driver installed, select the latest version of the “.inf” file, and then click “Next”. ● Above screen will be displayed when you have installed the Windows XP Service Pack 2. Check “Install the software automatically”, and then click “Next”. For Windows XP ● Above Screen will not be shown when installing the printer driver for the first time. Click “Continue Anyway”.
Check “Yes, I want to restart my computer now.”, and then click “Finish”. Installing Printer/Fax Driver 14 memo: 15 Open the printer properties screen, and configure the Optional Devices, and then click "OK". ● For instructions on configuring the optional devices, refer to Device Tab in the Operating Instructions (For PCL Printer Driver) on the provided CD-ROM.
Fax Driver ■ System Requirements ■ Installing the Fax Driver • Personal Computer :IBM PC/AT and compatibles (CPU Pentium II or greater is required, Pentium 4 or greater is recommended) • Operating System :Windows 98*1, Windows Me *2, Windows NT 4.
4 Click "Next" on the welcome screen. 5 Click "Fax Driver". 6 Click "Install Fax Driver". 7 The screen of preparing installation is displayed. Installing Application Softwares 3 Click "Printer Driver / Fax Driver".
Fax Driver ■ Installing the Fax Driver 8 Check "I accept the terms of the license agreement", and then click "Next". 10 The Wizard automatically searches for machines connected to your network, and displays the found units in the Network MFP Device window. Select your network MFP, and then click "Next". ● Make sure that your machine is connected to the network properly and/or the Power Switch is ON before clicking "Next". 9 Select "Enable communications (recommended)", and then click "Next".
12 The setup status progress screen of the new software installation is displayed. Installing Application Softwares 11 Select "Yes, I want to restart my computer now.", and then click "Finish".
Panasonic Document Management System ■ Installing the Panasonic Document Management System 1 Insert the "Panasonic Document Management System" CD-ROM. The Panasonic-DMS opening screen is displayed. ● If the CD-ROM does not launch automatically, double click "My Computer" on the Desktop or on the Stratmenu, and then double click the CD-ROM icon. 2 32 3 Click "Next" on the welcome screen. 4 Click "Panasonic-DMS". 5 Click "Install Panasonic-DMS Software". Click on the desired language.
Select the desired software(s) you want to install, and then click "Install". 7 The InstallShield Wizard screen is displayed. 8 Click "Next". 9 10 Check "I accept the terms of the license agreement", and then click "Next". Installing Application Softwares 6 Click "Next".
Panasonic Document Management System ■ Installing the Panasonic Document Management System 11 Click "Next". 13 12 Click "Next". 14 Click "Next". Select "Enable Communications (recommended)", and then click "Next". ● Above screen will be displayed when you have installed the Windows XP Service Pack 2.
16 Click "Install". Memo: Installing Application Softwares 15 Check "Yes, I want to restart my computer now.", and then click "Finish".
Network Scanner Settings (Option) ■ Scanner Setup Procedure Scanning to PC 1. Installing the Panasonic Document Management System. (See pages 32-35) Before being able to transfer scanned data to your PC, the Panasonic Document Management System must be installed, and the scanner configuration has to be setup on your PC first. Scan 2. Setting up the Scanner Configuration using the Communications Utility. (See page 37) Scanning to SD Memory Card or PCMCIA/ PC Card. 3.
Network Scanner Settings (Option) ■ Setting up the Scanner Configuration using the Communications Utility 1 Right-Click "Panasonic Communications Utility" icon on the Task Bar, and then select "Scanner Configuration...". memo: Click "Add Device" if your PC address information is registered onto the devices located on the different subnet. 2 1 2 Check "Auto Registration", and then enter Name and Key Name to be saved to the machine. 1 Click "Add". 4 Click "OK". 1 1 4 2 Refer to right column.
Facsimile Settings (Option) ■ Setting up the User Parameters 1 Press the Function key. 4 Enter the Key Operator’s ID Code (4 digits), and then select "OK". 1 2 ● Default identification code is "0000". To change this identification code, please contact system administrator. 38 2 Select "Fax/Email Settings". 3 Select "04 Key Operator Mode". 5 Select "00 User Parameters".
Select "01 Logo", and then enter your company’s name or your name as a LOGO using the Keyboard. (Up to 25 characters) 8 ● To correct a mistake, select "Clear" to delete entries one digit at a time, and reenter the correct character. Select " " in the beginning of the ID Number to add a "+" symbol, followed by your Country Code digit. Select "Space" to enter a blank space.
Email/Internet Fax Settings (Option) ■ Email/Internet Fax Settings Procedure 1. Setup the Network Configuration using the Control Panel of the machine. ■ Setting up the Network Configurations 1 Press the Function key. 2 Select "General Settings". 3 Select "09 Key Operator Mode". 2. If necessary, program the Address book. ● Refer to the Operating Instructions (For Basic Operations). ● The IP Address, Subnet Mask, and Gateway Address must be registered before setting up the network configuration.
4 Enter the Key Operator’s ID Code (4 digits), and then select "OK". 1 5 7 Enter the Host Name, Domain Name, and then DNS Server Address. 2 ● Default identification code is "0000". To change this identification code, please contact system administrator. 1 Select "Host Name" to enter a host name using the Keyboard, and then select "OK". Select "29 DNS Server Address". 2 Select "Domain Name" to enter a domain name using the Keyboard, and then select "OK".
Email/Internet Fax Settings (Option) ■ Setting up the Network Configurations 9 Select "Fax/Email Settings". 12 10 Select "04 Key Operator Mode". 13 11 Enter the Key Operator’s ID Code (4 digits), and then select "OK". 2 ● Default identification code is "0000". To change this identification code, please contact system administrator. 42 Select "05 Email Address" and enter the Email address using the Keyboard, and then select "OK". (Up to 60 characters.) 2 14 1 Select "00 User Parameters".
Enter the Port Number, and then select "OK". Select "07 SMTP Server IP" and enter the SMTP server IP address using the Keyboard, and then select "OK". ● If you select "No" for DNS Server Address at the step 6 in page 41, SMTP Server IP address is required in stead of SMTP Server name. 16 17 Enter the Port Number, and then select "OK". Select "11 POP Server IP" and enter the POP server IP address using the Keyboard, and then select "OK".
Email/Internet Fax Settings (Option) ■ Setting up the Network Configurations 18 Select "12 POP User Name" and enter the POP user name using the Keyboard, and then select "OK". 21 Turn the Power Switch OFF, and then back ON again. ● The Power Switch is on the left side of the machine. 19 20 44 Select "13 POP Password" and enter the POP password using the Keyboard, and then select "OK". Press the Reset key.
Completion Notice ■ Setting up the Completion Notice Ex: Copy Job The Completion Notice utility software is automatically installed when installing either Printer Driver or Fax Driver. The Completion Notice utility software will display the pop-up notice on your PC screen when finishing the Print, PC Fax, Copy and Fax jobs. The information displayed in the Completion Notice vary between the type of job.
Appendix Function Setting List (Example) To change required function parameter, refer to the Operating Instruction (For Function Parameters) on the provided CD-ROM.
Appendix
Appendix Function Setting List (Example) 48
Appendix
Appendix Function Setting List (Example) 50
Appendix
Appendix Function Setting List (Example) 52
Appendix
Appendix Function Setting List (Example) 54
Appendix
Appendix Function Setting List (Example) 56
Appendix
Appendix Function Setting List (Example) 58
Appendix
IMPORTANT INFORMATION When requesting information, supplies or service, always refer to the model and serial number of your machine. The model and serial number plate (Main Name Plate) is located on the rear of the machine. For your convenience, space is provided below to record information you may need in the future for reference or troubleshooting. Model No.: Serial No.
Memo: 61
Memo: 62
© 2005 Panasonic Communications Co., Ltd. All Rights Reserved. Unauthorized copying and distribution is a violation of law. The contents of these Operating Instructions are subject to change without notice. For Service, Call: For Customer Support: Panasonic Communication Co., Ltd. Fukuoka, Japan http://www.panasonic.co.