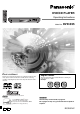
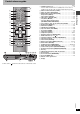
Í SLEEP SETUP OPEN/CLOSE A.SRD 1 2 3 AUDIO ONLY 4 5 7 8 9 0 S10 DVD/CD PLAYER 6 DEPTH ENH GROUP CANCEL SLOW/SEARCH SKIP STOP PAUSE PLAY PLAY LIST DIRECT NAVIGATOR MENU TOP MENU Operating Instructions ENTER DISPLAY RETURN 7 Í/ I DOUBLE RE-MASTER D E SUBTITLE AUDIO ANGLE/PAGE QUICK REPLAY ZOOM MODE DOWN UP OPEN/CLOSE DOUBLE POSITION PLAY MODE ZOOM RE-MASTER MEMORY Model No. Dear customer Thank you for purchasing this product.
Table of contents Accessories Getting started Please check and identify the supplied accessories. Use numbers indicated in parentheses when asking for replacement parts. (Only for U.S.A.) To order accessories contact 1-800-332-5368 or the website (http://www.panasonic.com). (Only for Canada) To order accessories, call the dealer from whom you have made your purchase. ∏ 1 Getting started Accessories . . . . . . . . . . . . . . . . . . . . . . . . . . . . . . . . . . . . . . .
CAUTION! WARNING: TO REDUCE THE RISK OF FIRE, ELECTRIC SHOCK OR PRODUCT DAMAGE, DO NOT EXPOSE THIS APPARATUS TO RAIN, MOISTURE, DRIPPING OR SPLASHING AND THAT NO OBJECTS FILLED WITH LIQUIDS, SUCH AS VASES, SHALL BE PLACED ON THE APPARATUS. CAUTION RISK OF ELECTRIC SHOCK DO NOT OPEN CAUTION: TO REDUCE THE RISK OF ELECTRIC SHOCK, DO NOT REMOVE SCREWS. NO USER-SERVICEABLE PARTS INSIDE. REFER SERVICING TO QUALIFIED SERVICE PERSONNEL. Getting started THIS PRODUCT UTILIZES A LASER.
IMPORTANT SAFETY INSTRUCTIONS Getting started Read these operating instructions carefully before using the unit. Follow the safety instructions on the unit and the applicable safety instructions listed below. Keep these operating instructions handy for future reference. 1) Read these instructions. 2) Keep these instructions. 3) Heed all warnings. 4) Follow all instructions. 5) Do not use this apparatus near water. 6) Clean only with dry cloth. 7) Do not block any ventilation openings.
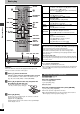
@ A B Í SLEEP 1 2 3 4 5 6 7 SETUP OPEN/CLOSE A.SRD 1 2 3 4 5 6 7 8 9 0 S10 AUDIO ONLY C DEPTH ENH GROUP CANCEL SLOW/SEAR SKIP STOP PAUSE CH D E F G PLAY 8 PLAY LIST DIRECT NAVIGATOR 9 MENU TOP MENU : ; < = > ENTER H RETURN DISPLAY I SUBTITLE AUDIO ANGLE/PAGE QUICK REPLAY J K DOUBLE POSITION PLAY MODE ZOOM RE-MASTER MEMORY ? L M 1 B L N OP Q 7 Í/ I DOUBLE RE-MASTER D E ZOOM MODE DOWN UP OPEN/CLOSE R S Page 1 Standby/on button (Í). . . . . . . . . . . . . .
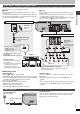
Connection Before connection ≥The equipment connections described are examples. ≥Peripheral equipment and optional cables sold separately unless otherwise indicated. ≥Disconnect the AC power supply cord. ≥Turn off all equipment and read the appropriate operating instructions. Getting started Connection to a television This page explains how to connect the unit to a television and set it up so you hear the audio through the television’s speakers.
Enjoy the powerful movie theater and hall-like sound available with multiple channel audio found on DVDs by connecting an amplifier and speakers. There are two types of connection, digital and analog. \A\ DIgital \B\ Analog Connect an amplifier with Dolby Digital and DTS decoders to enjoy Connect an amplifier with multi-channel audio input terminals to enjoy surround sound. surround sound.
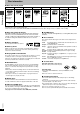
Disc information ∫ Discs that can be played DVD-RAM DVD-Audio DVD-Video DVD-R Video CD SVCD CD CD-R/RW Getting started ` Conforming to IEC62107 Shown as “DVD-VR” on the display [RAM] [DVD-A] [DVD-V] [VCD] [CD] [WMA] [MP3] [JPEG] Use discs with the above logos and that conform to specifications. The unit cannot play other discs correctly. Do not use irregularly shaped discs (e.g. heart-shaped), as these can damage the unit.
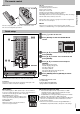
The remote control ∫ Batteries R6, AA, UM-3 ≥mix old and new batteries. ≥use different types at the same time. ≥heat or expose to flame. ≥take apart or short circuit. ≥attempt to recharge alkaline or manganese batteries. ≥use batteries if the covering has been peeled off. Mishandling of batteries can cause electrolyte leakage which can damage items the fluid contacts and may cause a fire. Remove if the remote control is not going to be used for a long period of time. Store in a cool, dark place.
Basic play SLEEP Stop Press [∫]. “!” flashes on the display. Press [1] (PLAY) to restart from this position or [∫] to clear it. DVD-Video: Press [1] (PLAY) again to review chapters (➜ page 11). Pause Press [;]. Press [1] (PLAY) to restart. Skip Press [:] (backward) or [9] (forward). Group skip [JPEG] Press [4] (backward) or [3] (forward). Search Press [6] (backward) or [5] (forward). Press [1] (PLAY) to restart play. Slowmotion While paused, press [6] (backward) or [5] (forward).
Selecting groups to play Replaying a scene—QUICK REPLAY [DVD-A] [WMA] [MP3] [JPEG] 3 Press [GROUP]. Press [3, 4] to select the group number and press [ENTER]. 1 1 1 18 [JPEG] Skip back a few pictures. During play Group No. Track No. in disc Track No. in group Total No. of tracks on disc Press [3, 4] to select the track/picture number and press [ENTER]. Press [QUICK REPLAY]. ≥This feature may not work while playing some parts of a disc or at all with some discs.
Navigation menus Track title search [CD] (CD text only) [WMA] [MP3] Í SLEEP Example: finding a track including the word “LOVE”. SETUP OPEN/CLOSE While the menu is displayed A.SRD 1 1 2 3 4 5 6 7 8 9 0 S10 AUDIO ONLY Numbered buttons DEPTH ENH Press [3, 4] to select “Find” and press [ENTER].
[Note] Playing the programs on DVD-RAM [WMA] ≥You cannot play WMA files that are copy protected. ≥WMA files must have the extension “.WMA” or “.wma”. [RAM] Use the program list to find programs to play. [JPEG] ≥To view JPEG files on this unit: sTake them on a digital camera that meets the DCF (Design rule for Camera File system) standard. Some digital cameras have functions that are not supported by the DCF standard like automatic picture rotation which may render a picture un-viewable.
Increasing your enjoyment of movies and music A.SRD A. SRD 1 2 Subtitles 3 [DVD-A] (Moving picture part) [DVD-V] [VCD] (SVCD only) You can change the subtitle language and turn the subtitles on and off. [RAM] You can turn the subtitles on and off. During play AUDIO ONLY AUDIO ONLY DEPTH ENH 4 5 6 7 8 9 0 S10 DEPTH ENH GROUP CANCEL SLOW/SEAR SKIP STOP PAUSE CH Press [SUBTITLE]. PLAY The number changes each time you press the button. e.g.
Advanced Surround Variable Zoom function [RAM] [DVD-V] [VCD] (2-channel or over only) Enjoy a surround-like effect when using 2 front speakers (SP) or headphones (HP) (connect the unit to equipment that has a headphone jack). The effect broadens when playing discs with surround effects and sound seems to come from speakers either side of you.
Changing play sequence Program play Í SLEEP You can select up to 32 items to play in the order you choose. SETUP OPEN/CLOSE 1 A.SRD 1 2 3 4 5 6 7 8 9 0 S10 AUDIO ONLY Numbered buttons DEPTH ENH ≥Some items cannot be selected. [DVD-V] ≥Repeat this step to program other items. ≥Times are not displayed when programming DVD-Video and WMA/MP3.
Using On-Screen Menu Icons Disc information SETUP OPEN/CLOSE A.SRD e.g. [DVD-V] 1 2 3 4 5 6 7 8 9 0 S10 AUDIO ONLY Numbered buttons DEPTH ENH GROUP CANCEL CANCEL SLOW/SEAR SKIP STOP PAUSE CH PLAY 1 PLAY LIST DIRECT NAVIGATOR MENU TOP MENU 3, 4, 2, 1 ENTER ENTER DISPLAY DISPLAY RETURN RETURN On-Screen Menu Icons are menus that contain information about the disc or unit and allow you to perform operations by changing this information. Common procedures 1 Press [DISPLAY].
Using On-Screen Menu Icons Unit information Display Menu Play Menu A-B repeat [RAM] [DVD-A] [DVD-V] [VCD] [CD] [WMA] [MP3] (When the elapsed play time is displayed) Repeat a section between points A and B within an item. [ENTER] (start point) ➜ [ENTER] (finish point) To cancel: [ENTER] ≥Subtitles recorded around A and B may fail to appear. ≥The end of an item becomes point B when it is reached. ≥A-B repeat is canceled when you press [QUICK REPLAY].
Audio Menu Picture Menu Advanced Surround (➜ page 15) ∫ User mode Press [1] while “U1”, “U2” or “U3” is highlighted and then press [3, 4] to select “1”, “2” or “3”. Double Re-master (➜ page 15) Dialogue Enhancer [DVD-V] (Dolby Digital, DTS, 3-channel or over only, where the dialogue is recorded in the center channel) This makes the dialogue in movies DVD AV R CD WM A V MP MP3 G easier to hear.
Changing settings This chart shows the settings for this unit. Change the settings to suit your preferences and to suit the unit to the environment in which it is being used. The changes remain intact even if you switch the unit to standby. See page 21 for operation. Menus Disc Advanced operations Video Audio Items Options (Underlined items are the factory preset.) Audio Choose the audio language. English Original§1 French Spanish Other ¢¢¢¢§2 Subtitle Choose the subtitle language.
Entering a password (Ratings) Í SLEEP SETUP SETUP OPEN/CLOSE A.SRD 1 2 3 AUDIO ONLY Numbered buttons 4 5 6 7 8 9 0 S10 DEPTH ENH GROUP CANCEL CANCEL SLOW/SEAR SKIP STOP PAUSE [DVD-V] The password screen is shown when you select levels 0 to 7. 1. Input a 4-digit password with the numbered buttons. ≥If you enter a wrong number, press [CANCEL] to erase it. 2. Press [ENTER]. ≥The lock symbol appears closed to show the rating is locked. ≥Do not forget your password. 3.
Changing settings Speaker setting Delay time (b) For analog connection (➜ page 7) (Effective only when playing multi-channel discs) Change speaker presence and size a, delay time b, and channel balance c to suit the speakers you have connected when you select “Multi-channel” (3 or more speakers are connected). For optimum listening with 5.1-channel sound, all the speakers, except for the subwoofer, should be the same distance from the seating position.
Glossary Bitstream The digital form of multi-channel data (e.g. 5.1 channel) before decoding. Decoder A decoder restores coded audio signals on DVDs to normal. Dolby Digital This is a method of coding digital signals developed by Dolby Laboratories. Apart from stereo (2-channel) audio, these signals can also be multi-channel audio. A large amount of audio information can be recorded on one disc using this method.
Troubleshooting guide Before requesting service, make the below checks. If you are in doubt about some of the check points, or if the remedies indicated in the chart do not solve the problem: In the U.S.A., contact the Panasonic Customer Call Center at 1-800-211-7262, or e-mail consumerproducts@panasonic.com, or the website (http://www.panasonic.com). In Canada, contact the Panasonic Canada Inc. Customer Care Centre at 1-800-561-5505, or visit the website (www.panasonic.
Picture Page The picture shown on the television is not normal. (The sides of the picture are cut off, the picture is stretched horizontally, or black bands appear at the top and bottom of the screen.) ≥Go to Video in the SETUP menus, and change “TV Aspect” to suit your television. ≥Use the television to change the aspect to the correct one. If your television cannot change the aspect when input is progressive, try changing 4:3 Aspect with the On-Screen Menu Icons.
Limited Warranty (ONLY FOR U.S.A.) Panasonic Consumer Electronics Company, Division of Matsushita Electric Corporation of America One Panasonic Way Secaucus, New Jersey 07094 Panasonic Sales Company, Division of Matsushita Electric of Puerto Rico, Inc. Ave. 65 de Infantería, Km. 9.
Guía de referencia rápida en español Conexión a un televisor Televisor AUDIO VIDEO IN IN Í L SLEEP Í R SETUP OPEN/CLOSE SETUP < A.
Panasonic Consumer Electronics Company, Division of Matsushita Electric Corporation of America Panasonic Sales Company, Division of Matsushita Electric of Puerto Rico, Inc. (“PSC”) One Panasonic Way Secaucus, New Jersey 07094 http://www.panasonic.com Ave. 65 de Infantería, Km. 9.5 San Gabriel Industrial Park, Carolina, Puerto Rico 00985 Panasonic Canada Inc. 5770 Ambler Drive Mississauga, Ontario L4W 2T3 www.panasonic.ca pr RQT6974-P F0203YU0 C 2003 Matsushita Electric Industrial Co., Ltd.