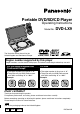
® Portable DVD/SD/CD Player SETU P PLAY Operating Instructions DVD/SD MODE Í 1 ; ∫ TOP MENU DISPL AY RETUR N SUB -TITLE MENU A.SURR AUDIO OUND ANGLE CANC 0 9 8 7 S10 6 5 4 EL 3 2 1 GROU SEA Model No. 9 : 5 6 P PAGE VOLU s ME r DVD-LX9 RCH R ENTE VOL TOP U MEN LAY DISP URN RET MEN ON U OFF DC IN 9V EN OP A.S OUN URR MON D ITOR MOD PICT E URE DVD MOD /SD E CHG The illustration shows the unit for the United Kingdom and Continental Europe.
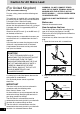
Caution for AC Mains Lead (For United Kingdom) (“EB”area code model only) For your safety, please read the following text carefully. This appliance is supplied with a moulded three pin mains plug for your safety and convenience. A 5-ampere fuse is fitted in this plug. Should the fuse need to be replaced please ensure that the replacement fuse has a rating of 5-ampere and that it is approved by ASTA or BSI to BS1362. Check for the ASTA mark Ï or the BSI mark Ì on the body of the fuse.
THIS PRODUCT UTILIZES A LASER. USE OF CONTROLS OR ADJUSTMENTS OR PERFORMANCE OF PROCEDURES OTHER THAN THOSE SPECIFIED HEREIN MAY RESULT IN HAZARDOUS RADIATION EXPOSURE. DO NOT OPEN COVERS AND DO NOT REPAIR YOURSELF. REFER SERVICING TO QUALIFIED PERSONNEL. WARNING: TO REDUCE THE RISK OF FIRE, ELECTRIC SHOCK OR PRODUCT DAMAGE, DO NOT EXPOSE THIS APPARATUS TO RAIN, MOISTURE, DRIPPING OR SPLASHING AND THAT NO OBJECTS FILLED WITH LIQUIDS, SUCH AS VASES, SHALL BE PLACED ON THE APPARATUS.
Accessories SUOMI VAROITUS! Getting Started LAITTEEN KÄYTTÄMINEN MUULLA KUIN TÄSSÄ KÄYTTÖOHJEESSA MAINITULLA TAVALLA SAATTAA ALTISTAA KÄYTTÄJÄN TURVALLISUUSLUOKAN 1 YLITTÄVÄLLE NÄKYMÄTTÖMÄLLE LASERSÄTEILYLLE. VAROITUS: TULIPALO-, SÄHKÖISKUVAARAN TAI TUOTETTA KOHTAAVAN MUUN VAHINGON VÄHENTÄMISEKSI EI LAITETTA SAA ALTISTAA SATEELLE, KOSTEUDELLE, VESIPISAROILLE TAI ROISKEELLE, EIKÄ NESTETTÄ SISÄLTÄVIÄ ESINEITÄ, KUTEN ESIMERKIKSI MALJAKOITA, SAA ASETTAA LAITTEEN PÄÄLLE.
Basic Operations Playing discs. . . . . . . . . . . . . . . . . . . . . . . . . . . . . . . . . . . . . . . . . . 16 Playing SD cards . . . . . . . . . . . . . . . . . . . . . . . . . . . . . . . . . . . . . . 18 Playing the programs or play lists on DVD-RAM . . . . . . . . . . . . 22 WMA/MP3, CD text and JPEG navigation menus . . . . . . . . . . . . 23 ≥Playing HighMAT discs . . . . . . . . . . . . . . . . . . . . . . . . . . . . . . . . . 25 Convenient features . . . . . . . . . . . . . . . . . . . . . .
Precautions RQT6915 Getting Started Read these operating instructions carefully before using the unit. Follow the safety instructions on the unit and the applicable safety instructions listed below. Keep these operating instructions handy for future reference. 6 1) 2) 3) 4) 5) 6) 7) Read these instructions. Keep these instructions. Heed all warnings. Follow all instructions. Do not use this apparatus near water. Clean only with dry cloth. Do not block any ventilation openings.
This AC adaptor operates on AC between 100 V and 240 V. But ≥Obtain a suitable plug adaptor if the plug does not fit the AC mains socket. To prevent damage Avoid the following; ≥Spraying flammable insecticides near the unit. ≥Pressing the LCD. ≥Touching the lens and other parts of the laser pickup. Do not use the unit in the following places; ≥Where the temperature is below 5 oC or above 35 oC.
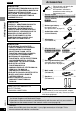
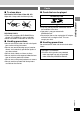
Disc and Card information Discs ∫ Discs that can be played DVD-RAM DVD-Audio DVD-Video Video CD CD CD-R/RW Getting Started — SVCD DVD-R (conforming to IEC62107) [RAM] [DVD-A] [DVD-V] [VCD] [CD] [WMA] [MP3] [JPEG] Use discs with the above logos and that conform to specifications. The unit cannot play other discs correctly. Do not use irregularly shaped discs (e.g. heart-shaped), as these can damage the unit.
Cards SD Memory Card DVD-RAM, DVD-R ≥Clean with an optional DVD-RAM/PD disc cleaner (LF-K200DCA1, where available). ≥Never use cloths or cleaners for CDs, etc. ≥Play may not be possible sometimes due to the condition of the data. ≥Operation is not guaranteed with MultiMediaCard. ≥Do not eject the card or unplug the AC adaptor while the unit is using the card. This can corrupt your data.
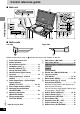
Control reference guide ∫ Main unit 1 DC IN 9V Ë SEARCH 3 4 A 2 Getting Started ; < = > A.SURROUND TOP MENU DISPLAY MENU RETURN VOL B OPEN MONITOR MODE D RETURN A.
Adjusting the angle of the LCD ∫ Remote control L S Change the angle of the LCD to suit your viewing style. SETUP PLAY MODE DVD/SD CH E MODE OPEN AUDIO PLAYER CHG LX9 X AM /SD/AU DV D - R DVD- /SD/CD DVD K TABLE YBAC POR VIDEO PLA V DVD/T /VIDEO CH SEAR N RETUR ENTER Y DISPLA ENU TOPM M ENU OF VOL ON AUDIO OPT OUT VIDEO SD CARD : PUSH RELEASE Getting Started MENU OUND A.
Preparing the multi cradle and power supply 4 BEFORE USE Remove the insulation sheet Attach to cradle. (When the unit is off) Make sure built-in battery is attached. DC IN 9V Ë Getting Started PULL 1 Make sure the built-in battery is attached whenever you use the unit. Fit so unit clicks firmly into place. DC IN 9V FOR UNITED KINGDOM ONLY READ THE CAUTION FOR THE AC MAINS LEAD ON PAGE 2 BEFORE CONNECTION. 2 Unwind speaker wire, then fit the wire back into the groove of the speaker base.
Battery pack (Lithium ion battery pack) ∫ To confirm the battery charge MON ITOR PIC TUR E MOD A.S URR OU ND MOD E E OP EN DV D/S D CH G SE AR CH O DI AU UT TO OP ENT O ER VI DE TOP ME NU DIS PLAY ME NU ∫ To recharge ∫ (When the unit is off) E VO RE TU RN LE L AS RE SH : PU RD OF F CA SD ON DISPLAY Attach the unit to the multi cradle (➡ left). ≥You can also connect the AC adaptor directly to the player to recharge the battery.
Preparing the multi cradle and power supply Battery pack (Lithium ion battery pack) ∫ To detach the built-in battery pack (When the unit is off) Slide and hold. ∫ To attach the optional battery pack (When the unit is off) Use together with built-in battery pack. Battery pack Part number CGP-H501 Getting Started 2 1 1 Bottom ∫ To attach (When the unit is off) 2 Push the battery so This unit (Bottom) it clicks into place. 1 2 Slide the pack so it clicks and locks into place.
The remote control Car adaptor (optional) ∫ Battery (Lithium battery) [For\the\United\Kingdom\and\Continental\Europe\ This unit (Left side) 2 1 DC IN 3 Ë Ë Face + upwards. Replacement: CR2025 ∫ Use Car adaptor Part number DY-DC95 Remote control signal sensor Getting Started DC IN 9V A.
Playing discs [RAM] [DVD-A] [DVD-V] [VCD] [CD] [WMA] [MP3] [JPEG] Preparations ≥Open the LCD (➡ page 11). ≥[RAM] Remove discs from their cartridges. TOP MENU MENU RETURN 65 The menu language is set to English, but you can change it as follows (➡ page 40, Display—Menu Language). English is used in the examples. [For\the\United\Kingdom\and\Continental\Europe\ English>French/German/Italian/Spanish/ Portuguese/Swedish/Dutch [For\Asia] English>French/Spanish Headphones 3.
Press [∫]. “!” flashes on the display. Press [1] (Play) to restart from this position or [∫] to clear it. DVD-Video: Press [1] (Play) again to review chapters (➡ below). Pause Press [;]. Press [1] (Play) to restart. Skip Press [:] (backward) or [9] (forward). Group skip [JPEG] Use [4] (backward) or [3] (forward). Search OMain unitN Turn the shuttle dial. OMain unitN Release the shuttle dial to restart play. ORemote controlN Press [6] (backward) or [5] (forward).
Playing SD cards SD You can play the following types of data recorded on an SD Memory Card: Still pictures [PICTURE] JPEG files taken on digital cameras conforming to DCF standards (set down by the Japan Electronics and Information Technology Industries Association). MPEG4 files (ASF format) taken on a digital video camera or SD Multi AV Device.
2 Use [3, 4, 2, 1] to select a file and press [ENTER]. TOP MENU [PICTURE] Press [:, 9] to show other pictures. [4] Adjust the volume. Using headphones Turn down the volume before connection, and then adjust the level. Headphones 3.5 mm stereo Ë E MOD To pause play Press [;] during play. Press [1] (Play) to restart play. A.
Playing SD cards MON ITOR PIC TUR E MOD SD Accessing other features with the menus A.S URR OU ND MOD E E OP EN DV D/S D CH G SE AR CH O DI AU UT TO OP ENT :9 O ER VI DE [PICTURE] [MPEG4] [MUSIC] [VOICE] TOP ME NU ME DIS PLAY NU E VO RE TU RN LE L AS RE SH : PU RD OF F CA SD ON MENU 1 3421 ENTER Slideshow—show still pictures one after another The settings you make here are maintained even if you switch the unit to standby. While stopped Press [MENU].
Playing play lists Zooming pictures [MPEG4] [MUSIC] You can play the play lists you created with “SD-Jukebox”. 1. While the menu is on the screen 1. Press [3, 4] to select “SELECT PLAYLIST” and press [ENTER]. Example: 1. While the menu is on the screen 1. Press [3, 4] to select “SCREEN”. 2. Press [2, 1] to change the size. 1. FULL (zoom)()NORMAL ≥Picture quality worsens and parts of the picture may be cut off when you select “FULL”.
Playing the programs or play lists on DVD-RAM [RAM] 2 MON ITOR PIC TUR E MOD 3 A.S URR OU ND MOD E E OP EN Use [3, 4] to select the play list. Press [ENTER].
WMA/MP3, CD text and JPEG navigation menus MON ITOR PIC TUR E MOD A.S URR OU ND Track title search MOD E E OP EN [WMA] [MP3] [CD] (CD text only) DV D/S D CH G SE AR CH O DI AU UT TO OP O ER VI DE TOP ME NU :9 DIS PLAY ME NU E VO RE TU RN LE L AS RE SH : PU RD OF F CA SD ON 3421 TOP MENU RETURN ENTER [WMA] [MP3] [CD] (CD text only) [JPEG] If the disc contains both audio data (WMA and MP3) and JPEG Check “Mixed Disc-Audio&Stills” setting in the SETUP menu (➡ page 42).
WMA/MP3, CD text and JPEG navigation menus 2 DV D/S D CH G SE AR CH O DI AU UT TO OP ENT O ER VI DE TOP ME NU ME DIS PLAY NU E VO RE TU RN LE L AS RE SH : PU RD OF F CA SD 3421 TOP MENU ENTER MENU RETURN DISPLAY Use [3, 4] to select a group and press [ENTER]. The audio navigation menu/album display for the group appears. ON To use the contents screen to find a track [CD] (CD text only) You can use the text information recorded on these discs to find a track to play.
A menu appears after you insert the disc. Naming folders and files At the time of e.g. MP3 recording, prefix root 001 group folder and file 001 track.mp3 002 track.mp3 003 track.mp3 002 group 003 group 001 track.mp3 002 track.mp3 003 track.mp3 004 track.mp3 001 track.mp3 002 track.mp3 003 track.mp3 Windows Media, and the Windows logo are trademarks, or registered trademarks of Microsoft Corporation in the United States and/or other countries.
Convenient features Rotating pictures SETUP PLAY MODE DVD/SD PLAY MODE Í ∫ ; 1 TOP MENU DISPLAY MENU RETURN SUB -TITLE A.SURROUND AUDIO ANGLE 1 3421 ENTER ANGLE CANCEL Basic Operations 65 GROUP PAGE CANCEL 1 2 3 4 5 6 7 8 9 0 6 5 : 9 GROUP PAGE S10 While a picture is displayed 1 2 Press [ANGLE]. Use [3, 4] to select “Rotate right” or “Rotate left” and press [ENTER]. The picture rotates ninety degrees each time you do this.
3 Changing the play sequence Press [PLAY MODE]. The display changes each time you press the button. [A] All group ([DVD-A])_)[B] Program ^=OFF(=[C] Random(} [A] All group play [DVD-A] The unit plays tracks in all the groups on a disc. Press [1] (Play). [B] Program play You can select up to 32 items to play in the order you choose. [DVD-A] [DVD-V] [WMA] [MP3] Press the numbered buttons to select a group or a title. e.g. DVD-Video PROGRAM Choose a title and chapter, then press ENTER.
Convenient features Repeat play SETUP PLAY MODE DVD/SD Í ∫ ∫ ; 1 TOP MENU DISPLAY MENU 3421 ENTER RETURN A.SURROUND AUDIO ANGLE SUB -TITLE Play Menu CANCEL 2 3 4 5 6 S10 7 8 9 0 Numbered buttons Basic Operations [RAM] [DVD-A] [DVD-V] [VCD] [CD] [WMA] [MP3] You can repeat a section between point A and point B within an item. During play Do steps 1 to 3 on page 32 to select “A-B Repeat”.
Increasing your enjoyment of movies Marker [RAM] [DVD-A] [DVD-V] [VCD] [CD] [WMA] [MP3] [JPEG] You can mark up to 5 positions to play again. [RAM]: 999 positions [RAM]: If places have been marked (e.g., with a DVD video recorder), they are displayed. Do steps 1 to 3 on page 32 to select “Marker”. E OP EN DV D/S D CH G SE AR CH O DI AU UT TO OP O DE VI ENT ER TOP ME NU DIS PLAY NU E AS LE RE VO L RE TU RN A.
Increasing your enjoyment of movies Subtitles SETUP PLAY MODE DVD/SD Í ∫ ; 1 TOP MENU DISPLAY MENU RETURN SUB -TITLE A.SURROUND AUDIO ANGLE AUDIO CANCEL 1 2 3 4 5 6 3421 ENTER SUBTITLE ANGLE S10 Basic Operations Changing soundtracks, subtitle languages and angles Some discs have multiple soundtracks, subtitle languages and camera angles, and you can change these during play.
Changing the monitor settings Picture quality 1 MONITOR MODE Press [PICTURE MODE]. 0 -5 MON ITOR PIC TUR E MOD BRIGHT COLOUR SHARP GAMMA AI MODE BLUE LED A.S URR OU ND MOD E E OP EN DV D/S D CH G SE AR CH O DI AU UT TO OP ENT O ER VI DE ON ON 5 OFF OFF TOP ME NU DIS PLAY NU RE TU RN PICTURE MODE E VO LE L AS RE SH : PU RD OF F CA SD ON 3421 ENTER Í indicator 2 3 Use [3, 4] to select the item. Use [2, 1] to select the setting. BRIGHT Brightens the picture.
Using GUI screens MON ITOR PIC TUR E MOD E A.S URR OU ND MOD E OP EN DV D/S D CH G SE AR CH O DI AU UT TO OP ENT O ER VI DE TOP ME NU ME DIS PLAY NU E VO RE TU RN LE L AS RE SH : PU RD OF F CA SD ON DISPLAY RETURN 3421 ENTER 1 For your reference ≥Depending on the condition of the unit (playing, stopped, etc.) and the type of software, there are some items you cannot select or change. ≥When numbers are displayed (e.g.title No.
Disc information d d e a PG: Program number [RAM] PL: Playlist number [RAM] T: Title number [DVD-V] T: Track number [VCD] [CD] G: Group number [DVD-A] [WMA] [MP3] [JPEG] b C: Chapter number [DVD-V] T: Track number [DVD-A] [WMA] [MP3] P: Picture number [JPEG] c Time [RAM] [DVD-A] [DVD-V] [VCD] [CD] ≥Use [3, 4] to show the elapsed play time or remaining time.
Using GUI screens Unit information Play menu Display menu a A-B Repeat (➡ page 28) b Repeat Mode (➡ page 28) c Play mode display [DVD-A] [DVD-V] [VCD] [CD] [WMA] [MP3] ---: Normal play PGM: Program play RND: Random play ALL: All group play ([DVD-A]) d Marker (➡ page 29) Picture menu Advanced Operations N 480P Auto1 a b c a Picture Mode [RAM] [DVD-A] [DVD-V] [VCD] [JPEG] N: Normal mode C1: Mellows images and enhances detail in dark scenes.
Using this unit with other equipment Enjoying more powerful sound Enjoy the powerful movie theater and hall-like sound available with multiple channel audio found on DVDs by connecting an amplifier and speakers. Note ≥The equipment connections described are examples. ≥Peripheral equipment and optional cables sold separately unless otherwise indicated. ≥Before connection, turn off all equipment and read the appropriate operating instructions. Connecting to a receiver or amplifier with 5.
Using this unit with other equipment Using this unit with a television Before connecting, turn off all equipment and read the appropriate operating instructions. Do not connect the player through your video cassette recorder. The picture may not be played back correctly due to the copy guard. Connecting the multi cradle AUDIO OUT VIDEO OUT 5.
Multi cradle + SPEAKER COMPONENT VIDEO OUT (NTSC : 480P/480I , PAL : 5761) Y PB S VIDEO OUT PR AUDIO OUT SUB WOOFER CENTRE VIDEO OUT 5.1ch 2ch (MIX) FRONT SORROUND 4≠ R - Television’s COMPONENT VIDEO IN terminals R L R L Television’s S VIDEO IN S video cable (not included) terminal Video cable (not included) COMPONENT VIDEO OUT terminal S VIDEO OUT terminal These terminals can be used for either interlace or progressive output and provide a purer picture than the S VIDEO OUT terminal.
Changing settings Using this unit with other equipment Recording to digital recording equipment or cassette tapes SETUP PLAY MODE DVD/SD ∫ Advanced Operations Note ≥With DVD, the following conditions must be met: a the disc doesn’t have protection preventing digital recording, and b the recording equipment can handle signals with a sampling frequency of 48 kHz. ≥You cannot record WMA/MP3. When recording DVDs, make the following settings.
This chart shows the settings for this unit. Change the settings to suit your preference and to suit the unit to the environment in which it is being used. These settings are retained in memory until they are changed, even the unit is turned off. ≥Underlined items are the factory presets. Menus Disc Items Audio Choose the preferred audio language. Original§1 Other¢¢¢¢§3 English Subtitle Choose the preferred subtitle language.
Changing settings Menus Audio Items Speaker Setting (Analog connection) Choose the settings to suit your audio system and the listening environment. Multi-channel: when 3 or more speakers are connected (➡ right). 2-channel: when 2 speakers or an amplifier with a Dolby Pro Logic decoder is connected. PCM Down Conversion (Digital connection) Select how to output audio with a sampling frequency of 96 kHz or 88.2 kHz.
Speaker setting You need to change settings a, b, and c when you select “Multi-channel” in “Speaker Setting” (you have connected 3 or more speakers). ≥When playing DVD-Audio, the unit may not output as set here due to limitations imposed by the unit or disc. Center Front (L) a b a c SETUP L ms 0 C Exit Test dB 0 R dB 0 SW dB 0 RS SELECT LS ENTER RETURN ∫ Speaker presence and size (a) dB 0 ms 0 a Front (R) a c Subwoofer Surround (L) a c b c a Surround (R) 1.
Changing settings Menus Others Items HighMAT Play HighMAT discs as HighMAT discs, or as regular WMA/MP3/JPEG discs. (Reload the disc for the setting to be effective.) Enable: Play HighMAT discs as HighMAT discs. Disable: Play HighMAT discs as regular WMA/MP3/JPEG discs. Mixed Disc-Audio&Stills Select the type of file played on discs containing both JPEG and WMA/MP3. (Reload the disc for the setting to be effective.
Maintenance ∫ To clean this unit, wipe with a soft, dry cloth. ≥Use eyeglass cleaner to remove stubborn dirt from the LCD. ≥Never use alcohol, paint thinner or benzine to clean this unit. ∫ Maintenance of the lens ≥Remove dust carefully with an air blower for camera lenses (optional). ≥Recommended product: ≥≥Lens cleaner kit (SZZP1038C) ≥≥(Available from Panasonic dealers.) ≥Be careful not to touch the lens with your fingers.
Troubleshooting Guide Before requesting service, make the following checks. If you are in doubt about some of the check points, or if the remedies indicated in the chart do not solve the problem, consult your dealer for instructions. Reference pages are shown as black circled numbers <. Power No power. ≥Check connections to the AC adaptor or battery pack. < > ≥You cannot turn on the unit with the remote control if the unit is powered by the battery pack. Unit turns off automatically.
Operation The unit doesn’t play the data type (WMA/MP3 or JPEG) selected in the “Mixed Disc-Audio&Stills” in the SETUP menu. Reload the disc for the setting to be effective. Open and close the disc lid, then press [1] (Play) to start play. Sound There is a lot of noise. ≥Move unit away from mobile phones. No sound from the unit’s speaker. ≥The speaker is off if the LCD is closed or headphones are connected. ≥Turn up the volume. @ No sound from other speakers. Distorted sound.
Troubleshooting Guide Picture The SETUP menus and other screens shown on the television are displayed incorrectly. Colors appear faded. ≥The unit and television are using different video systems. [Units\for\the\United\Kingdom\and\Continental\Europe\ Use a multi-system or PAL television. [Units\for\Asia] Use a multi-system or NTSC television. Displays GUI screens are cut off. ≥Use [3, 4] while the Bar position icon is highlighted to move them down. P No On-Screen display.
DVD-RAM (DVD-VR format) DVD-Video, DVD-Audio Music CD [CD-DA (CD-TEXT compatible)] Video CD, CD-R/CD-RW [CD-DA (CD-TEXT compatible), Video CD, MP3, WMA, JPEG, HighMAT Level 2 (Audio and Image)] DVD-R (finalized as DVD-Video) SD played: Media: SD Memory Card Image: JPEG Video: MPEG4 Voice: G.726 Audio: MPEG2-AAC, MP3 (Sampling frequency: 32 kHz, 44.
CLASS 1 LASER PRODUCT LUOKAN 1 LASERLAITE KLASS 1 LASER APPARAT (Bottom of product) CAUTION – VISIBLE AND INVISIBLE LASER RADIATION WHEN OPEN. AVOID EXPOSURE TO BEAM. ATTENTION – RAYONNEMENT LASER VISIBLE ET INVISIBLE EN CAS D’OUVERTURE. EXPOSITION DANGEREUSE AU FAISCEAU. VORSICHT – SICHTBARE UND UNSICHTBARE LASERSTRAHLUNG, WENN ABDECKUNG GEÖFFNET. NICHT DEM STRAHL AUSSETZEN. ADVARSEL – SYNLIG OG USYNLIG LASERSTRÅLING VED ÅBNING. UNDGÅ UDSÆTTELSE FOR STRÅLING.