Getting started Editing Playing back Recording Basic operations DVD Recorder Model No. DMR-XW350 Quick Start Guide Operating Instructions Dear customer Copying Thank you for purchasing this product. For optimum performance and safety, please read these instructions carefully. Music Still pictures With Other Equipment Before connecting, operating or adjusting this product, please read the instructions completely. Please keep this manual for future reference.
Characteristics of this unit VIERA CASTTM Record with High Definition It is possible to record in high definition quality when the broadcast is high definition. 7 You can access a selection of Internet services from the Home screen with VIERA CAST, for example, YouTube, Picasa Web Albums. (Current as of June 2009) 73 • Enjoying VIERA CASTTM Internet DIGA 2 programmes Simultaneous Recording It is possible to record 2 programmes being broadcasted at the same time.
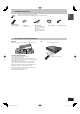
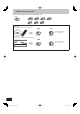
Included accessories (N2QAYB000344) 1 Remote control 2 Batteries for remote control 1 AC mains lead For use with this unit only. Do not use it with other equipment. Also, do not use cords for other equipment with this unit. Getting started Please check and identify the supplied accessories. (Product numbers correct as of June 2009. These may be subject to change.
Table of contents Getting started Title Getting started Recording Characteristics of this unit . . . . . . . . . . . . . . . . . . . . . . . .2 Included accessories . . . . . . . . . . . . . . . . . . . . . . . . . . . . .3 The remote control information . . . . . . . . . . . . . . . . . . . .3 Quick Start Guide HDD and disc information . . . . . . . . . . . . . . . . . . . . . . . . .6 Recording and copying programmes . . . . . . . . . . . . . . . . . . . . . . .
Useful functions during still picture play. . . . . . . . . . . . . . . . . . . .59 Editing still pictures . . . . . . . . . . . . . . . . . . . . . . . . . . . . .60 Editing still pictures (JPEG) . . . . . . . . . . . . . . . . . . . . . . . . . . . . .60 Still pictures operation . . . . . . . . . . . . . . . . . . . . . . . . . . . . . . . . .61 Copying still pictures . . . . . . . . . . . . . . . . . . . . . . . . . . . .62 Copying all the still pictures on the USB memory —Copy All Pictures . . . . .
HDD and disc information This unit can record to HDD and copy to the following recording media. Internal DVD-RAM HDD +R DVD-R DVD-R DL DVD-RW +R DL +RW Recordings can only be made to HDD in DR mode first, with the same quality as broadcasted, then they can be copied to discs. Instant record It can only record to HDD by pressing [* REC]. HDD Discs REC Record to the HDD and then copy to the disc. Can do Cannot do Timer record It can only record to HDD when using timer recording.
Recording and copying programmes This unit will record the high definition quality programmes of the digital broadcast onto the HDD with high quality image and audio as they were broadcasted. Quick Start Guide If copying is performed on those programmes, they are copied in standard definition.
HDD and disc information HDD and discs you can use for recording and play ( : Possible, –: Impossible) Disc type Hard disk drive (HDD) Standard symbol HDD Data that can be recorded and played Quality in which video is recorded Recording mode in which video is recorded Video/Still picture/Music High definition (HD) quality/Standard definition (SD) quality DR, HG, HX, HE, HL, XP, SP, LP, EP, FR Rewritable Timer recording Recording modes that can be selected differ depending on the recording methods.
DVD-RAM DVD-R DVD-R DL DVD-RW Standard symbol RAM -R before finalisation DVD-V after finalisation -R DL before finalisation DVD-V after finalisation -RW(V) before finalisation DVD-V after finalisation Data that can be recorded and played Video Still picture Video Quality in which video is recorded Standard definition (SD) quality Recording mode in which video is recordedÚ XP, SP, LP, EP, FR Rewritable – { Timer recording can be played back on Panasonic DVD recorders and DVD-RAM compatible
HDD and disc information Play-only discs Disc type Logo Standard symbol Uses High quality movie and music discs DVD-Video DVD-V DVD-RW (DVD Video Recording format) -RW(VR) DVD-R DVD-R DL DivX, MP3, JPEG CD CD Disc with high definition video (AVCHD) recorded by Panasonic’s video camera, etc. – DivX, MP3, JPEG – AVCHD DVD-RW video recorded on another DVD recorder By formatting (➡ 81) the disc, you can record onto it in DVD-Video format.
USB memory and card information USB memories you can use on this unit USB memories can only be used for playback or copy to HDD or discs. Format Indicated in these instructions by Data that can be played Data that can be copied Quick Start Guide Compatible USB memories USB memories which are defined as USB mass storage class and digital camera that use PTP protocol: –USB memories that support USB 1.0/1.1 and USB 2.0 Full Speed/High Speed. USB memories of up to 128 GB can be used.
Control reference guide Remote control Instructions for operations are generally described using the remote control. bo 1 2 1 Turn the unit on or off (➡ 18) 2 Select drive (HDD, DVD or SD) (➡ 21, 22, 58) Drive changes each time you press [DRIVE SELECT]. 3 Select channels and title numbers, etc./Enter numbers or characters (The character buttons may be used when operating VIERA CAST contents.
Main unit 2 3 4 5 6 Quick Start Guide 1 7 8 9 bk bl bm bn bo Pull to flip down the front panel. 1 Standby/on switch (8) (➡ 18) Press to switch the unit from on to standby mode or vice versa. In standby mode, the unit is still consuming a small amount of power.
HDD (Hard disk drive) handling care The HDD is a high precision recording instrument and because of its long recording capability and high speed operation it is a very special device that is easily susceptible to damage. As a basic rule, save important content to a disc as backup. ■ The HDD is a device that is not built to withstand vibration/shock or dust Depending on the setup environment and handling of the HDD some content may become damaged and play and recording may no longer be possible.
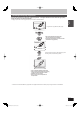
Media handling (Disc/USB memory/SD card) Inserting discs Disc and card care 1 Press [; OPEN/CLOSE] to open the tray. Cartridge disc Insert label-up with the arrow facing in. Do not touch the recorded surface or the terminal surface. DO DO NOT Quick Start Guide Insert label-up. ■ How to hold a disc or card ■ If there is dirt or condensation on the disc Insert fully. 2 Press [; OPEN/CLOSE] to close the tray.
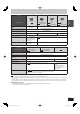
STEP 1 Connection Before connection, turn off all equipment and read the appropriate operating instructions. Refer to “Additional connections” (➡ 95) for connection using other terminals and connection with other equipment. When the unit is not to be used for a long time To save power, unplug it from the household mains socket. This unit consumes a small amount of power, even when it is turned off. [approx. 0.
You can enjoy high-quality picture by changing the connection between this unit and your TV. Quick Start Guide Connecting to a TV with an HDMI (High Definition Multimedia Interface) cable When connected to an HDMI compatible unit, an uncompressed digital audio and video signal is transmitted. You can enjoy high quality, digital video and audio with just one cord. When connecting to an HDMI-compatible HDTV (High Definition Television), the output can be switched to 1080p, 1080i or 720p HD video.
STEP 2 Channel reception settings and TV aspect settings “Unit’s Display” is fixed to “Automatic” in the Setup menu. (➡ 88) 2 “Unit’s Display” is changed to “Bright” in the Setup menu. 3 It is possible to startup and start recording within several seconds. – Depending on the type of TV or the connected terminal, it may take time to display the screen. After Power Save setting is complete, TV Aspect setting screen appears.
Watching digital broadcasts ■ Select the programme to view using the TV Guide 1 Press [GUIDE]. TV CH AV FRI 27.03.2009 21:40 TV Guide All Types All DVB Channels FRI 27.03 Landscape 21:30-22:30 How To Look Good Naked Time: 21:30 22:00 22:30 23:00 23:30 1 TV ONE How To Look Good Naked ONE News T 2 TV2 American Idol Supernatural 5 Maori Tel .
Watching digital broadcasts To store frequently viewed page (List mode only) During the page is displayed 1 Press the colour button of the colour to store. 2 Press and hold [OK]. e.g., To select subtitle language 1 Press [OPTION]. FUNCTION MENU P100 Aspect Play Menu Broadcast Audio Selection Subtitle Language Drive Select OK 101 RETURN 2 3 888 The number changes to white. Press [w, q] to select language for the subtitle.
Playing DVD-Video/Playing recorded video contents Refer to “Advanced playback” (➡ 36) for detailed information. You can quickly find the recorded titles and easily play them. You can also sort the titles or edit the Groups of titles.
Recording television programmes Refer to “Important notes for recording” (➡ 26) and “Advanced recording” (➡ 28) for detailed information. HDD 5 To stop recording Press [g]. If the following screen appears Stop Recording TV DRIVE SELECT Recording [ TV ONE 001 ] VOL DRIVE SELECT CH Recording of the above channel is in progress. To stop recording, select "Yes" or press STOP.
Timer recording (Manual timer recording) y Date/Week You can select current date up to one month later minus one day. You can select “1day” or “Weekly” by pressing the “Green” button only when “Date/Week” is selected. Titles recorded using the same daily or weekly timer are bundled and displayed as a “group” in the DIRECT NAVIGATOR screen (➡ 38) except when using Auto Renewal Recording. y Start/Stop Press and hold [e, r] to alter the Start (Start time) and Stop (Finish time) in 15-minute increments.
Deleting titles Using the DELETE Navigator to delete 1 TV VOL DRIVE SELECT CH AV DRIVE SELECT 2 PAGE 1 2abc 3def 4ghi 5jkl 6mno p 7qrs 8tuv 9wxyz INPUT MANUAL SKIP DEL 0 SELECT CH DEL DELETE Navigator Grouped Titles Time Remaining HDD Date PAUSE DIR ECT NAVIGATO R OK OPTION “Red” REC RETURN FUNCTION MENU RETURN REC MODE TIME SLIP PROG/CHECK 3 HDD RAM -R -R DL -RW(V) +R +R DL +RW (You cannot delete items on finalised discs.) A title cannot be restored once it is deleted.
Copying titles 2 Press [e, r] to select “New item” and press [OK]. Create List Grouped Titles HDD TV VOL DRIVE SELECT CH Date Channel Time 25.05 01.01 TV ONE 01.01 TV2 12:36 Born And Bred: A Wrathful 1:35 1:13 Title Name Title 2 1 1 Time 12:36 Rec time 0:52(SP) AV PAGE 1 2abc 3def 4ghi 5jkl 6mno p 7qrs 8tuv 9wxyz INPUT MANUAL SKIP DEL 0 SELECT Page 01/01 CH OK h STOP PAUSE PLAY/x1.
Important notes for recording Recording to HDD Recording to discs Recording or timer recording is performed in DR mode using this unit’s tuner. Recording or timer recording from external equipment is performed in XP, SP, LP, EP or FR mode. RAM -R -RW(V) +R +RW Recording on the discs is performed either in FR mode using “Recording via AV2 input” or in XP, SP, LP or EP mode using “DV Automatic Recording”. Recording to DVD-R DL and +R DL You cannot directly record to a DVD-R DL and +R DL disc on this unit.
High Speed Copy Speed to copy the title recorded on the HDD to a disc differs depending on the recording mode of the title and the disc to copy. The title in DR, HG, HX, HE, HL modes can not be copied at high speed. Title in XP, SP, LP, EP, FR modes RAM Title can be copied at high speed. -R -R DL -RW(V) +R +R DL +RW Title can be copied at high speed if “Rec for High Speed Copy” was set to “On” before the programme is recorded to HDD. (The default setting is “On”.
Advanced recording Recording modes This also explains about while recording and while copying. (There are discs that can only copy, depending on the disc.) Recording modes that can be selected differ depending on the recording methods and discs.
■ FR (Flexible Recording Mode) You can set FR (Flexible Recording) mode when copying or recording from external equipment. The unit automatically selects a recording rate between XP and EP (8 hours) that will enable the recordings to fit in the remaining disc space with the best possible recording quality. For example with a 90 minute recording to an unused DVD-RAM, the picture quality is adjusted to between “XP” and “SP”.
Advanced recording Playing while you are recording This operation will only record to HDD. Chasing playback Playback from the beginning of the title in the HDD, while the title is being recorded to the HDD. Simultaneous rec and play Playback the previously recorded title while recording onto the HDD. 1 2 Press [DRIVE SELECT] to select the HDD or DVD drive. Press [DIRECT NAVIGATOR] during recording. DIRECT NAVIGATOR Grouped Titles Time Remaining HDD 30:54 DR VIDEO PICTURE Date Channel Time 25.05 01.
Operation during Recording Check the recording programme Press [STATUS ]. e.g., while 2 programmes simultaneous recording Recording programme displayed on the TV screen Recording programme not displayed on the TV screen HDD REC1 001 TV ONE 002 TV2 REC2 To stop recording It is necessary to display the programme you want to stop on the TV screen. (➡ above) To pause recording It is necessary to display the programme you want to pause on the TV screen. (➡ above) Recording Press [INPUT SELECT].
Advanced timer recording HDD Timer recording Using the TV Guide System This operation will only record to HDD in DR mode. TV Guide system provides programme information only from the digital broadcasts station displayed on the television like a TV programme magazine. y You can enter up to 32 programmes up to a month in advance. (Each daily or weekly programme is counted as one programme.) 3 Press [OK]. The timer programme is stored and the timer icon (red) is displayed.
To release the unit from recording standby Even when the unit is turned off, you can display the timer recording list by pressing [PROG/CHECK]. 1 2 Press [PROG/CHECK]. Press [e, r] to select the programme and press the “Red” button. To cancel recording when recording has already begun Press [INPUT SELECT] or [1 2 CH] to display the programme that you want to stop recording on the TV screen while 2 programmes are simultaneously recording. 1 Press [g]. e.g.
Advanced timer recording HDD Check, change or delete a programme Even when the unit is turned off, you can display the timer recording list by pressing [PROG/CHECK]. Press [PROG/CHECK]. Timer Recording Remain HDD 75:15 DR Channel Name z z z TVNZ 6 The sitting TV ONE ONE News Tonight TV2 Supernatural TV ONE How To Look Good Naked FRI 27.03.2009 21:41 Schedule Drive/Mode FRI 27.03 22:20 - 22:30 FRI 27.03 22:30 - 23:00 FRI 22:30 - 23:25 FRI 27.
Selecting the programme from the desired programme type or Favourites Operations in the TV Guide system Press [GUIDE] to switch between Landscape view and Portrait view. Landscape view This function lets you display a TV Guide list sorted by programme type (e.g. Movies, Sport) or Favourites. 1 From the desired programme type Press the “Yellow” button to display the list of programme type. FRI 27.03.2009 21:42 TV Guide All Types All DVB Channels FRI 27.
Advanced playback Refer to page 40 for playing DivX. Refer to page 58 for playing still pictures. Refer to page 65 for playing music. Note When playing back a title recorded on the HDD, ensure that you match the “TV System” setting to the recorded title (➡ 88). A disc or title with different “TV System” (➡ 88) may not be able to playback while recording or on standby for the timer recording.
Skipping the specified time (Time Slip) 1 Press [TIME SLIP]. 2 Press [e, r] to select the time and press [OK]. Play skips the specified time. Each time you press [e, r], the time increases [e] or decreases [r] by 1 minute intervals. (Press and hold for 10-minute intervals.) Except DVD-V AVCHD , DivX -5 min. Manual Skip This automatically disappears after approximately 5 seconds. To show the screen again, press [TIME SLIP] again. Press [MANUAL SKIP].
Selecting recorded programmes (titles) to play—DIRECT NAVIGATOR DIRECT NAVIGATOR screen icons * Currently recording. Title protected. Title that was not recorded due to recording protection Title cannot be played (When copying a title to the HDD, or when data is damaged etc.) Groups of titles ( HDD only) × Title that was recorded but has not yet been played ( HDD only) Title recorded using a different encoding system from that of the TV system currently selected on the unit.
Playback of the High Definition Video (AVCHD) AVCHD It is possible to playback the high definition video (AVCHD) recorded on the Panasonic’s video camera, etc. on the disc or SD card. 1 2 To exit the screen Press [EXIT]. Insert a disc or SD card. To display the top menu Press [DIRECT NAVIGATOR]. Press [e, r] to select “Play Video (AVCHD)” and press [OK]. When the top menu or “DIRECT NAVIGATOR” is not displayed Refer to “Starting from a selected title” (➡ 36) to playback. e.g.
Playing DivX Using the tree screen to find a folder Playing DivX video contents 1 -R -R DL CD USB ABOUT DIVX VIDEO: DivX® is a digital video format created by DivX, Inc. This is an official DivX Certified device that plays DivX video. You can play DivX video contents recorded with a computer onto DVD-R, DVD-R DL, CD-R/CD-RW and USB memory. 1 Insert a disc or USB memory. While the file list is displayed Press [OPTION]. 2 Press [e, r] to select “Select Folder”, and press [OK].
Regarding DivX VOD content ABOUT DIVX VIDEO-ON-DEMAND: This DivX® Certified device must be registered in order to play DivX Video-on-Demand (VOD) content. First generate the DivX VOD registration code for your device and submit it during the registration process. [Important: DivX VOD content is protected by a DivX DRM (Digital Rights Management) system that restricts playback to registered DivX Certified devices.
Editing titles HDD RAM -R -R DL -RW(V) +R +R DL +RW -RW(VR) Only “Properties” is (You cannot edit finalised discs.) possible. Editing of the title can be performed with this unit. For example, an unnecessary part of the title can be deleted. (➡ 43, Partial Delete) 1 2 Press [DIRECT NAVIGATOR]. HDD RAM When “VIDEO” is not selected, press the “Red” button to select “VIDEO”. Press [e, r] to select the title. DIRECT NAVIGATOR Grouped Titles Time Remaining HDD 30:54 DR VIDEO Channel Date 25.
Title operations After performing steps 1–4 (➡ 42) Delete HDD RAM -R -R DL -RW(V) +R +R DL +RW Properties HDD RAM -R -R DL -RW(V) +R +R DL +RW -RW(VR) Press [w, q] to select “Delete” and press [OK]. Once deleted, the recorded contents are lost and cannot be restored. Make certain before proceeding. The available recording space on DVD-R, DVD-R DL, +R or +R DL does not increase when you delete titles.
Editing titles Title operations After performing steps 1–4 (➡ 42) DR File Conversion HDD (Converting the recording mode) DR File Conversion is a function to convert the recording mode of the title in DR mode. The converted title will be copied to HDD. It will take about the same time as playback of the title to convert the recording mode. 1 Press [e, r] to select “Recording Mode”. 2 Press [w, q] to select the recording mode and press [r]. 3 Press [w, q] to select when to start the conversion.
Create/Playback/Edit of the Chapter chapter is possible. 4 Only playback of Press [w, q] to select the chapter. To start play Press [OK]. To edit Step 5. To create Press the “Green” button. (➡ below) Regarding Chapters Programmes are recorded as a single title consisting of one chapter. DIRECT NAVIGATOR Title Chapter View Time Remaining 30:54 DR VIDEO HDD End 0:00.00 You can divide a title into multiple chapters. Each section between the division points (Chapter Marks) becomes a chapter.
Copying titles There are following copying methods. Copy Title Playing Copy Copy AVCHD Copy the playing title on the HDD to the disc. (➡ 49) Make a copying list and then copy. You can set the unit to copy titles in the way you want. (➡ 50) High definition video (AVCHD format) can be copied from disc, SD card or USB.
■ Copy speed Features Are chapters maintained? ( : Possible, –: Impossible) High speed mode Normal speed mode Copy with shorter time than the recorded time of the title with same quality (recording mode). It will take same or longer time as the recorded time of the titles to be copied. Even if you select a recording mode with better picture quality than the original, the picture quality does not improve.
Copying titles ■ Frequently Asked Questions When is high speed copy not possible? It will copy at normal speed in following cases: y Copying to RAM -R -R DL -RW(V) +R +R DL +RW in following conditions: – Titles in DR, HG, HX, HE, HL mode – Title of the AVCHD copied to the HDD y Copying to -R -R DL -RW(V) +R +R DL +RW in following conditions: – Copy including a title that was recorded to HDD with “Rec for High Speed Copy” set to “Off” – Titles that contain many deleted segments – Titles that have been copie
Copy Title Playing Copy the playing title on the HDD to the disc. It will start copying from the beginning of the title regardless of the playing position. HDD p RAM -R -R DL -RW(V) +R +R DL +RW 1 ■ Speed and recording mode when copying Titles in DR, HG, HX, HE or HL mode Playback the title to copy. Copy destination Copy Speed Recording mode RAM -R -R DL -RW(V) +R +R DL +RW Normal speed FR Titles in XP, SP, LP, EP or FR mode 4 Press [OPTION].
Copying titles Copying using the copying list—Copy HDD ' RAM +RW -RW(VR) p HDD HDD p -R -R DL -RW(V) +R +R DL You can order titles as desired for copy to disc. 1 2 6 While stopped Press [FUNCTION MENU]. Press [e, r] to select “Copy” and press [OK].
Copying list icons and functions Copying list indicators Titles that can be copied in high speed mode to the inserted disc Title contains still picture(s) y Still picture(s) cannot be copied. Title recorded using a different encoding system (NTSC) from that of the TV system currently selected on (PAL) the unit. y Titles displaying these marks cannot be selected. Data size of each registered item Size: Destination Capacity: 4343MB Size: 0 MB ( 0% ) Data size recorded to the copy Title No.
Copying titles Copying a finalised DVD-R, DVD-R DL, DVD-RW (DVD-Video format), +R and +R DL DVD-V 4 p HDD You can copy the content of finalised DVD-R, DVD-R DL, DVD-RW (DVD-Video format), +R, and +R DL to the HDD and re-edit. While playing a disc, the content being played is copied to the HDD according to the set time. When “Rec for High Speed Copy” (➡ 85) is set to “On” and you make a copy, the copy will be made using the picture size selected in “Aspect for Recording” (➡ 85) in the Setup menu.
Recording broadcasts from external equipment HDD See also “Important notes for recording” (➡ 26). e.g., Connecting to the AV2 terminals on the front Turn off the unit and external equipment before connecting. This unit S VIDEO VIDEO L/MONO - AUDIO- R AV2 IN S Video cable Audio/video cable External equipment Connect to Audio/Video output terminals. The S VIDEO terminal achieves a more vivid picture than the VIDEO terminal. Preparation Press [DRIVE SELECT] to select the HDD drive.
Copying from a video cassette recorder e.g., Connecting to the AV2 or DV input terminals on the front Turn off the unit and other video equipment before connecting. This unit S VIDEO DV IN VIDEO L/MONO - AUDIO- R AV2 IN DV cable (IEEE 1394, 4-pin) DV Automatic Recording HDD RAM -R -RW(V) +R +RW Preparation 1 Turn off this unit and DV equipment, then connect the equipment with the unit’s DV input terminal (➡ left). 2 Turn on this unit. If you record to a disc, insert a disc (➡ 15).
Recording via AV2 input Flexible Recording via AV input (Recording that fits the size of a new DVD) RAM -R -RW(V) +R +RW It is possible to record to disc from equipment connected to the AV2 input terminals. Recording mode is FR mode. (➡ 28) Preparation Press [DRIVE SELECT] to select the DVD drive. RAM If the disc is protected, release protection (➡ 80, Setting the protection). When the output signal from the external equipment is NTSC, change “TV System” to “NTSC” in the Setup menu (➡ 88).
Copy the HD Video (AVCHD format) or the SD Video (MPEG2 format) Copying HD Video (AVCHD format) It is possible to copy the HD video (AVCHD format) recorded on the Panasonic’s video camera, etc. to the HDD. ■ From an SD card or Discs AVCHD AVCHD ■ From a video equipment (Disc) p HDD (SD card) p HDD HDD HDD of Panasonic’s video camera, etc. p HDD You cannot playback HD Video in the HDD of Panasonic’s video camera, etc. with this unit. You must copy the files to the HDD.
Copying SD Video (MPEG2 format) It is possible to copy the SD video (MPEG2 format) recorded on the Panasonic’s video camera, etc. to the HDD or disc. ■ From an SD card ■ From a video equipment SD p HDD RAM (All the recordings on the same date become a title.) HDD of Panasonic’s video camera, etc. p HDD RAM (All the recordings on the same date become a title.) HDD DVD-RAM 1 HDD DVD-RAM Insert a card.
Playing still pictures HDD RAM -R -R DL CD USB SD You can play still pictures recorded with a computer onto a DVD-R, DVD-R DL, CD-R/CD-RW, USB memory and SD card. You cannot play still pictures while recording or copying. Preparation RAM -R -R DL CD USB SD Insert a disc, USB memory, or SD card. (➡ 15) Press [DRIVE SELECT] to select the drive. Select “DVD” for any discs. 1 Press [DIRECT NAVIGATOR]. HDD RAM When “PICTURE” is not selected, press the “Green” button to select “PICTURE”.
Useful functions during still picture play Start Slideshow You can display still pictures one by one at a constant interval. 1 Press [e, r, w, q] to select the album or date. 2 Press [q] (PLAY). You can also start Slideshow with following steps. After performing step 1 (➡ above) 1 Press [OPTION]. 2 Press [e, r] to select “Start Slideshow” and press [OK]. To end the slideshow Press [RETURN ]. Slideshow Settings 1 2 3 4 Press [e, r, w, q] to select the album or date. Press [OPTION].
Editing still pictures Editing still pictures (JPEG) HDD RAM SD y Editing can be done in units of pictures, albums or dates. y You cannot edit still pictures recorded on DVD-R, DVD-R DL, CDR/CD-RW and USB memory. Preparation y Press [DRIVE SELECT] to select the drive. y RAM SD Release protection (➡ 11, 80, Setting the protection). 1 3 Press [e, r] to select the operation and press [OK] (e.g.
Still pictures operation After performing steps 1–3 (➡ 60) Copy to Album HDD RAM Copy to New Album HDD RAM Copy the selected album, date or pictures to an existing album. 1 Press [w, q] to select “Start” and press [OK]. 2 Press [e, r, w, q] to select the destination album and press [OK]. The destination album with protect setting cannot be copied to. After copying, the screen shows the Album View automatically. Copy the selected album, date or pictures to new album.
Copying still pictures HDD RAM USB SD Pictures copied from SD card and USB memory will be categorised according to the shooting date. Pictures without shooting date will be categorised using the creation date. You cannot copy pictures recorded to DVD-R, DVD-R DL or CD-R/ CD-RW. If the space on the destination drive runs out or the number of files/folders to be copied exceeds the maximum (➡ 112), copying will stop partway through. You cannot copy the information about the picture rotation.
5 Register still pictures for copy. 6 If you are going to copy a registered list without making any changes to it (➡ step 6). Pictures from different dates or albums will not be registered to same list. Press [e, r] to select “Start Copying” and press [OK]. [Only when copied with “By Picture (Album)” from HDD to RAM SD or from RAM to HDD SD ] When specifying another album as the copying destination, select “Album”.
Deleting still pictures Once deleted, the recorded contents are lost and cannot be restored. Make certain before proceeding. HDD RAM SD Preparation Press [DRIVE SELECT] to select the drive. RAM SD Release protection (➡ 11, 80, Setting the protection). 1 2 While stopped Press [FUNCTION MENU]. Press [e, r] to select “Delete” and press [OK]. HDD RAM When “PICTURE” is not selected, press the “Green” button to select “PICTURE”. HDD RAM Switching the DIRECT NAVIGATOR appearance 1 Press [OPTION].
Playing music Playing MP3 files Playing music CD -R -R DL CD USB You can play MP3 files recorded with a computer onto a DVD-R, DVD-R DL, CD-R/CD-RW and USB memory. You cannot play MP3 files on the USB memory while recording. 1 While stopped While stopped Insert a music CD. The unit starts accessing the Gracenote® Database (➡ 70) and searches for the title information. Insert a disc or USB memory.
Playing music Playing music recorded on HDD 3 Copying music to HDD (➡ 70) Press [e, r] to select the track and press [OK]. Preparation Press [DRIVE SELECT] to select the HDD drive. 1 DIRECT NAVIGATOR Music List 0.09 4.30 March Moon HDD Does this flower open? Playing track While stopped Press [DIRECT NAVIGATOR]. No.
Useful functions during music play HDD -R -R DL CD USB Operations during play Stop Pause Press [g]. Search Press [t] or [y]. Press [q] (PLAY) to restart play. During play or while paused Press [u] or [i]. Skip to the track you want to play. Each press increases the number of skips. While Music List screen is displayed Press [e, r] to select the track and press the “Green” button. Up to 99 tracks can be registered.
Editing music/playlist Album and track operation Editing music After performing steps 1–4 (➡ left) HDD Preparation Press [DRIVE SELECT] to select the HDD drive. 1 While stopped Press [DIRECT NAVIGATOR]. When “MUSIC” is not selected, press the “Yellow” button to select “MUSIC”.
Editing Playlist Register track to Playlist HDD HDD You can register your favourite albums and tracks into 10 preset playlists. Name of the playlist can be changed. New playlist cannot be added. Up to 999 tracks can be registered to each playlist. Preparation Press [DRIVE SELECT] to select the HDD drive. 1 Preparation Press [DRIVE SELECT] to select the HDD drive. While stopped Press [DIRECT NAVIGATOR]. When “MUSIC” is not selected, press the “Yellow” button to select “MUSIC”.
Copying music to HDD You can store the two formats of music data in this unit’s HDD. Music CD (CD-DA) When inserting music CDs, this unit makes access to the internal Gracenote® Database to obtain title information. The album name, track name and artist name are assigned automatically allowing you find the track easily when playing back. 1 While stopped Insert a disc or USB memory. CD (Music CD) The unit starts accessing the Gracenote® Database and searches for the title information.
Deleting music HDD Once deleted, the recorded contents are lost and cannot be restored. Make certain before proceeding. 1 2 While stopped Press [FUNCTION MENU]. Press [e, r] to select “Delete” and press [OK]. When “MUSIC” is not selected, press the “Yellow” button to select “MUSIC”. DELETE Navigator HDD Music Menu Total Tracks 53 VIDEO PICTURE MUSIC Artists Albums My Favourites Playlists Frequently Played OK RETURN 3 OPTION VIDEO Please select to access music.
Entering text 2 HDD RAM -R -R DL -RW(V) +R +R DL +RW SD You can give names to recorded titles, etc. The maximum number of characters: 64 (44 ) Album of still pictures ( HDD RAM ) 36 Album (Music) ( HDD ) 59 Track Repeat this step to enter other characters. To delete a character Press [e, r, w, q] to select the character in the name field and press [h]. (The selected characters are deleted.
Enjoying VIERA CASTTM You can access a selection of Internet services from the Home screen with VIERA CAST, for example, YouTube, Picasa Web Albums. (Current as of June 2009) VIERA CAST requires a broadband Internet connection. Dial-up Internet connections cannot be used. Preparation Network connection (➡ 98) Network setting (➡ 92) 1 Press [VIERA CAST]. Message is displayed. Please read these instructions carefully and then press [OK] to start VIERA CAST function.
Linked operations with the TV (VIERA Link “HDAVI ControlTM”) You can enjoy linked operations with the TV and receiver by using “HDAVI Control”. What is VIERA Link “HDAVI Control”? VIERA Link “HDAVI Control” is a convenient function that offers linked operations of this unit, and a Panasonic TV (VIERA) or receiver under “HDAVI Control”. You can use this function by connecting the equipment with the HDMI cable. See the operating instructions for connected equipment for operational details.
Easy control only with VIERA remote control If you connect this unit to the TV that supports “HDAVI Control 2” or later with an HDMI cable, you can enjoy using more convenient functions. You can operate this unit using buttons on the TV remote control. The buttons that you can use for this unit vary depending on the TV. For details, refer to the operating instructions of the TV. Use the remote control supplied with this unit if you cannot operate this unit using buttons on the TV remote control.
Convenient functions to playback and viewing Audio attribute Using on-screen menus LPCM/ Digital/DTS/MPEG: k (kHz): b (bit): ch (channel): Common procedures 1 Press [DISPLAY]. Disc Play Picture Sound 2 3 4 Soundtrack 1 Digital 2/0 ch Subtitles Off Audio channel LR Setting Menu Item Depending on the condition of the unit (playing, stopped, etc.) and disc contents, there are some items that you cannot select or change. The menu is not displayed when playing still pictures.
Play menu—Change the play sequence This function works only when the elapsed play time is displayed. Select the item for repeat play. Depending on the disc, the items that can be selected will differ. Repeat Play Items displayed depends on the contents of the playback. All Title Chapter Playlist Select “Off” to cancel.
Convenient functions to playback and viewing Status messages Press [STATUS Switch the aspect ratio of the screen ]. The display changes each time you press the button. A B When black bars are shown at the top, bottom, left, and right sides of the screen, you can enlarge the image to fill the screen. 1 2 Press [OPTION]. Press [e, r] to select “Aspect” and press [OK]. 3 C Press [w, q] to select the item.
FUNCTION MENU window/Pause Live TV FUNCTION MENU window By using the FUNCTION MENU window you may access the main functions quickly and easily. 1 Press [FUNCTION MENU]. Functions displayed depend on the selected drive or type of disc. To pause the TV programme you are watching—Pause Live TV You can pause the TV programme you are watching using this unit’s tuner and resume later by temporarily saving it on the HDD. This is useful when you have to briefly stop watching TV to run an errand.
Disc and card management RAM -R -R DL -RW(V) +R +R DL +RW -RW(VR) SD Preparation Press [DRIVE SELECT] to select the DVD or SD drive. Common procedures 1 2 Setting the protection RAM After performing steps 1–3 (➡ left) 1 While stopped Press [FUNCTION MENU]. Press [e, r] to select “Others” and press [OK]. 2 Press [w, q] to select “Yes” and press [OK]. e.g., RAM DVD Management FUNCTION MENU DVD-RAM Time Remaining Press [e, r] to select “Disc Protection” and press [OK].
Deleting all titles—Delete all titles Enabling the unit’s recording function—Format RAM Preparation Release protection (➡ 80, Setting the protection). After performing steps 1–3 (➡ 80, Common procedures) 1 2 3 4 Press [e, r] to select “Delete all titles” and press [OK]. Press [w, q] to select “Yes” and press [OK]. Press [w, q] to select “Start” and press [OK]. A message appears when finished. Press [OK]. To return to the previous screen Press [RETURN ]. To exit the screen Press [EXIT].
Disc and card management Selecting the background style—Top Menu After finalising – -R -R DL +R +R DL The disc becomes play-only and you can no longer record or edit. – -RW(V) You can record and edit the disc after formatting (➡ 81) although it becomes play-only after finalising. -R -R DL -RW(V) +R +R DL +RW The background selected here will be displayed as the DVD-Video top menu after finalising or creating Top Menu ( +RW ).
Changing the unit’s settings You can change the unit’s settings using the Setup menu. y The settings remain intact even if you switch the unit to standby. Common procedures 1 2 3 While stopped Press [FUNCTION MENU]. Press [e, r] to select “Others” and press [OK]. OK RETURN 5 6 ■ Favourites Edit You can create four groups of channels for viewing and recording easier. Editing these groups does not affect the channel setting itself.
Changing the unit’s settings ■ Auto Tuning You can restart auto channel setting if set up (➡ 18) fails for some reason. 1 Press [e, r] to select “Auto Tuning” and press [OK]. When the confirmation screen appears 2 Press [w, q] to select “Yes” and press [OK]. Tuning will start automatically.
Aspect for Recording HDD/Disc (All factory default settings are indicated with underlined text.) Settings for Playback Sets the aspect ratio when recording or copying in XP, SP, LP, EP, FR mode. [Automatic] The programme will be recorded in the original aspect used when recording started (including when recording started at a commercial, etc.). [16:9] [4:3] Press [OK] to show the following settings.
Changing the unit’s settings Picture Sound (All factory default settings are indicated with underlined text.) Dynamic Range Compression Still Mode Select the type of picture shown when you pause play (➡ 114, Frames and fields). [Automatic] [Field] Select if jittering occurs when “Automatic” is selected. (The picture is coarser.) [Frame] Select if small text or fine patterns cannot be seen clearly when “Automatic” is selected. (The picture is clearer and finer.
Dolby Digital DTS 2 MPEG 1 Audio Channels for HG/HX/HE/HL Recording 1 This will set the audio when converting the recording mode to HG, HX, HE or HL, from DR (➡ 44). Select to output Dolby Digital, DTS Digital Surround or MPEG as bitstream or PCM. Note Not making the proper settings may result in noise. If the unit is connected with the HDMI AV OUT terminal, the specifications of the connected equipment take preference over this unit and audio selected in these items may not be output (e.g.
Changing the unit’s settings Display Connection (All factory default settings are indicated with underlined text.) On-Screen Messages Choose the approximate time until the digital channel information screen (➡ 20) disappears automatically. The length of time the control panel (➡ 75) is displayed can also be changed, but “Off” does not work. [Off] (The digital channel information is not displayed.) [3 sec.] [5 sec.] [7 sec.] [10 sec.] (All factory default settings are indicated with underlined text.
Network Settings HDMI Connection Press [OK] to show the following settings. (All factory default settings are indicated with underlined text.) HDMI Video Mode Select “On” when video is output from HDMI AV OUT terminal. [On] [Off] When the equipment such as amplifiers is connected using HDMI cable, and TV is connected to the COMPONENT VIDEO OUT terminal (setup before connecting to the amplifiers.) HDMI Video Format You can only select items compatible with the connected equipment.
Changing the unit’s settings Others System Update (➡ 94) (All factory default settings are indicated with underlined text.) Automatic Standby Select how long the unit remains on when it is not being used. [2 hours] [4 hours] [6 hours] [Off] Software Update in Standby Remote Control [On] Change the remote control code on the main unit and the remote control (the two must match) if you place other Panasonic products close together.
Other Settings Television operation You can configure the remote control TV operation buttons to turn the television on/off, change the television input mode, select the television channel and change the television volume. Point the remote control at the television. While pressing [^ TV], enter the code with the numbered buttons. e.g.
Network Settings These settings are used when you will connect this unit to a network. The connection to the Internet may take time or the Internet may not be connected depending on the connection environment. It is recommended that you use a broadband connection. ■ Testing the connection Always test the connection when a LAN cable is connected or when new “IP Address/DNS Settings” have been made. 1 2 3 4 Press [FUNCTION MENU]. Press [e, r] to select “Others” and press [OK].
■ Setting the proxy server In most cases, default settings can normally be used without making any changes. Please use this setting when instructed to by your Internet service provider. Set the proxy server only after the connection test is completed properly. 1 2 3 4 Press [FUNCTION MENU]. Press [e, r] to select “Others” and press [OK]. Press [e, r] to select “Setup” and press [OK]. Press [e, r] to select “Network Settings” and press [OK]. 5 Press [e, r] to select “Proxy Server Settings” and press [OK].
Software (Firmware) Update Software of this unit can be updated automatically by following method. y From broadcasts y From Internet [network connection and setting is required. (➡ 92, 98)] Update of the software is done when it is in standby mode. Once the new software is found, it will start the download of the software, and then the update. Download of the software will start automatically when the power of this unit is turned off or when it is 3 a.m.
Additional connections Connecting a stereo amplifier Connecting a television with S VIDEO terminals The S VIDEO OUT terminal achieves a more vivid picture than the VIDEO OUT terminal. (Actual results depend on the television.) Connect to terminals of the same colour. Supplied Audio/Video cable can also be used as an alternative for Audio cable without connecting the video connector (yellow). Television’s rear panel Connect to terminals of the same colour.
Additional connections Connecting with an HDMI compatible television and receiver When connected to an HDMI compatible unit, an uncompressed digital audio and video signal is transmitted. You can enjoy high quality, digital video and audio with just one cord. When connecting to an HDMI-compatible HDTV (High Definition Television), the output can be switched to 1080p, 1080i or 720p HD video. This unit incorporates HDMITM (V.1.3a with Deep Colour, x.v.ColourTM) technology (➡ 114, 115).
Connecting an Analogue television and VCR To household mains socket (AC 220 to 240 V, 50 Hz) To the aerial AC mains lead (included) Connect only after all other connections are complete.
Additional connections Network connection Following function will be available when this unit is connected to the network. y This document is assuming that you already have a broadband connection. y This connection is not necessary if following functions are not to be used. Enjoying VIERA CASTTM You can access a selection of Internet services from the Home screen with VIERA CAST, for example, YouTube, Picasa Web Albums.
Operations that can be performed simultaneously Operations that can be performed while recording or copying a title ( : Possible, –: Impossible) Playback of HDD Playback of discs Playback of still pictures While recording to HDD in DR mode – While recording from external equipment to HDD (in XP, SP, LP, EP and FR mode) – Playback of music recorded on HDD While recording from DV input – – – – While copying in normal speed mode – – – – While copying in high speed mode [With finalising or cre
Frequently asked questions Refer to the following items if you have any doubts about unit operations. Recording Set up Can I record from a commercially purchased video cassette or DVD? Which aerial is suitable for receiving digital terrestrial broadcasts? ¾ Most commercially sold video cassettes and DVD are copy protected; therefore, recording is usually not possible. ¾ You can use your current aerial. However, depending on the area where you live, a new aerial may be necessary.
TV Guide USB Is it possible to programme a recording, with a start and end time that are different from the TV Guide system? What can or cannot be done using the USB port on this unit? ¾ You can play DivX, MP3 or still picture (JPEG) files on a USB memory. (➡ 40, 58, 65) ¾ You can copy still pictures (JPEG) files on a USB memory to the HDD. (➡ 62) ¾ You can copy MP3 files on a USB memory to the HDD. (➡ 70) ¾ You can connect a video equipment and copy SD Video to the HDD or DVD-RAM.
Messages On the television Page Authorisation Error. You are trying to play the DivX VOD content that was purchased with a different registration code. You cannot play the content on this unit. (DivX) 41 Cannot finish recording completely. The programme was copy-protected. The HDD or disc may be full. The maximum number of programme has been exceeded. — — 28 Cannot play.
On the unit’s display The following messages or service numbers appear on the unit’s display when something unusual is detected during startup and use. Page 90 DVD (“ ” stands for a number.) The remote control and main unit are using different codes. Change the code on the remote control. GUIDE TV Guide data is being downloaded. 35 FINISH The software update is complete. 94 H or F (“ ” stands for a service number.) There is something unusual.
Troubleshooting guide Before requesting service, make the following checks. If you are in doubt about some of the check points, or if the solutions indicated in the chart do not solve the problem, consult your dealer for instructions. Updating to the latest software may solve the problem. (➡ 94) The following do not indicate a problem with this unit: Regular disc rotating sounds. Poor reception due to atmospheric conditions. Image disturbance during search.
TV screen and video Television reception worsens after connecting the unit. ¾ This can occur because the signals are being divided between the unit and other equipment. It can be solved by using a signal booster, available from audio-visual suppliers. If it is not solved by using a signal booster, consult the dealer. The digital channel information or control panel does not appear. ¾ Select the length of time (3–10 sec.) that “On-Screen Messages” in the Setup menu will be displayed.
Troubleshooting guide Sound Operation No sound. Low volume. Distorted sound. Cannot hear the desired audio type. Cannot operate the television. The remote control doesn’t work. ¾ Check the connections and the “Digital Audio Output” settings. Check the input mode on the amplifier if you have connected one. (➡ 16, 17, 86, 95–97) ¾ Press [AUDIO] to select the audio. (➡ 37) ¾ Turn “Sound Effects” in the Sound menu to “Off” in the following cases.
Recording, timer recording and copying Cannot record. Cannot copy. ¾ You can not record to the disc by pressing the [* REC]. ¾ You haven’t inserted a disc or the disc you inserted cannot be recorded on. Insert a disc the unit can record onto. (➡ 8, 9) ¾ The disc is unformatted. Format the disc. RAM -RW(V) +R +R DL +RW (➡ 81) ¾ The disc is protected with DVD Management. (➡ 80) ¾ You cannot record when there is not enough space or when the number of titles has reached its limit.
Troubleshooting guide Play Play fails to start even when [q] (PLAY) is pressed. Play starts but then stops immediately. ¾ Insert the disc correctly with the label facing up. (➡ 15) ¾ The disc is dirty. (➡ 15) ¾ You tried to play a blank disc or disc unplayable on this unit. (➡ 10) ¾ You tried to play a +RW that needs to be finalised on the equipment used for recording. ¾ When recording to DVD-RAM using “EP (8 hours)” mode, play may not be possible on DVD players that are compatible with DVD-RAM.
Still pictures USB Cannot display DIRECT NAVIGATOR screen. The contents of the USB memory cannot be read. ¾ This screen cannot be displayed during recording or copy. ¾ Remove the USB memory from the USB port and then insert again. If this does not solve the problem, turn off and turn on the unit again. ¾ Check that the USB memory is inserted correctly. (➡ 15) ¾ The format of the USB memory or of its contents is not compatible with the unit. (The contents on the USB memory may be damaged.
Troubleshooting guide Picture regularly breaks up on some channels. “No signal” message is displayed. ¾ Check “DVB Signal Condition”. If “Signal Quality” or “Signal Strength” are displayed in red or constantly changing, check aerial. If problem persists consult your local TV aerial installer. (➡ 84) ¾ Interference (known as impulse noise) from household appliances such as light switches, fridges etc. may cause picture break up and/or audio distortion.
Specifications Recording system DVD-RAM: DVD Video Recording format DVD-R: DVD-Video format DVD-R DL (Dual Layer): DVD-Video format DVD-RW: DVD-Video format +R +R DL (Double Layer) +RW Recordable discs DVD-RAM: DVD-R (SL): DVD-R (DL): DVD-RW: +R (SL): +R (DL): +RW: 2X SPEED (Ver. 2.0), 2-3X SPEED (Ver. 2.1), 2-5X SPEED (Ver. 2.2) 1X SPEED (Ver. 2.0), 1-4X SPEED (Ver. 2.0), 1-8X SPEED (Ver. 2.0), 1-16X SPEED (Ver. 2.1) 2-4X SPEED (Ver. 3.0), 2-8X SPEED (Ver. 3.0) 1X SPEED (Ver. 1.1), 1-2X SPEED (Ver. 1.
Specifications SD Card Slot: Compatible media: Format: SD Memory Card slot: 1 pc SD Memory Card 3, SDHC Memory Card 4 FAT12, FAT16 (In case of SD Memory Card) FAT32 4 (In case of SDHC Memory Card) Data that can be played: JPEG, SD (Standard Definition)-Video 5, HD (High Definition)-Video USB device USB standard: Format: Data that can be played: MP3 Playable media File format USB 2.
■ Structure of folders displayed by this unit SD You can play MP3 and still pictures (JPEG) on this unit by making folders as shown below. However depending on the method of writing data (writing software), play may not be in the order you numbered the folders. Structure of MP3 folders : Numbers XXX: Letters Card DCIM XXXXX CD USB (Picture folder) Prefix with 3-digit numbers in the order you want to play them. Root XXXX 001 Any folder with JPEG files e.g., 001track.mp3 (file=track) 002track.
Glossary AVCHD AVCHD is a new format (standard) for Panasonic’s video camera, etc. that can be used to record and play high-resolution HD images. Frames and fields Frames refer to the single images that constitute the video you see on your television. Each frame consists of two fields. Bitstream This is the digital form of multi-channel audio data (e.g., 5.1 channel) before it is decoded into its various channels. Decoder A decoder restores the coded audio signals on discs to normal.
RGB This refers to the three primary colours of light, red (R), green (G), and blue (B) and also the method of producing video that uses them. By dividing the video signal into the three colours for transmission, noise is reduced for even higher quality images. Router Distinguishes the IP address assigned to each device, such as the PC, and relays the flow of data within the network.
Safety precaution CAUTION! THIS PRODUCT UTILIZES A LASER. USE OF CONTROLS OR ADJUSTMENTS OR PERFORMANCE OF PROCEDURES OTHER THAN THOSE SPECIFIED HEREIN MAY RESULT IN HAZARDOUS RADIATION EXPOSURE. DO NOT OPEN COVERS AND DO NOT REPAIR YOURSELF. REFER SERVICING TO QUALIFIED PERSONNEL.
License Manufactured under license from Dolby Laboratories. Dolby and the double-D symbol are trademarks of Dolby Laboratories. Manufactured under license under U.S. Patent #’s: 5,451,942; 5,956,674; 5,974,380; 5,978,762; 6,487,535 & other U.S. and worldwide patents issued & pending. DTS and DTS Digital Surround are registered trademarks and the DTS logos and Symbol are trademarks of DTS, Inc.© 1996-2008 DTS, Inc. All Rights Reserved.
Index Adjust the audio quality (Sound menu) . . . . . . . . . . . . . . . . . . 77 Adjust the picture quality (Picture menu) . . . . . . . . . . . . . . . . 77 Album (Music) Edit. . . . . . . . . . . . . . . . . . . . . . . . . . . . . . . . . . . . . . . . . . . . . . . 68 Play . . . . . . . . . . . . . . . . . . . . . . . . . . . . . . . . . . . . . . . . . . . . . . 66 Album (Still picture) Copy. . . . . . . . . . . . . . . . . . . . . . . . . . . . . . . . . . . . . . . . . . . . . . 62 Edit. . . . . .
One Touch Recording. . . . . . . . . . . . . . . . . . . . . . . . . . . . . . . . . 22 Partial Delete. . . . . . . . . . . . . . . . . . . . . . . . . . . . . . . . . . . . . . . . 43 Pause Live TV . . . . . . . . . . . . . . . . . . . . . . . . . . . . . . . . . . . . . . . 79 VIERA . . . . . . . . . . . . . . . . . . . . . . . . . . . . . . . . . . . . . . . . . . . . 75 Playing back DVD-Video . . . . . . . . . . . . . . . . . . . . . . . . . . . . . . . . . . . . . . . . . 21 HD Video . . . . . . . . .
-If you see this symbolInformation on Disposal in other Countries outside the European Union This symbol is only valid in the European Union. If you wish to discard this product, please contact your local authorities or dealer and ask for the correct method of disposal. Panasonic Corporation Web Site: http://panasonic.