Household Massage Lounger Operating Instructions Model No. Before operating this unit, please read these instructions completely.
IMPORTANT SAFETY INSTRUCTIONS English Basic precautions should always be followed when using an electrical unit, including the following. Please ensure that you read all instructions before using the Household Massage Lounger. DANGER – To reduce the risk of electric shock: 1. Always unplug this unit from the electrical outlet immediately after using and before cleaning. WARNING – To reduce the risk of burns, fire, electric shock, or injury to persons: 1. 2. 3. 4. 5. 6. 7. 8. 9. 10. 11. 12. 13. 14. 15.
English SAFETY PRECAUTIONS CAUTION: To avoid the risk of injury: 1. Persons with any of the conditions listed below or who are undergoing medical treatment or suffer from medical conditions should consult with their physicians before using the unit: a) Pregnant women, people who are ill, in poor physical shape. b) People suffering from back, neck, shoulder, or hip pain. c) People who have a pacemaker, defibrillator, or other personal medical devices prone to electronic interference.
English 14. Sit on the unit after confirming there is no foreign matter between the parts of the unit. (Confirm that there are no foreign objects stuck in the back cushion, leg/sole massage section, or under the seat.) Failure to observe this precaution may result in accident or injury. 15. Always return the legrest to its original position before moving the unit. Failure to observe this precaution may result in injury due to the legrest returning to its original position when the unit is being moved. 16.
English GROUNDING INSTRUCTIONS This product must be grounded. If it should malfunction or break down, grounding provides a path of least resistance for electric current to reduce the risk of electric shock. This product is equipped with a cord having an equipment-grounding conductor and a grounding plug. The plug must be plugged into an appropriate outlet that is properly installed and grounded in accordance with all local codes and ordinances.
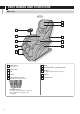
PART NAMES AND FUNCTIONS English Main unit Front 6 7 1 2 8 3 9 4 10 5 1 Control Panel • See page 7 to 8. 2 3 4 5 Back Cushion Seat Legrest Leg/Sole massage section • Includes air massage function. Sole Shiatsu Sheet • “Creepers” are provided on the back side. • Fine adjustment of position possible. • Removable. 6 7 8 9 10 Pillow Retracted position of massage heads Backrest • Includes integrated massage heads.
English Back 16 17 18 19 11 12 13 14 15 20 11 12 13 14 15 2 Lock Switch 3 Lock Switch Key Tag • For preventing children from swallowing it by accident. 4 Lock Switch Key 5 Power Switch • Lock switch is set to “open” and power switch is set to “on” prior to leaving the factory.
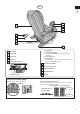
Control Panel English 1 7 2 8 3 9 4 10 11 12 5 6 13 1 2 OFF/ON button 8 Illumination Off/On button • See page 17. Quick Stop button • Press this button to stop the massage immediately. 9 Lower Body Massage Off/On buttons • See pages 19 and 21. 3 Display • This illustration is when all lamps are illuminated. • See page 8. 4 10 Lower Body Massage Intensity Adjustment buttons • See pages 19 and 21. Auto Program Selection buttons • See page 17.
1 2 3 5 1 Sound Off Display • Displayed when the sound is turned off. 2 3 4 Time Remaining Display English Display 4 6 7 5 8 Lower Body Massage Operation Off/On Display • Displays the current lower body massage operation. LEG/FOOT Shoulder Position Display LEG STRETCH Upper Body Massage Operation Display • Displays the current upper body massage operation. 6 Massage Area Display • Flashes to indicate areas currently being massaged.
SETTING UP THE MASSAGE LOUNGER English 1. Where to use the unit Keep at least 4" (10 cm) away from the wall. • Ensure there is adequate space to recline. • Do not expose the massage lounger to direct sunlight or high temperatures, such as in front of heating sources, because this can cause discoloration or hardening of the synthetic leather. • Place the unit on a mat to prevent floor damage. • When placing a mat under the unit, the size of the mat should be sufficient [at least 47.2 in. × 27.6 in.
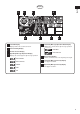
English Confirm that the main unit and the accessories are in the box. Main unit Width: Approx. 26.8 in. (68 cm) Height: Approx. 28.3 in. (72 cm) Length: Approx. 61.0 in. (155 cm) Accessories Armrests (Right/Left) Control Panel Stand Control panel holder Left/Right indication Right Side Cover Left Side Cover Sole Shiatsu Sheet Fixing screw • This is installed on the sole massage section prior to leaving the factory. • The direction of the holder can be adjusted with the revolving ball joint.
ASSEMBLY English 1. Attaching the armrests (On both the right and left sides) 1 Insert the armrest into the unit. • Be careful to avoid pinching your fingers. A 1. Align the protrusions on the unit with the grooves in the armrest. 2. Align the front protrusion on the armrest with the groove on the unit and align the rear protrusion of the armrest with the position of A. 3. Press the armrest downwards while simultaneously pushing it towards the seat.
2 Fasten the armrest with the attachment screws. Set the two attachment screws in place with the allen key first and then tighten firmly. Attachment Screws (M6 × 16) Right armrest — 2 pcs. Left armrest — 2 pcs. Back English Turn screws clockwise to tighten. Front Attachment Screw Attachment Screw Allen key Allen key How to tighten the screws Hole Allen key • Put an attachment screw on the edge of the allen key and tighten the screw horizontally to the hole.
3. Attaching the side covers (On both the right and left sides) English The method for attaching the covers is the same for both sides. The diagram shows the right side where the control panel stand is attached. 1 Insert the bottom tabs on the cover into the bottom notches on the armrest. Bottom tabs Right Side Cover Left Side Cover 2 Insert the top tabs into the notches on the armrest. Right side cover Notches Top tabs Notches Push the cover until you hear it click.
1 Insert the power plug into the power outlet. 2 Confirm the lock switch key is set to the English 5. Raising the backrest to the upright position 1 “open” position. 3 Confirm the power switch is set to the “on” position. 4 Press the button on the control panel twice. • Press once, and then press again approx. 1 second later. The backrest will rise to the upright position automatically. 6.
BEFORE SITTING DOWN English Check the following before using the unit 1. Check the surrounding area Make sure there are no objects, people, or pets in the vicinity of the unit. 2. Check the power cord and the power plug See Warning No. 8 on page 1. 3. Be sure to push the connector all the way into the appliance inlet 4. Switching on the power supply 1 Insert the power plug into an electrical outlet. 2 Turn the lock switch key to the “open” position. 3 Slide the power switch to the “on” position.
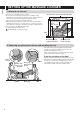
3 1 1 Make sure the covering is free of rips or tears. 2 Make sure there are no obstacles between English 5. Check the unit the parts of the unit. 3 Make sure the massage heads are in the retracted position, i.e. they are parked to the left and right in the upper part of the backrest. If not retracted, press retracted position. 4 twice to return the massage heads to the sure the legrest is lowered. 4 Make • Do not sit on the legrest when it is raised.
SELECTING A MENU AND STARTING THE MASSAGE English The illumination will light up and sound will start when you sit down. button 1. is lit on • To stop the sound, press the the display. • To stop the illumination, press the button 2. • Color of the illumination will change according to the operation. • If the illumination does not light up and sound does not start after sitting down, sit back deeply in the chair. • After 15 minutes of use, we recommend that you take a 10 minute break.
• Fine adjust the position of the massage heads to the position of your shoulders when you hear beeps and flashing. (The program will start after approximately 15 seconds.) • The shoulder position can be changed during the auto program massage. starts English shoulder position 4 •Adjusting The massage heads will move to the shoulder area while tapping. A single press of the button will raise or lower the massage heads approximately 0.6 in. (1.5 cm).
5 Making Adjustments English A Adjusting the intensity of the upper body massage Upper body intensity display (3 levels) Stronger Weaker Intensity 1 Intensity 2 Intensity 3 B Adjusting the intensity of the lower body massage Lower body intensity display Stronger Weaker Intensity 1 Intensity 2 Intensity 3 C Turning off the lower body actions Leg/foot massage is turned off when pressed. It will turn back on by pressing again. Leg stretch is turned off when pressed.
the button. 1 Press • The power will turn off automatically if the massage does not start within 3 minutes after turning on the power. English MANUAL OPERATION FOR THE UPPER BODY 1 2 the massage type you want. 2 Select • Press the button of the massage you require. • The unit will automatically recline to the massage position. See page 16 for a fine adjustment. Massage Actions NECK KNEAD Feels like the thumbs of two hands repeatedly kneading from the lower part to the upper part of your neck.
Adjust as you like 3 You can adjust the position or intensity of the massage heads, and you will hear a “beep-beep-beep” sound when it reaches English its limit. A Adjusting the Vertical Position of the Massage Heads Up • Press the button once to move the position slightly [approx. 0.6 in. (1.5 cm)]. Press and hold the button to move the position continuously; release the button to stop the movement.
Lower body intensity display • Default is level 2. English the massage intensity 3 •Adjusting The intensity is adjustable in 3 steps. shut-off in leg/foot massage and leg stretch 4 •Auto The massage will end after approximately 15 minutes and the unit will automatically shut off. • The legrest will automatically lower. • If you want to continue using the unit press the button.
AFTER COMPLETING THE MASSAGE English Return the seat to the original position 1 Check that there is nothing in the vicinity of the backrest or the legrest. the button twice. 2 •Press The backrest and legrest will automatically return to their original positions. The backrest and the legrest can be returned with the reclining button. (See page 16.) 3 Place the control panel in its holder. 4 Return the pillow to its original position if it was flipped. Disconnect the power See Warning No.
Using the wheels to move the unit Lifting the unit • Grasp the legrest to move the unit when using the wheels. • It is easier to move the unit with the massage heads retracted and the backrest in the upright position. * Place a mat or cloth on the floor and move the unit slowly to prevent floor damage. • Move the unit by having one person firmly hold onto the fabric section on the underside of the legrest and another person use the groove on the back cover of the backrest.
TROUBLESHOOTING English Problem Cause and Remedy Motor Noises • It sounds and feels like the massage heads are straining to get over wrinkles in the cloth. • The motor groans when it comes under load. • There is excessive noise during Tapping. (The noise is greater at the top of the unit.) • There is a creaking noise when the massage heads are in operation. • There is a rattling sound when the massage heads move up or down. • The belt can be heard rotating.
Contents of the error will be displayed in the remaining time display area when an error occurs during the operation. Time Remaining Display • For the error “U10” and Error display English ERROR DISPLAY will flash alternately. Contents For safety reasons, operation will terminate automatically when it cannot detect if someone is seated. If this error occurs even if you are seated, sit back all the way to the backrest, and operate from the start again.