Sillón de masaje Instrucciones de uso Modelo No. EP1061/EP1060 EP1061/EP1060 Panasonic Consumer Electronics Company One Panasonic Way 3D-1 EP1061 Secaucus, New Jersey 07094 1-800-338-0552 for questions and comments. EP1060 www.panasonic.com/massage Before operating this unit, please read these instructions completely, and save for future reference. Antes de utilizar esta unidad, lea completamente estas instrucciones y gurdelas por si necesita consultarlas en el futuro. No.
Thank you for purchasing the Panasonic Swede-Atsu Massage Lounger EP1061/EP1060. Please read this manual carefully to ensure optimum performance and safety. TM INDEX / íNDICE English See page 3-28 Español Ver págs 29-54 IMPORTANT SAFETY INSTRUCTIONS Basic precautions should always be followed when using an electrical unit, including the following. Please ensure that you read all instructions before using the Household Massage Lounger. DANGER – To reduce the risk of electric shock: 1.
Thank you for purchasing the Panasonic Swede-Atsu Massage Lounger EP1061/EP1060. Please read this manual carefully to ensure optimum performance and safety. TM INDEX / íNDICE English See page 3-28 Español Ver págs 29-54 IMPORTANT SAFETY INSTRUCTIONS Basic precautions should always be followed when using an electrical unit, including the following. Please ensure that you read all instructions before using the Household Massage Lounger. DANGER – To reduce the risk of electric shock: 1.
SAFETY PRECAUTIONS OPERATING PRECAUTIONS WARNING: To avoid the risk of injury, follow these precautions: WARNING: To avoid damaging to the chair, follow these precautions: 1. Pregnant women, people who are ill, in poor physical shape or undergoing medical treatment, and people suffering from back, neck, shoulder or hip pain should consult their doctor before using the unit.
SAFETY PRECAUTIONS OPERATING PRECAUTIONS WARNING: To avoid the risk of injury, follow these precautions: WARNING: To avoid damaging to the chair, follow these precautions: 1. Pregnant women, people who are ill, in poor physical shape or undergoing medical treatment, and people suffering from back, neck, shoulder or hip pain should consult their doctor before using the unit.
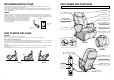
GROUNDING INSTRUCTIONS PART NAMES AND FUNCTIONS • The product must be grounded. If it should malfunction, grounding provides the path of least resistance for electric current to reduce the risk of electric shock. • This product is equipped with a cord having an equipment-grounding conductor and a grounding plug. The plug must be plugged into an appropriate outlet that is properly installed and grounded in accordance with all local codes and ordinances.
GROUNDING INSTRUCTIONS PART NAMES AND FUNCTIONS • The product must be grounded. If it should malfunction, grounding provides the path of least resistance for electric current to reduce the risk of electric shock. • This product is equipped with a cord having an equipment-grounding conductor and a grounding plug. The plug must be plugged into an appropriate outlet that is properly installed and grounded in accordance with all local codes and ordinances.
PART NAMES AND FUNCTIONS SETTING UP THE MASSAGE LOUNGER CONTROLLER (EP1061) Cover Closed ON/OFF Button Shoulder Position Quick Stop Button immediately. neck roller position reclining Reclining Button reclining 16in. 40cm 16in. 40cm Ensure there is Adequate Space for Reclining • Ensure that there is approximately 16in. (40cm) behind and at least 16in. (40cm) in front of the unit. the backrest and legrest. position.
PART NAMES AND FUNCTIONS SETTING UP THE MASSAGE LOUNGER CONTROLLER (EP1061) Cover Closed ON/OFF Button Shoulder Position Quick Stop Button immediately. neck roller position reclining Reclining Button reclining 16in. 40cm 16in. 40cm Ensure there is Adequate Space for Reclining • Ensure that there is approximately 16in. (40cm) behind and at least 16in. (40cm) in front of the unit. the backrest and legrest. position.
HOW TO USE THE MASSAGE LOUNGER — INTRODUCTION BEFORE USING THE UNIT • Here you will find an overview of how to use the massage lounger. Please refer to the pages shown for further details. AFTER CHECKING THE SURROUNDING AREA, TURN ON THE POWER 1. Check the Surrounding Area 1. After Carrying Out Safety Checks, Turn the Unit On (See Page 11) z Plug the power plug into the power socket. x Turn the lock switch to the “open” position. c Turn on the power switch on the back of the unit.
HOW TO USE THE MASSAGE LOUNGER — INTRODUCTION BEFORE USING THE UNIT • Here you will find an overview of how to use the massage lounger. Please refer to the pages shown for further details. AFTER CHECKING THE SURROUNDING AREA, TURN ON THE POWER 1. Check the Surrounding Area 1. After Carrying Out Safety Checks, Turn the Unit On (See Page 11) z Plug the power plug into the power socket. x Turn the lock switch to the “open” position. c Turn on the power switch on the back of the unit.
ADJUSTING THE SEAT RECLINING THE SEAT NOTE: BEFORE SITTING DOWN CAUTION Position the chair at least 16 in. (40cm) away from any wall or other obstacle to ensure adequate reclining space. • Slowly sit down after checking the position of the massage heads. Do not exceed the maximum user weight of 264 lbs. (120kg). Before sitting down, you must first check the position of the massage heads with your hands.
ADJUSTING THE SEAT RECLINING THE SEAT NOTE: BEFORE SITTING DOWN CAUTION Position the chair at least 16 in. (40cm) away from any wall or other obstacle to ensure adequate reclining space. • Slowly sit down after checking the position of the massage heads. Do not exceed the maximum user weight of 264 lbs. (120kg). Before sitting down, you must first check the position of the massage heads with your hands.
• When the Shoulder Position Indicator is flashing, adjust the position of the massage heads (upper roller) so that they lightly touch the shoulder. • The shoulder position can be adjusted up and down 4in. (10cm). • When it is not possible to correctly adjust the shoulder position, slide your body down and try adjusting it again. PROGRAMMED OPERATION • Please check that there are no children or pets in the vicinity of the unit before use. 1.
• When the Shoulder Position Indicator is flashing, adjust the position of the massage heads (upper roller) so that they lightly touch the shoulder. • The shoulder position can be adjusted up and down 4in. (10cm). • When it is not possible to correctly adjust the shoulder position, slide your body down and try adjusting it again. PROGRAMMED OPERATION • Please check that there are no children or pets in the vicinity of the unit before use. 1.
E.g.2 Changing to a massage type outside the category. (Changing to Tap B when Knead is selected.) • When Knead is combined with Tap B, deselecting Knead will leave only Tap. MANUAL OPERATION MANUAL OPERATION FOR THE UPPER BODY manual operation shiatsu swedish manual operation knead shiatsu swedish manual operation knead shiatsu swedish knead tap B vibration tap A tap B regional whole back Press 1. Press • The ON/OFF lamp will come on.
E.g.2 Changing to a massage type outside the category. (Changing to Tap B when Knead is selected.) • When Knead is combined with Tap B, deselecting Knead will leave only Tap. MANUAL OPERATION MANUAL OPERATION FOR THE UPPER BODY manual operation shiatsu swedish manual operation knead shiatsu swedish manual operation knead shiatsu swedish knead tap B vibration tap A tap B regional whole back Press 1. Press • The ON/OFF lamp will come on.
AFTER COMPLETING THE MASSAGE LEG MASSAGE IN MANUAL OPERATION (EP1061) • The leg massager has two functions. The massager can also massage the soles of the feet. 1. Press Soles of feet RETURN THE SEAT TO THE ORIGINAL POSITION 1. Check that there is Nothing Under the Backrest or the Legrest. Calves button • The programmed operation and leg massage button will flash. 2. Press the Leg Massage button slow fast slow leg massage • The leg massage will start.
AFTER COMPLETING THE MASSAGE LEG MASSAGE IN MANUAL OPERATION (EP1061) • The leg massager has two functions. The massager can also massage the soles of the feet. 1. Press Soles of feet RETURN THE SEAT TO THE ORIGINAL POSITION 1. Check that there is Nothing Under the Backrest or the Legrest. Calves button • The programmed operation and leg massage button will flash. 2. Press the Leg Massage button slow fast slow leg massage • The leg massage will start.
DETAILS REGARDING PROGRAMMED OPERATION DISCONNECT THE POWER 1. Turn Off the Power • The movements below are shown in simplified form for the sake of illustration. • When the programs have finished the unit will automatically stop. (Although programmed operation lasts for approximately 15 minutes (12–17 minutes), this will vary according to the shoulder position and program selected, whether or not tapping is on or off, and the weight of the person using the unit.
DETAILS REGARDING PROGRAMMED OPERATION DISCONNECT THE POWER 1. Turn Off the Power • The movements below are shown in simplified form for the sake of illustration. • When the programs have finished the unit will automatically stop. (Although programmed operation lasts for approximately 15 minutes (12–17 minutes), this will vary according to the shoulder position and program selected, whether or not tapping is on or off, and the weight of the person using the unit.
• The movements below are shown in simplified form for the sake of illustration. • When the programs have finished the unit will automatically stop. (Although programmed operation lasts for approximately 15 minutes (12–17 minutes), this will vary according to the shoulder position and program selected, whether or not tapping is on or off, and the weight of the person using the unit.
• The movements below are shown in simplified form for the sake of illustration. • When the programs have finished the unit will automatically stop. (Although programmed operation lasts for approximately 15 minutes (12–17 minutes), this will vary according to the shoulder position and program selected, whether or not tapping is on or off, and the weight of the person using the unit.
Swedish This motion is like the palms of both hands being used to press and rub over a wide area from both sides of the body. This type of massage is ideal for someone wanting a broad massage on the back or lower back. Knead With this massage, a strong push is followed by a quick release in a rhythm that is designed to relax stiff muscles. It is ideal for loosening stiff muscles in the neck and shoulders. Vibration The minute vibrations are designed to relax even the tensest body.
Swedish This motion is like the palms of both hands being used to press and rub over a wide area from both sides of the body. This type of massage is ideal for someone wanting a broad massage on the back or lower back. Knead With this massage, a strong push is followed by a quick release in a rhythm that is designed to relax stiff muscles. It is ideal for loosening stiff muscles in the neck and shoulders. Vibration The minute vibrations are designed to relax even the tensest body.
TROUBLESHOOTING Problem Before requesting service for this unit, check the table below for the possible cause of the problem. Some simple checks or minor adjustment on your part may eliminate the problem and restore proper operation. If you are in doubt about some of the check points, or if the remedies indicated in the chart do not solve the problem, call us at 1-800-338-0552 to locate the servicer near to you. It is not possible to recline the unit. The legrest cannot be raised or lowered.
TROUBLESHOOTING Problem Before requesting service for this unit, check the table below for the possible cause of the problem. Some simple checks or minor adjustment on your part may eliminate the problem and restore proper operation. If you are in doubt about some of the check points, or if the remedies indicated in the chart do not solve the problem, call us at 1-800-338-0552 to locate the servicer near to you. It is not possible to recline the unit. The legrest cannot be raised or lowered.
SPECIFICATIONS (EP1061) Power Supply: Power Consumption: 120V AC, 60Hz 160W (Approx. 5W in Standby mode with the controller turned off or when the unit is turned off.) Upper Body Massage Massage Area (Up-Down): Massage Area (Left-Right): Approx. 27.6in. (70cm) Distance between Massage Heads during Operation Approx. 2.4 – 5.9in. (6 – 15cm) Massage Area (Forward-Back): 2.2in. (5.5cm) Massage Cycle: Shiatsu: Approx. 12 cycles/min. Swedish: Approx. 11 cycles/min. Knead: Approx. 12 cycles/min.
Gracias por haber adquirido el sillón de masaje Swede-Atsu Panasonic modelo EP1060/EP1061. Lea atentamente este manual para obtener un rendimiento y una seguridad óptimos. TM INSTRUCCIONES DE SEGURIDAD Es muy importante observar siempre las precauciones básicas durante el uso de instrumentos eléctricos, entre las cuales se incluyen las siguientes. Asegúrese de leer todas las instrucciones antes de utilizar el sillón de masaje doméstico. PELIGRO – Riesgo de descargas eléctricas: 1.
PRECAUCIONES DE SEGURIDAD PRECAUCIONES PARA EL FUNCIONAMIENTO ADVERTENCIA: Para evitar el riesgo de lesionarse, siga estas precauciones. ADVERTENCIA: Para evitar dañar el asiento, siga estas precauciones: 1. Las mujeres embarazadas, personas enfermas, en baja forma física o bajo tratamiento médico y las personas que sufran dolores de espalda, cuello, hombros o de cadera deberán consultar a su médico antes de usar la unidad.
PRECAUCIONES DE SEGURIDAD PRECAUCIONES PARA EL FUNCIONAMIENTO ADVERTENCIA: Para evitar el riesgo de lesionarse, siga estas precauciones. ADVERTENCIA: Para evitar dañar el asiento, siga estas precauciones: 1. Las mujeres embarazadas, personas enfermas, en baja forma física o bajo tratamiento médico y las personas que sufran dolores de espalda, cuello, hombros o de cadera deberán consultar a su médico antes de usar la unidad.
CONEXIÓN A TOMA DE TIERRA PARTES DE LA UNIDAD Y SUS FUNCIONES • El producto debe ser conectado a tierra. Si funciona mal, la conexión a tierra proporciona el camino de menos resistencia a la corriente eléctrica, reduciéndose así el riesgo de poder recibir una descarga eléctrica. • Este producto está equipado con un cable que dispone de un conductor y una clavija con conexión a tierra.
CONEXIÓN A TOMA DE TIERRA PARTES DE LA UNIDAD Y SUS FUNCIONES • El producto debe ser conectado a tierra. Si funciona mal, la conexión a tierra proporciona el camino de menos resistencia a la corriente eléctrica, reduciéndose así el riesgo de poder recibir una descarga eléctrica. • Este producto está equipado con un cable que dispone de un conductor y una clavija con conexión a tierra.
PARTES DE LA UNIDAD Y SUS FUNCIONES MANDO DE CONTROL (EP1061) Tapa cerrada Botón de encendido/apagado Botón de parada neck roller position reclining programmed operation / manual operation programmed operation Indicador de modo • Indica el modo de operación (manual o programado).
PARTES DE LA UNIDAD Y SUS FUNCIONES MANDO DE CONTROL (EP1061) Tapa cerrada Botón de encendido/apagado Botón de parada neck roller position reclining programmed operation / manual operation programmed operation Indicador de modo • Indica el modo de operación (manual o programado).
USO DEL SILLÓN DE MASAJES — INTRODUCCIÓN ANTES DEL USO DE LA UNIDAD • A continuación describimos el modo de uso general del sillón de masaje. Para obtener mayor detalle, consulte las páginas indicadas. TRAS COMPROBAR EL ÁREA CIRCUNDANTE, ENCIENDA LA UNIDAD 1. Compruebe el área que rodea al sillón 1. Tras realizar las comprobaciones de seguridad, encienda la unidad (ver pág. 37) z Conecte el enchufe de alimentación a la toma de corriente.
USO DEL SILLÓN DE MASAJES — INTRODUCCIÓN ANTES DEL USO DE LA UNIDAD • A continuación describimos el modo de uso general del sillón de masaje. Para obtener mayor detalle, consulte las páginas indicadas. TRAS COMPROBAR EL ÁREA CIRCUNDANTE, ENCIENDA LA UNIDAD 1. Compruebe el área que rodea al sillón 1. Tras realizar las comprobaciones de seguridad, encienda la unidad (ver pág. 37) z Conecte el enchufe de alimentación a la toma de corriente.
AJUSTE DEL ASIENTO RECLINAR EL ASIENTO NOTE: ANTES DE SENTARSE PRECAUCIONES • Siéntese despacio tras comprobar la posición de los rodillos de masaje. No sobrepase el peso máximo del usuario de 264lbs.(120 kg.) Antes de sentarse, deberá comprobar primero la posición de las cabezas de masaje con sus manos porque, si no lo hace, las cabezas de masaje podrán causar lesiones o que la unidad funcione mal.
AJUSTE DEL ASIENTO RECLINAR EL ASIENTO NOTE: ANTES DE SENTARSE PRECAUCIONES • Siéntese despacio tras comprobar la posición de los rodillos de masaje. No sobrepase el peso máximo del usuario de 264lbs.(120 kg.) Antes de sentarse, deberá comprobar primero la posición de las cabezas de masaje con sus manos porque, si no lo hace, las cabezas de masaje podrán causar lesiones o que la unidad funcione mal.
MODO PROGRAMADO • Verifique que no se encuentra ningún niño o animal alrededor de la unidad antes de su uso. 1. Pulse el botón 1 neck roller position reclining 2. Seleccione el programa deseado 3 programmed operation / manual operation programmed operation storong 2 • El indicador de encendido/apagado se encenderá. • Entonces puede seleccionar tanto la intensidad (fuerte o suave) del masaje o uno de los modos manuales seleccionables abriendo la tapa del mando de control.
MODO PROGRAMADO • Verifique que no se encuentra ningún niño o animal alrededor de la unidad antes de su uso. 1. Pulse el botón 1 neck roller position reclining 2. Seleccione el programa deseado 3 programmed operation / manual operation programmed operation storong 2 • El indicador de encendido/apagado se encenderá. • Entonces puede seleccionar tanto la intensidad (fuerte o suave) del masaje o uno de los modos manuales seleccionables abriendo la tapa del mando de control.
Ej. 2: Cambiar el tipo de masaje dentro de otra categoría. (Cambiar a Percusión B cuando está seleccionado Amasar.) • Cuando Amasar está combinado con Percusión B, al deseleccionar Amasar, sólo continúa con Percusión. MODO MANUAL MODO MANUAL EN LA PARTE SUPERIOR DEL CUERPO • Verifique que no se encuentra ningún niño o animal alrededor de la unidad antes de su uso.
Ej. 2: Cambiar el tipo de masaje dentro de otra categoría. (Cambiar a Percusión B cuando está seleccionado Amasar.) • Cuando Amasar está combinado con Percusión B, al deseleccionar Amasar, sólo continúa con Percusión. MODO MANUAL MODO MANUAL EN LA PARTE SUPERIOR DEL CUERPO • Verifique que no se encuentra ningún niño o animal alrededor de la unidad antes de su uso.
DESPUÉS DE COMPLETAR EL MASAJE MASAJE DE PIERNAS CON EL MODO MANUAL (EP1061) • El dispositivo de masaje de las piernas tiene dos funciones. Cuando está subido funciona para dar masajes en las pantorrillas, y cuando está bajado para dar masajes en las plantas de los pies. Plantas de los pies DEVOLVER EL ASIENTO A LA POSICIÓN INICIAL 1. Verifique que no hay ningún obstáculo bajo el respaldo y el reposapiernas Pantorrillas 1. Pulse el botón • Los botones de modo programado y masaje de piernas parpadearán.
DESPUÉS DE COMPLETAR EL MASAJE MASAJE DE PIERNAS CON EL MODO MANUAL (EP1061) • El dispositivo de masaje de las piernas tiene dos funciones. Cuando está subido funciona para dar masajes en las pantorrillas, y cuando está bajado para dar masajes en las plantas de los pies. Plantas de los pies DEVOLVER EL ASIENTO A LA POSICIÓN INICIAL 1. Verifique que no hay ningún obstáculo bajo el respaldo y el reposapiernas Pantorrillas 1. Pulse el botón • Los botones de modo programado y masaje de piernas parpadearán.
DETALLES DEL MODO PROGRAMADO DESCONECTAR LA UNIDAD 1. Apague la unidad • En las ilustraciones siguientes se muestran los movimientos de forma esquemática. • Cuando los programas llegan a su fin, la unidad se detiene automáticamente. (Aunque la duración del modo programado es de 15 minutos aprox. (entre 12 y 17), esto variará de acuerdo con la posición de los hombros, del programa seleccionado, independientemente de si la percusión está activada, y del peso de la persona que está usando la unidad.
DETALLES DEL MODO PROGRAMADO DESCONECTAR LA UNIDAD 1. Apague la unidad • En las ilustraciones siguientes se muestran los movimientos de forma esquemática. • Cuando los programas llegan a su fin, la unidad se detiene automáticamente. (Aunque la duración del modo programado es de 15 minutos aprox. (entre 12 y 17), esto variará de acuerdo con la posición de los hombros, del programa seleccionado, independientemente de si la percusión está activada, y del peso de la persona que está usando la unidad.
• En las ilustraciones siguientes se muestran los movimientos de forma esquemática. • Cuando los programas llegan a su fin, la unidad se detiene automáticamente. (Aunque la duración del modo programado es de 15 minutos aprox. (entre 12 y 17), esto variará de acuerdo con la posición de los hombros, del programa seleccionado, independientemente de si la percusión está activada, y del peso de la persona que está usando la unidad.
• En las ilustraciones siguientes se muestran los movimientos de forma esquemática. • Cuando los programas llegan a su fin, la unidad se detiene automáticamente. (Aunque la duración del modo programado es de 15 minutos aprox. (entre 12 y 17), esto variará de acuerdo con la posición de los hombros, del programa seleccionado, independientemente de si la percusión está activada, y del peso de la persona que está usando la unidad.
DETALLES DEL MODO MANUAL Shiatsu Este tipo de masaje emula a los pulgares de ambas manos que trabajan sobre los puntos de acupresión. Se trata de una alternancia de presión y relajación que transmite la misma sensación que un masajista de shiatsu profesional. Este tipo de masajes resulta ideal para aquellas personas con fatiga y dolores musculares que necesitan un masaje localizado.
DETALLES DEL MODO MANUAL Shiatsu Este tipo de masaje emula a los pulgares de ambas manos que trabajan sobre los puntos de acupresión. Se trata de una alternancia de presión y relajación que transmite la misma sensación que un masajista de shiatsu profesional. Este tipo de masajes resulta ideal para aquellas personas con fatiga y dolores musculares que necesitan un masaje localizado.
LOCALIZACIÓN DE AVERÍAS Problema Antes de solicitar el servicio de reparaciones para esta unidad, lea la tabla de abajo y verifique las posibles causas de los problemas. Algunas sencillas verificaciones o pequeños ajustes que usted haga podrán eliminar el problema y restaurar el funcionamiento correcto.
LOCALIZACIÓN DE AVERÍAS Problema Antes de solicitar el servicio de reparaciones para esta unidad, lea la tabla de abajo y verifique las posibles causas de los problemas. Algunas sencillas verificaciones o pequeños ajustes que usted haga podrán eliminar el problema y restaurar el funcionamiento correcto.
DATOS TÉCNICOS (EP1061) Alimentación: Consumo de energía: 120V AC, 60Hz 160W (Aprox. 5W en modo de espera con el mando de control apagado o cuando la unidad está apagada.) Masaje de la parte superior del cuerpo Área de masaje (Arriba-Abajo): 27.6in. (70 cm) aprox. Área de masaje (Izquierda-Derecha): Distancia entre los rodillos de masaje durante el funcionamiento 2.4 – 5.9in. (6 – 15 cm) aprox. Área de masaje (Adelante-Atrás): 2.2in. (5,5 cm) aprox. Ciclo del masaje: Shiatsu : 12 ciclos/min. aprox.
SPECIFICATIONS (EP1061) Power Supply: Power Consumption: 120V AC, 60Hz 160W (Approx. 5W in Standby mode with the controller turned off or when the unit is turned off.) Upper Body Massage Massage Area (Up-Down): Massage Area (Left-Right): Approx. 27.6in. (70cm) Distance between Massage Heads during Operation Approx. 2.4 – 5.9in. (6 – 15cm) Massage Area (Forward-Back): 2.2in. (5.5cm) Massage Cycle: Shiatsu: Approx. 12 cycles/min. Swedish: Approx. 11 cycles/min. Knead: Approx. 12 cycles/min.
Sillón de masaje Instrucciones de uso Modelo No. EP1061/EP1060 EP1061/EP1060 Panasonic Consumer Electronics Company One Panasonic Way 3D-1 EP1061 Secaucus, New Jersey 07094 1-800-338-0552 for questions and comments. EP1060 www.panasonic.com/massage Before operating this unit, please read these instructions completely, and save for future reference. Antes de utilizar esta unidad, lea completamente estas instrucciones y gurdelas por si necesita consultarlas en el futuro. No.