
Operating instructions
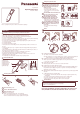


Using the eyelash curler
1
To activate the heating element, slide
the ON/OFF switch up until the power
indicator illuminates, and hold it for
about 15 seconds.
This allows the pads to heat up.
Pad surfaces will be between 40 °C
(104 °F) and 45 °C (113 °F) after about
15 seconds.
2
Slide the ON/OFF switch downward and
place the curling support in contact
with the base of the eyelashes.
3
Slide the ON/OFF switch upward
slightly until the eyelash-base pad
lightly holds the curling support.
If all eyelashes are not properly aligned
between the pads, repeat steps 2 and 3.
4
Keep the ON/OFF switch sliding up so
that the tip pad holds the eyelash with
the eyelash base, and hold it for 10 to
15 seconds.
Do not slide the ON/OFF switch up
forcefully.
•
•
•
•
1
1
2
3
4
Q&A
1 2
Q1
Q3
Q2
Q1 Eyelashesaredifculttocurl.
A Tip 1: Make sure the ON/OFF switch is slid upward.
Tip 2: After applying for 15 seconds, slightly raise the end of the eyelash curler upward and
hold for a few more seconds before sliding the ON/OFF switch downward.
Q2 Eyelashesatcornersofeyes(eyelashesgrowingoutward)aredifculttocurl.
A Tilt the eyelash curler outward to properly align the outside eyelashes between the pads.
Use the edge of the eyelash curler.
Q3 Eyelash tips touch eyelids.
A Hold the eyelash curler closer to the face; do not raise the handle.
Q4 Eyelashesarelong,makingitdifculttocurltips.
A Clamp eyelash tips in the eyelash curler. Slide the ON/OFF switch upward slightly and use
the eyelash-base pad to lightly curl eyelashes. If eyelashes are clamped at an angle, re-
clamp them so they are straight.
Q5 What precautions should be taken when using the eyelash curler on eyelashes applied with
mascara?
A 1. Wait until mascara has completely dried.
2. Do not apply too much mascara, otherwise mascara may not dry and eyelashes may
stick together.
3. If eyelashes stick together, comb them from base to tip to separate them.
4. Do not use the eyelash curler for a long time (max. 2 to 3 seconds).
Mascara may come off if the eyelash curler is used for a long time.
Specications
Power supply: Batteries
Battery size: Two AAA alkaline batteries (sold separately)
Weight: 2.5 oz (including batteries)
This product is intended for household use only.
FOR YOUR CONVENIENCE, WE HAVE ESTABLISHED A TOLL-FREE (IN USA
ONLY) NATIONAL ACCESSORY PURCHASE HOT LINE AT 1-800-338-0552.
•
•
1
Eyelash Curler
Operating Instructions
Model No. EH2331
Before operating this unit, please read these instructions completely.
ENGLISH
Caution - Risk of personal injury. Follow instructions.
Keep out of reach of children.
Stop using the product if you notice anything abnormal about your eyes.
Persons with conjunctivitis or other eye illnesses should not use this product.
Do not use the product while wearing contact lenses.
If your eyes or eyelids feel unusual after applying mascara, stop using the product immediately.
Do not use the product if it has been dropped, struck or damaged.
Do not press the eyelash-base pad or eyelash-tip pad against your eyelids for more than
10 seconds. There is a risk of burns.
Do not wash with water.
Do not modify, disassemble or repair.
If either pad comes in contact with your skin, causing a burning sensation, use water to cool
the area.
Consult a specialist if your eyes or eyelids feel unusual in any way while using the product or
soon afterward.
If the product is dirty, dip a cloth in mild soapy water, wring it out, and then wipe the surface of
the product. Do not use thinner or benzine.
If the curling support is dirty, use a soft tissue to lightly wipe off the surface.
The pads cannot be replaced. Do not pull them or remove them.
A damaged or defective product should be returned to a customer service center or an
authorized customer service agent.
Do not attempt to use this product if defective or try to repair it yourself.
Parts identication
A
ON/OFF switch
B
Battery cover
C
Power indicator
D
Eyelash-base pad
E
Curling support
F
Eyelash-tip pad
G
Protective cap
1
Inserting the batteries
1
2 3
1
Remove the battery cover.
2
Insert two AAA alkaline batteries.
3
Replace the battery cover.
Batteries sold separately
Make sure the batteries match the + and – markings.
Do not mix old and new batteries or use rechargeable batteries.
Remove the batteries when not using the product for a long time.
•
•
•
•
•
•
•
•
•
•
•
•
•
•
•
•
•
•
•