Operating Instructions Compact Plain Paper Fax with Digital Cordless Phone Model No. Please read these operating instructions before using the unit and save for future reference. Charge the battery for about 7 hours before initial use. This unit is compatible with Caller ID and SMS (SMS is for KX-FC225AL only). To use these features, you must subscribe to the appropriate service of your service provider. KX-FC225AL KX-FC225NZ Be sure to use the telephone line cord included in this unit.
Thank you for purchasing a Panasonic fax machine. Things you should keep a record of Attach your sales receipt here. For your future reference Date of purchase Serial number (found on the rear of the unit) Dealer’s name and address Dealer’s telephone number Caution: L Note that the images of copied or received documents will remain on the used ink film. Use discretion when disposing of the used ink film. L Do not rub or use an eraser on the printed side of recording paper, as the print may smear.
For Australian users Warning: ● Please ensure that a separate telephone, not dependent on local power, is available for emergency use. ● This equipment will be inoperable when mains power fails. ● When a failure occurs which results in the internal parts becoming accessible, disconnect the power supply cord immediately and return this unit to an authorised service centre.
Important information (for Australian users) Instructions to customer Installation Attached to this apparatus is an approval label. This label is evidence that it is a “Permitted Attachment” which has been authorised to be connected to your telephone service. Conditions relating to connection and operation of this Permitted Attachment are contained in Telecommunications General By-Law 220 (5).
Important Information Important Safety Instructions Information Important safety instructions When using this unit, basic safety precautions should always be followed to reduce the risk of fire, electric shock, or personal injury. 1. Read and understand all instructions. 2. Follow all warnings and instructions marked on this unit. 3. Unplug this unit from power outlets before cleaning. Do not use liquid or aerosol cleaners. 4.
Important Information L Unplug this unit from power outlets if it emits smoke, an abnormal smell or makes unusual noise. These conditions can cause fire or electric shock. Confirm that smoke has stopped and contact an authorised service centre. L The cordless handset is magnetised and may retain small metallic objects. For Best Performance Location and noise The base unit and cordless handset use radio waves to communicate with each other.
Table of Contents 1. Introduction and Installation 1. Table of Contents Accessories 1.1 1.2 Included accessories..................................... 9 Accessory information ................................... 9 Finding the Controls 1.3 1.4 1.5 1.6 Button descriptions of the base unit ............ 10 Button descriptions of the cordless handset 11 Display descriptions of the cordless handset .. 11 Overview ..................................................... 12 Installation 1.7 1.8 1.9 1.10 1.
Table of Contents 10.Multi-unit Operation Additional Units 10.1 Operating additional units............................ 55 10.2 Registering a cordless handset to a base unit 55 Other Features 10.3 Intercom ...................................................... 55 10.4 Transferring a call/conference ..................... 56 10.5 Copying phonebook items ........................... 56 11.Useful Information Useful Information 11.1 Character entry............................................ 58 12.
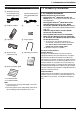
1. Introduction and Installation 1 Introduction and Installation Accessories 1.1 Included accessories 1.2 Accessory information 1 Telephone line cord For Australian users (Modular type plug)*1 1.2.1 Available accessories For New Zealand users (New Zealand BT type plug)*2 2 Cordless handset 3 Rechargeable batteries 4 Paper tray 5 Paper support Additional/replacement accessories – Replacement film*1 (Model No./Part No. KXFA52E): 30 m u 2 rolls (Each roll will print about 90 A4-sized pages.
1. Introduction and Installation L To search for a stored item (page 23, page 32). Finding the Controls 1.3 Button descriptions of the base unit A BCDE F G H IJ K P {SET} L To store a setting during programming. Q {MUTE} L To mute your voice during a conversation. Press again to resume the conversation. R {SP-PHONE} L For speakerphone operation. S {FAX START} L To send or receive a fax. T {COPY} LMN OP QR S T A {MIC} (Microphone) L The built-in microphone.
1. Introduction and Installation 1.4 Button descriptions of the cordless handset 1.5 Display descriptions of the cordless handset Display icons A B C G H Display icon Meaning w Within range of a base unit L When flashing: Cordless handset is searching for base unit (out of range of base unit, cordless handset is not registered to base unit, no power on base unit) L Cordless handset is accessing base unit (intercom, paging, changing base unit settings, etc.
1. Introduction and Installation 1.6.2 Cordless handset 1.6 Overview 1 1.6.
1. Introduction and Installation L Make sure the blue gear (2) and white gear (3) are installed as shown. Installation 1.7 Ink film The included film roll is a starter ink film. 3 1 Open the front cover. 2 2 Release the back cover by pushing the green button (1). 5 Turn the blue gear (4) in the direction of the arrow until the ink film is tight (5) and at least one layer of ink film is wrapped around the blue core (6). 1 4 3 Open the back cover.
1. Introduction and Installation Correct 1.8 Paper tray Pull up the metal recording paper guide (1), then install the paper tray (2). 1 turn Tight 6 2 Incorrect No ink film is wrapped around the blue core. 1 Slack/Crease Reverse 6 Close the back cover securely by pushing down on L Make sure the arrows on the paper tray and the unit match. the dotted area at both ends (7). 7 1.9 Paper support Hold open the paper support (1), then insert the ends into the holes on the paper tray (2).
1. Introduction and Installation 1.10 Recording paper g/m2 The unit can hold up to 20 sheets of 64 to 80 paper. Please refer to page 76 for more information on recording paper. g/m2 1 Fan the paper to prevent paper jams. 1.11 Battery installation / replacement Important: L Use only the included rechargeable batteries noted on page 5, 9. L When replacing batteries, we recommend using the Panasonic rechargeable batteries noted on page 5, 9. L Wipe the battery ends (S, T) with a dry cloth.
2. Preparation 2 Preparationand Setup Connections 2.1 Connections Important: L The unit will not function when there is a power failure. To make calls in emergency situations, you should connect a telephone that can function during a power failure to the telephone line. L If you use the unit with a computer and your internet provider instructs you to install a filter, please connect the telephone line cord as follows (page 65, 66). 2.1.
2. Preparation 2.2 Battery charge Place the cordless handset on the cradle of the base unit for about 7 hours before initial use. When charging, the battery strength icon is shown as follows. When the batteries are fully charged, 5 remains on the display. L The charge indicator (1) lights up when the cordless handset is placed on the base unit. 2 1 Note: L It is normal for batteries not to reach full capacity at the initial charge.
2. Preparation Volume 2.4 Adjusting cordless handset volume 2.5 Adjusting base unit volume {SET} {j/OK} {^}{V}{>} {ih} {A}{B} Ringer volume Ringer volume 1. {j/OK} 2. Press {^} or {V} to select “Handset Setup”. i {>} 3. Press {^} or {V} to select “Ringer Setup”. i {>} 4. Press {^} or {V} to select “Ringer Volume”. i {>} 5. Press {^} or {V} to select the desired volume. i {>} i {ih} Note: L When receiving a call, you can adjust the ringer volume by pressing {^} or {V}.
2. Preparation Initial Programming 2.6.2 With the base unit 2.6 Date and time The date and time can be set using either the cordless handset or the base unit. L The other party’s fax machine will print the date and time on the top of each page you send according to your unit’s date and time setting. Important: L If e is displayed on the base unit, either the date and time has not been set or the setting has been lost (due to a power failure, etc.).
2. Preparation 2.7 Your logo 2.8 Your fax number You can program your logo (name, company name, etc.) so that it appears on the top of each page sent. You can program your fax number so that it appears on the top of each page sent. {SET} {SET} {MENU} {RECALL} {STOP} {MENU} {<}{>} {STOP} {<}{>} 1 {MENU} i {#}{0}{2} i {SET} LOGO=| 1 {MENU} i {#}{0}{3} i {SET} NO.=| [#:ABC] 2 Enter your logo, up to 30 characters (see page 58 for character entry). L To enter a hyphen, press {RECALL}.
3. Telephone 3 Telephone Making and Answering Calls 3.1 Making phone calls 3.1.2 With the base unit 3.1.1 With the cordless handset {C} {R} {^}{V}{>} {ih} {s} {C/T} 1 Lift the cordless handset and press {C}. L To make hands-free phone calls, press {s}. 2 Dial the telephone number. 3 To hang up, press {ih} or place the cordless handset on the base unit. Note: L While talking using {C}, you can switch to a handsfree phone conversation by pressing {s}. To switch back, press {C}.
3. Telephone Automatic Dialling 3.2 Answering phone calls 3.2.1 With the cordless handset {C} {ih} {s} 3.3 Cordless handset phonebook You can store 50 items to the cordless handset phonebook. When the system has additional cordless handsets (page 55), each cordless handset can have its own phonebook. L The base unit has its own individual phonebook (page 23). L You can copy phonebook items between the base unit and the cordless handset, or between two cordless handsets (page 57).
3. Telephone 3. Press {^} or {V} repeatedly to scroll through the phonebook if necessary. L You can copy phonebook items between the base unit and the cordless handset (page 56). {ERASE} {SET} 3.3.3 Editing a stored item {STOP} Changing a name, phone number 1. Find the desired item (page 22). i {j/OK} 2. “Edit” i {>} 3. Edit the name if necessary. For further details, see the storing procedure on page 22. i {j/OK} 4. Edit the phone number if necessary.
3. Telephone 4 Edit the telephone number if necessary. For further details, see the storing procedure on page 23. i {SET} 3.5.4 Erasing a stored item 1 {PHONEBOOK} 2 Press {A} or {B} repeatedly to display the desired item. i {MENU} i {#} L To cancel erasing, press {STOP}. 3 {SET} 3.5.5 Erasing all items 1 {PHONEBOOK} i {ERASE} 2 Press {A} or {B} repeatedly to select “YES”. i {SET} L To cancel erasing, press {STOP}. 3 {SET} 3.
3. Telephone Caller ID 3.7 Caller ID service This unit is compatible with the Caller ID service offered by your local telephone company. To use this unit’s Caller ID features, you must subscribe to a Caller ID service. For New Zealand users: For all local and national incoming calls, your display will show the area code (e.g. 09 for Auckland) or the cellular prefix (e.g. 0274 for Telecom Cellular) followed by the caller’s telephone number. An Auckland caller’s number will be displayed as 09XXXXXXX.
3. Telephone 3.8.1 With the cordless handset {C} {s} 3.8.3 Symbols and operations for caller information {j/OK} What “,” means “,” on the display means the call has already been viewed or answered. {ih} {^}{V}{>} To stop viewing Press {ih} on the cordless handset or {STOP} on the base unit. 1 {j/OK} i “Caller List” i {>} 2 Press {V} to search from the recently received caller information. L If you press {^}, the display order will be reversed. 3.
3. Telephone L To erase all items, select “Erase All”. i {>} 4 “Yes” i {>} i {ih} 3.10.2 With the base unit To erase all caller information 1 Press {MENU} repeatedly to display “CALLER SETUP”. i {SET} L “CALL LIST ERASE” will be displayed. 2 {SET} L To cancel erasing, press {STOP}, then {MENU}. 3 {SET} i {STOP} To erase specific caller information 1 {CALLER ID} 2 Press {A} or {B} repeatedly to display the desired item. i {ERASE} i {STOP} 3.11 Storing caller information into the phonebook 3.11.
4. SMS (KX-FC225AL only) 4 SMS (KX-FC225AL only) SMS 4.1 SMS (Short Message Service) SMS allows you to send and receive text messages between other fixed-line and mobile phones that support compatible SMS networks and features. Important: L To use SMS features, you must: – subscribe to the Caller ID and/or appropriate service – confirm SMS is turned on – confirm the correct message centre numbers are stored Consult your service provider/telephone company for details and availability.
4. SMS (KX-FC225AL only) characters you can send or receive may be limited by your SMS service provider/telephone company. Consult your SMS service provider/telephone company for details. L If your message contains over 160 characters, the message is a long message and “@@Long Message@@” is displayed. Your service provider/telephone company may treat long messages differently from other messages. Consult your service provider/telephone company for details.
4. SMS (KX-FC225AL only) 4.5.3 Erasing received messages 1 While reading a received message, press {j/OK}. 2 “Erase” i {>} L To erase all messages in the selected mailbox, select “Erase All”. i {>} 4 5 6 7 3 “Yes” i {>} i {ih} 4.5.4 Storing the sender’s number in the cordless handset phonebook 1 While reading a received message, press {j/OK}. 2 “Add Phonebook” i {>} 3 Continue from step 3, “3.3.1 Storing phonebook items”, page 22. 4.5.
5. Fax 5 Fax Sending Faxes 5.1 Sending a fax manually 1 To send more than 10 pages at a time Insert the first 10 pages of the document. Add the other pages (up to 10 at a time) on top of the previously inserted pages while the last page is being fed into the unit. Pre-dialling a fax number 1. Enter the fax number. 2. Insert the document. 3. {FAX START} Sending from memory (Quick scan feature) To use this feature, activate feature #34 (page 48) beforehand. 1. Insert the document. 2. Enter the fax number.
5. Fax 5.2 Document requirements 128 mm Minimum document size L Check that ink, paste or correction fluid has dried completely. L To send a document with a width of less than 210 mm, we recommend using a copy machine to copy the original document onto A4 or letter-sized paper, then sending the copied document. 5.
5. Fax 5.4 Broadcast transmission By storing the base unit’s phonebook items (page 23) into the broadcast memory, you can send the same document to multiple parties (up to 20). Your programmed items will remain in the broadcast memory, allowing frequent re-use. 5.4.1 Programming items into the broadcast memory L After transmission, the unit will automatically print a report (Broadcast sending report).
5. Fax Receiving Faxes 5.5 Selecting the way to use your fax machine 5.5.2 Use only as a fax (FAX ONLY mode) Depending on your situation, select the way you prefer to use your fax machine. – Use as a telephone answering machine and/or fax (TAM/FAX mode) – Use only as a fax (FAX ONLY mode) – Use mostly as a telephone (TEL mode) Setup Set the fax machine to FAX ONLY mode (page 36) by pressing {AUTO ANSWER} repeatedly. 5.5.
5. Fax L The {AUTO ANSWER} indicator on the base unit turns OFF and r disappears from the cordless handset display. – – – document reception is required, a fax calling tone (slow beep) is heard, or no sound is heard, press {j/OK}. 3. “Fax Start” i {>} L You can also press {FAX START} on the base unit. AUTO ANSWER 4. Press {ih} or place the cordless handset on the base unit. How to receive faxes with an extension telephone 1.
5. Fax 5.7 Receiving a fax automatically – Auto answer ON Note: L By default, the unit reduces the size of the received document to 92% when printing (See feature #36 on page 49 for details). 5.7.1 Activating TAM/FAX mode (Telephone Answering Machine/Fax mode) 1 Make sure feature #77 is set to “TAM/FAX” (page 51) beforehand. 2 Press {AUTO ANSWER} repeatedly to display “TAM/FAX MODE”. L The {AUTO ANSWER} indicator on the base unit turns ON and r appears on the cordless handset display.
5. Fax Activating FAX ONLY mode with the cordless handset 1. {j/OK} i “Answer System” i {>} 2. “Answer On” i {>} i {ih} Note: L Make sure feature #77 is set to “FAX ONLY” beforehand (page 51). 5.9.2 Storing undesired callers You can register up to 10 undesired numbers from the Caller ID list (page 25) if you do not wish to receive faxes from them. 1 Press {MENU} repeatedly to display “JUNK FAX PROH.”. 2 Press {>} repeatedly to display “JUNK LIST SET”.
6. Distinctive Ring 6 Distinctive Distinctive Ring Ring 6.1 Using with the ring detection feature This feature is only for use if you subscribe to a Distinctive Ring pattern service from your telephone company. For more information on the availability of this service in your area, please contact your telephone company before setting this feature on your unit. In Australia, this service is called “Fax Stream Duet”. In New Zealand, this service is called “FaxAbility”.
7. Copy L If the document exceeds the memory capacity, copying of the exceeded document will be cancelled and this feature will be turned OFF automatically. 7 Copy Copying 7.1 Making a copy To stop copying Press {STOP}. 1 7.1.1 More copying features To enlarge a document 1. Insert the document. 2. {COPY} i {>} 3. Press {A} repeatedly to select “150%” or “200%”. i {START} L The unit will enlarge the centre of the upper part of the document.
7. Copy 5. Press {A} or {B} repeatedly to display “COLLATE ON”. i {START} Example: Making 2 copies of a 4-page original document 4 3 1 2 1 1 2 2 3 4 3 3 4 2 1 Collated pages 4 Uncollated pages Note: L The unit will store the documents into memory while collating the copies. If memory becomes full while storing, the unit will only print out the stored pages.
8. Answering Machine 8 Answering Machine Greeting 8.1 Recording your greeting message The unit has a pre-recorded greeting message for TAM/FAX mode. If you record your own greeting message, it will be played instead of the pre-recorded greeting message when a call is received. The maximum recording time of your greeting message is either 16 seconds (default) or 60 seconds. We recommend you record a message of less than 12 seconds to make it easier to receive faxes.
8. Answering Machine Incoming Messages 8.2 Listening to recorded messages If you subscribe to Caller ID service During playback, you can call back the displayed name or number using the base unit. When the unit has recorded new voice messages: – The {AUTO ANSWER} indicator will flash when auto answer is turned ON. – The total number of recorded messages will flash on the base unit display. 2. Edit the telephone number (page 26). 8.2.1 To play back messages 1. Press {MENU} during playback.
8. Answering Machine Remote Operation 8.4 Using the answering machine with the cordless handset Helpful hints: L To activate TAM/FAX mode with the cordless handset, see page 36. 1 To stop playback Press {9}. If you subscribe to Caller ID service During playback, you can call back the displayed name or number using the cordless handset. 1. Press {j/OK} during playback. 2. “Call Back” i {>} Note: To edit the number before calling back; {C} {<}{>} {j/OK} {ih} {s} 1. Press {j/OK} during playback. 2.
8. Answering Machine Key Direct commands {*}{6} Erases greeting message (during greeting message playback) *1 If pressed within the first 5 seconds of a message, the previous message will be played. 1. {j/OK} i “Answer System” i {>} 2. “Settings” i {>} 3. “Call Screening” i {>} 4. “On” or “Off” i {>} i {ih} Note: L You can also program this feature with the base unit (feature #67 on page 50). 8.4.
8.
9. Programmable Features 9 Programmable Features 9.1 Base unit programming 1. {MENU} 2. Press {#} and the 2-digit code. 3. Press the desired command to display the desired setting. L This step may be slightly different depending on the feature. 4. {SET} {MENU} 5. To exit programming, press {MENU}. {SET} 9.1.1 Basic features Feature Feature code Selection Setting the date and time*1 {#}{0}{1} Enter the date and time using the dial keypad. See page 19 for details.
9. Programmable Features Feature Feature code Selection Changing the maximum recording time for incoming messages*1 {#}{1}{0} {1} “1 MINUTE” {2} “GREETING ONLY”: The unit plays the greeting message but does not record any incoming messages. {3} “3 MINUTES” (default) Note: L You can also program this feature with the cordless handset (page 44). Setting the remote operation ID*1 {#}{1}{1} 1. {MENU} i {#}{1}{1} 2. To activate the remote operation feature, enter a 3-digit remote operation ID.
9. Programmable Features Feature Feature code Selection Sending a fax at a specified time {#}{2}{5} This feature allows you to take advantage of low-cost calling hours offered by your telephone company. This feature can be set up to 24 hours in advance of the desired time. {0} “OFF” (default) {1} “ON” To send a document: 1. Insert the document. 2. If necessary, press {A} or {B} repeatedly to select the desired resolution (page 31). 3. {MENU} i {#}{2}{5} 4. Press {1} to select “ON”. i {SET} 5.
9. Programmable Features Feature Feature code Selection Receiving oversized documents {#}{3}{6} If the size of the document sent by the other party is as large as or larger than the recording paper, the unit can reduce the document and print it. Select the desired reduction rate.
9. Programmable Features Feature Feature code Selection Setting the auto disconnection {#}{4}{9} To answer a call with an extension telephone in TAM/FAX mode (page 36), activate this feature and program the code. {0} “OFF” {1} “ON” (default) 1. {MENU} i {#}{4}{9} 2. Press {1} to select “ON”. i {SET} 3. Enter your code from 2 to 4 digits, using 0-9 and {*}. L The default code is “;0”. 4.
9. Programmable Features Feature Feature code Selection Setting recall/flash time (for the base unit and cordless handset)*3 {#}{7}{2} The recall/flash time depends on your telephone exchange or host PBX. {1} “900msec.” {2} “700msec.” {3} “600msec.” {4} “400msec.” {5} “300msec.” {6} “250msec.” {7} “200msec.” {8} “160msec.” {9} “110msec.” {*} “100msec.” (default) {0} “90msec.” {#} “80msec.
9. Programmable Features Cordless Handset 9.2 Cordless handset programming 1. {j/OK} 2. Press {^} or {V} to select “Handset Setup”. i {>} 3. Press {^} or {V} to select the desired item in the cordless handset settings menu. i {>} {j/OK} {^}{V}{>} {ih} 4. Press {^} or {V} to select the desired item in the sub-menu. i {>} 5. Press {^} or {V} to select the desired setting then press {>} or follow the instruction in the rightmost column of the chart. L To exit the operation, press {ih}. 9.2.
9. Programmable Features *1 When this setting is changed using the cordless handset, the setting for the base unit will also be changed, and vice versa. *2 This setting can be changed individually for the base unit and the cordless handset. – To set the base unit ringer volume, see page 18. – To set the base unit ringtone for outside calls, see feature #17 on page 47. – To set the base unit LCD display contrast, see feature #39 on page 49.
9. Programmable Features 9.2.2 Time settings Alarm An alarm will sound for 3 minutes at the set time once or daily. Set the date and time beforehand (page 19). 1. {j/OK} i “Handset Setup” i {>} 2. “Time Settings” i {>} 3. “Alarm” i {>} 2 times 4. Select an alarm mode. i {>} “Off” Turns alarm OFF. Press {>} again, then press {ih} to finish. “Once” The alarm sounds once at the set time. Enter the desired day and month. “Daily” An alarm sounds daily at the set time. 2. “Call Options” i {>} 3.
10. Multi-unit Operation 10 Multi-unit Additional Units Operation 10.1 Operating additional units 2 Enter “335”. 3 “Cancel Handset” i {>} L The numbers of all cordless handsets registered to the base unit are displayed. 10.1.1 Additional cordless handsets Up to 6 cordless handsets can be registered to the base unit. Additional cordless handsets will give you the freedom to, for example, have an intercom call with another cordless handset while a third cordless handset is on an outside call.
10. Multi-unit Operation With the base unit 1 {INTERCOM} 2 To page one cordless handset, press the desired cordless handset number. To page all cordless handsets, press {0}. L The destination cordless handset(s) will beep (be paged) for 1 minute. L To stop paging, press {SP-PHONE} or {INTERCOM}. 3 When the paged party answers, talk into {MIC}. 4 To end the intercom call, press {SP-PHONE} or {INTERCOM}.
10. Multi-unit Operation 10.5.1 To the base unit or another cordless handset (using the cordless handset) Copying one phonebook item 1. Find the desired cordless handset phonebook item (page 22). i {j/OK} 2. “Copy” i {>} 3. To copy to the base unit, press {0}. To copy to another cordless handset, press the desired cordless handset number you wish to send the cordless handset phonebook item to. L When an item has been copied, “Completed” is displayed.
11. Useful Information 11 Useful Information 11.1 Character entry The dial keys are used to enter characters and numbers. Each dial key has multiple characters assigned to it. The available character entry modes are Alphabet (ABC), Numeric (0-9), Greek (F), Extended 1 (G), Extended 2 (H), and Cyrillic (I). For SMS messages, Alphabet (ABC), Numeric (0-9), Greek (F), and Extended (G) modes are available.
11. Useful Information Extended 2 character table (O) {0} {1} {2} {3} {4} {5} {6} {7} {8} {9} L The following are used for both uppercase and lowercase: Cyrillic character table (P) {0} {1} {2} {3} {4} {5} {6} {7} {8} {9} 11.1.
12. Help 12 Help 12.1 Error messages – Reports If a problem occurs during fax transmission or reception, one of the following messages will be printed on the sending and journal reports (page 31). Message COMMUNICATION ERROR Code 40-42 46-72 FF Cause & Solution L A transmission or reception error occurred. Try again or check with the other party. 43 44 L A line problem occurred. Connect the telephone line cord to a different jack and try again. L An overseas transmission error occurred.
12. Help 12.2 Error messages – Display If the unit detects a problem, one or more of the following messages will appear on the display. 12.2.1 Base unit Display Cause & Solution “BACK COVER OPEN” L The back cover is open. Close the back cover firmly. “BUSY” L The cordless handset you tried to call is in use. L The cordless handset you are calling is too far from the base unit. “CALL SERVICE” L There is something wrong with the unit. Contact our service personnel.
12. Help Display Cause & Solution “MODEM ERROR” L There is something wrong with the unit’s modem. Contact our service personnel. “NO FAX REPLY” L The other party’s fax machine is busy or has run out of recording paper. Try again. “OPEN CHECK “OPEN CHECK CABINET FILM SLACK” CABINET FILM TYPE” L Please use genuine Panasonic replacement film (page 9). L The ink film is slack. Tighten it (see step 5 on page 13).
12. Help 12.2.2 Cordless handset Display Cause & Solution “Answer Sys. Full” L Erase unnecessary messages (page 42, 43). “Error” L Recording was too short. Try again. “Failed” L Phonebook copy failed. Confirm the destination unit is in standby mode and try again. “Incomplete” L The destination unit’s phonebook memory is full. Erase the unnecessary phonebook items from the destination unit and try again.
12. Help 12.3.2 General Problem Cause & Solution The unit displays “PAPER JAMMED” even though paper is installed. L You forced the recording paper into the paper tray too strongly. Remove all of the installed paper, and re-install it gently. The unit displays “CHECK PAPER” even though paper is inserted. L The paper is inserted halfway. Insert it correctly (page 72) and press {SET} to clear the message. The other party complains they only hear a fax tone and cannot talk. L FAX ONLY mode is set.
12. Help Problem Cause & Solution The unit does not display the caller’s name and/or telephone number. L You need to subscribe to a Caller ID service. L Other telephone equipment may be interfering with your phone. Disconnect it and try again. L Other electrical appliances connected to the same outlet may be interfering with the Caller ID information. L Telephone line noise may be affecting the Caller ID information. L The caller requested not to send his/her information (page 25).
12. Help Problem Cause & Solution A busy tone is heard when {C} is pressed. L The cordless handset is too far from the base unit. Move closer and try again. L The base unit or another cordless handset is on an outside call. Wait for the other user to complete the call. Static, sound cuts in/out, fades. Interference from other electrical units. L Place the cordless handset and the base unit away from other electrical appliances. L Move closer to the base unit.
12. Help Problem Cause & Solution I cannot send a fax overseas. L Use the overseas transmission mode (feature #23 on page 47). L Add two pauses at the end of the telephone number or dial manually. The other party complains that letters on their received document are distorted or not clear. L If your line has special telephone services such as call waiting, the service may have been activated during fax transmission. Connect the unit to a line that does not have these services.
12. Help Problem Cause & Solution Recording paper frequently misfeeds. L Clean the document feeder rollers, recording paper feeder and rubber flap (page 73). Letters on the received document are distorted. L If your line has special telephone services such as call waiting, the service may have been activated during fax reception. Connect the unit to a line that does not have these services. I cannot receive documents using the cordless handset.
12. Help Problem Documents or recording paper frequently misfeed. Cause & Solution L Clean the document feeder rollers, recording paper feeder and rubber flap (page 73). 12.3.7 Answering machine Problem Cause & Solution I cannot listen to messages from a remote location. L Activate the remote operation feature by setting the remote operation ID beforehand (page 44, feature #11 on page 47). Press the remote operation ID correctly and firmly. L The unit is not in TAM/FAX mode.
12. Help Problem Cause & Solution “E0” is displayed. L Your telephone number is permanently withheld or you have not subscribed to the appropriate service. Consult your service provider. “Q” is not displayed after you display a message. An error code is displayed. L When an error code (“FD”, “FE”, or “E0”) is displayed, “Q” will not be displayed even if you have displayed the message. 12.3.9 If a power failure occurs L The unit will not function.
13. Maintenance 3 Turn the blue gear (5) in the direction of the arrow 13 Maintenance Jams 13.1 Recording paper jams until the ink film is tight (6) and at least one layer of ink film is wrapped around the blue core (7). 13.1.1 When the recording paper has jammed in the unit The display will show the following. PAPER JAMMED Important: L Remove the recording paper, then remove the paper tray beforehand, otherwise the paper may misfeed or jam.
13. Maintenance 4 Close the back cover securely by pushing down on the dotted area at both ends (8), then close the front cover securely (9). 8 13.2 Document jams 1 Open the front cover. Remove the jammed document carefully (1). 1 9 5 Install the paper tray (page 14), then insert the recording paper gently (page 15). 13.1.2 When the recording paper was not fed into the unit properly The display will show the following. CHECK PAPER Remove the recording paper and straighten.
13. Maintenance Cleaning 13.3 Document feeder/recording paper feeder/scanner glass cleaning Clean the document feeder/recording paper feeder/scanner glass when: – Documents or recording paper frequently misfeed. – Smudges or black/white lines appear on the original document when sending or copying. Caution: L Do not use paper products, such as paper towels or tissues. 5 4 Important: L Remove the recording paper, then remove the paper tray beforehand, otherwise the paper may misfeed or jam.
13. Maintenance 13.4 Thermal head cleaning If smudges or black/white lines appear on a copied/received document, check whether there is dust on the thermal head. Clean the thermal head to remove the dust. Caution: L To prevent a malfunction due to static electricity, do not use a dry cloth and do not touch the thermal head directly. 5 Important: L Remove the recording paper, then remove the paper tray beforehand, otherwise the paper may misfeed or jam.
14. General Information 14 General Printed Repor Information ts Specifications 14.1 Reference lists and reports (Base unit only) 14.2 Specifications You can print out the following lists and reports for your reference: – “SETUP LIST” – “PHONEBOOK LIST” – “JOURNAL REPORT” – “BROADCAST LIST” – “PRINTER TEST” L If the test print has a smudges, blurred points or lines, clean the thermal head (page 74).
14. General Information ■ Copy memory capacity: Approx. 10 pages (Based on the ITU-T No. 1 Test Chart in fine resolution.) *1 Transmission speed depends upon the contents of the pages, resolution, telephone line conditions and capability of the other party’s machine. *2 Transmission speed is based upon the ITU-T No. 1 Test Chart. If the capability of the other party’s machine is inferior to your unit, the transmission time may be longer.
15. Index Cordless handset: 11 15. Index 15.
15.
Notes 79
Note for Australian users: L Panasonic Australia operates a toll free Customer Care Centre. Please visit the website for assistance at or please call 132600. Note for New Zealand users: L Panasonic New Zealand operates a Customer Support Centre. Please call (09) 2720178 for assistance. N52 Sales Department: Panasonic Australia Pty.