
Manual

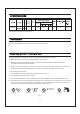
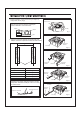

Make sure that adaptor claws are properly inserted
into body slots.
IMPORTANT:
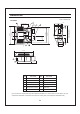
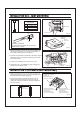
5. Insert the fan body into joists. (Fig.9)
6. Secure the fan body to adaptor by using thumb
screw and plug connector to receptacle. (Fig.10)
INSTALL ATION JOIST MOUNTING- CONTINUEDII II()INSTALL ATION JOIST MOUNTING- CONTINUEDII II()
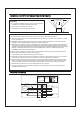
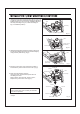
When mounting
body and blower
separately
1. Loosen 4 screws (but
do not remove them
from blower). (Fig.12-1)
2. Remove blower section.
(Fig.12-2)
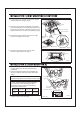
4. Insert fan body (without
blower section) into joists.
(Fig.9)
5. Secure the adaptor to
fan body by using thumb
screw. (Fig.10)
7. Insert the blower into the
fan body. (Fig.12-3)
8. Secure the blower.
(Fig.12-4) and plug
connector to receptacle.
(Fig.10)
3. Remove adaptor from
fan body and secure it
to joists as in Fig.8 of
page 8.
9
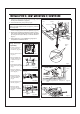
7. Secure to joists by using
long screws (ST4.2X20) and secure it to fan body
by using screw (ST4.2X12) in vertical direction.
(Fig.11)
the suspension bracket
II
8. Follow step 8 to 11 of installation (page 8) to
complete the installation work.
I
Fig. 9
4. Insert to fan body (refering
to step 2 of installation , page 6).
the suspension bracket in
I
Fig. 11
2 Long screws
(ST4.2X20)
Screw (ST4.2X12)II
6. Secure the fan body
to joists by using long
screw (ST4.2X20).
(Fig.11)
Conduit
Junction box cover
Circular duct
Joist
Fan body
Adaptor
claws
Fig.12-1
Adaptor
4 Screws
Fig.12-4
4 Screws
Screw driver
Fig.12-3
Fan body
Fig.12-2
Fan body
Blower
Fig. 10
Thumb
screw
Plug connector I
Receptacle I
Ceiling
Joist