
User manual


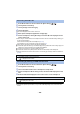

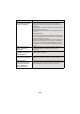

Table Of Contents
- Read this first
- Contents
- Preparation
- Basic
- Advanced (Recording)
- Using the zoom
- Level Shot Function [V380]
- HDR Movie Mode [W580]
- Recording with the Sub Camera (Twin Camera) [W580]
- Recording with the Backup for Twin Camera Function
- Changing the Recording Mode
- Manual recording
- Recording with the Touch Function
- Recording functions of operation icons
- Recording functions of menus
- Advanced (Playback)
- Copy/Dubbing
- Wi-Fi
- Wireless Twin/Multi-Camera
- Wireless Twin/Multi-Camera function
- Using a Smartphone as a Wireless Sub Camera
- When connecting a smartphone to this unit as a Wireless Sub Camera for the first time (To use the Wireless Twin Camera function)
- When connecting a smartphone to this unit as a Wireless Sub Camera for the first time (To use the Wireless Multi-Camera function)
- When connecting for the second time or later
- Terminating the connection
- Recording with a Wireless Sub Camera (Wireless Twin/Multi-Camera)
- If the Wi-Fi connection cannot be established (Wireless Twin/Multi- Camera)
- With a PC
- Others

- 161 -
When [Wi-Fi] is selected
1 Turn on the Wi-Fi function in the smartphone’s setup menu.
2 On the smartphone’s Wi-Fi setting screen, select the SSID displayed on this
unit.
≥ If this is the first time the smartphone is connecting to this unit via Wi-Fi, enter the Password
displayed on this unit’s screen into the smartphone.
≥ It may take time to complete the Wi-Fi connection.
3 When the Wi-Fi connection is complete, press the home button on the
smartphone and start up the smartphone application “Image App”.
4 Follow the on-screen instructions of the smartphone to set up a connection.
≥ When the settings is complete, the smartphone and this unit are connected directly, allowing you
to use remote operations.
Control this unit remotely with the smartphone. (l 135)
Connecting to a wireless access point
Check if the wireless access point you are using is compatible with WPS
j If the wireless access point is compatible with WPS:
Proceed to the following [WPS Connection]
j If the wireless access point is not compatible with WPS:
“Searching for wireless access points to set up a connection” (l 162)
1 Press Wi-Fi button on this unit.
2 Touch [Wi-Fi Setup].
3 Touch [Wireless Settings].
4 Touch the part with no display of a wireless
access point C.
≥ For information on how to delete wireless access points or
change the search order of wireless access points, please
refer to [Wireless Settings] on page 170.
5 Touch [WPS Connection].
6 Set the wireless access point to waiting for WPS.
≥ For further details, please read the operating instructions for the
wireless access point. (When using a tethering connection, please
read the operating instructions for the smartphone.)
≥ A message is displayed when the connection is complete. Touch
[ENTER], and exit [Wireless Settings].
≥ A message is displayed when the connection attempt fails. Touch
[ENTER], and set the connection again.
[WPS Connection]
A [Delete]
B [ENTER]