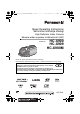
simplified_HC-X900&X909&X900MEP_eng.book 1 ページ 2012年1月16日 月曜日 午後4時34分 Basic Operating Instructions Skrócona instrukcja obsługi High Definition Video Camera Kamera wideo wysokiej rozdzielczości (HD) Model No. HC-X900 HC-X909 HC-X900M Before use, please read these instructions completely. Przed pierwszym włączeniem kamery prosimy o dokładne przeczytanie instrukcji obsługi.
simplified_HC-X900&X909&X900MEP_eng.book 2 ページ 2012年1月16日 月曜日 午後4時34分 Information for Your Safety WARNING: To reduce the risk of fire, electric shock or product damage, ≥ Do not expose this unit to rain, moisture, dripping or splashing. ≥ Do not place objects filled with liquids, such as vases, on this unit. ≥ Use only the recommended accessories. ≥ Do not remove covers. ≥ Do not repair this unit by yourself. Refer servicing to qualified service personnel.
simplified_HC-X900&X909&X900MEP_eng.book 3 ページ 2012年1月16日 月曜日 午後4時34分 ENGLISH ∫ Information for Users on Collection and Disposal of Old Equipment and used Batteries These symbols on the products, packaging, and/ or accompanying documents mean that used electrical and electronic products and batteries should not be mixed with general household waste.
simplified_HC-X900&X909&X900MEP_eng.book 4 ページ ∫ Cautions for use Keep this unit as far away as possible from electromagnetic equipment (such as microwave ovens, TVs, video games etc.). ≥ If you use this unit on top of or near a TV, the pictures and/or sound on this unit may be disrupted by electromagnetic wave radiation. ≥ Do not use this unit near cell phones because doing so may result in noise adversely affecting the pictures and/or sound.
simplified_HC-X900&X909&X900MEP_eng.book 5 ページ ∫ About Condensation (When the lens, the viewfinder or LCD Monitor is fogged up) Condensation occurs when the ambient temperature or humidity changes. Be careful of condensation since it causes lens, viewfinder and LCD monitor stains, fungus and camera malfunction.
simplified_HC-X900&X909&X900MEP_eng.book 6 ページ Contents Information for Your Safety......................2 Accessories...............................................7 Preparation Power supply............................................. 8 Inserting/removing the battery.............. 8 Charging the battery ............................ 9 Charging and recording time..............10 Recording to a card ................................ 12 Cards that you can use with this unit .................................
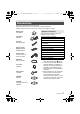
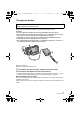
simplified_HC-X900&X909&X900MEP_eng.book 7 ページ 2012年1月16日 月曜日 午後4時34分 Accessories Check the accessories before using this unit. Keep the accessories out of reach of children to prevent swallowing. Product numbers correct as of Jan. 2012. These may be subject to change. Battery pack VW-VBN130 AC adaptor VSK0733 AC cable K2CQ2YY00082 Optional accessories Some optional accessories may not be available in some countries.
simplified_HC-X900&X909&X900MEP_eng.book 8 ページ 2012年1月16日 月曜日 午後4時34分 Preparation Power supply ∫ About batteries that you can use with this unit The battery that can be used with this unit is VW-VBN130/VW-VBN260. ≥ The unit has a function for distinguishing batteries which can be used safely. The dedicated battery (VW-VBN130/VW-VBN260) supports this function.
simplified_HC-X900&X909&X900MEP_eng.book 9 ページ 2012年1月16日 月曜日 午後4時34分 Charging the battery When this unit is purchased, the battery is not charged. Charge the battery fully before using this unit for the first time. The unit is in the standby condition when the AC adaptor is connected. The primary circuit is always “live” as long as the AC adaptor is connected to an electrical outlet. Important: ≥ Use the supplied AC adaptor. Do not use the AC adaptor of another device.
simplified_HC-X900&X909&X900MEP_eng.book 10 ページ 2012年1月16日 月曜日 午後4時34分 ≥ Do not use any other AC adaptors except the supplied one. ≥ We recommend using Panasonic batteries (l 7). ≥ If you use other batteries, we cannot guarantee the quality of this product. ≥ Do not heat or expose to flame. ≥ Do not leave the battery(ies) in a car exposed to direct sunlight for a long period of time with doors and windows closed.
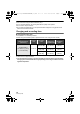
simplified_HC-X900&X909&X900MEP_eng.book 11 ページ 2012年1月16日 月曜日 午後4時34分 ≥ The actual recordable time refers to the recordable time when repeatedly starting/stopping recording, turning the unit on/off, moving the zoom lever etc. ≥ The batteries heat up after use or charging. This is not a malfunction. Battery capacity indication ≥ The display changes as the battery capacity reduces. # # # # If there is less than 3 minutes remaining, then will become red. If the battery discharges, then will flash.
simplified_HC-X900&X909&X900MEP_eng.book 12 ページ 2012年1月16日 月曜日 午後4時34分 Preparation Recording to a card The unit can record still pictures or motion pictures to an SD card or built-in memory. To record to an SD card, read the following. This unit (an SDXC compatible device) is compatible with SD Memory Cards, SDHC Memory Cards and SDXC Memory Cards. When using an SDHC memory card/SDXC memory card with other equipment, check the equipment is compatible with these memory cards.
simplified_HC-X900&X909&X900MEP_eng.book 13 ページ 2012年1月16日 月曜日 午後4時34分 Inserting/removing an SD card When using an SD card not from Panasonic, or one previously used on other equipment, for the first time on this unit, format the SD card. (l 23) When the SD card is formatted, all of the recorded data is deleted. Once the data is deleted, it cannot be restored. Caution: Check that the access lamp has gone off. 1 Open the SD card cover and insert (remove) the SD card into (from) the card slot.
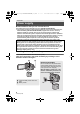
simplified_HC-X900&X909&X900MEP_eng.book 14 ページ 2012年1月16日 月曜日 午後4時34分 Preparation Turning the unit on/off You can turn the unit on and off using the power button, the LCD monitor or the viewfinder. Turning the unit on and off with the power button Open the LCD monitor and press the power button to turn on the unit. To turn off the unit Hold down the power button until the status indicator goes off. A The status indicator lights on.
simplified_HC-X900&X909&X900MEP_eng.book 15 ページ 2012年1月16日 月曜日 午後4時34分 Preparation Preparation of the LCD monitor/Viewfinder The viewfinder is turned off and the LCD monitor is turned on when the LCD monitor is opened. The viewfinder is turned on when the LCD monitor is closed and the viewfinder is extended. ≥ Live image recording or 3D recordings can be viewed in 3D on the LCD monitor. There are differences in the way that different people experience 3D images.
simplified_HC-X900&X909&X900MEP_eng.book 16 ページ 2012年1月16日 月曜日 午後4時34分 About the Touch Menu Touch (left side)/ Touch (right side) of (left side)/ on the Touch Menu to switch the operation icons. (right side) of on the Touch Menu. ≥ It is also possible to switch the operation icons by sliding the Touch Menu right or left while touching it. A Touch Menu T W Recording mode T FOCUS Playback mode Q. MENU WB W ALL SHTR IRIS MENU MENU B Operation icons to display can be changed.
simplified_HC-X900&X909&X900MEP_eng.book 17 ページ 2012年1月16日 月曜日 午後4時34分 Preparation Setting date and time When the unit is turned on for the first time, a message asking you to set the date and time will appear. Select [YES] and perform steps 2 to 3 below to set the date and time. 1 Select the menu. (l 22) MENU 2 : [SETUP] # [CLOCK SET] Touch the date or time to be set, then set the desired value using .
simplified_HC-X900&X909&X900MEP_eng.book 18 ページ 2012年1月16日 月曜日 午後4時34分 Basic Selecting a media to record [HC-X900M] The card and built-in memory can be selected separately to record motion pictures or still pictures. 1 2 Change the mode to or . Select the menu. (l 22) MENU 3 : [MEDIA SELECT] Touch the media to record motion pictures or still pictures. ≥ The media is selected separately to motion pictures or still pictures is highlighted in yellow. 4 Touch [ENTER].
simplified_HC-X900&X909&X900MEP_eng.book 19 ページ 2012年1月16日 月曜日 午後4時34分 Basic Recording motion pictures 1 2 3 Change the mode to . (l 14) Open the LCD monitor or extend the viewfinder. Press the recording start/stop button to start recording. A Recording button icon B When you begin recording, ; changes to ¥. 4 Press the recording start/stop button again to pause recording. T W ≥ Recording can also be started/stopped by touching the recording button icon.
simplified_HC-X900&X909&X900MEP_eng.book 20 ページ 2012年1月16日 月曜日 午後4時34分 Basic Motion picture/Still picture playback 1 2 3 Change the mode to . (l 14) ALL Touch the play mode select icon A. (l 16) HC-X900 / HC-X909 Select the still picture B or the recording format of the motion picture C you wish to play back. HC-X900M Select the media type D and then select the still picture B or the recording format of the motion picture C you wish to play back. ≥ Touch [ENTER].
simplified_HC-X900&X909&X900MEP_eng.book 5 21 ページ 2012年1月16日 月曜日 午後4時34分 Select the playback operation by touching the operation icon. F Operation icon 0h01m30s ≥ Operation icons and screen display will disappear when no touch operation is performed for a specific period of time. To display them again, touch the screen. Motion picture playback 1/;: 6: 5: ∫: Still picture playback Playback/Pause Rewind playback Fast forward playback Stops the playback and shows the thumbnails.
simplified_HC-X900&X909&X900MEP_eng.book 22 ページ 2012年1月16日 月曜日 午後4時34分 Basic Using the menu screen ≥ Touch 1 (left side)/ Touch MENU (right side) of . Q. MENU MENU 2 on the Touch Menu to display . (l 16) 4 Touch the desired item to enter the setting. 5 Touch [EXIT] to exit the menu setting. ∫ About Touch the top menu A. MENU guide display After touching , touching the submenus and items will cause function descriptions and settings confirmation messages to appear.
simplified_HC-X900&X909&X900MEP_eng.book 23 ページ 2012年1月16日 月曜日 午後4時34分 Basic Using the zoom Zoom lever/Zoom button icons T W 6 W T T T side: Close-up recording (zoom in) W side: Wide-angle recording (zoom out) ≥ The zoom speed varies depending on the range over which the zoom lever is moved. W A Zoom bar The zoom bar is displayed during the zoom operation.
simplified_HC-X900&X909&X900MEP_eng.book 24 ページ 2012年1月16日 月曜日 午後4時34分 Others Specifications High Definition Video Camera Information for your safety Power source: DC 9.3 V (When using AC adaptor) DC 7.2 V (When using battery) Power consumption: Recording; 8.9 W Charging; 10.3 W Motion picture recording format: [AVCHD]; AVCHD format version 2.0 compliant (AVCHD 3D/Progressive) [iFrame]; MPEG-4 AVC file format compliant (.MP4) Motion picture compression: MPEG-4 AVC/H.264 MPEG-4 MVC/H.
simplified_HC-X900&X909&X900MEP_eng.book 25 ページ 2012年1月16日 月曜日 午後4時34分 Image sensor: 1/4.1 type (1/4.1z) 3MOS image sensor Total; 3050 Kk3 Effective pixels; Motion picture; 2190 K to 2070 K k3 (16:9) Still picture; 2290 Kk3 (4:3), 2370 Kk3 (3:2), 2190 K to 2070 K k3 (16:9) Lens: Auto Iris, 12k Optical Zoom, F1.5 to F2.8 Focal length; 2.84 mm to 34.1 mm Macro (Full range AF) 35 mm equivalent; Motion picture; 29.8 mm to 368.8 mm (16:9) Still picture; 31 mm to 372 mm (4:3), 29.8 mm to 357.7 mm (3:2), 29.
simplified_HC-X900&X909&X900MEP_eng.book 26 ページ 2012年1月16日 HDMI mini connector video output level: HDMI™ (x.v.
simplified_HC-X900&X909&X900MEP_eng.book 27 ページ 2012年1月16日 月曜日 午後4時34分 AC adaptor Information for your safety Power source: Power consumption: DC output: AC 110 V to 240 V, 50/60 Hz 16 W DC 9.3 V, 1.2 A Dimensions: 52 mm (W)k26 mm (H)k86.3 mm (D) Mass: Approx. 115 g ∫ 3D Conversion Lens (optional) Lens: F2.0 (f = 1.64 mm) 35 mm equivalent; 33 mm Minimum recording distance; Approx. 1.2 m Minimum illumination: Approx.
simplified_HC-X900&X909&X900MEP_eng.book 28 ページ 2012年1月16日 月曜日 午後4時34分 Others About copyright ∫ Carefully observe copyright laws Recording of pre-recorded tapes or discs or other published or broadcast material for purposes other than your own private use may infringe copyright laws. Even for the purpose of private use, recording of certain material may be restricted. ∫ Licenses ≥ SDXC Logo is a trademark of SD-3C, LLC.
simplified_HC-X900&X909&X900MEP_eng.book 29 ページ 2012年1月16日 月曜日 午後4時34分 Others Reading the Operating Instructions (PDF format) More detailed instructions on the operation of this unit are contained in “Operating Instructions (PDF format)” in the supplied CD-ROM. Install it on your PC to read it. Download and install a version of Adobe Reader that you can use with your OS from the following Web Site. http://get.adobe.