Operating Instructions High Definition Video Camera Model No. HC-X920 HC-X929 HC-X920M HC-X910 Please read these instructions carefully before using this product, and save this manual for future use.
Read this first ∫ About the recording format for recording motion pictures ∫ Handling of built-in memory [HC-X920M] You can select from AVCHD* or iFrame recording formats to record motion pictures using this unit. (l 71) * It is compatible with AVCHD 3D or AVCHD Progressive (1080/50p). This unit is equipped with the built-in memory. When using this component, pay attention to the following points. AVCHD 3D: It is possible to record powerful, lifelike 3D full high-definition images.
∫ About Condensation (When the lens, the viewfinder or LCD Monitor is fogged up) ∫ For the purposes of these operating instructions Condensation occurs when there is a change in temperature or humidity, such as when the unit is taken from outside or a cold room to a warm room. Please be careful, as it may cause the lens, the viewfinder or LCD monitor to become soiled, moldy, or damaged.
Contents Read this first ................................................. 2 Preparation Names and Functions of Main Parts ............ 6 Power supply................................................ 10 Inserting/removing the battery ............... 10 Charging the battery .............................. 11 Charging and recording time ................. 12 Recording to a card ..................................... 13 Cards that you can use with this unit ..... 13 Inserting/removing an SD card ..............
Copy/Dubbing With a PC Copying between SD card and Built-in Memory [HC-X920M] .................................. 115 Copying/playing back with a USB HDD ... 118 Preparing for copying/playing back ..... 118 Simple copy ......................................... 120 Copy selected files .............................. 121 Playing back the USB HDD ................. 122 Dubbing with a Blu-ray disc recorder, video devices, etc. ..................................... 123 What you can do with a PC .................
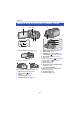
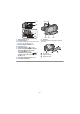
Preparation Names and Functions of Main Parts 8 A/V 1 11 2 3 45 1 12 13 14 15 16 6 7 9 10 LCD monitor (Touch screen) (l 17) ≥ It can open up to 90o. ≥ It can rotate up to 180o A towards the lens or 90o B towards the opposite direction.
17 21 22 18 19 20 23 24 17 SD card cover (l 14) 18 Tripod receptacle ≥ If you attach a tripod which has 5.5 mm screw or larger, it may damage this unit.
26 27 28 35 36 29 30 31 MIC 34 26 27 28 29 30 31 Status indicator (l 15, 134) Internal microphones Multi manual ring (l 55, 58) Shoe adaptor mounting part (l 202) Shoe adaptor cover (l 202) Shoe adaptor release lever [SHOE ADAPTOR RELEASE] (l 202) 32 Microphone terminal [MIC] ≥ A compatible plug-in powered microphone can be used as an external microphone. ≥ Audio will be stereo (2 ch) with the external microphone input.
HC-X920 / HC-X929 / HC-X920M 39 HC-X910 40 42 41 39 Wi-Fi Transmitter (l 128) 40 Wi-Fi button [Wi-Fi] (l 134, 139, 143, 147, 148, 152, 155) 41 Optical Image Stabilizer button [ O.I.S.] (l 46) 42 Optical Image Stabilizer button [ O.I.S.
Preparation Power supply ∫ About batteries that you can use with this unit The battery that can be used with this unit is VW-VBN130/VW-VBN260. ≥ The unit has a function for distinguishing batteries which can be used safely. The dedicated battery (VW-VBN130/VW-VBN260) supports this function. The only batteries suitable for use with this unit are genuine Panasonic products and batteries manufactured by other companies and certified by Panasonic. (Batteries which do not support this function cannot be used).
Charging the battery When this unit is purchased, the battery is not charged. Charge the battery fully before using this unit for the first time. The unit is in the standby condition when the AC adaptor is connected. The primary circuit is always “live” as long as the AC adaptor is connected to an electrical outlet. Important: ≥ Use the supplied AC adaptor. Do not use the AC adaptor of another device. ≥ Do not use the AC cable with any other equipment as it is designed only for this unit.
Charging and recording time ∫ Charging/Recording time ≥ Temperature: 25 oC/humidity: 60%RH ≥ When using the viewfinder (times in parentheses are when using the LCD monitor) Battery model number [Voltage/Capacity (minimum)] Supplied battery/ VW-VBN130 (optional) [7.2 V/1250 mAh] VW-VBN260 (optional) [7.
Preparation Recording to a card The unit can record still pictures or motion pictures to an SD card or built-in memory. To record to an SD card, read the following. Cards that you can use with this unit Use SD cards conforming to Class 4 or higher of the SD Speed Class Rating* for motion picture recording.
Inserting/removing an SD card When using an SD card not from Panasonic, or one previously used on other equipment, for the first time on this unit, format the SD card. (l 41) When the SD card is formatted, all of the recorded data is deleted. Once the data is deleted, it cannot be restored. Caution: Check that the access lamp has gone off. Access lamp [ACCESS] A ≥ When this unit is accessing the SD card or built-in memory, the access lamp lights up.
Preparation Turning the unit on/off You can turn the unit on and off using the power button, the LCD monitor or the viewfinder. Turning the unit on and off with the power button Open the LCD monitor and press the power button to turn on the unit. To turn off the unit A Hold down the power button until the status indicator goes off. The status indicator lights on. Turning the unit on and off with the LCD monitor/viewfinder Opening the LCD monitor or extending the viewfinder turns on the unit.
Preparation Selecting a mode Operate the mode switch to change the mode to Motion Picture Recording Mode (l 23) Still Picture Recording Mode (l 25) Playback Mode (l 29, 88) - 16 - , or .
Preparation How to use the touch screen You can operate by directly touching the LCD monitor (touch screen) with your finger. ∫ Touch Touch and release the touch screen to select icon or picture. ≥ Touch the centre of the icon. ≥ Touching the touch screen will not operate while you are touching another part of the touch screen. ∫ Slide while touching Move your finger while pressing on the touch screen. ∫ About the operation icons / / / : Touch when changing a page or performing settings.
About the Touch Menu Touch (left side)/ operation icons. (right side) of on the Touch Menu to switch the ≥ It is also possible to switch the operation icons by sliding the Touch Menu right or left while touching it. A Touch Menu T W Recording Mode T Playback Mode FOCUS W D E ALL SHTR IRIS B C Q. MENU WB MENU MENU Operation icons to display can be changed.
Preparation Setting date and time The clock is not set at the time of purchase. Make sure to set the clock. 1 Select the menu. (l 32) MENU 2 : [SETUP] # [CLOCK SET] Touch the date or time to be set, then set the desired value using / . Displaying the World Time setting (l 34): [HOME]/ [DESTINATION] ≥ The year can be set between 2000 and 2039. A 3 Touch [ENTER]. ≥ A message prompting for World Time setting may be displayed. Perform the World Time setting by touching the screen.
Basic Before recording ∫ Basic camera positioning 1 Hold the unit with both hands. 2 Put your hand through the grip belt. 3 It is convenient to use the recording button icon A when holding the unit at waist level. ≥ When recording, make sure your footing is stable and there is no danger of colliding with another person or object. ≥ When you are outdoors, record pictures with the sunlight behind you. If the subject is backlit, it will become dark in the recording.
∫ Attaching/Removing the lens hood This will reduce the extra light entering the lens in bright sunlight or backlight etc., making it possible to take clearer pictures. A Attaching the lens hood B Removing the lens hood ≥ If you use the Filter Kit (optional), the Conversion Lens (optional) or the 3D Conversion Lens (optional), remove the lens hood.
Basic Selecting a media to record [HC-X920M] The card and built-in memory can be selected separately to record motion pictures or still pictures. 1 2 Change the mode to MENU 3 or . Select the menu. (l 32) : [MEDIA SELECT] Touch the media to record motion pictures or still pictures. ≥ The media is selected separately to motion pictures or still pictures is highlighted in yellow. 4 Touch [ENTER].
Basic Recording motion pictures 1 2 3 A B 4 Change the mode to . Open the LCD monitor or extend the viewfinder. Press the recording start/stop button to start recording. T W Recording button icon When you begin recording, ; changes to ¥. Press the recording start/stop button again to pause recording. ≥ Recording can also be started/stopped by touching the recording button icon.
≥ To change the recording format, change the [REC MODE]. (l 71) ≥ Still pictures can be recorded while recording the motion picture. (l 26) ≥ The images recorded between pressing the recording start/stop button to start recording and pressing it again to pause recording become one scene. When you record with the [REC MODE] set to [iFrame], the scenes longer than approximately 20 minutes will be automatically divided. (Recording will continue.
Basic Recording still pictures 1 2 3 Change the mode to . Open the LCD monitor or extend the viewfinder. Press the button halfway. (For Auto Focus only) Focus indication: A B 4 Press the Focus indication ± (The white lamp flashes.): Focusing ¥ (The green lamp lights up.): When in focus No mark: When focusing is unsuccessful. Focus area (area inside brackets) button fully.
∫ About the screen indications in Still Picture Recording Mode Still picture operation indicator (l 180) R3000 20.4M MEGA Remaining number of still pictures ≥ Flashes in red when [0] appears. MEGA Optical Image Stabilizer (l 25) AF assist lamp (l 87) ßj 20.4M MEGA Size of still pictures (l 84) Optical Image Stabilizer (l 46) ß R3000 Flash (l 67) Flash level (l 67) Red-eye Reduction (l 67) ≥ Screen display will disappear when no touch operation is performed for a specific period of time.
Basic Intelligent Auto Mode The following modes (appropriate for the condition) are set just by pointing the unit to what you want to record. Intelligent auto button Pressing the Intelligent auto button can change the Recording Mode. (l 48) ≥ Pressing the Intelligent auto button when other Recording Modes are set will change to Intelligent Auto Mode. Mode Faces are detected and focused automatically, and the brightness is adjusted so it is recorded clearly.
∫ Intelligent Auto Mode When switching to Intelligent Auto Mode, the Automatic White Balance and Auto Focus operate and automatically adjust the colour balance and focusing. Depending on the brightness of the subject etc., the aperture and shutter speed are automatically adjusted for an optimum brightness. ≥ Colour balance and focus may not be adjusted automatically depending on light sources or scenes. If so, manually adjust these settings.
Basic Motion picture/Still picture playback 1 2 3 Change the mode to . Touch the play mode select icon A (l 18). ALL ≥ You can also set by touching MENU , selecting [VIDEO SETUP] or [PHOTO SETUP] # [MEDIA, VIDEO/ PICTURE] (l 32) HC-X920 / HC-X929 / HC-X910 Select the still picture B or the recording format of the motion picture C you wish to play back. HC-X920M Select the media type D and then select the still picture B or the recording format of the motion picture C you wish to play back.
5 Select the playback operation by touching the operation icon. E Operation icon ≥ Operation icons and screen display will disappear when no touch operation is performed for a specific period of time. To display them again, touch the screen. ≥ It will be played back in 2D only or 3D only when slide show is played back connected to the 3D compatible TV.
Sound will be heard only during normal playback. If pause play is continued for approx. 5 minutes, the screen returns to the thumbnails. The elapsed time for playback indication will be reset to 0h00m00s each scene. When playing back with [ALL AVCHD] selected, the screen may become black momentarily at the time the scene switches. ≥ The speaker of this unit does not output sounds when connected to a TV.
Basic Using the menu screen ≥ Touch 1 (left side)/ Touch MENU (right side) of on the Touch Menu to display ∫ About . MENU Touch the top menu A. 3 Touch the submenu B. ≥ Next (previous) page can be displayed by touching / . 4 5 . (l 18) guide display After touching , touching the submenus and items will cause function descriptions and settings confirmation messages to appear. ≥ After the messages have been displayed, the guide display is cancelled. Q.
Using the quick menu This allows quick setting of some of the menus. ≥ Touch (left side)/ (right side) of on the Touch Menu to display 1 Touch Q. MENU Q. MENU . (l 18) . The following menus can be set. Touch the desired menu. ≥ The items displayed differ depending on the position of the mode switch or settings. Icon 20.
Basic Using the Setup Menu [DISPLAY] Set the display method for the screen information display. MENU : [SETUP] # [DISPLAY] # desired setting [5 SECONDS]: Information is displayed on the screen for 5 seconds after starting the Motion Picture Recording Mode or Still Picture Recording Mode, starting to playback, or touching the screen. [ON]: Constantly display [CLOCK SET] Please refer to page 19.
≥ When the home region is set for the first time, the screen for selecting home/travel destination appears after setting the home region successively. If the home region has already been set once, execute the menu operation for Step 1. 5 (Only when setting the region of your travel destination) Touch / to select your travel destination and touch [ENTER]. ≥ Touch [SUMMER TIME SET] to set daylight saving time. appears and the summer time setting is turned on.
[ZOOM/REC DISPLAY] You can set the display method of the zoom button icons ( T / W ) and recording button icon ( ). MENU : [SETUP] # [ZOOM/REC DISPLAY] # desired setting [ON]: Constantly display [OFF]: Icons will disappear after approx. 5 seconds without any touch operation. [O.I.S. LOCK DISPLAY] Please refer to page 62. [EXT. DISPLAY] Please refer to page 112. [ECONOMY (BATT)] When about 5 minutes have passed without any operation, this unit automatically turns off to save battery life.
[QUICK POWER ON] The unit is put into recording pause approx. 1 second when the unit is turned on with the mode set to or . MENU : [SETUP] # [QUICK POWER ON] # [ON] ≥ Depending on the recording conditions, start time may be longer than 1 second. ≥ In the Quick Power On Mode, the zoom magnification becomes approx. 1k. [QUICK START] This unit is put into recording pause approx. 0.6 seconds after the LCD monitor is reopened or the viewfinder is extended.
[REC LAMP] The recording lamp lights up during recording and flashes when the Self-timer is counting down. When this is set to [OFF], it does not light during recording. MENU : [SETUP] # [REC LAMP] # [ON] [ALERT SOUND] Touch screen operation, starting and stopping of recording and unit on/off can be confirmed with this sound. When [OFF] is selected, the sound is not output at the start/end of recording, etc.
[POWER LCD] This makes it easier to view the LCD monitor in bright places including outdoors. MENU : [SETUP] # [POWER LCD] # [ON] ≥ These settings will not affect the images actually recorded. ≥ It is possible to set from the quick menu. (l 33) ≥ When the AC adaptor is in use, the LCD monitor is set to [ON] automatically. ≥ When the LCD monitor is bright, the recordable time with the battery will be shorter. [LCD SET] It adjusts brightness and colour density on the LCD monitor.
[TV ASPECT] Please refer to page 111. [3D PLAYBACK] Please refer to page 163, 166. [INITIAL SET] Set to [YES] for changing the menu settings back to the default condition. MENU : [SETUP] # [INITIAL SET] ≥ Settings for [MEDIA SELECT]*, [CLOCK SET] and [LANGUAGE] will not be changed. * For users who have HC-X920 / HC-X929 / HC-X910 , this menu is not displayed. HC-X920 / HC-X929 / HC-X920M [Reset Wi-Fi Settings] Set to [YES] for changing the Wi-Fi settings back to the default condition.
[NUMBER RESET] Set the file number of the iFrame and still picture recorded next to 0001. MENU : [SETUP] # [NUMBER RESET] ≥ Folder number is updated and file number will start from 0001. (l 177) ≥ To reset the folder number, format the SD card and built-in memory, and then perform [NUMBER RESET]. [FORMAT MEDIA] Please be aware that if a medium is formatted, then all the data recorded on the medium will be erased and cannot be restored. Back up important data on a PC, DVD disc etc.
[MEDIA STATUS] The used space and remaining recordable time of the SD card and built-in memory can be checked. MENU : [SETUP] # [MEDIA STATUS] ≥ HC-X920M Touching [CHANGE MEDIA] switches the unit between the display for the SD card and the display for the built-in memory. ≥ When the mode switch is set to , remaining recordable time for the selected recording mode is displayed. ≥ Touch [EXIT] to close the indication.
[O.I.S. DEMO] This item is used to start the Optical Image Stabilizer demo. MENU : [SETUP] # [O.I.S. DEMO] ≥ Touch [O.I.S. DEMO], the demonstration automatically starts.When you touch [EXIT], the demonstration will be cancelled. [LANGUAGE] You can select the language on the screen display and the menu screen.
Advanced (Recording) Using the zoom Zoom lever/Zoom button icons T side: Close-up recording (zoom in) W side: Wide-angle recording (zoom out) T W T 6 W T W A Zoom bar ≥ Maximum zoom ratio for recording motion pictures can be set with [ZOOM MODE]. (l 71) ∫ About the zoom bar The zoom bar is displayed during the zoom operation. W T A B Optical zoom Motion Picture Recording Mode: i.
Ring zoom Zoom operation can be done using the multi manual ring. You can set your preferred rotational directions for the zoom operation in [ZOOM RING SET] of the setup menu. [ZOOM RING SET] Rotational direction of the ring A B [ ] [ ] A side Wide-angle recording (zoom out) Close-up recording (zoom in) B side Close-up recording (zoom in) Wide-angle recording (zoom out) ≥ This function’s default setting is [ ]. ≥ The zoom speed varies depending on the speed you rotate the ring.
Advanced (Recording) Image Stabilizer Function Use the Image Stabilizer to reduce the effects of shake during recording. This unit is equipped with Hybrid Optical Image Stabilizer. Hybrid Optical Image Stabilizer is a hybrid of Optical and Electrical Image Stabilizer. HC-X920 / HC-X929 / HC-X920M HC-X910 O.I.S. O.I.S. Optical Image Stabilizer button Press the button to turn Optical Image Stabilizer on/off. (Motion Picture Recording Mode) / # (setting cancelled) ≥ When [HYBRID O.I.S.
∫ Changing Image Stabilizer Mode (Motion Picture Recording Mode) MENU : [RECORD SETUP] # [HYBRID O.I.S.] # [ON] or [OFF] When set to [ON], you can further improve image stabilization for recording while walking, or holding the unit and recording a distant subject with zoom. ≥ This function’s default setting is [ON]. (Still Picture Recording Mode) MENU : [RECORD SETUP] # [O.I.S.] # [MODE1] or [MODE2] [MODE1]: The function works all the time. [MODE2]: The function works when the button is pressed.
Advanced (Recording) Changing the Recording Mode 1 Touch the Recording Mode button icon. Q. MENU MENU 2 Touch the desired Recording Mode button icon. Mode Effect Intelligent Auto You can switch the mode to the Intelligent Auto Mode, which optimises settings to the recording environment you are in. (l 27) Intelligent Auto Plus You can add manually-adjusted brightness and colour balance settings to the Intelligent Auto Mode, and record.
Intelligent Auto Plus Please refer to page 27 for details about the effect of each mode. (Portrait)/ (Scenery)/ (Night Scenery)*2/ *1 *2 (Spotlight)*1/ (Macro)*2/ (Night Portrait)*2/ (Normal)*2 In Motion Picture Recording Mode only In Still Picture Recording Mode only ≥ Change the Recording Mode to 1 (Low Light)*1/ (Normal)*1/ . (l 48) (When adjusting the brightness) Touch (When adjusting the colour balance) Touch R side: Sets the balance to a reddish tone.
MINI 1 [Miniature Effect] Touch to adjust the horizontal position of the in-focus portion ≥ If you touch the screen, you can adjust the horizontal position of the in-focus portion. ≥ When no touch operations are performed for approximately 1 second, [Reset], [SIZE], and [ENTER] are displayed. If you touch the screen, you can readjust the horizontal position of the in-focus portion. ≥ Position of the in-focus portion will return to original position when you touch [Reset]. 2 Touch [SIZE].
8mm 1 [8mm movie] (When adjusting the brightness) Touch . ≥ The level of brightness is switched every time you touch the icon. (Standard) # (Bright) # (Dark) 2 (When adjusting the colour balance) Touch . ≥ The level of colour balance is switched every time you touch the icon. (Blue) # (Red) # (Yellow) 3 Start recording. ≥ The sound is monaural. SILN 1 [Silent movie] (When adjusting the brightness) Touch . ≥ The level of brightness is switched every time you touch the icon.
INTV [Time Lapse Rec] Touch the desired setup time. [1 SECOND]/[10 SECONDS]/[30 SECONDS]/[1 MINUTE]/[2 MINUTES] ≥ Touch [ENTER]. ≥ A frame is recorded with a set recording interval. 25 frames will make up motion picture of 1 second. Setup time (recording interval) Recording time Recorded time Sunset 1s Approx. 1 h Approx. 2 min Blooming 30 s Approx. 3 h Approx. 12 s Setup example ≥ Maximum recordable time is 12 hours. Audio cannot be recorded. [REC MODE] is set to [HA].
SCN Scene Mode ≥ Change the Recording Mode to SCN . (l 48) Touch the desired Scene Mode. Mode 5Sports Effect To make fast moving scenes less shaky with slow playback and pause of playback Portrait To make people stand out against the background Soft Skin To makes skin colours appear softer for a more attractive appearance Spotlight Improved quality when subject is brightly illuminated. Snow Improved image quality when shooting in snowy locations.
≥ (Night Scenery/Night Portrait) j The shutter speed is 1/2 or more in Still Picture Recording Mode. j Using a tripod is recommended. ≥ (Night Portrait) j The flash is set to [ON].
Advanced (Recording) Manual recording The operation sequence differs for the LCD monitor and viewfinder. ≥ The Manual Focus, White Balance, Shutter Speed, Brightness (Iris and Gain) settings are retained when you change between Motion Picture Recording Mode and Still Picture Recording Mode. Press the CAMERA FUNCTION button to switch to Manual Mode. ≥ It is also possible to switch to Manual Mode by touching the Recording Mode button icon.
White Balance Automatic White Balance function may not reproduce natural colours depending on the scenes or lighting conditions. If so, you can adjust the White Balance manually. ≥ Press the CAMERA FUNCTION button to switch to Manual Mode. (l 55) ≥ For how to perform the settings when using the viewfinder, refer to page 55. 1 2 Touch [WB]. Touch / FOCUS to select White Balance Mode. ≥ Touch [WB] to determine the mode.
Manual shutter speed/iris adjustment Shutter Speed: Adjust it when recording fast-moving subjects. Iris: Adjust it when the screen is too bright or too dark. ≥ Press the CAMERA FUNCTION button to switch to Manual Mode. (l 55) ≥ For how to perform the settings when using the viewfinder, refer to page 55. 1 2 Touch [SHTR] or [IRIS]. Touch / to adjust settings. ≥ Touch [SHTR]/[IRIS] to complete the adjustments.
Recording with Manual Focus Perform focus adjustments using the multi manual ring. If auto focusing is difficult due to the conditions, then use Manual Focus. ≥ Press the CAMERA FUNCTION button to switch to Manual Mode. (l 55) ≥ For how to perform the settings when using the viewfinder, refer to page 55. A 1 Rotate the multi manual ring to adjust the focus. (When MF assist function is used) Select the menu. MENU : [RECORD SETUP] # [MF ASSIST] # [ON] ≥ It is possible to set from the quick menu.
Advanced (Recording) Recording with the Touch function You can record using convenient functions just by the easy operation of touching the screen. 1 2 Touch (left side)/ (right side) of function icons. (l 18) on the Touch Menu to display Touch Touch the Touch function icon. (e.g. AF/AE tracking) ≥ To cancel, touch the Touch function icon again. (Optical Image Stabilizer Lock is cancelled by releasing the finger touching .
Level Shot This function detects the horizontal tilt of the unit, and automatically corrects it to the level position before recording. : When this function is set to on. : When this function is set to off. 1 Touch . ≥ Icon is displayed in A position. j When the tilt is corrected: j When the tilt is above the correction range: / ≥ When the tilt exceeds the correction range, move the unit to the position where is displayed. 2 Start recording.
AF/AE tracking It is possible to set the focus and exposure to the subject specified on the touch screen. The focus and exposure will keep following the subject automatically even if it moves. 1 Touch . ≥ When [FACE RECOG.] (l 73) is [ON] and a registered face is detected, the target is automatically locked. 2 Touch the object and lock the target. ≥ When you touch the head of the object, the target frame on the head gets locked and tracking starts.
Optical Image Stabilizer Lock In Motion Picture Recording Mode, you can further improve optical image stabilization by touching and holding . With this function, you can further reduce the effects of the shake that tends to occur when using zoom. 1 2 Press the Optical Image Stabilizer button to turn the Image Stabilizer on. Touch and hold . ≥ Icon is displayed in A while you are touching and holding . ≥ Optical Image Stabilizer Lock is released when you remove your finger from the icon.
Advanced (Recording) Recording functions of operation icons Select the operation icons to add different effects to the images to be recorded. 1 2 Touch (left side)/ (right side) of operation icons. (l 18) on the Touch Menu to display the Touch an operation icon. (e.g. PRE-REC) PRE-REC ≥ The operation icons that are displayed in the Touch Menu can be changed. ([SELECT OPERATION ICONS]: l 38) ≥ Select the operation icon again to cancel the function.
Fade When you start recording, the image/audio gradually appears. (Fade in) When you pause recording, the image/audio gradually disappears. (Fade out) ≥ The Fade setting is cancelled when the recording stops. (Fade in) ∫ To select the colour for fade in/out MENU : [RECORD SETUP] # [FADE COLOUR] # [WHITE] or [BLACK] (Fade out) ≥ The thumbnails of scenes recorded using fade in become black (or white).
PRE-REC This prevents you from missing a shot. This allows recording of the pictures and sound to start approximately 3 seconds before the recording start/stop button is pressed. ≥ PRE-REC appears on the screen. ≥ Aim the unit at the subject beforehand. ≥ There is no beep sound. ≥ PRE-REC is cancelled in the following cases. j If you change the mode j HC-X920 / HC-X929 / HC-X910 If you remove the SD card j HC-X920M If you remove the SD card while [MEDIA SELECT] is set to [VIDEO/SD CARD] Q.
Smile Shot When a smiling face is detected during motion picture recording, the unit automatically records a still picture. The icon changes each time it is touched. ([ON]) # ([FACE RECOG.]) # [OFF] : The unit records a still picture on detecting a smiling face. : Still pictures are only recorded when the face of a person registered using Face Recognition (l 73) is detected. [OFF]: Cancel the setting.
Built-in flash When the button is pressed, the flash is activated and the picture will be recorded. Use the Built-in flash in order to record still pictures in dark places. The icon changes each time it is touched. ß ([ON]) # ßA ([AUTO]) # ([OFF]) ≥ The unit automatically determines if the flash is necessary even when it has been set to by detecting the ambient brightness. (If it determines that the flash is necessary, the indication lights up in red.
Self-timer This is for recording still pictures using the timer. The icon changes each time it is touched. Ø10 (Records after 10 seconds) # Ø2 (Records after 2 seconds) # setting cancelled ≥ When the button is pressed, a still picture is recorded after the Ø10 or Ø2 display and the recording lamp flashes for the time which has been set. After recording, the Self-timer is cancelled.
Guidelines You can check if the image is level while recording or playing back motion pictures and still pictures. The function can also be used to estimate the balance of the composition. The icon changes each time it is touched. # # # Setting cancelled ≥ It is possible to set from the quick menu. (l 33) ≥ The guidelines do not appear on the images actually recorded. ∫ Displaying guidelines at playback ≥ Change the mode to and touch the play mode select icon.
Advanced (Recording) Recording functions of menus [SCENE MODE] When you record images in different situations, this mode automatically sets optimum shutter speeds and apertures. ≥ Set Creative Control Mode to [Time Lapse Rec].
[ZOOM MODE] Set the maximum zoom ratio for the Motion Picture Recording Mode. MENU : [RECORD SETUP] # [ZOOM MODE] # desired setting [Opt.Zoom 12k]: Optical zoom only (Up to 12k) [i.Zoom 25k]: This zoom function allows you to maintain high-definition picture quality. (Up to 25k) [D.Zoom 40k]: Digital zoom (Up to 40k) [D.Zoom 700k]: Digital zoom (Up to 700k) ≥ The larger the digital zoom magnification, the more the image quality is degraded.
[DIGITAL CINEMA] Use this function to record an image with vivid colour, like an image on a movie film. ≥ Switch to Manual Mode. (l 55) ≥ Set [ZOOM MODE] to [Opt.Zoom 12k]. (l 71) ≥ Set [REC MODE] to [PH], [HA] or [HG]. (l 71) MENU : [RECORD SETUP] # [DIGITAL CINEMA] # [ON] ≥ The images may not appear smooth. HC-X920M [RELAY REC] It is possible to continuously record motion picture to an SD card when there is no space available in the built-in memory.
[FACE RECOG.] Face Recognition is a function for finding faces that resemble faces which have already been registered and automatically prioritising focus and exposure for those faces. This function makes it possible to keep the face of your loved ones in focus even when they are at the back or on the end of a line in a group picture. MENU : [RECORD SETUP] # [FACE RECOG.
Entering text ≥ The characters can be conveniently input without moving the cursor when the [Auto Cursor Position] is set to [ON]. (l 40) Icon [A] etc. / [A/a/1] Description of operation Enters a character. Moves the cursor to left or right. Switches between [A]/[a] (alphabet) and [&/1] (symbols/numbers). Enters a space. [Delete] Deletes a character. Deletes the previous character if the cursor is in an empty space. [Enter] Ends text entry. ≥ A maximum of 9 characters can be entered.
∫ Cancelling a registered person 1 Select the menu. MENU : [RECORD SETUP] # [FACE RECOG.] # [SET] # [DELETE] or [DELETE ALL] ≥ Touching [DELETE ALL] cancels all the registered people. 2 (When [DELETE] is selected) Touch the person to cancel. ≥ When touched, the person is selected and again. ≥ Touch [ENTER]. is displayed. To cancel the selected person, touch ≥ Since Face Recognition searches for faces that resemble the registered faces, there is no guarantee of positive recognition.
[FACE FRAMING] Detected faces appear with frames. MENU : [RECORD SETUP] # [FACE FRAMING] # desired setting [PRIMARY]: Only the prioritised face framing is displayed. [ALL]: All face detection framings are displayed. [OFF]: Cancel the setting. ≥ Up to 15 frames are indicated. Larger faces and faces nearer to the centre of the screen take preference over others. When [FACE RECOG.] is [ON] registered people are given priority.
[LEVEL GAUGE] This function displays the horizontal/vertical tilt of the unit with the electronic level. MENU : [RECORD SETUP] # [LEVEL GAUGE] # [ON] ∫ To correct the tilt (Horizontal direction) (Vertical direction) When correcting the leftward tilt When correcting the downward tilt ≥ The horizontal tilt display A and vertical tilt display B appear yellow when there is a tilt, and appear green when there is almost no tilt.
[AUTO SLOW SHTR (3D)] This auto slow shutter function is only used with the 3D Conversion Lens (optional). ≥ Switch to Manual Mode. (l 55) MENU : [RECORD SETUP] # [AUTO SLOW SHTR (3D)] # [ON] ≥ For details, refer to [AUTO SLOW SHTR (2D)]. ≥ This function’s default setting is [ON]. ≥ When a 3D Conversion Lens is used, the recording scene will become darker. We recommend setting this function to [ON].
[SHOOTING GUIDE] Message is displayed when this unit is moved rapidly. MENU : [RECORD SETUP] # [SHOOTING GUIDE] # [ON] When “CAMERA PANNING IS TOO FAST.” appears, move the unit slowly while recording. ≥ Message will not appear while pausing the recording. (Message will appear even if it is pausing the recording if [DEMO MODE] is set to [ON].) [Wind Noise Canceller] This will reduce the wind noise coming into the built-in microphones while maintaining the realism. ≥ Switch to Manual Mode.
[5.1ch/2ch] You can switch the channel number setting of the built-in microphone. MENU : [RECORD SETUP] # [5.1ch/2ch] # desired setting [5.1ch]: Records with the 5.1 ch surround microphone. [2ch]: Records with the 2ch stereo microphone. ≥ The option is set to [2ch] when an external microphone is connected. [MIC SETUP] Recording setting of the built-in microphone can be adjusted. MENU : [RECORD SETUP] # [MIC SETUP] # desired setting [SURROUND]*1: Records the surrounding sound with added realism.
[MIC LEVEL] When recording, the input level from the built-in microphones and the external microphone terminal can be adjusted. 1 Select the menu. MENU : [RECORD SETUP] # [MIC LEVEL] # desired setting [AUTO]: AGC is activated, and the recording level is adjusted automatically. [SET ]: The desired recording level can be set. AGC is activated, and sound distortions are reduced. [SET ]: The desired recording level can be set. Sounds are recorded in natural quality.
[BASS SETTING] Change the lower setting of the built-in microphone according to your choice. ≥ Switch to Manual Mode. (l 55) MENU : [RECORD SETUP] # [BASS SETTING] # desired setting [0dB]/[+3dB]/[+6dB]/[LOWCUT] ≥ Normally set to [0dB]. ≥ Select [+3dB] or [+6dB] to get strong power feeling at bass level. [PICTURE ADJUST] Adjust the quality of the image while recording. Adjust by outputting to a TV while adjusting the quality of the image.
[LUMINANCE] Displays the luminance level of the centre of the screen (luminance display frame) in %. It makes the adjustment of the brightness of the object easier, by checking the luminance level of the object, when recording same object in different surroundings. Adjust the brightness using [IRIS]. (l 57) ≥ Switch to Manual Mode. (l 55) MENU : [RECORD SETUP] # [LUMINANCE] # desired setting ≥ It is possible to set from the quick menu in Manual Mode.
[PICTURE SIZE] The higher the number of pixels, the higher the clarity of the picture when printing. MENU : [PICTURE] # [PICTURE SIZE] # desired setting ≥ It is possible to set from the quick menu. (l 33) ≥ The number of recording pixels that can be set changes depending on selected screen aspect ratio. (l 85) ∫ Picture size and Maximum zoom ratio in Still Picture Recording Mode Picture size Aspect ratio Extra Optical Zoom (l 45) –* 15.1M 4480k3360 5.8M 2784k2088 0.
[ASPECT RATIO] This allows you to select the aspect ratio of the pictures to suit printing or the playback method. MENU : [PICTURE] # [ASPECT RATIO] # desired setting [4:3]: Aspect ratio of 4:3 television [3:2]: Aspect ratio of conventional film camera or prints (such as L-size print) [16:9]: Aspect ratio of high-definition television, etc. ≥ This function’s default setting is [16:9]. ≥ When the aspect ratio is set to [4:3] or [3:2], black bands may appear on the left and right of the screen.
[HI-SPEED BURST] Recording is done continuously at the rate of 50 still pictures per second. Use this function to record an object with fast movement. 1 Select the menu. MENU : [PICTURE] # [HI-SPEED BURST] # [ON] [ON]: 180 still pictures are recorded continuously at the rate of 50 per second. The picture size is 2.1 M (1920k1080). [OFF]: Cancel the setting. 2 Press the button. ≥ flashes in red during recording. ≥ First press the button halfway, then press it fully to set the focus and record.
[AF ASSIST LAMP] Illuminating the subject makes it easier for the camera to focus when recording in low light conditions that make focusing difficult. ≥ Switch to Manual Mode. (l 55) MENU : [PICTURE] # [AF ASSIST LAMP] # [AUTO] ≥ The available distance of the AF assist lamp is approx. 1.5 m. ≥ A Conversion Lens (optional) can block the AF assist lamp, and it will become harder to adjust the focus.
Advanced (Playback) Playback Operations Motion picture playback using operation icon For details on the basic playback operations, refer to page 29. Playback operation Playback display Operating steps During Playback Touch the LCD monitor and slide from right to left (from left to right) during playback. Skip playback (to the start of a scene) Slow-motion Playback During Pause Frame-by-frame Playback With the playback paused, continue touching .
Playback operation Playback display Operating steps Touch the Direct playback bar or slide it while touching. ≥ The playback pauses temporarily and skips to the position touched or slid to while touching. ≥ Playback will start by releasing your touching or sliding finger. During Playback Direct playback Creating still picture from motion picture A single frame from the recorded motion picture can be saved as a still picture.
3 (When [MINUTES] is selected) Touch / to set the time. ≥ It can be set up to a maximum of 60 minutes. ≥ Touch [ENTER]. 4 Touch the thumbnail to be played back. ≥ Next (Previous) thumbnail can be displayed by touching / . Repeat Playback Playback of the first scene starts after playback of the last scene finishes. MENU : [VIDEO SETUP] # [REPEAT PLAY] # [ON] The indication appears on the full screen views. ≥ All the scenes are played back repeatedly.
Zooming in on a still picture during playback (Playback zoom) You can zoom in by touching a still picture during playback. 1 Touch and hold the part you wish to zoom in on during still picture playback. ≥ The still picture is zoomed in the following order: k1 # k2 # k4. Touch and hold the screen to zoom in from the normal display to k2, Touch the screen to zoom in from k2 to k4. ≥ The still picture is zoomed in on, centring on the part you touched.
Advanced (Playback) Various playback functions Playing back motion pictures/still pictures by date The scenes or the still pictures recorded on the same day can be played back in succession. 1 2 Touch the date select icon. (l 18) Touch the playback date. The scenes or the still pictures recorded on the date selected are displayed as thumbnails. 3 Touch the scene or the still picture to be played back.
Highlight Playback Part that was recognised as clearly recorded is extracted from multiple scenes, and it can be played back or stored in a short time with effects and music added. It is also possible to create an original Highlight Playback by checking your favourite scenes and setting up to extract those scenes. ≥ Highlight Playback cannot be used for iFrame scenes and scenes saved in MP4. 1 Touch . (l 18) ALL 2 Touch the desired effects [POP]: Recommended for party scene.
∫ Setting up the custom effect It is possible to enjoy the Highlight Playback with your favourite effect by setting up the combination of an image effect and music. 1 2 3 Touch [CUSTOM]. Touch [EFFECT SETUP] or [MUSIC SELECT]. (When [EFFECT SETUP] is selected) Touch the desired effect. ≥ When [EFFECT SETUP] is changed, [MUSIC SELECT] will be set the same as [EFFECT SETUP]. (To set [EFFECT SETUP] and [MUSIC SELECT] to different settings, change [MUSIC SELECT] after setting [EFFECT SETUP].
Playing back with the settings changed Touch [SET] to select the item to change. [SCENE SETUP]: Select the scene or date to be played back. [FAVOURITE SCENE SETUP]: Set up the favourite scenes. (l 96) [FAVOURITE SCENE PLAY]: Set up if the favourite scenes are to be included in the Highlight Playback or not. (l 96) [PRIORITY SETUP]: Select the target to give priority to play back. (l 97) [PLAYBACK TIME]: Select the time to play back. (l 97) [TITLE SETUP]: Select the cover image and enter the title.
∫ Checking the favourite scenes 1 2 Touch the scene to be played back. Touch [Add] and add the favourite part. ≥ Total of 4 seconds before and after touching the [Add] will be added as favourite. ≥ Number of favourite scenes that can be added are 1 to 14. (Number of scenes that can be added differs depending on the scenes selected.) ≥ Favourite check display (A) is displayed in orange, and favourite check display B is displayed on the slide bar.
∫ Priority settings 1 Touch [FACE] or [FACE RECOG.]. ≥ If you touch [FACE], any detected face, including the face of person registered for Face Recognition, is given priority on playback. 2 (When [FACE RECOG.] is selected) Touch a face to specify. ≥ You can specify up to 6 faces, which are to be played back in priority. ≥ When touched, the registered face is selected and surrounded by red. Touch the registered face again to cancel the operation. ≥ Touch [ENTER].
Saving the Highlight Playback The scenes put together as a Highlight Playback can be saved as a single scene. HC-X920 / HC-X929 / HC-X910 The recorded scenes will be saved in the SD card. HC-X920M The recorded scenes will be saved in the built-in memory. 1 2 3 Stop the playback of the Highlight Playback or wait until the playback of the Highlight Playback is finished. Touch [SAVE]. Select the format to save. . [QUALITY (AVCHD)]: It is saved in high-definition image quality.
Changing the playback settings and playing back the slide show 1 Touch . (l 18) ALL 2 (Only when you would like to change the settings) Touch [SET] to select the item to change. [DATE SETUP]: Select the date to be played back. [PLAYBACK SETUP]: Select to play back in 3D (2D still pictures are converted to 3D still pictures and played back) or play back in 2D (3D still pictures are converted to 2D still pictures and played back).
(When [MUSIC SELECT] is selected) Touch the desired sound. ≥ Touch [ENTER]. (To test the music audio) Touch [START] and start the audio testing. ≥ Touch the other music option to change the music to be tested. ≥ When you touch [STOP], the music playback stops. 4 5 Touch [START]. Select the playback operation. (l 29) ≥ When the playback is finished or stopped, the screen to select [REPLAY], [SELECT AGAIN] or [EXIT] is displayed. Touch the desired item.
Advanced (Playback) Deleting scenes/still pictures Deleted scenes/still pictures cannot be restored, so perform appropriate confirmation of the contents before proceeding with deletion. ¬ Change the mode to . ∫ To delete the scene or still picture being played back 0h01m30s Touch while scenes or still pictures to be deleted are being played back. ∫ To delete scenes or still pictures from the thumbnail display ≥ Switch the thumbnail display of the scenes or still pictures to delete.
≥ You can also delete scenes by touching MENU , selecting [EDIT SCENE] # [DELETE] # [ALL SCENES], [MULTI] or [SINGLE]. ≥ You can also delete still pictures by touching MENU , selecting [PHOTO SETUP] # [DELETE] # [ALL SCENES], [MULTI] or [SINGLE]. ≥ During Highlight Playback, scenes/still pictures cannot be deleted. ≥ Scenes that cannot be played back (the thumbnails are displayed as ) cannot be deleted. ≥ In case of [ALL SCENES], the deletion may take time if there are many scenes or still pictures.
Deleting part of a scene (AVCHD) Unnecessary part of an AVCHD scene can be deleted. The deleted scenes cannot be restored. ≥ Change the mode to and touch the play mode select icon. Then, select the AVCHD scene. (l 29) 1 Select the menu. MENU 2 3 : [EDIT SCENE] # [SECTION DELETE] Touch the scene with a part to delete. Slide while touching the two top and bottom section selection buttons and set the section to delete 0h00m15s ≥ It is convenient to use Slow-motion Playback and Frame-byframe Playback.
Dividing a scene (AVCHD) It is possible to divide an AVCHD scene. Any unwanted parts in the scene can be deleted after dividing. ≥ Change the mode to and touch the play mode select icon. Then, select the AVCHD scene. (l 29) 1 Select the menu. MENU 2 3 : [EDIT SCENE] # [DIVIDE] # [SET] Touch the scene to be divided. Touch to set the dividing point. ≥ It is convenient to use Slow-motion Playback and Frame-byframe Playback. (l 88) ≥ Touch [YES] to continue dividing the same scene.
Dividing a scene to partially delete (iFrame/MP4) Divide the iFrame scenes or scenes saved in MP4, and delete unnecessary parts. This divides the recorded scenes in two and deletes the front half or back half. The scenes that were deleted after division cannot be recovered. ≥ Change the mode to and touch the play mode select icon. Then, set to [iFrame] or [MP4]. (l 29) 1 Select the menu. MENU 2 3 : [EDIT SCENE] # [SPLIT&DELETE] Touch the scene to be divided. Touch to set the dividing point.
Deleting personal information Deletes Face Recognition information from scenes in which faces were recognised. ≥ Change the mode to and touch the play mode select icon. Then, select the AVCHD scene. (l 29) ≥ Face Recognition information is not recorded in the scenes recorded in iFrame or the scenes saved as MP4. 1 Select the menu. MENU 2 : [VIDEO SETUP] # [DELETE PERSONAL INFO] Touch the desired scenes with personal information to be deleted. appears at scenes for which faces were recognised.
Advanced (Playback) Convert to MP4 Before copying, convert the scenes recorded in AVCHD to those with the image quality (MP4: 640k360/25p) that supports playback on a PC or uploading on the internet. ≥ Set the mode to scene. (l 29) 1 Select the menu. MENU 2 , touch the play mode selection icon, and then select the AVCHD : [EDIT SCENE] # [CONVERT TO MP4] Touch the scene you want to convert to MP4. ≥ The scene selection is made as you touch it, and the cancel the operation, touch the scene again.
Advanced (Playback) Relay scene combining [HC-X920M] You can combine the relayed scene (l 72) in the built-in memory and the continued scene in the SD card to be one into the SD card. Relay-recorded scene A B C Built-in memory SD card Range of Relay Recording ≥ Change the mode to scene. (l 29) 1 2 and touch the play mode select icon. Then, select the AVCHD Insert the SD card that was used for Relay Recording. Select the menu.
Combining of the relay scene cannot be performed if the available space on the SD card is less than the volume of the relayed scene in the built-in memory. It is recommended to combine the relay scene using the HD Writer AE 5.0. ≥ The personal information of the relayed scene in the built-in memory or SD card is deleted, the personal information of the combined relay scene is deleted.
Advanced (Playback) Watching Video/Pictures on your TV Confirm the terminals on your TV and use a cable compatible with the terminals. Image quality may vary with the connected terminals. A 1 2 High quality HDMI terminal Video terminal ≥ Use the HDMI mini cable (supplied). ≥ Use the AV cable (supplied). ≥ HDMI is the interface for digital devices.
2 Select the video input on the TV. ≥ Example: Select the [HDMI] channel with a HDMI mini cable. Select the [Video 2] channel with an AV cable. (The name of the channel may differ depending on the connected TV.) ≥ Check the input setting (input switch) and the audio input setting on the TV. (For more information, please read the operating instructions for the TV.) 3 Change the mode to to play back. ≥ When connected to the TV, sound in Playback Mode is not output from this unit.
∫ To display the on-screen information on the TV When the menu setting is changed, the information displayed on the screen (operation icon and time code etc.) can be displayed/not displayed on the TV. MENU : [SETUP] # [EXT. DISPLAY] # desired setting [SIMPLE]*: Information partially displayed [DETAIL]: All information displayed [OFF]: Not displayed * This setting is only available in Motion Picture Recording Mode or Still Picture Recording Mode.
Advanced (Playback) Playback using VIERA Link What is the VIERA Link (HDAVI Control™)? ≥ This function allows you to use your remote control for the Panasonic TV for easy operations when this unit has been connected to a VIERA Link compatible device using a HDMI mini cable (supplied) for automatic linked operations. (Not all operations are possible.) ≥ VIERA Link is a unique Panasonic function built on a HDMI control function using the standard HDMI CEC (Consumer Electronics Control) specification.
3 Operate with the remote control for the TV. ≥ You can select the scene or picture you want to play back by pressing the button up, down, left or right, and then the button in the center. (When selecting scenes) (When playing back) A Display/Cancel operation icons ≥ The following operations are available by pressing the colour buttons on the remote control. Green ≥ Switching the number of scenes/still pictures in thumbnail display (9 thumbnails > 20 thumbnails > 9 thumbnails...
Copy/Dubbing Copying between SD card and Built-in Memory [HC-X920M] Motion pictures or still pictures recorded with this unit can be copied between an SD card inserted in this unit and a built-in memory. ∫ Check the used space of the copy destination It is possible to check the used space of the SD card or built-in memory by [MEDIA STATUS] (l 42).
Converting the recording format When [ ] is selected, the recording format will be converted. Touch [YES] and select the copying method. [ ]: This will convert the scene recorded in AVCHD on the built-in memory to MP4 (640k360/25p) and copy to the SD card. [ ]: This will convert the scene recorded in 1080/50p on the builtin memory to 1080/50i and copy to the SD card. [ ]: This will convert the scene recorded in AVCHD 3D on the built-in memory to 1080/50i and copy to the SD card.
If you will delete the motion pictures or still pictures after copying is complete, be sure to play back the motion pictures or still pictures to check that they have been copied to correctly before deleting. ≥ Depending on the following conditions, the time it takes for copying may be longer. j The number of recorded scenes is large. j The temperature of the unit is high.
Copy/Dubbing Copying/playing back with a USB HDD ≥ In this Operating Instructions, “USB hard disk drive” is indicated as “USB HDD”. If you connect a USB HDD (commercially-available) to this unit by using a USB Connection Cable (supplied with USB HDD), you can copy motion pictures and still pictures recorded on this unit to a USB HDD. It can also play back the scenes and still pictures copied to the USB HDD.
4 Touch the desired item. [Simple copy]: Copies all scenes and still pictures recorded with this unit that have not been copied yet. (l 120) [Copy selected files]: Allows you to select desired scenes/still pictures, and then copy. (l 121) [Playback HDD]: Plays back scenes and still pictures stored in a USB HDD on this unit. (l 122) [Safe Removal]: Allows you to safely remove this unit and a USB HDD.
∫ Formatting This is for initialising the USB HDD. ≥ Please be aware that if a media is formatted then all the data recorded on the media is erased and cannot be recovered. Back up important data on a PC etc. ≥ Connect this unit to the USB HDD and touch [Playback HDD] MENU : [SETUP] # [FORMAT MEDIA] # [HDD] ≥ When formatting is complete, touch [EXIT] to exit the message screen. ≥ Connect this unit and the USB HDD to format.
Copy selected files 1 Connect this unit to the USB HDD to prepare for copying. (l 118) ≥ You cannot supply power to the USB HDD from this unit. 2 3 Touch [Copy selected files]. ≥ You can also copy scenes or still pictures by touching MENU , selecting [COPY]. HC-X920 / HC-X929 / HC-X910 Touch [NEXT]. HC-X920M Touch the media you want to copy. [ ]: When copying from the SD card to the USB HDD. [ ]: When copying from the built-in memory to the USB HDD.
Playing back the USB HDD ≥ Only motion picture/still picture that have been copied by connecting this unit to the USB HDD or copied with HD Writer AE 5.0 can be played back. A B USB Connection Cable (supplied with recommended USB HDD) recommended USB HDD (commercially-available) 1 Connect this unit to the USB HDD to prepare for playback. (l 118) ≥ When playing back on a TV, connect this unit to the TV. (l 110) 2 3 Touch [Playback HDD].
Copy/Dubbing Dubbing with a Blu-ray disc recorder, video devices, etc. ∫ Check before dubbing Check the equipment used for dubbing.
Dubbing in high-definition picture quality ∫ To dub using equipment with an SD card slot You can dub by directly inserting an SD card. ≥ HC-X920M To copy scenes or still pictures from the built-in memory to an SD card, see page 115. ∫ To dub using equipment with a USB terminal You can dub by connecting a USB cable. ≥ Use the AC adaptor to free you from worrying about the battery running down. ≥ Turn on the unit. A USB cable (supplied) ≥ Insert the plugs as far as they will go.
About the screen indication of the unit ≥ When the unit is accessing the SD card, card access icon ( ) appears on the unit screen or the access lamp is on. ≥ HC-X920M When the unit is accessing the built-in memory, built-in memory access icon ( ) appears on the unit screen or the access lamp is on. ≥ Be careful not to disconnect the USB cable, AC adaptor or battery while the unit is accessing the media, as this may result in the loss of recorded content.
Dubbing in standard picture quality ∫ Dubbing using equipment without an SD card slot or a USB terminal, or using a video device You can dub by connecting an AV cable. ≥ Images are dubbed in standard quality. ≥ Use the AC adaptor to free you from worrying about the battery running down. Change the video input on the video device and TV that this unit is connected to. ≥ The channel set will differ depending on the terminal to which the unit is connected.
Wi-Fi [HC-X920]/[HC-X929]/[HC-X920M] Wi-Fi® function ∫ Use this unit as a wireless LAN device When using equipment or computer systems that require more reliable security than wireless LAN devices, ensure that the appropriate measures are taken for safety designs and defects for the systems used. Panasonic will not take any responsibility for any damage that arises when using this unit for any purpose other than as a wireless LAN device.
≥ When sending motion pictures or still pictures with the Wi-Fi function, do not cover the Wi-Fi transmitter with your hand. (l 9) ≥ When the battery indicator is flashing red, the connection with other equipment may not start or the connection may be disrupted. ≥ The Wi-Fi transmitter may become warm when using the Wi-Fi function; however this is not a sign of a malfunction.
Wi-Fi [HC-X920]/[HC-X929]/[HC-X920M] What you can do with the Wi-Fi function and the preparations By linking with Wi-Fi compatible devices, you can use the Wi-Fi functions of [Remote Ctrl], [DLNA Play], [Live Cast] and [Hom.Monitor]. Before using the respective Wi-Fi functions, check and prepare your device. ≥ For the operations and settings of your device such as the smartphone, please read the operating instructions of the device.
[DLNA Play] You can play back scenes and still pictures of this unit on a DLNAcompatible TV. A DLNA-compatible TV 1 Check if the wireless access point is compatible with IEEE802.11b, IEEE802.11g, or IEEE802.11n. Check if the TV is DLNA-compatible 2 When the preparation above is complete, proceed to “Connecting to a wireless access point”. (l 134) [Live Cast] Using the “LUMIX CLUB” and USTREAM services, you can broadcast live motion pictures.
When the preparation above is complete, proceed to “Connecting to a wireless access point”. (l 134) [Hom.Monitor] You can confirm the recording screen of this unit from outside using a smartphone. Image App Caution: This function is not designed for anti-theft or disaster use. 1 2 3 Check if the wireless access point is compatible with IEEE802.11b, IEEE802.11g, or IEEE802.11n. Install the smartphone application “Image App” on your smartphone.
Install the “Image App” About the “Image App” The “Image App” is an application provided by Panasonic. For Android apps Version OS Installation procedure For iOS apps 1.0 (As of December 2012) Android 2.2~Android 4.0 1 2 3 4 Connect your Android device to a network. Select “Google Play™ Store”. Enter “Image App” into the search box. Select “Image App” and install it. ≥ The icon will be added to the menu. iOS 4.3~iOS 6.0 1 2 3 4 Connect your iOS device to a network. Select “App StoreSM”.
Acquire a USTREAM ID/Password/Programme Acquire a USTREAM ID/Password/Programme using a smartphone or a PC. About the USTREAM With this video-sharing website, you can stream and watch motion pictures this unit is recording. Refer to the USTREAM site for details. http://www.ustream.tv/ ≥ Operation cannot be guaranteed on future USTREAM services and updates. The service content and screens which can be used are subject to change without prior notice.
Wi-Fi [HC-X920]/[HC-X929]/[HC-X920M] Connecting to Wi-Fi To use the Wi-Fi function, connect this unit to a wireless access point or smartphone via Wi-Fi. If the clock has been set for the first time, the confirmation message for the Wi-Fi settings will be displayed. Touch [YES], and then configure the access point settings below.
3 4 Touch [Easy Connection (WPS)]. Set the wireless access point to waiting for WPS. ≥ For further details, please read the operating instructions for the wireless access point. ≥ A message is displayed when the connection is complete. ≥ A message is displayed when the connection attempt fails. Touch [EXIT], and set the connection again. Enter a PIN code to set the Wi-Fi connection 1 Touch [PIN code] in Step 4. 2 Touch the wireless access point to be connected.
5 Touch [NEXT]. ≥ A message is displayed when the connection is complete. ≥ A message is displayed when the connection attempt fails. Touch [EXIT], and set the connection again. Confirming that the Wi-Fi connection is complete j The status indicator of this unit is lit green j is displayed on the screen When the preparations for the Wi-Fi function (l 129) and the Wi-Fi connection are complete, you can use the following functions: j [Remote Ctrl] (l 143) j [DLNA Play] (l 147) j [Live Cast] (l 148) j [Hom.
3 4 Touch [Set Wireless Access Point]. Touch the part with no display of a wireless access point. ≥ For information on how to delete wireless access points or change the search order of wireless access points, please refer to [Set Wireless Access Point] on page 155. 5 6 A B Touch [Manual Connection]. [Delete] [EXIT] Select [Search] or [Set Manually]. [Search]: Allows you to search for wireless access points, select one, and set it.
∫ When connecting by [Set Manually] 1 2 Touch [Set Manually]. Touch [INPUT], then Enter the SSID of the wireless access point to be connected. ≥ For details on how to enter characters, refer to page 73. ≥ When the entry is complete, touch [Enter]. 3 Touch [NEXT], and then touch the desired Network Authentication method. Network authentication type Encryption types that can be set [Open] [NONE]/[WEP] [WEP] There is no setup of an encryption types.
Connecting to the smartphone Check if your smartphone is compatible with WPS j If your smartphone is compatible with WPS: Proceed to the following [Easy Connection (WPS)] j If your smartphone is not compatible with WPS: Connecting by entering an SSID and Password (l 140) You can also connect by scanning the QR code displayed on this unit with a smartphone. (l 140) [Easy Connection (WPS)] 1 2 3 4 5 6 Press Wi-Fi button. Touch [Wi-Fi Setup]. Touch [Direct Connection]. Touch [Change connection type].
Connecting by entering an SSID and Password 1 2 3 4 5 Press Wi-Fi button. Touch [Wi-Fi Setup]. Touch [Direct Connection]. Select the SSID displayed on this unit in the Wi-Fi setting of the smartphone. Enter the Password displayed on this unit into a smartphone.
If the Wi-Fi connection cannot be established ≥ Please refer to the operating instruction of the device in use for details about the setting of the wireless access point or smartphone. Problem It cannot connect to the wireless access point. The wireless access point is not detected. Check points (General) ≥ Turn ON the wireless access point. ≥ Approach the wireless access point and reconnect. ≥ If it takes time to complete the connection, the Wi-Fi connection will be aborted. Reset the connection settings.
Problem Check points It takes long time every time to connect to a smartphone. ≥ It may take longer time to connect depending on the Wi-Fi connection setting of the smartphone, but it is not a malfunction. This unit is not displayed in the Wi-Fi setting screen of the smartphone. ≥ Try switching the ON/OFF of the Wi-Fi function in the Wi-Fi settings of the smartphone. The Wi-Fi connection is disconnected immediately.
Wi-Fi [HC-X920]/[HC-X929]/[HC-X920M] Recording/playing back with remote operations Using a smartphone, you can perform record/playback operations from a remote location or upload motion pictures and still pictures recorded in this unit on SNS (Social Networking Service). Image ImageApp App Image App A B When connecting to a smartphone When connecting to a wireless access point ≥ Before using, perform the preparations for using the Wi-Fi function.
Using with a wireless access point connection 1 2 Connect the smartphone and the wireless access point. Press Wi-Fi button and touch [Remote Ctrl]. ≥ It will go into connection standby for remote operation. ≥ Even if the Wi-Fi button is pressed continuously for approximately 2 seconds while Wi-Fi is not in use, it will go into connection standby for remote operation.
Screen display during remote operations Smartphone screen shots are example displayed in Motion Picture Recording Mode and Playback Mode.
Functions available for remote operations ∫ When Recording Mode ≥ ≥ ≥ ≥ ≥ ≥ ≥ ≥ ≥ ≥ ≥ ≥ Turning the unit off Selecting a mode Recording motion pictures/still pictures HC-X920M Selecting a media to record Using the zoom (Available in the medium or fast speed) Selecting a iA/MNL mode White Balance Recording format Backlight Compensation Picture Size Aspect Ratio Self-timer ∫ When Playback Mode ≥ Playback j Scenes recorded in iFrame cannot be played back. j 3D still pictures are played back in 2D.
Wi-Fi [HC-X920]/[HC-X929]/[HC-X920M] Playing back on a TV Connecting this unit to a DLNA-compatible TV via Wi-Fi, you can play back scenes and still pictures on the TV. A DLNA-compatible TV ≥ Before using, perform the preparations for using the Wi-Fi function. (l 130) ≥ Please read the operating instructions for the TV about connecting TV to the wireless access point. ≥ Do not remove the SD card while playing back on a TV. 1 2 Press Wi-Fi button. Touch [DLNA Play].
Wi-Fi [HC-X920]/[HC-X929]/[HC-X920M] Live Cast You can broadcast motion pictures of this unit live by setting up a link between the “LUMIX CLUB” and USTREAM. LUMIX CLUB USTREAM XXXXXXXXX ≥ Before using, perform the preparations for using the Wi-Fi function. (l 130) ≥ Check your contract details carefully, as smartphone and internet contract details may result in high communication charges being incurred, or a limit placed on communication traffic. 1 2 Press Wi-Fi button. Touch [Live Cast].
Touch ≥ . / / will disappear when no touch function is performed for a specific period of time. To display them again, touch the screen. R 1h20m A [EXIT] ∫ To start the live broadcast Touch . ≥ If you press the start recording button, you can simultaneously record the broadcast to this unit. ≥ / / will disappear when no touch function is performed for a specific period of time. To display them again, touch the screen. ∫ To stop the live broadcast Touch R 1h20m A .
Configuring the live broadcast settings Touch screen. ≥ to display the live broadcast setting R 1h20m / / will disappear when no touch function is performed for a specific period of time. To display them again, touch the screen. A [EXIT] ∫ To configure the e-mail delivery settings You can make the delivery setting of a broadcast notification e-mail and the setting for the scheduled time and date of the broadcast indicated in the e-mail. 1 2 3 Touch [E-MAIL SETUP]. Touch [ON] or [OFF].
∫ To save in USTREAM 1 2 Touch [Save in USTREAM]. Touch [ON] or [OFF]. [ON]: Live motion pictures are saved on USTREAM. [OFF]: Select this option not to save on USTREAM. ∫ To set the image quality of a motion picture you simultaneously broadcast and record 1 2 Touch [REC MODE]. Touch desired recording mode. [PH]/[HA]/[HG]/[HE] ∫ HC-X920M To select the media 1 2 3 Touch [MEDIA SELECT]. Touch the media for recording motion pictures and the media for recording still pictures. Touch [ENTER].
Wi-Fi [HC-X920]/[HC-X929]/[HC-X920M] Home Monitor You can confirm the recording screen of this unit from outside using a smartphone. Image App XXXXXXXXX ≥ Before using, perform the preparations for using the Wi-Fi function. (l 131) ≥ Switch the Wi-Fi setting to off on your smartphone and use with mobile network such as 3G.
∫ When configuring the home monitor settings using QR code 1 2 3 Press Wi-Fi button. Touch [Hom.Monitor]. Touch [QR code]. ≥ QR code is displayed on the screen of this unit. 4 5 6 Start up the smartphone application “Image App”. Display the screen of a connection setup to home monitor from the menu of a smartphone. Scan QR code displayed on this unit with the smartphone. ≥ A confirmation screen is displayed on the screen of a smartphone. Touch [YES] to start home monitor.
≥ When automatic recording is performed with non-moving object detection, the set time will be reset and non-moving object detection will start again. Changing the home monitor settings of this unit Setting cannot be performed while operating monitoring with a smartphone. Touch [Setup] and select desired setting. ∫ [Home Monitor Connect] You can display the registration screen for a Device ID and Password.
Wi-Fi [HC-X920]/[HC-X929]/[HC-X920M] How to Use the [Wi-Fi Setup] Menu Configure various settings necessary to use the Wi-Fi function. When connected to Wi-Fi, the settings cannot be changed. 1 2 3 Press Wi-Fi button. Touch [Wi-Fi Setup]. Touch desired menu item. [Set Wireless Access Point] You can add or delete wireless access points, or rearrange the display order of wireless access points. ≥ Up to 3 wireless access points can be set.
[ECONOMY (Wi-Fi)] [ON]/[OFF] If you set [ON], the LCD monitor turns off when remotely operating this unit with a smartphone (in Motion Picture Recording Mode or Still Picture Recording Mode) so that power consumption is reduced. ≥ When the LCD monitor is turned off, you can display the screen by touching it. ≥ If the Wi-Fi connection is turned off, this unit will turn off automatically approximately 30 minutes later.
[Wireless LAN setup] You can change or check your wireless LAN’s network settings, such as the [IP Address], [Subnet Mask] and [MAC Address]. [IP Address]/[Subnet Mask]/[Gateway]/[Primary DNS]/[Secondary DNS]/[MAC Address] ≥ If you touch [AUTO], the network settings are configured automatically. If you touch [MANUAL], you can set each item. Select the item you want to set, and set it. ≥ [MAC Address] cannot be changed. Using the “LUMIX CLUB” Acquire a “LUMIX CLUB” Login ID (free).
∫ Check or change the acquired Login ID/Password ≥ To change the “LUMIX CLUB” Password on this unit, access the “LUMIX CLUB” website from your smartphone or PC and change the “LUMIX CLUB” Password in advance. 1 2 3 4 5 Press Wi-Fi button. Touch [Wi-Fi Setup]. Touch [LUMIX CLUB]. Touch [Add/Change Account]. Touch [Change Account] ≥ The Login ID and Password are displayed. ≥ The Password is displayed as “ ”. 6 7 Touch [Login ID] or [Password]. Enter the Login ID or Password, and touch [Enter].
∫ Delete your Login ID and account from the “LUMIX CLUB” Delete the Login ID from this unit when transferring it to another party or disposing of it. You can also delete your “LUMIX CLUB” account. 1 2 3 4 Press Wi-Fi button. Touch [Wi-Fi Setup]. Touch [LUMIX CLUB]. Touch [Delete account]. ≥ The message is displayed. Touch [NEXT]. 5 Touch [YES] in the Login ID delete confirmation screen. ≥ The message is displayed. Touch [NEXT].
3D image Recording 3D image With the 3D Conversion Lens (optional) attached, you can record life-like and powerful 3D image. To view 3D image, a television that supports 3D is required. ≥ In the unit, the recordable 3D images are AVCHD 3D format or side-by-side format (2screen structure). ≥ Lifelike and powerful 3D full high-definition image can be recorded by recording in AVCHD 3D format.
5 (When recording motion pictures) Press the recording start/stop button to start recording. (l 23) ≥ Start recording after removing the Lens front cap. ≥ [REC MODE] during recording the 3D will be [AVCHD 3D] or [SbS 3D]. (l 71) (When recording still pictures) Press the button to record still pictures. (l 25) ≥ 3D appears on the screen. ≥ It is possible to record still pictures while recording motion pictures. (Simultaneous recording) ≥ The number of recording pixels are 2.1 M (1920k1080).
∫ Functions not available during 3D recording (Button/lever operations) (Motion picture recording functions) Stabilizer*1 j Recording Mode ([1080/50p], [PH], [HA], [HG], [HE], [iFrame]) j Level Shot j Smile Shot j Tele Macro j Zoom Mode*2 j Creative Control Mode j Digital Cinema j Face Recognition j Microphone Setup ([ZOOM MIC]) j Histogram j Hybrid Optical Image j Intelligent Auto Mode or Intelligent Auto Plus Mode (Night Portrait, Macro) j Manual Focus j Wi-Fi function (Setup menu) (Still picture re
3D image 3D image playback Connect the unit to a 3D compatible television using an HDMI mini cable (supplied) and play back scenes or still pictures recorded in 3D to enjoy lifelike and powerful 3D full high-definition images. ≥ 3D full high-definition image can be enjoyed by playing back the image recorded in AVCHD 3D on a 3D compatible TV that is compatible with the frame sequential format. ≥ The picture quality of side-by-side format 3D image is different from the 3D full high-definition images.
≥ The recording screen for 3D Recording Mode can be displayed in 3D on a 3D-compatible TV when the 3D Conversion Lens (optional) is attached to this unit. ≥ You cannot play back 3D image on the LCD monitor of the unit. When you play back scenes recorded in 3D on the LCD monitor, they will be played back in 2D. ≥ If your television does not switch to a 3D image, make the necessary settings on the TV. (For further details, please read the operating instructions for the TV.
3D image Converting and playing back 2D images as 3D You can connect this unit to 3D compatible TV, convert the scene/still picture recorded in 2D (conventional image) to 3D and play back. ¬ Change the mode to and touch the play mode select icon. Then, select the AVCHD scene or set to . (l 29) 1 Touch . ≥ This is not displayed when playing back the iFrame or scenes saved as MP4. 2 Play back the scene or the still picture by touching it.
3D image 3D image storage You can store 3D image with a USB HDD, a video device or a PC. Copying with a USB HDD ≥ Please refer to page 118 for details about copying with a USB HDD. You can copy and save the scenes recorded with this unit in 3D while maintaining the recorded image quality and 3D effect. Dubbing with a Blu-ray disc recorder, video device, etc. ∫ Dubbing in high-definition picture quality ≥ Please refer to page 123 for details about dubbing in high-definition picture quality.
∫ Dubbing in standard picture quality ≥ Please refer to page 126 for details about dubbing in standard picture quality. Copying unaltered as 3D motion picture When [3D PLAYBACK] is [AUTO], the 3D motion picture is recorded in side-by-side format. MENU : [SETUP] # [3D PLAYBACK] # [AUTO] ≥ If the dubbed motion picture does not change to 3D motion picture, make the necessary settings on the TV. (For further details, please read the operating instructions for the TV.
With a PC What you can do with a PC HD Writer AE 5.0 You can copy the motion/still picture data to the HDD of PCs or write to media like Blu-ray discs, DVD discs or SD cards using HD Writer AE 5.0, the software installed in the supplied CD-ROM. Refer to the operating instructions of HD Writer AE 5.0 (PDF file) for details on how to use it. ∫ Smart Wizard The Smart Wizard Screen is automatically displayed when you connect this unit to a PC with HD Writer AE 5.0 installed.
What can be done with the HD Writer AE 5.0 Data type Playing back on a PC: Play back the motion picture data in high-definition picture quality on a PC. Motion picture and still picture Formatting discs: Depending on the type of disc that you use, formatting is necessary. Motion picture ≥ It is possible to play back still pictures on a PC using a image viewer standard to Windows or commercially available image browsing software, and copy still pictures to a PC using Windows Explorer.
End User License Agreement Before opening the CD-ROM package, please read the following. You (“Licensee”) are granted a license for the Software defined in this End User License Agreement (“Agreement”) on condition that you agree to the terms and conditions of this Agreement. of the Software will be uninterrupted or error free. Panasonic or any of its distributors will not be liable for any damage suffered by Licensee arising from or in connection with Licensee’s use of the Software.
With a PC Operating environment ≥ Even if the system requirements mentioned in these operating instructions are fulfilled, some PCs cannot be used. ≥ A CD-ROM drive is necessary to install the supplied software applications. (A compatible Blu-ray disc/DVD writer drive and media are necessary for writing to a Blu-ray disc/DVD.) ≥ Operation is not guaranteed in the following cases. j When 2 or more USB devices are connected to a PC, or when devices are connected through USB hubs or by using extension cables.
Free hard disk drive Ultra DMA — 100 or more space 450 MB or more (for installing the software) ≥ When writing to a DVD/Blu-ray disc/SD, more than double the amount of free space as the disc being created is necessary. Sound DirectSound Support Interface USB port [Hi-Speed USB (USB 2.
∫ To use the HD Writer AE 5.0 You will need a high performance PC depending on the functions to be used. It may not properly play back or properly operate depending on the environment of the PC used. Refer to the operating environment and notes. ≥ Operation during the playback may become slow if the CPU or memory is not fulfilling the requirements of the operating environment. ≥ Always use the most current driver for the video card. ≥ Always make sure there is enough capacity on the HDD in the PC.
With a PC Installation When installing the software, log on to your computer as the Administrator or with a user name with equivalent authorization. (If you do not have authorization to do this, consult your manager.) ≥ Before starting the installation, close all applications that are running. ≥ Do not perform any other operations on your PC while the software is being installed. ≥ Explanation of operations is based on Windows 7. 1 Insert the CD-ROM into the PC.
With a PC Connecting to a PC ≥ Connect this unit to the PC after the software applications are installed. ≥ Remove the supplied CD-ROM from your PC. A USB cable (supplied) ≥ Insert the plugs as far as they will go. 1 Connect this unit to the AC adaptor. ≥ Use the AC adaptor to free you from worrying about the battery running down. ≥ Connect with the AC adaptor when using the Conversion Assist Function. 2 3 Turn on the unit. Connect this unit to a PC. ≥ The USB function selection screen will appear.
∫ To disconnect USB cable safely Select the icon in task tray displayed on the PC, and then click [Eject Panasonic Video Camera]. ≥ Depending on your PC’s settings, this icon may not be displayed. About the screen indication of the unit ≥ Do not disconnect the USB cable, the battery or the AC adaptor while the access lamp is on or card access icon ( ) appears on the unit screen.
About the PC display When the unit is connected to a PC, it is recognised as an external drive. ≥ Removable disk (Example: ) is displayed in [Computer]. The following data will be recorded. 1 MPO system/JPEG system still pictures (up to 999 still pictures can be recorded. ([S1000001.MPO], [S1000001.JPG] etc.)) 2 iFrame system motion picture files ([S1000001.MP4] etc.) 3 MP4 system motion picture files ([S1000001.MP4] etc.
With a PC Starting HD Writer AE 5.0 ≥ To use the software, log on as an Administrator or as user name for standard user account (only for Windows 8/Windows 7/Windows Vista). The software cannot be used with the user name for a guest account. (On the PC) Select [Start] # [All Programs] # [Panasonic] # [HD Writer AE 5.0] # [HD Writer AE 5.0]. ≥ For details on how to use the software applications, read the PDF operating instructions of the software.
With a PC If using Mac ≥ HD Writer AE 5.0 is not available for Mac. ≥ iMovie’11 supported. For details about iMovie’11, please contact Apple Inc. ≥ iMovie’11 is not compatible with 1080/50p. 1080/50p scenes cannot be imported to a Mac. j For users who have HC-X920 / HC-X929 / HC-X910 , it cannot acquire the scenes recorded in 1080/50p. Record in 1080/50i or iFrame when importing to Mac. j For users who have HC-X920M , import after converting the scene recorded in 1080/50p to 1080/50i using [ ].
Others Indications * HC-X920M only ∫ Recording indications Motion Picture Recording Mode 0h00m00s R 1h20m PRE-REC Still Picture Recording Mode 1h30m 1h30m R 3000 20.4M MEGA 3D +6dB MF 1/100 OPEN 0dB 12:34 15. 11. 2013 99%↑ 12:34 15. 11.
B 99% C Zebra (l 82) Display Touch Menu (l 18) Luminance level (l 83) Backlight Compensation (l 68) PRE-REC (l 65) PRE-REC Tele Macro (l 68) Time Lapse Recording (l 52) +3dB / +6dB / Intelligent Contrast Control (l 64) Bass Setting (l 82) LOW CUT / Zoom Microphone (l 80) Focus Microphone (l 80) Microphone Level (l 81) / Stereo Microphone (l 80) / Smile Shot (l 66) / Wind Noise Canceller (l 79) Power LCD (l 39) / / / / Colour Night View function (l 69) / Image Stabilizer (l 46, 162)/O
∫ Playback indications 1/;/5/ /6/ D/E/;1/2; ∫ /7/8/9/:/ Display during playback (l 29, 88) 0h00m00s Playback Time (l 30) No.
Others Messages Major confirmation/error messages to be indicated on the screen in text. *1 HC-X920M only *2 HC-X920 / HC-X929 / HC-X920M only PERIODICALLY MAKE BACK UP OF DATA IN BUILT-IN MEMORY.*1 We recommend backing up important recorded motion pictures and still pictures periodically to a PC, DVD disc, etc. to protect it. (l 168) This message does not indicate that there is a problem with this unit. CHECK CARD. This card is not compatible or it cannot be recognised by the unit.
About recovery If faulty management information is found, the messages may appear and a repair is performed. (Repairing may take time depending on the error.) ≥ is displayed when abnormal management information is detected when the scenes are displayed in thumbnail. Use a sufficiently charged battery or the AC adaptor. Depending on the condition of the data, it may not be possible to completely repair the data.
Others Troubleshooting ∫ It is not a malfunction in following cases A clicking sound is heard when the unit is shaken. ≥ This is the sound of the lens moving and is not a defect. This sound will no longer be heard when the unit is turned on and change the mode to or . Object seems to be warped. ≥ Object seems to be warped slightly when the object moves across the image very fast, but this is because the unit is using MOS for the image sensor. This is not a malfunction.
Power Problem “ERROR OCCURRED. PLEASE TURN UNIT OFF, THEN TURN ON AGAIN.” is displayed. Check points ≥ The unit has automatically detected an error. Restart the unit by turning the unit off and on. ≥ The unit will be turned off in about 1 minute if the unit is not turned off and on. ≥ Repair is needed if it is repeatedly displayed even if it is restarted. Detach the power connected, and consult the dealer who you purchased this unit from. Do not attempt to repair the unit by yourself.
Recording Problem Check points Colour or brightness of the image changes, or you may see horizontal bars in the image. ≥ Colour or brightness of the image may change, or you may see horizontal bars in the image when the object is recorded under fluorescent light, mercury light or sodium light, etc., but this is not a malfunction.
With other products Problem VIERA Link does not work. Check points (Setting on this unit) ≥ Connect with a HDMI mini cable (supplied). (l 113) ≥ Touch MENU , then touch [SETUP] # [VIERA Link] # [ON]. (l 113) ≥ Turn the unit off and then back on again. (Setting on other devices) ≥ If the TV input does not switch automatically, switch the input using the TV remote control. ≥ Check the VIERA Link setting on the connected device. ≥ Please refer to the operating instructions of the connected device.
About the Wi-Fi function [HC-X920/HC-X929/HC-X920M] Problem Check points Cannot use [DLNA Play]. ≥ Make sure the television is compatible with DLNA. Read the instructions for the television you are using. ≥ Make sure the wireless access point and this device are properly connected. ≥ Approach the wireless access point and reconnect. ≥ If a connection cannot be made between this device and a DLNA-compatible device, try to reconnect and make sure they connect properly.
≥ A continuous recording of motion picture data that exceeds 4 GB may momentarily stop at every 4 GB of data when played back with another device. ≥ It may not play back smoothly when the editing of scenes was done with the HD Writer AE 5.0, but it will play back smoothly if you set the seamless settings in the HD Writer AE 5.0. Refer to the operating instructions for the HD Writer AE 5.0.
Others Cautions for use About this unit The unit and the SD card become warm during use. This is not a malfunction. Keep this unit as far away as possible from electromagnetic equipment (such as microwave ovens, TVs, video games etc.). ≥ If you use this unit on top of or near a TV, the pictures and/or sound on this unit may be disrupted by electromagnetic wave radiation. ≥ Do not use this unit near cell phones because doing so may result in noise adversely affecting the pictures and/or sound.
Do not use the unit for surveillance purposes or other business uses. ≥ This unit was designed for consumer intermittent use. It was not intended for continuous use, or for any industrial or commercial application resulting in prolonged use. ≥ In certain situations, continuous use could cause the unit to overheat and cause a malfunction. Such use is strongly discouraged.
Do not throw old battery into fire. ≥ Heating a battery or throwing it into a fire may result in an explosion. If the operating time is very short even after the battery has been recharged, the battery has worn out. Please purchase a new battery. About the AC adaptor ≥ If the temperature of the battery is extremely high or extremely low, charging may take time or the battery may not be charged. ≥ If you use the AC adaptor near a radio, radio reception may be disturbed.
About 3D About 3D recording Attach the 3D Conversion Lens securely. It must not be used with an insecure attachment. Do not use the 3D Conversion Lens without adjusting it first. ≥ It will not be possible to record 3D image correctly, and this may lead to tiredness or discomfort. ≥ When you re-attach the 3D Conversion Lens after removing it, we recommend making the adjustments again. With the 3D Conversion Lens attached, do not record a subject at less than the minimum focus distance.
About the SD card LCD monitor/viewfinder When disposing of or giving away the SD card, note that: ≥ Formatting and deletion of data on this unit or computer only changes the file management information and does not completely delete the data in the SD card. ≥ It is recommended that the SD card is physically destroyed or the SD card is physically formatted using this unit when disposing of or giving away the SD card.
About personal information After you have set up the Face Recognition function, personal information will be held in this unit and included in recorded images. ≥ When the unit is serviced, or given away/ disposed of, the personal information should be deleted in the interests of protecting personal information. (l 106) Indemnity ≥ Information, including personal information, may be changed or lost as a result of mistaken operation, static electricity effects, accident, breakage, repair or other handling.
Others About copyright ∫ Carefully observe copyright laws Recording of pre-recorded tapes or discs or other published or broadcast material for purposes other than your own private use may infringe copyright laws. Even for the purpose of private use, recording of certain material may be restricted. ∫ Licenses ≥ SDXC Logo is a trademark of SD-3C, LLC.
This product incorporates the following software: (1) the software developed independently by or for Panasonic Corporation, (2) the software owned by third party and licensed to Panasonic Corporation, (3) the software licensed under the GNU General Public License, Version 2.0 (GPL V2.0), (4) the software licensed under the GNU LESSER General Public License, Version 2.1 (LGPL V2.1), and/or (5) open source software other than the software licensed under the GPL V2.0 and/or LGPL V2.1.
Others Recording modes/approximate recordable time ≥ SD cards are only mentioned with their main memory size. The stated times are the approximate recordable times for continuous recording.
Others Approximate number of recordable pictures ≥ SD cards are only mentioned with their main memory size. The stated number is the approximate number of recordable pictures. Picture size 15.
When recording 3D still picture Picture size 2.1 M 1920k1080 Aspect ratio [16:9] 4 GB SD card HC-X920M Built-in memory 1000 16 GB 4300 64 GB 17500 32 GB 8500 ≥ The number of recordable pictures depends on the subject being recorded. ≥ When recording a 3D still picture, the equivalent 2D still picture is recorded as well; therefore, the number of recordable pictures will be reduced accordingly. ≥ Maximum number of recordable pictures that can be displayed is 9999.
Others Optional accessories Attaching the Conversion Lens/ Filter Kit Attaching the supplied shoe adaptor Attach the Wide Conversion Lens (VW-W4907H; optional), ND filter or MC protector of the Filter Kit (VW-LF49N; optional) in front of the lens. ≥ It is not possible to attach it to the front of the lens hood. (l 21) ≥ You will not be able to use the flash. Set the flash setting to ([OFF]). (l 67) Be careful about the following.
Panasonic Corporation Web site: http://panasonic.