Operating Instructions Wearable Camera Model No. HX-A500 Please read these instructions carefully before using this product, and save this manual for future use.
Contents Preparation Wi-Fi (Important) About the Waterproof/ Dustproof........................................................ 4 Read this first ................................................. 7 What you can do with this unit ..................... 9 Names and Functions of Main Parts .......... 10 Power supply................................................ 11 Charging the battery .............................. 11 Charging and recording time ................. 12 Recording to a card ......................
With a PC What you can do with a PC ......................... 71 Card reader function (mass storage) ......... 72 Operating environment .......................... 72 Copying motion/still pictures on PC ....... 73 About the PC display ............................. 74 Using the HD Writer WE 2.0 (Windows only) ............................................ 75 The feature of HD Writer WE 2.0........... 75 Before Installing HD Writer WE 2.0 ....... 76 Operating environment for HD Writer WE 2.0 ....................
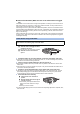
Preparation (Important) About the Waterproof/ Dustproof Waterproof/Dustproof Performance This unit’s waterproof/dustproof rating complies with the “IP58” rating. Provided the care and maintenance guidelines described in this document are strictly followed, this unit can operate underwater, to a depth not exceeding 3.0 m for a time not exceeding 30 minutes. * This does not guarantee no destruction, no malfunction, or waterproofing in all conditions.
∫ About Condensation (When the lens or the LCD monitor is fogged up) Condensation occurs when there is a change in temperature or humidity, such as when the unit is taken from outside or a cold room to a warm room. Please be careful, as it may cause the lens or LCD monitor to become soiled, moldy, or damaged. When taking the unit to a place which has a different temperature, if the unit is accustomed to the room temperature of the destination for about one hour, condensation can be prevented.
Using this unit underwater ≥ Use this unit underwater at a depth of down to 3.0 m with the water temperature between 0 oC and 35 oC. ≥ Do not use this unit at a depth of over 3.0 m. ≥ Do not use it in hot water over 35 oC (in a bath or hot spring). ≥ Do not use this unit underwater not longer than 30 minutes continuously. ≥ Do not open or close the side cover. ≥ Do not apply shock to this unit underwater. (Waterproof performance may not be maintained, and there is a chance of water leak.
Preparation Read this first ∫ About recording formats and compatibility of this unit ≥ This unit is an MP4 format (MPEG-4 AVC file standard)* Wearable Camera for recording highdefinition motion pictures. * You can record 4K motion pictures ([3840k2160/25p]). ≥ AVCHD and MPEG2 motion pictures are different formats, and are not therefore supported by this unit. ≥ Motion pictures recorded with other devices are not supported by this unit.
∫ For the purposes of these operating instructions ≥ Pictures may be slightly different from the original. ≥ Depending on the firmware version you are using, captured screens described in these operating instructions may differ from the actual screens. ≥ Names, icons, contents and services of applications may be changed with no prior notice. Please note that they may differ from the descriptions of these operating instructions. ≥ microSD card and microSDHC card are referred to as the “microSD card”.
Preparation What you can do with this unit You can enjoy a variety of functions by setting up a Wi-Fi connection between this unit and a smartphone or a wireless access point.
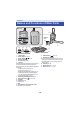
Preparation Names and Functions of Main Parts Main unit 9 8 1 2 5 3 4 6 7 14 15 Camera unit 10 11 12 16 13 17 18 1 LCD monitor 2 Power lamp (l 13, 16) 3 Power button [ ] (l 16) 4 Wi-Fi Transmitter 5 Access lamp (l 15) 6 Joystick Use the joystick to operate the menu screen or to use a Wi-Fi mode. Move the joystick up, down, left or right, and then press the joystick to set an item.
Preparation Power supply Charging the battery When this unit is purchased, the battery is not charged. Charge the battery fully before using this unit for the first time. ≥ This unit has a built-in rechargeable lithium-ion battery. Do not remove except when disposing of this unit. (l 92) ≥ The battery will not be charged if this unit is turned on. Connect it with the PC to charge the battery after turning it off. ≥ It is recommended to charge the battery in a temperature between 10 oC and 30 oC.
Charging and recording time ∫ Charging/Recording time ≥ Temperature: 25 oC/humidity: 60%RH Charging time 4 h 30 min [3840k2160/25p] Maximum continuous recordable time 1 h 25 min Actual recordable time 45 min [1920k1080/50p] [1920k1080/25p] 2h 2 h 20 min 1h 1 h 10 min 1h Pixels/Frame rate [1280k720/50p] 1 h 55 min [1280k720/25p] 2 h 15 min [848k480/25p] [1920k1080/50fps] 2 h 20 min 2 h 15 min [1280k720/100fps] [848k480/200fps] 2 h 10 min 2 h 5 min 1 h 10 min 1 h 5 min ≥ “h” is an abbreviat
When the Power lamp is flashing during charging Flashing with approx. 0.5 second period (off for approx. 0.25 second, on for approx. 0.25 second): ≥ Check that the USB terminals of this unit or the connecting device, such as PC are not dirty or covered with a foreign object, and reconnect correctly. If a foreign object or dirt is present, turn off this unit before removing. ≥ The environment is at an extremely high or low temperature.
Preparation Recording to a card This unit can record motion pictures or still pictures to a microSD card. Cards that you can use with this unit ≥ The information on the cards that you can use are current as of April 2014. Card type microSD Card microSDHC Card Capacity 512 MB/1 GB/2 GB 4 GB/8 GB/16 GB/32 GB ≥ To record motion pictures, use a microSD card that supports one of the following SD Speed Class Ratings*.
Inserting/removing a microSD card When using a microSD card not from Panasonic, or one previously used on other equipment, for the first time on this unit, format the microSD card. (l 20) When the microSD card is formatted, all of the recorded data is deleted. Once the data is deleted, it cannot be restored. Caution: Check that the access lamp has gone off. A Access lamp ≥ When this unit is accessing the microSD card (such as recognition, recording, playback and deletion), the access lamp lights up.
Preparation Turning this unit on/off Press the power button to turn on this unit. The power lamp is turned on. To turn off this unit Hold down the power button until the power lamp goes off. About overheat detection When the internal temperature of this unit rises during use, it turns off automatically after emitting a warning sound and displaying a message. To use this unit again, wait until it cools down. ≥ This unit cannot be used until it cools down.
Preparation Setting date and time The clock is not set at the time of purchase. Make sure to set the clock. 1 Press the joystick to select the menu. (l 18) [SETUP] # [CLOCK SET] 2 Move the joystick right or left to select the date to be set, then move the joystick up or down to select the desired value. ≥ Press the joystick or recording start/stop button to enter the selection. ≥ The year can be set between 2000 and 2039.
Preparation Using the menu screen 1 2 To get back to the previous screen Press the joystick. Move the joystick left. Select the top menu A, then press the joystick. To exit the menu screen Press the recording start/stop button. To set menu items with a smartphone By installing “Image App” on a smartphone, you can set menu items of this unit remotely from the smartphone. 1 RECORD SETUP EXIT 3 Select the submenu B, then press the joystick.
Preparation Using the Setup Menu (When setting a menu item on this unit) Press the joystick to select the menu. [SETUP] # desired menu item (When setting a menu item on the “Image App”) ≥ Set up a Wi-Fi connection between this unit and a smartphone, and perform remote operation. (l 43) On the “Image App” screen, tap and set the menu item. [Camera setup] # desired menu item ≥ For more information, refer to the [Help] in the “Image App” menu. [CLOCK SET] Please refer to page 17.
[AUTO POWER OFF] When about 5 minutes have passed without any operation, this unit automatically turns off to save the battery life. ≥ This unit will not automatically turn off during Wi-Fi mode or when using this unit as the card reader. [LCD BRIGHTNESS] It adjusts brightness on the LCD monitor. 1 Press the joystick to select the menu. [SETUP] # [LCD BRIGHTNESS] 2 3 Move the joystick right or left to adjust settings, then press the joystick.
[VERSION DISP.] The firmware version of this unit is displayed. ≥ This item cannot be displayed in “Image App”. [VERSION UP] You can update the firmware version of this unit. For the latest update information, check the support website below. (As of April 2014) http://panasonic.jp/support/global/cs/e_cam/index.html (This Site is English only) ≥ This item cannot be used in “Image App”. [NUMBER RESET] Set the file number of the motion picture and still picture recorded next to 0001.
Recording Before recording This unit is designed to record images when attached to the Armband Case and the Head Mount. Wearing this unit Wear the main unit and camera unit. ≥ If a feeling of discomfort arises after a long period of use, stop the use or adjust the size of the Head Mount/Armband Case/ Headband to loosen them a little. Please note that the parts may leave marks on your face and other body parts after use. ≥ For the direction of the camera, check the actual image on the LCD monitor.
4 5 Pass the band through the band hole. Attach the band to the hard surface of the hook and loop fastener to fasten the band to your arm. ≥ When fastening the main unit, try not to drop the camera unit to avoid a shock and try not to scratch the lens. D Hard surface of the hook and loop fastener ∫ About the Armband Case The Armband Case can be used as a portable holder.
Assembling the Head Mount 1 Push down the lock lever of the Head Mount (L) to the UNLOCK side. A 2 3 Lock lever Attach the Head Mount (R) to the Head Mount (L). Loosen the adjustment knob, and change the direction of the camera holder. ≥ To loosen the adjustment knob, rotate it towards 1. To tighten the adjustment knob, rotate it towards 2. ≥ Adjust the direction as shown in the illustration, and tighten the adjustment knob again.
3 4 Hook the Head Mount to your ears firmly so that the camera unit will be positioned on the left side of your face. Adjust the size of the Head Mount, and push down the lock lever to the LOCK side. ≥ Adjust by slowly pulling the Head Mount (R) sideways. ≥ If you adjust in such a way that the camera unit comes into close contact with the cheek, you can record less blurry images. 5 Hold the camera holder, and adjust the direction of the lens. ≥ To loosen the adjustment knob, rotate it towards 1.
∫ How to remove the camera Hold the camera holder as shown in the figure, and remove the camera unit in the direction of the arrow. ≥ Do not touch the lens or pull the camera/main unit connection cable while attaching or removing. ≥ When adjusting the size of the Head Mount and the tightness of the Headband, do so slowly without applying too much force. ≥ If the adjustment knob comes off, attach it as indicated in the right figure.
Recording Recording ≥ Set this unit to the desired Recording Mode before recording. (l 30) 1 Press the recording start/stop button. ≥ If this unit is set to record a motion picture, recording starts. ≥ In [PICTURE RECORDING], a still picture will be recorded. ≥ Once recording starts, the LCD monitor will turn off approximately 30 seconds later. To turn it on again, operate the joystick. A When you begin recording a motion picture, ; changes to ¥.
Displaying the information screen If you move the joystick right, you can display the information screen. ≥ If you move the joystick right again, the information screen will disappear. ≥ The information screen is not displayed when a Wi-Fi mode ([SMARTPHONE MODE]/[ACCESS POINT MODE]) is active. ≥ For information on the icons to be displayed, refer to page 80. /25p STANDARD AWB 15.11.
∫ Checking the motion picture/still picture you have recorded (Rec Review) If you move the joystick down during recording pause, you can play back the last recorded motion picture or still picture for approximately 5 seconds. ≥ During Rec Review, 1 (Green) is displayed on the screen. ≥ Only the first 5 seconds of the motion picture will be played back. (Sound is not output) ≥ Moving the joystick down during the playback will return you to the recording screen.
Recording Changing the Recording Mode You can record images with a variety of recording methods by changing the Recording Mode. 1 Press the joystick to select the menu. [RECORD SETUP] # [RECORDING MODE] # desired recording mode Recording Mode icon Recording method [NORMAL SHOOTING] Recording motion pictures. [SLOW MOTION] This records motion pictures in slow motion by setting a high frame rate (increasing the number of frames).
[SLOW MOTION] This records motion pictures in slow motion by setting a high frame rate (increasing the number of frames). ≥ Sound cannot be recorded. ≥ [ANGLE OF VIEW], [LEVEL SHOT], [IMAGE STABILIZATION] and [COLOUR NIGHT VIEW] are not available. ≥ If you record motion pictures in a dark place, recorded motion pictures may be darker than those in [NORMAL SHOOTING]. ≥ When recording in [SLOW MOTION], use a microSD card with an SD Speed Class Rating of 6 or higher.
Recording Recording functions of menus (When setting a menu item on this unit) Press the joystick to select the menu. [RECORD SETUP] # desired menu item (When setting a menu item on the “Image App”) ≥ Set up a Wi-Fi connection between this unit and a smartphone, and perform remote operation. (l 43) On the “Image App” screen, tap and set the menu item. [Record Setup] # desired menu item ≥ For more information, refer to the [Help] in the “Image App” menu. [RECORDING MODE] Please refer to page 30.
[PICTURE SIZE] The higher the number of pixels, the higher the clarity of the picture when printing. ≥ This unit can record still pictures of the 16:9 aspect ratio. ≥ Set [RECORDING MODE] to [PICTURE RECORDING]. (l 30) [16.3M]/[8.3M]/[5.3M] ≥ [16.3M] is not available when the [ANGLE OF VIEW] is set to [STANDARD]. ≥ [8.3M] is not available when the [IMAGE STABILIZATION] is set to [ON]. ≥ If you set [ANGLE OF VIEW] to [STANDARD] when [16.3M] is set, [PICTURE SIZE] will switch to [8.3M].
[INTERVAL REC MODE] This is for recording still pictures at a set interval. ≥ Set [RECORDING MODE] to [PICTURE RECORDING]. (l 30) 1 Press the joystick to select the menu. [RECORD SETUP] # [INTERVAL REC MODE] # desired setting [60 SECONDS]/[30 SECONDS]/[10 SECONDS]/[5 SECONDS]/[3 SECONDS]/[OFF] ≥ If you set this item to [OFF], normal still pictures will be recorded. 2 Press the recording start/stop button to start recording. ≥ Still pictures will be recorded at specified intervals.
[WHITE BALANCE] When the colour tone looks unnatural due to a light source, etc., adjust the White Balance manually. ≥ You cannot change the setting when [COLOUR NIGHT VIEW] is set to [ON]. 1 Press the joystick to select the menu. [RECORD SETUP] # [WHITE BALANCE] # [PRESET] 2 Move the joystick right or left to change the Preset mode.
[BACKLIGHT COMPENS.] This makes the image brighter to prevent darkening of a backlit subject. ≥ It cannot be set when the [COLOUR NIGHT VIEW] is set to [ON]. [COLOUR NIGHT VIEW] This function allows you to record colour images in very low light situations. ≥ It cannot be set when [RECORDING MODE] is set to [SLOW MOTION]. ≥ Recorded image is seen as if frames were missed. ≥ If set in a bright place, the screen may become washed out for a while.
Playback Playback using a smartphone Motion pictures or still pictures stored in this unit are played back with the smartphone. ≥ For more information, refer to the [Help] in the “Image App” menu. Preparation: 1 Install the smartphone application “Image App” on your smartphone. (l 56) 2 Set up a Wi-Fi connection between this unit and the smartphone, and perform remote operation. (l 43) 1 Tap . ≥ The thumbnails of motion pictures or still pictures recorded on this unit will be displayed. 2 Tap ( ).
Playback Using playback functions on a smartphone ≥ Set up a Wi-Fi connection between this unit and the smartphone, and perform remote operation. (l 43) Tap # # items in [CAMERA FUNCTION] on the “Image App” screen. ≥ For more information, refer to the [Help] in the “Image App” menu.
Playback Playing back on a TV If your TV is equipped with an SD card slot that supports the playback of MP4 files, you can play back the files of motion pictures recorded with this unit by inserting the card into the slot. Please note that to play back motion pictures recorded with [PIXELS / FRAME RATE] set to [3840k2160/25p], you need a TV equipped with an SD card slot that supports 4K motion pictures.
Wi-Fi Wi-Fi® function ∫ Use this unit as a wireless LAN device When using equipment or computer systems that require more reliable security than wireless LAN devices, ensure that the appropriate measures are taken for safety designs and defects for the systems used. Panasonic will not take any responsibility for any damage that arises when using this unit for any purpose other than as a wireless LAN device.
≥ This unit cannot be used to connect to a public wireless LAN connection. ≥ Use a IEEE802.11b, IEEE802.11g or IEEE802.11n compatible device when using a wireless access point. ≥ This unit uses the 2.4 GHz frequency band. You cannot establish a wireless LAN connection using the 5 GHz frequency band. ≥ When using a wireless access point, we strongly recommend that you set a encryption to maintain information security.
Wi-Fi Using Wi-Fi modes This unit offers the following Wi-Fi functions. Change to a Wi-Fi mode that matches the Wi-Fi function you want to use. Wi-Fi function Available Wi-Fi modes Description Remote operation [SMARTPHONE MODE]/ [ACCESS POINT MODE] You can perform recording and playback operations on your smartphone. Live broadcasting [LIVE CAST] You can broadcast motion pictures of this unit live by setting up a link between the “LUMIX CLUB” and USTREAM.
Wi-Fi Remote operation Using a smartphone, you can perform record/playback operations from a remote location or upload motion pictures and still pictures recorded in this unit on SNS (Social Networking Service). Image App Image App A B When connecting directly to a smartphone When connecting to a wireless access point ≥ You need to turn on the Wi-Fi function of your smartphone. ≥ Do not remove the microSD card during remote operations. ≥ Refer to [Help] in the “Image App” menu about how to operate.
Preparations before using remote operation 1 2 Install the smartphone application “Image App” on your smartphone. (l 56) Check if the smartphone is an Android (NFC-compatible), Android (non-NFCcompatible), or iOS device. ≥ If your smartphone is NFC-compatible, a message asking you to touch the NFC mark on the device will be displayed when starting up the “Image App”. Setting up a direct Wi-Fi connection between this unit and a smartphone ≥ This operation is not possible while this unit is recording.
If you touch the second smartphone when this unit has already been connected to the first one The remote operation with the first smartphone that has been connected to this unit will be cut off, and the newly touched smartphone will be connected. ≥ The connection cannot be established while this unit is recording or copying a file to the smartphone during remote operations. ∫ If the device is Android (non-NFC-compatible) or iOS 1 Set [Wi-Fi MODE] to [SMARTPHONE MODE].
Using remote operation with a wireless access point connection ([ACCESS POINT MODE]) ∫ If the device is Android (NFC-compatible) ≥ Set the NFC function of the smartphone to on. 1 Connect the smartphone to a wireless access point. ≥ When you connect using NFC for the first time, please make connection of this unit and a wireless access point. (l 59) ≥ You need to connect this unit and a smartphone to the same wireless access point via Wi-Fi. 2 3 Start up the smartphone application “Image App”.
Screen display during remote operations Examples of smartphone screens.
Wi-Fi Live broadcasting You can broadcast motion pictures of this unit live by setting up a link between the “LUMIX CLUB” and USTREAM. LUMIX CLUB A USTREAM You can also broadcast motion pictures live by connecting this unit and a smartphone that supports tethering. ≥ If [CLOCK SET] (l 17) is not set correctly, live broadcasting is not possible.
Preparations before broadcasting live 1 (When connecting to a wireless access point) Check if the wireless access point is compatible with IEEE802.11b/g/n. (For tethering connection) Check if your smartphone is compatible with the tethering function. ≥ For information on how to set up the tethering function, refer to the operating instructions for your smartphone. 2 Acquire a USTREAM ID/Password/Programme. ≥ Acquire a USTREAM ID/Password/Programme using a smartphone or a PC.
Broadcasting live Set [Wi-Fi MODE] to [LIVE CAST]. (l 42) ≥ Confirm that the Wi-Fi mode has started up in [LIVE CAST]. ≥ If a “LUMIX CLUB” Login ID and Password has not been registered to this unit yet, enter them according to the screen. ≥ Select [Change AP] and press the joystick, you can switch the wireless access point to another one that has been registered to this unit. ≥ When the connection is made correctly, the screen of this unit switches to [LIVE CAST].
∫ Screen displays during a live broadcast / 1h23m Wi-Fi mode icon Elapsed time of the live broadcast ≥ This is displayed during a live broadcast. Microphone setting ≥ The indication appears when [Microphone OFF] is set.
∫ Making detailed settings You can make detailed settings such as the e-mail settings or the line quality setting. ≥ You can also make detailed settings from the “Image App” menu. (l 66) 1 2 Press the joystick to display the [LIVE CAST] menu. Select [Details], then press the joystick. Items Contents [E-MAIL SETUP] You can make the delivery setting of a broadcast notification e-mail and the setting for the scheduled time and date of the broadcast indicated in the e-mail.
To set the line quality ≥ Select [Details] in the [LIVE CAST] menu. (l 52) 1 2 Move the joystick to select [LINE QUALITY], then press the joystick. Select the desired line quality, then press the joystick. Line Quality [AUTO] Resolution Frame rate Recommended optimal speed (upstream) Use this option to check the line quality and automatically set the item.
Wi-Fi Playback on a DLNA-compatible TV Connecting this unit to a DLNA-compatible TV via Wi-Fi, you can play back motion pictures and still pictures on the TV. Image App 1080/25p XXXXXXXXX A DLNA-compatible TV Preparations before using Playback on a DLNAcompatible TV 1 2 3 ≥ ≥ ≥ * Check if the wireless access point is compatible with IEEE802.11b/g/n. Check if the TV is DLNA-compatible. Set up a Wi-Fi connection between this unit and the wireless access point.
Playing back on a DLNA-compatible TV You can play back the motion pictures and still pictures recorded in this unit on a TV. ≥ The following motion pictures can be played back: [RECORDING MODE] [PIXELS / FRAME RATE] [NORMAL SHOOTING] [1280k720/25p]/[848k480/25p] [SLOW MOTION] [1280k720/100fps]/[848k480/200fps] [LOOP RECORDING] – ≥ Connect a TV to a wireless access point You need to connect this unit and a TV to the same wireless access point via Wi-Fi. 1 Set [Wi-Fi MODE] to [ACCESS POINT MODE].
Wi-Fi Install the “Image App” About the “Image App” The “Image App” is an application provided by Panasonic. For Android apps For iOS apps OS Android 2.3.3 or later* iOS 5.0 or later* Installation procedure 1 1 2 3 4 Connect your Android device to a network. Select “Google Play™ Store”. Enter “Panasonic Image App” into the search box. Select “Panasonic Image App” and install it. ≥ The icon will be added to the menu. 2 3 4 Connect your iOS device to a network. Select “App StoreSM”.
Wi-Fi Setting Up a Wi-Fi Connection To use the Wi-Fi function, connect this unit to a wireless access point or smartphone via Wi-Fi. ∫ About the connection status icon when connected to Wi-Fi A Wi-Fi mode icon ≥ The displayed icon will change according to the Wi-Fi mode. : / : [SMARTPHONE MODE] : [LIVE CAST] [ACCESS POINT MODE] B The connection status icon When directly connected: connected to Wi-Fi/ not connected to Wi-Fi ≥ The icon disappears when you turn off a Wi-Fi mode.
Setting up with [Wi-Fi Easy Setup] When you set up a Wi-Fi connection between this unit and the smartphone for the first time, [Wi-Fi Easy Setup] is started up on the “Image App”. Proceed to complete the setup by following the on-screen instructions. ≥ For information about the installation of the “Image App”, refer to page 56. ≥ For information on how to set up a Wi-Fi connection between this unit and a smartphone, refer to page 43.
Connecting to a wireless access point ≥ The number of wireless access points you can register differs depending on the Wi-Fi mode. In [LIVE CAST], you can register up to three wireless access points; in [ACCESS POINT MODE], you can register only one access point. ≥ In [LIVE CAST], this unit will try to connect to the first wireless access point, and if the attempt fails, it will try to connect to the second one, and so on.
Enter a PIN code to set the Wi-Fi connection 1 Select [PIN code] and press the joystick in Step 4. 2 Select the wireless access point to be connected, then press the joystick. ≥ To run a wireless access point search again, move the joystick left, select [PIN code], then press the joystick. 3 Enter the PIN code displayed on this unit screen into the wireless access point. ≥ For further details, please read the operating instructions for the wireless access point.
≥ When no wireless access points are displayed, refer to “Setting up a connection manually”. (l 62) ≥ If an Encryption key (Password) is not set, the connection is complete and a message is displayed. To finish the setup, select [EXIT] and press the joystick on the connection destination setting screen. 6 (When there is an Encryption key (Password)) Select the entry field, press the joystick, then enter the Password. ヹヹヹヹヹヹヹヹヹヹヹヹ ≥ Confirm that “Please enter password” is displayed in the area F.
Setting up a connection manually ≥ When connecting by [Set Manually], confirm the SSID (Identification name) and Encryption key (Password) of the wireless access point you are using. 1 Press the joystick to select the menu. (When setting a connection destination in [LIVE CAST]) [Wi-Fi SETUP] # [LIVE CAST SETUP] # [SET CONNECT. DEST.] (When setting a connection destination in [ACCESS POINT MODE]) [Wi-Fi SETUP] # [Access Point Mode Setup] # [SET CONNECT. DEST.] 2 Select [New], then press the joystick.
7 (When there is an Encryption key (Password)) Select the entry field, press the joystick, then enter the Password. ヹヹヹヹヹヹヹヹヹヹヹヹ ≥ Confirm that “Please enter password” is displayed in the area I. ≥ For details on how to enter characters, refer to page 61. 8 Select [NEXT], then press the joystick. ≥ When the connection is complete, a message will be displayed and the screen will return to the connection destination setting screen. Select [EXIT], then press the joystick to finish the setup.
If the Wi-Fi connection cannot be established ≥ Please refer to the operating instruction of the device in use for details about the setting of the wireless access point or smartphone. Problem It cannot connect to the wireless access point. The wireless access point is not detected. Check points (General) ≥ Turn on the wireless access point. ≥ Approach the wireless access point and reconnect. ≥ If it takes time to complete the connection, the Wi-Fi connection will be aborted. Reset the connection settings.
Problem Check points The Wi-Fi connection is not possible between this unit and a smartphone. (Wireless Access Point Connection) ≥ Make sure the smartphone is properly connected to the wireless access point by checking the Wi-Fi settings of the smartphone. ≥ Make sure this unit and the smartphone are connected to the same wireless access point. ≥ Make sure the wireless access point is registered in this unit.
Wi-Fi How to Use the [Wi-Fi SETUP] Menu Configure various settings necessary to use the Wi-Fi function. When a Wi-Fi mode is active, the settings cannot be changed on this unit. (When setting a menu item on this unit) Press the joystick to select the menu. [Wi-Fi SETUP] # desired menu item (When setting a menu item on the “Image App”) ≥ Set up a Wi-Fi connection between this unit and a smartphone, and perform remote operation. (l 43) On the “Image App” screen, tap and set the menu item.
[LUMIX CLUB] Please refer to page 68. [START UP USING NFC] You can enable/disable the NFC function. [RESET Wi-Fi SETTINGS] You can change the Wi-Fi setting back to the default condition. The “LUMIX CLUB” Login ID can also be deleted. 1 Press the joystick to select the menu. [Wi-Fi SETUP] # [RESET Wi-Fi SETTINGS] # [YES] 2 (To delete the Login ID of the “LUMIX CLUB”) Select [YES], then press the joystick. ≥ [RESET Wi-Fi SETTINGS] cannot be used in “Image App”.
Using the “LUMIX CLUB” Acquire a “LUMIX CLUB” Login ID (free). If you register to “LUMIX CLUB”, you can upload motion pictures and still pictures recorded with this unit on a WEB service remotely or use the live broadcast function. ≥ You can set the same “LUMIX CLUB” Login ID for this unit and a smartphone. When Login ID is acquired over the smartphone (“Image App”) only, it is possible to register the same Login ID to this unit using the “Image App”.
∫ Check or change the Login ID/Password acquired with this unit ≥ To change the “LUMIX CLUB” Password on this unit, access the “LUMIX CLUB” website from your smartphone or PC and change the “LUMIX CLUB” Password in advance. 1 Press the joystick to select the menu. [Wi-Fi SETUP] # [LUMIX CLUB] # [Add/Change Account] # [Change Account] ≥ The Login ID and Password are displayed. ≥ The Password is displayed as “ ”. 2 3 Select [Login ID] or [Password], then press the joystick.
∫ Delete your Login ID and account from the “LUMIX CLUB” on this unit Delete the Login ID from this unit when transferring it to another party or disposing of it. You can also delete your “LUMIX CLUB” account. 1 Press the joystick to select the menu. [Wi-Fi SETUP] # [LUMIX CLUB] # [Delete account] ≥ The message is displayed. Select [NEXT], then press the joystick. 2 Select [YES] and press the joystick in the Login ID delete confirmation screen. ≥ A message will be displayed for a while.
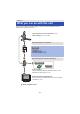
With a PC What you can do with a PC If you connect this unit to a PC while this unit is turned off, charging of this unit starts. (l 11) If you connect this unit to a PC while this unit is turned on, this unit is recognised as a card reader, so you can access the microSD card in this unit from the PC. (l 72) ≥ If the battery has worn out with this unit, recharge sufficiently and turn on this unit.
With a PC Card reader function (mass storage) Operating environment When using this unit as a card reader, the following PC environment is required. ≥ Even if the system requirements mentioned in these operating instructions are fulfilled, some PCs cannot be used. ≥ Incorporation of data on the Microsoft Windows XP is guaranteed. but, other functions is not guaranteed. ≥ Operation on an upgraded OS is not guaranteed. ≥ Operation on an OS other than the one pre-installed is not guaranteed.
Copying motion/still pictures on PC Using with Windows When using this unit as a card reader, removable disk (Example: in [Computer]. ) is displayed We recommend using HD Writer WE 2.0 (l 75) to copy motion picture files. Using Windows Explorer or other programmes on the PC to copy, move or rename files and folders recorded with this unit will result in them being unusable with HD Writer WE 2.0. It is impossible to write files to microSD card on this unit from a PC.
About the PC display The folder structure of a microSD card on which this unit has performed recording is as follows. Example folder structure of a microSD card: ≥ Folder numbers range from 100 to 999. CAM_SD Four or five alphabetic characters after a three-digit number indicate the file type. DCIM ≥ A new folder is created each time the date changes.
With a PC Using the HD Writer WE 2.0 (Windows only) The feature of HD Writer WE 2.0 You can copy the motion/still picture files to the HDD of PCs or microSD cards using HD Writer WE 2.0. What can be done with the HD Writer WE 2.
Before Installing HD Writer WE 2.0 Your installation or use of the Software defined below shall be conclusively deemed to constitute your acceptance of the terms of this Agreement. If you do not accept the terms of this Agreement, do not install, nor use the Software. End User License Agreement You (“Licensee”) are granted a license for the Software defined in this End User License Agreement (“Agreement”) on condition that you agree to the terms and conditions of this Agreement.
Operating environment for HD Writer WE 2.0 When using HD Writer WE 2.0, the following PC environment is required. ≥ Even if the system requirements mentioned in these operating instructions are fulfilled, some PCs cannot be used. ≥ For 4K motion pictures, editing may take a long time or smooth playback may not be possible, even if the recommended system requirements are fulfilled. ≥ A compatible DVD writer drive and media are necessary for writing to a DVD.
Free hard disk drive space Ultra DMA — 100 or more 450 MB or more (for installing the software) Sound DirectSound Support Interface USB port [Hi-Speed USB (USB 2.0)] Other requirements Mouse or equivalent pointing device Internet connection ≥ ≥ ≥ ≥ ≥ ≥ ≥ ≥ This software is only for Windows. Input is not supported in languages other than English, German, French and Russian. Operation cannot be guaranteed on all DVD drives.
∫ Uninstalling HD Writer WE 2.0 Follow the steps below to uninstall any software applications that you no longer require. 1 2 Select [Start] # [Control Panel] # [Uninstall a Program]. Select [HD Writer WE 2.0], then click [Uninstall]. ≥ Proceed with the uninstallation by following the on-screen instructions. ≥ After uninstalling the software, be sure to reboot the PC. Starting HD Writer WE 2.0 ≥ To use the software, log on as an Administrator or as user name for standard user account.
Others Indications (Recording screen) (Information screen) 0h00m00s Delay 0h00m00s Delay /25p STANDARD 15.11.2014 R 1h20m 15:30 R 1h20m A / / C / /25p / /50p / /25p / /50p / Recording mode (l 30) /25p / /50fps / /100fps / /200fps Pixels/Frame rate (l 32) Delay-Start REC (l 33) 60sec/ 3sec 30sec/ 10sec/ 16.3M / 8.3M / 5.
∫ Indication of connection to Wi-Fi / Wi-Fi connection status (Wireless access point connection) (l 57) / / Wi-Fi connection status (Direct connection) (l 57) / / Wi-Fi mode icon (l 57) ∫ Indication of connection to other devices Accessing the card (l 71) ∫ Confirmatory indications microSD card is not inserted or is incompatible.
Others Messages Major confirmation/error messages to be indicated on the screen in text. CHECK CARD. This card is not compatible or it cannot be recognised by the unit. If this message appears even though motion pictures and still pictures are recorded on an microSD card, the card may be unstable. Reinsert the microSD card, then turn the unit off and then on again. No wireless access point found ≥ Check the Wi-Fi set up of your wireless access point and smartphone.
Others Troubleshooting ∫ It is not a malfunction in following cases The lens or LCD monitor fog up. ≥ This is due to condensation. It is not a malfunction. Please refer to page 5. The alert sound and shutter sound are low. ≥ This is for ensuring the waterproof performance of this unit, and not a malfunction. Opening and closing the side cover will restore the original volume. Power Problem This unit cannot be turned on. This unit does not stay on long enough.
With a PC Problem Check points When connected by the USB cable, this unit is not detected by the PC. ≥ If this unit is turned off, this unit starts charging when it is connected to a PC. ≥ After re-inserting the microSD card into this unit, reconnect the supplied USB cable. ≥ Select another USB terminal on the PC. ≥ Check the operating environment. (l 72, 77) ≥ Connect the supplied USB cable again after restarting the PC and turning on this unit again.
About the Wi-Fi function Problem Check points Cannot connect to wireless access point or smartphone. ≥ Read page 64 if the Wi-Fi connection cannot be established. When looking at the recording screen or playing back an image on the smartphone, mosaiclike noise appears and the motion is not smooth. ≥ Depending on the smartphone or radio wave conditions, when you play back a motion picture, mosaic-like noise may appear on the screen and the motion may not be smooth.
Others Cautions for use About this unit This unit and the microSD card become warm during use. This is not a malfunction. Keep this unit as far away as possible from electromagnetic equipment (such as microwave ovens, TVs, video games etc.). ≥ If you use this unit on top of or near a TV, the pictures and/or sound on this unit may be disrupted by electromagnetic wave radiation. ≥ Recorded data may be damaged, or pictures may be distorted, by strong magnetic fields created by speakers or large motors.
electricity or malfunctions with this unit or the microSD card. About personal information When the Wi-Fi function is used, the SSID, Password, and other personal information will be included in this unit. Disclaimer ≥ Information including personal information may be altered or vanish due to erroneous operation, effect of static electricity, accident, malfunction, repair, or other handlings.
LCD monitor ≥ When the LCD screen is dirty or condensation has occurred, please wipe it using a soft cloth such as eyeglass cleaner. ≥ When the unit has become very cold, for example due to storage in a cold area, its LCD monitor will be slightly darker than usual immediately after the unit is turned on. The normal brightness will be restored when the unit’s internal temperature rises. Extremely high precision technology is employed to produce the LCD Monitor screen. The result is more than 99.
Others Approximate recordable time microSD cards are only mentioned with their main memory size. The stated times are the approximate recordable times for continuous recording. [NORMAL SHOOTING] Pixels/ Frame rate Transfer rate (VBR) [3840k2160/ 25p] [1920k1080/ 50p] 8 GB 16 GB 32 GB Max. 72 Mbps 7 min 14 min 28 min 55 min Max.
Others Approximate number of recordable pictures microSD cards are only mentioned with their main memory size. The stated number is the approximate number of recordable pictures. Picture size Aspect ratio [16.3M] (5376k3024) [8.3M] (3840k2160) [5.3M] (3072k1728) 16:9 microSD card 4 GB 8 GB 16 GB 32 GB 400 800 1600 3300 750 1500 3000 6000 1100 2200 4500 8500 ≥ The number of recordable pictures depends on the subject being recorded.
Others Optional accessories Some optional accessories may not be available in some countries. About the Video Camera Mount (For Handlebar) You can attach the Video Camera Mount (For Handlebar)/RP-CMC10 as follows. ≥ To use the Video Camera Mount (For Handlebar)/RP-CMC10, the Tripod Mount/VW-CTA100 is required. ≥ Please also refer to the operating instructions of the Video Camera Mount (For Handlebar) and the Tripod Mount.
Others Requests when disposing of this unit When disposing of your used products, remove the battery built into this unit after performing [RESET Wi-Fi SETTINGS] (l 67), and please cooperate in recycling of the battery. Please refer to page 93 about how to remove the battery. ≥ Please make sure that the battery is disposed of at an officially assigned location, if there is one in your country. Do not disassemble this unit other than when disposing of this unit.
How to remove the battery When disposing of your used products, perform [RESET Wi-Fi SETTINGS] to delete personal information from this unit. This figure describes the disposal of this unit, it is not instruction for repair. If disassembled, repair is not possible. ≥ Disassemble after the battery runs out. ≥ If it cannot be removed smoothly, contact Panasonic’s Service Centre. ≥ Keep disassembled parts out of reach of children.
Others About copyright ∫ Carefully observe copyright laws Recording of pre-recorded tapes or discs or other published or broadcast material for purposes other than your own private use may infringe copyright laws. Even for the purpose of private use, recording of certain material may be restricted. ∫ Licenses ≥ microSDHC Logo is a trademark of SD-3C, LLC.
Panasonic Corporation Web site: http://panasonic.