
User Manual


2 Tap [SHELF Camera].
3 Tap [Add New Camera].
4 Follow the on-screen instructions, remove the rear cover from the camera, and then tap [Next].
5 Follow the on-screen instructions, plug in the camera, and then tap [Next].
R Wait about 1 minute for the camera to start up.
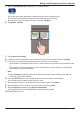
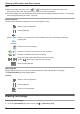
6 Follow the on-screen instructions and confirm the LED color on your camera.
– If the camera’s LED indicator lights in yellow, tap the yellow icon and proceed to step 7.
– If the camera’s LED indicator lights in a color other than yellow, tap the icon for that color and
follow the on-screen instructions.
7 Confirm that the wireless network name (SSID) of the wireless router that the camera will connect to
is displayed, and then tap [Done].
R If a different wireless network name is displayed, tap [Change the network] and follow the
on-screen instructions.
8 Determine if you will complete the initial setup using WPS or without using WPS (Basic Setup).
– Set up using WPS:
Select [WPS] and proceed from WPS.
– Set up without using WPS:
Select [Basic Setup] and proceed from Basic Setup.
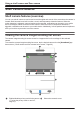
WPS
WPS is a function of wireless routers that is used to easily connect wireless devices to wireless
routers. A WPS button on a wireless router indicates that it has the WPS function.
WPS
1 Press and hold the WPS button on the wireless router until the router’s WPS LED indicator starts
blinking.
2 Tap [Next].
3 Press the SETUP button on the camera for about 5 seconds until the camera beeps.
R The camera’s LED indicator starts blinking in yellow.
4 Tap [Next].
R When [Linking] is displayed, wait for up to about 2 minutes until the camera is connected to your
wireless network and mobile device.
5 Press the SETUP button on the camera for about 2 seconds until the camera beeps.
R The camera’s LED indicator starts blinking in green.
41
Using a shelf camera and floor camera