Operating Instructions Home Network System Digital Cordless Handset Model No. KX-HNH100E Before initial use, see “Getting Started” on page 11. Thank you for purchasing a Panasonic product. Please read these operating instructions before using the unit and save them for future reference. For dedicated help, support, or advice, available to help you Monday - Friday, 09:00 - 23:00. For U.K., please contact us on 0330 3331112 and for Ireland 01 4475228. HNH100E_(en_en)_1228_ver.103.
Table of Contents Introduction Accessory information ..................................3 Expanding the Panasonic Home Network System .........................................................4 Sales and support information .....................6 Important Information About this system .........................................7 For your safety .............................................7 Important safety instructions ........................8 For best performance ...................................
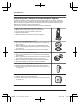
Introduction Accessory information Supplied accessories No. Accessory item/Part number A Rechargeable batteries*1 Quantity 2 B Handset cover*2 1 C Charger/PNLC1042ZW 1 D AC adaptor/PNLV233EKX 1 *1 *2 See page 3 for replacement battery information. The handset cover comes attached to the handset. B A C D Additional/replacement accessories Please contact your nearest Panasonic dealer for sales information. Accessory item Model no.
Introduction Expanding the Panasonic Home Network System The Panasonic Home Network System is a wireless system that lets you create a powerful network of devices, such as cameras, sensors, and smart plugs, and control them all with an easy-to-use app. Compatible devices are explained below. For information about the Home Network app, refer to the User’s Guide (page 43). The maximum number of devices for each device type is listed below. Digital Cordless Handset (KX-HNH100: 6 max.
Introduction Smart Plug (KX-HNA101: 50 max.*2) R Can be turned on and off using the handset or Home Network app, when triggered by a sensor, or according to a schedule R Built-in overcurrent and overwattage detection for added peace of mind R Power consumption is logged for your reference *1 *2 Optional handsets may be a different colour from that of the handset supplied as part of a pre-configured bundle.
Introduction Sales and support information Customer Communications Centre R For customers within the U.K.: 0330 3331112 R For customers within Ireland: 01 4475228 R For further support on your product, please visit our website: www.panasonic.co.uk Direct Sales at Panasonic U.K. R Order accessory and consumable items for your product with ease and confidence by phoning our Customer Communications Centre Monday - Friday 9:00am - 5:00pm (Excluding public holidays).
Important Information About this system R This system is an auxiliary system; it is not designed to provide complete protection from property loss. Panasonic will not be held responsible in the event that property loss occurs while this system is in operation. R The system’s wireless features are subject to interference, therefore functionality in all situations cannot be guaranteed.
Important Information CAUTION Important safety instructions Installation and location R Never install wiring during a lightning storm. R Never install telephone line jacks in wet locations unless the jack is specifically designed for wet locations. R Never touch uninsulated telephone wires or terminals unless the telephone line has been disconnected at the network interface. R Use caution when installing or modifying telephone lines. R The AC adaptor is used as the main disconnect device.
Important Information R If the reception for a hub location is not satisfactory, move the hub to another location for better reception. Environment R Keep the product away from electrical noise generating devices, such as fluorescent lamps and motors. R The product should be kept free from excessive smoke, dust, high temperature, and vibration. R The product should not be exposed to direct sunlight. R Do not place heavy objects on top of the product.
Important Information Information on Disposal in other Countries outside the European Union These symbols (A, B) are only valid in the European Union. If you wish to discard these items, please contact your local authorities or dealer and ask for the correct method of disposal. Note for the battery symbol This symbol (B) might be used in combination with a chemical symbol. In this case it complies with the requirement set by the Directive for the chemical involved.
Getting Started Battery charging Setting up Connections Connect the AC adaptor plug to the unit by pressing the plug firmly. Connect the AC adaptor to the power outlet. Note: R Use only the supplied Panasonic AC adaptor PNLV233E. 1 Charge for about 7 hours. R Confirm “Charging” is displayed (1). R When the batteries are fully charged, “Fully Charged” is displayed. 1 2 Note when setting up Note for connections Battery installation R USE ONLY rechargeable Ni-MH batteries AAA (R03) size (1).
Getting Started Battery level Icon Controls Battery level High Handset Medium Low F Needs charging. Panasonic Ni-MH battery performance (supplied batteries) Operation G Operating time In continuous use 15 hours max. Not in use (standby) 170 hours max. Note: R Actual battery performance depends on usage and ambient environment.
Getting Started By pressing a soft key, you can select the feature shown directly above it on the display. Navigator key – MDN, MCN, MFN, or MEN: Scroll through various lists and items. – MDN or MCN: Adjust the receiver or speaker volume while talking. – MFN (W: Phonebook): View the phonebook entry. – MEN (T: Redial): View the redial list. – MCN ( : Caller list): View the caller list. Item Away mode is set. (page 40) Privacy mode is on. (page 27) “Greeting Only” is selected.
Getting Started Icon Action Temporarily turns off the ringer for incoming calls. (page 15) Registering the handset Places a call on hold. Registering a handset to the hub Opens the phonebook. Allows you to edit phone numbers. (page 30) Adds new entry. (page 21) Displays phonebook search menu. (page 21) Turns the key lock feature off. (page 19) This procedure is not required for devices that were included as part of a bundle. Before you can use the handset, it must be registered to the hub.
Making/Answering Calls Example: If you need to dial the line access number “0” when making outside calls with a PBX: Making calls 1 2 3 Lift the handset and dial the phone number. R To correct a digit, press MCN. M N When you finish talking, press MeN or place the handset on the charger. Using the speakerphone 1 2 Dial the phone number and press MZN. When you finish talking, press MeN. Note: R To switch back to the receiver, press MZN/ M N. 1 2 0 a MDN (Pause) Dial the phone number.
Making/Answering Calls Missed calls If a call is not answered, the unit treats it as a is displayed. This lets you missed call and know if you should view the caller list to see who called while you were away. Even if only one missed call in the caller list is disappears from the viewed (page 16), display. When you receive another new call, is displayed again.
Making/Answering Calls Useful features during a call Hold 1 2 3 Press M N during an outside call. MbN: “Hold” a MOKN To release hold, press M N. Note: R After holding for 10 minutes, the call is disconnected. Mute 1 2 phone service provider for information about this feature. 1 2 Note: R Please contact your phone service provider for details and availability of this service in your area.
Making/Answering Calls To join the conversation, press M N when the other unit is on an outside call. Note: R A maximum of 3 parties (including 1 outside party) can join a conversation using 2 extensions. (3-way conference) R To prevent other users from joining your conversations with outside callers, turn privacy mode on (page 27). Handset locator You can locate a misplaced handset by paging it. 1 Hub: Press M A HANDSET/ LOCATORN. R All registered handsets beep for 1 minute.
Making/Answering Calls Key lock The handset can be locked so that no calls or settings can be made. Incoming calls can be answered, but all other functions are disabled while key lock is on. To turn key lock on, press M N for about 3 seconds. R To turn key lock off, press M N for about 3 seconds. Note: R Calls to emergency numbers cannot be made until key lock is turned off. Helpline Tel. No.: U.K. 0330 3331112 Ireland 01 4475228 HNH100E_(en_en)_1228_ver.103.
Phonebook Phonebook You can add 500 names (16 characters max.) and phone numbers (24 digits max.) to the phonebook, and assign each phonebook entry to the desired category. Important: R All entries can be shared by any registered handset. R You can copy contacts from your mobile device to the unit’s phonebook if your mobile device is registered to the hub.
Phonebook You can narrow down the search to enter the first characters of a name. * a To search for the name, enter the first characters (up to 4) in uppercase (page 44). a MOKN MbN: Scroll through the phonebook if necessary. To search by category M N a MbN: “Category” a MOKN MbN: Select the desired category. a MOKN MbN: Scroll through the phonebook if necessary. 3 M N Editing entries 1 2 3 4 Find the desired entry (page 20). M N a MbN: “Edit” a MOKN Edit the name if necessary.
Phonebook Note: R If you edit a phonebook entry which is assigned to a speed dial key, the edited entry does not transfer to the speed dial key. Editing an entry 1 2 3 4 5 Press and hold the desired speed dial key (1 to 6). a M N MbN: “Edit” a MOKN Edit the name if necessary. a MOKN Edit the phone number if necessary. a MOKN MOKN a MeN Erasing an entry 1 2 3 4 Press and hold the desired speed dial key (1 to 6).
Programming Menu list To access the features, there are 2 methods. n Scrolling through the display menus 1 M N 2 3 4 Press MDN, MCN, MEN, or MFN to select the desired main menu. a MOKN Press MCN or MDN to select the desired item from the next sub-menus. a MOKN Press MCN or MDN to select the desired setting. a MOKN n Using the direct command code 1 M N a Enter the desired code. Example: Press M N#160. 2 Select the desired setting. a MOKN Note: R To exit the operation, press MeN.
Programming Sub-menu 1 Sub-menu 2 Settings Disarm PIN*1 Settings #810 41 Handset Off–6 <3> #803 41 Hub*1 Off–6 <3> #G803 Handset Off–6 <3> #808 Hub*1 Off–6 <3> #G808 Handset Off–6 <6> #804 Hub*1 Off–6 <6> #G804 Handset Off–6 <3> #807 Hub*1 Off–6 <3> #G807 Away – Exit Alert Volume*1 Off–6 <3> #805 Talking Notification Off #809 At Home – Alert Volume At Home – Entry Alert Volume Away – Alert Volume Away – Entry Alert Volume Main menu: Code – 41 “Answering System” Sub
Programming Sub-menu 1 Sub-menu 2 Settings Code New Message Alert*1 Outgoing Call – On/Off On #338 36 Outgoing Call – Notification to Settings – Outgoing Call – Remote Code Activate Hub Beep On #339 36 Number of Rings*1 2-9 Rings <8 Rings> Auto #211 39 Recording Time*1 1 Minute <3 Minutes> Greeting Only*2 #305 39 #306 37 Call Screening Off – #310 38 Answering System On/ Off*1 On #343 34 Remote Code*1 Answer On*1 Answer Off*1 Main me
Programming Main menu: “Initial Setup” Sub-menu 1 Sub-menu 2 Settings Ringer Setup Ringer Volume Off–6 <6> #160 – Ringtone*3 #161 – Night Mode – On/Off On #238 29 Night Mode – Start/End <23:00/06:00> #237 29 Night Mode – Ring Delay 30 sec. <60 sec.> 90 sec. 120 sec.
Programming Sub-menu 1 Sub-menu 2 Line Setup Recall/Flash*1, – Privacy Mode*1, *7 Network Setup*1 *6 Settings Code 900 msec. 700 msec. 600 msec. 400 msec. 300 msec. 250 msec. 200 msec. 160 msec. 110 msec. <100 msec.> 90 msec. 80 msec. #121 17 On #194 17 Current Status – #526 32 Wi-Fi Setup – #523 32 #500 32 IP Setup Manual (Static) Reset Network – Hub PIN*1 Register – Register H.set (H.
Programming *1 *2 *3 *4 *5 *6 *7 If you program these settings using one of the units, you do not need to program the same item using another unit. This menu is not displayed when scrolling through the display menus. It is only available in direct command code. The preset melodies in this product are used with the following permission: – “Ringtone 3”: © 2014 Copyrights Vision Inc. – “Ringtone 4” - “Ringtone 40”: © 2012 Copyrights Vision Inc.
Programming Note: R Press M N to stop the alarm completely. R When the handset is in use, the alarm will not sound until the handset is in standby mode. N to stop the R Press any dial key or M sound but keep the snooze function activated. R If you want to make an outside call when the snooze function is activated, please stop the snooze function before making the call. Night mode Night mode allows you to select a period of time during which the handset will not ring for outside calls.
Programming following items are available when storing phone numbers in the call block list (250 max.). – “Single Number”: The unit can reject calls from specific phone numbers. – “Range of Numbers”: The unit can reject calls that begin with a number stored in the call block list, such as a toll-free phone number prefix or certain area codes. You can also set the unit to reject calls that do not have a phone number. When a call is received, the unit does not ring while the caller is being identified.
Programming Other programming Changing the handset name You can customise the name of your handset. This can help you easily identify handsets when making intercom calls, transferring calls to other handsets, etc. You can select whether or not the handset name is displayed in standby mode. The default setting is “No”. If you select “Yes” without entering any handset name, “Handset 1” to “Handset 6” is displayed. 1 2 3 M N#104 Enter the desired name (10 characters max.).
Programming same hub. This allows the handset to end its wireless connection with the system. Wi-Fi network access settings 1 M N#131 R All handsets registered to the hub are displayed. If mobile devices (smartphones, tablets, etc.) are registered to the hub, you can also select and deregister them using this procedure. 1 2 MbN: Select the handset you want to cancel. a MOKN M N#523 R The hub searches for available wireless networks and “Searching...” is displayed on the handset.
Programming 2 MbN and MFEN: Display the desired information. a MeN Resetting the hub’s network settings All network-related settings will be reset to the default settings. No other information will be deleted. 1 2 3 M N#730 Enter the hub PIN (default: “0000”). MOKN R The hub restarts. Wait until the hub LED indicator lights in yellow and then set the Wi-Fi network access settings using Home Network app. For more information, refer to the User’s Guide (page 43). Helpline Tel. No.: U.K.
Answering System Answering system The answering system can answer and record calls for you when you are unavailable to answer the phone. You can also set the unit to play a greeting message but not to record caller messages by selecting “Greeting Only” as the recording time setting (page 39). Important: R When callers leave messages, the unit records the day and time of each message. Make sure the unit’s date and time setting is correct.
Answering System 4 Press MnN to stop recording. a MeN Using a pre-recorded greeting message The unit provides 2 pre-recorded greeting messages: – If you reset to pre-recorded greeting or do not record your own greeting message, the unit plays a pre-recorded greeting asking callers to leave a message. – If the message recording time (page 39) is set to “Greeting Only”, callers’ messages are not recorded and the unit plays a different pre-recorded greeting message asking callers to call again.
Answering System Fast-forwarding the message New message alert by a call Press and hold MEN until the unit plays the desired part of the message. R During fast-forwarding, the handset makes a continuous beeping sound. Fast-forwarding speed may vary depending on the recorded message. R Even if you press and hold MEN when the end of this message is played, the next message is played at normal speed. This feature allows you to receive a notification by phone when new messages are recorded.
Answering System Editing the set phone number 1 2 3 4 5 M N#338 MbN: “Notification to” a MOKN M N a MbN: “Edit” a MOKN Edit the phone number if necessary (24 digits max.). a MOKN 2 times a MeN M N#338 MbN: “Notification to” a MOKN M N a MbN: “Erase” a MOKN MbN: “Yes” a MOKN a MeN R The new message alert setting is turned off.
Answering System Deactivating remote operation Key Operation Press * in step 2 on “Remote access code”, page 37. R The entered remote access code is deleted. *4 Erase currently playing message *5 Erase all messages *6 Reset to a pre-recorded greeting message (during greeting message playback) *# End remote operation (or hang up) Using the answering system remotely 1 Dial your phone number from a touch-tone phone. 2 After the greeting message starts, enter your remote access code.
Answering System Number of rings before the unit answers a call You can change the number of times the phone rings “Number of Rings” before the unit answers a call. You can select 2 to 9 rings, or “Auto”. The default setting is “8 Rings”. “Auto”: The unit’s answering system answers at the end of the 5th ring when new messages have been recorded, or at the end of the 8th ring when there are no new messages.
Home Network System Integration Home Network System integration If you have other devices registered to the hub, such as cameras, sensors, and smart plugs, you can use the handset as an integrated part of the Home Network System. Specifically, you can use the handset to: – arm and disarm the alarm system (page 40). – receive notifications when the sensors are triggered. – display the status of each sensor (page 41). – turn smart plugs on and off (page 42).
Home Network System Integration you 1 minute by default*1 to disarm the system. During this time, the entry delay alert will sound. If you do not disarm the system in time, the sensors are triggered and the hub and handset sound an alert. *1 This setting can be changed when using the Home Network app. For more information, refer to the User’s Guide (page 43). Stopping the alert When a sensor is triggered, the hub and handset sound an alert. Use the following procedure to stop the alert.
Home Network System Integration default PIN is “0000”. We recommend changing the disarm PIN. Important: R When you change the disarm PIN, please make note of the new PIN. The unit will not reveal the PIN to you. If you forget the PIN, contact an authorised service centre. Note: R The status of smart plugs may fail to change. In this case, an error message indicating the number of the smart plugs that have not changed is displayed. To confirm the status, see “Displaying smart plug status”, page 42.
Home Network System Integration preprogrammed phone number when a sensor is triggered. Downloading the Home Network app Download information is available at the web page listed below. www.panasonic.net/pcc/support/tel/ homenetwork/ Accessing the User’s Guide The User’s Guide is a collection of online documentation that helps you get the most out of the Home Network app. 1 iPhone/iPad Tap in the app’s home screen. Android™ devices Tap or press your mobile device’s menu button in the app’s home screen.
Useful Information Voice mail service Voice mail is an automatic answering service offered by your phone service provider. After you subscribe to this service, your phone service provider’s voice mail system answers calls for you when you are unavailable to answer the phone or when your line is busy. Messages are recorded by your phone service provider, not your telephone. is displayed on the handset if message indication service is When you have new messages, available.
Useful Information Alphabet character table (ABC) z 1 2 3 4 5 6 7 8 9 y R The following characters are assigned to the 1 key when entering a Wi-Fi password. Numeric entry table (0-9) z 1 2 Greek character table ( z 1 2 3 1 2 5 6 7 8 9 y 4 5 6 7 8 9 y 4 5 6 7 8 9 y ) 3 Extended 1 character table ( z 4 ) 3 R The following are used for both uppercase and lowercase: Helpline Tel. No.: U.K. 0330 3331112 Ireland 01 4475228 HNH100E_(en_en)_1228_ver.103.
Useful Information Extended 2 character table ( z 1 2 ) 3 4 5 6 7 8 9 y 7 8 9 y R The following are used for both uppercase and lowercase: Cyrillic character table ( z 46 1 2 ) 3 4 5 6 Helpline Tel. No.: U.K. 0330 3331112 Ireland 01 4475228 HNH100E_(en_en)_1228_ver.103.
Useful Information Error messages Display message Cause/solution Hub no power or No link. Reconnect AC adaptor. R The handset has lost communication with the hub. Move closer to the hub and try again. R Unplug the hub’s AC adaptor to reset the unit. Reconnect the adaptor and try again. R The handset’s registration may have been cancelled. Re-register the handset (page 31). Cannot obtain IP Address R Your wireless router does not support DHCP, or the DHCP feature of your wireless router is turned off.
Useful Information Troubleshooting If you still have difficulties after following the instructions in this section, disconnect the hub’s AC adaptor and turn off the handset, then reconnect the hub’s AC adaptor. Remove the batteries from the handset, insert the batteries into the handset again, and turn on the handset. General use Problem Cause/solution The handset does not turn on even after installing charged batteries. R Place the handset on the charger to turn on the handset.
Useful Information Menu list Problem Cause/solution The display is in a language I cannot read. R Change the display language (page 14). I cannot register a handset to a hub. R The maximum number of handsets (6) is already registered to the hub. Cancel unused handset registrations from the hub (page 31). R You entered the wrong hub PIN. If you forget your PIN, see “I cannot remember the hub PIN.” (page 49). I cannot remember the hub PIN. R Change the hub PIN using the following method.
Useful Information Problem Cause/solution The handset does not ring. R The ringer volume is turned off. Adjust the ringer volume (page 15, 26). R Night mode is turned on. Turn it off (page 29). I cannot make a call. R You dialled a call restricted number (page 31). R The key lock feature is turned on. Turn it off (page 19). Caller ID/Talking Caller ID Problem Cause/solution Caller information is not displayed. R You must subscribe to Caller ID service.
Useful Information Answering system Problem Cause/solution The unit does not record new messages. R The answering system is turned off. Turn it on (page 34). R The message memory is full. Erase unnecessary messages (page 35). R The recording time is set to “Greeting Only”. Change the setting (page 39). R Your phone service provider’s voice mail service may be answering your calls before the unit’s answering system can answer your calls.
Useful Information Network connection Problem Cause/solution I am having trouble connecting. R Your wireless router is not turned or is not functioning. Refer to the operating instructions included with your wireless router. R Your mobile device is not connected to your wireless router. Check your mobile device’s Wi-Fi settings. Refer to the operating instructions included with your mobile device.
Appendix Specifications R Standard: DECT (Digital Enhanced Cordless Telecommunications) GAP (Generic Access Profile) R Frequency range: 1.88 GHz to 1.90 GHz R RF transmission power Approx. 10 mW (average power per channel) 250 mW (max.) R Power source: Handset: AAA (R03) Ni-MH battery (2 ´ 1.2 V, 550 mAh) Charger: 100–240 V AC, 50/60 Hz R Power consumption: Charger: Standby: Approx. 0.1 W Maximum: Approx. 1.
Appendix Conditions of guarantee This guarantee is in addition to and does not in any way affect any statutory or other rights of consumer purchasers. If within the applicable guarantee period, the product proves to be defective by reason of faulty design, workmanship or materials, we undertake subject to the following conditions to have the defective product (or any part or parts there of) repaired or replaced free of charge. 1. The product shall have been purchased and used solely within either the U.K.
Appendix Graphical symbols for use on equipment and their descriptions Symbol Explanation Symbol Explanation Alternating current (A.C.) Class P equipment (equipment in which protection against electric shock relies on Double Insulation or Reinforced Insulation) Direct current (D.C.) “ON” (power) Protective earth “OFF” (power) Protective bonding earth Stand-by (power) Functional earth “ON”/“OFF” (power; push-push) For indoor use only Caution, risk of electric shock Helpline Tel. No.: U.K.
Index Index # A B C D E F H 3-way conference: 18 Answering calls: 15 Answering system Activating the answering system: 34 Call screening: 38 Erasing messages: 35, 38 Greeting message: 34 Greeting only: 39 Listening to messages: 35, 38 New message alerting: 36 Number of rings: 39 Recording time: 39 Remote access code: 37 Remote operation: 37 Turning on/off: 34 Auto talk: 15, 26 Battery: 11 Call restriction: 31 Call share: 17 Call waiting: 17 Call Waiting Caller ID: 17 Caller ID features: 15 Caller list:
Notes 57 HNH100E_(en_en)_1228_ver.103.
Notes 58 HNH100E_(en_en)_1228_ver.103.
Notes 59 HNH100E_(en_en)_1228_ver.103.
IMPORTANT! If your product is not working properly. . . 1 Make sure that the hub is connected to the telephone line. 2 Use rechargeable Ni-MH batteries. (Alkaline/Manganese/Ni-Cd batteries CANNOT be used.) 3 Reinsert the batteries and restart the handset. 4 Read troubleshooting page in the Operating Instructions. If you still have any problems, please call the Helpline 0330 3331112 (U.K.) 01 4475228 (Ireland) or contact us through our website: www.panasonic.co.