Facsimile Quick Reference Guide Model No. KX-PW201CL KX-PW201CW KX-PW201CL Thank you for purchasing a Panasonic facsimile.
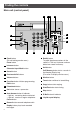
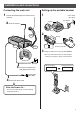
Finding the controls Main unit (control panel) 1 2 3 4 8月 1日 14:00 00 ケ ン ヨウケン 19 5 18 6 17 7 16 15 1 Flash button (For call waiting service users.) Erase button 2 Intercom button Character Input Mode button 13 12 11 10 9 8 11 Redial button To redial the phone numbers in the redial list. The last 10 phone numbers dialed are stored in memory. 12 Hold button Call Memory button starts a search in the Number Display log. (For caller ID display service users.
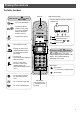
Finding the controls Portable handset Earpiece How to use LCD (with back light) key ● ● To use the phonebook. ● To redial the phone numbers in the redial list. The last 10 phone numbers dialed are stored in memory. ● Displays battery strength, telephone numbers etc. 1 コ キ1 2 To adjust the volume. 2 1 Portable handset number 2 Function menu that is controlled by or 3 ● 3 . Battery strength To make/answer calls. To page the main unit or another portable handset.
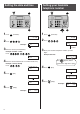
Installations and connections Installing the thermal recording papar 1 Open the control panel. 4 Pull the recording paper towards you to cut off. く 開 2 Open the control panel until it locks. 1 Pull up here. Control panel Install a new thermal recording paper. Replacement thermal recording paper: UG-0010A4 (15 m role type) ¥450 2 Install the recording paper. As of June 2003. ・ Rolling core is upside Reverse Slack 3 Pull the paper approx.
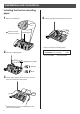
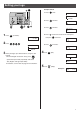
Installations and connections Connecting the main unit Setting up the portable handset 1 main Connect the cord and place the handset on the unit. 1 Power outlet (AC 100 V) AC adaptor Charger 2 Raise the antenna. Plug 2 Click Battery Black Click Connector Red Battery cover Click 3 Charge the battery in the charger for 10 hours. 回 (電話 線 停電 回線へ )電話用 機 ● Telephone line cord After your Panasonic battery is fully charged, it will last up to about 7 hours of conversation.
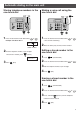
Setting the date and time 1 Press (Function). キノウアトウロクモード カ イ セ シ シ シ [ ▼▲] オ ス 2 Press Setting your facsimile telephone number 1 Press (Function). キノウアトウロクモード カ イ セ シ シ シ [ ▼▲] オ ス 2 Press . . アナタノバンゴウ? . ...... TEL= .. 2 2003年06月01日 Example : 20 : 10 Cursor 3 Enter the correct year/month/day. 3 Enter your facsimile telephone number, up to 20 Example: October 1, 2003 Press Cursor . digits. Example: 098 765· アナタノバンゴウ? TEL=0980765..
Setting your logo Example: Micah 1. Press once. アナタノナマエ? M Cursor 2. Press six times. アナタノナマエ? Mi 3. Press six times. アナタノナマエ? Mic 1 Press 4. Press キノウアトウロクモード カ イ セ シ シ シ [ ▼▲] オ ス 2 Press to move the cursor to the next space (Function). . アナタノナマエ? and press four times. アナタノナマエ? Mica 5. Press five times. アナタノナマエ? Micah Cursor 3 Enter your logo, up to 30 characters, using the dial 4 Press (Set). トウロクアシマシタ keypad.
Character input and command key table Pressing the dial keys will select a character as shown below.
Automatic dialing on the main unit Storing telephone numbers in the one-touch dial Making a voice call using the one-touch dial ∼ ∼ 1 Press the desired one-touch dial button ( to Example: one-touch dial 1 ). 1 Press the desired one-touch dial button ( ● ワンタッチ 1 トウロク サレテイマセン to ). The unit will start dialing. 2 When the other party answers, lift the handset. Button number 2 Enter the telephone number, up to 24 digits. ● To correct a mistake, press (Clear).
Automatic dialing on the main unit Storing names and telephone numbers in the phonebook Making a voice call using the phonebook 1 Press 1 Press 2 Press (Phonebook). トウロクハ[キノウ]オス ケ ン サ ク ハ ク[ ▼▲] オ ス 2 Press “XX” shows the remaining station numbers you can store. ● You can program up to 100 stations, including 4 preprogrammed stations. デンワチョウ トウロク アキ xxケン page 8 for instructions). 4 Press (Set). 5 Enter the telephone number, up to 24 digits. To correct a mistake, press 3 Lift the handset.
Automatic dialing on the portable handset Storing telephone number in the one-touch dial Making a voice call using the one-touch dial 1 Press 1 Press (one-touch). ● ワンタッチ トウロク サレテイマセン 2 Enter the telephone number, up to 24 digits. ● To correct a mistake, press (Clear). 00009876543・ 3 Press 登録 (Register). (one-touch). The unit will start dialing. 2 When the other party answers, start talking. Editing a stored number in the one-touch dial 1 Press (Function). 2 Press (one-touch).
Automatic dialing on the portable handset Storing names and telephone numbers in the phonebook Making a voice call using the phonebook 1 Press 1 Press 2 Press 2 Press (Phonebook). ケ ン サ ク ハ ア [ ▼▲] オ ス 登録 (Search button) repeatedly until the desired name is displayed. (Register). “XX” shows the remaining station numbers you can store. ● You can program up to 100 stations, including 4 preprogrammed stations.
Intercom between the main unit and portable handset An intercom is available between the main unit and portable handset. Using the main unit: Using the portable handset: 1 ■ For single portable handset users 1 ■ For single portable handset users # Lift the handset. Press (Intercom). ■ For multiple portable handset users バンゴウ? Press $ Press (Intercom). . 2 Start talking.
Sending faxes Sending a fax manually Sending a fax using automatic dialing Only one page can be set at a time. Document guide Only one page can be set at a time. Document guide FACE D OWN FACE D OWN Document cover Document cover ∼ Using the one-touch dial 1 Open the document cover, and adjust the width of the 1 Insert the document (1 page only) FACE DOWN until document guides to the size of the document. 2 Insert the document (1 page only) FACE DOWN until a single beep is heard.
Receiving faxes Receiving a fax manually (AUTO ANSWER off) Using the main unit: Using the portable handset: 1 When you hear a ring, lift the handset to answer the 1 When you hear a ring, lift the portable handset from call. the charger to answer the call. ● If the portable handset is not set on the charger, press (Talk). 2 When: – document reception is required, – a fax calling tone (slow beep) is heard, or – no sound is heard, press ● (Fax), then replace the handset.
Receiving faxes Receiving a fax automatically (AUTO ANSWER on) Recording your own greeting message light on 1 If the pressing (Auto answer) light is off, turn it on by . You can record your own greeting message. When receiving a call, it will be played to callers instead of the pre-recorded Japanese greeting message. 1 Press 2 Press 2 When receiving a call, the unit will receive a fax document or record a voice message automatically depending on the caller’s request. (Function). .
Operating the built-in answering device Activating the answering device Operating the answering device from a remote location light on/flash light on/flash 1 Turn the (Auto answer) light on by pressing 2 When receiving a call, a greeting message will be . 1. Press played and the unit will record a voice message. ● To record your own greeting message, see page 16. When new messages are recorded, the (Auto answer) light will flash. Press to listen to recorded messages.
Individual e-mail services Using the e-mail services PCC information services Panasonic Communications Co., Ltd. (hereafter called “PCC”) offers individual information services, such as e-mail. Your fax machine with e-mail features will enable you to send an e-mail to another party’s personal computer (PC) or another e-mail fax machine anywhere in the world through the Internet. Also, you will be able to receive an e-mail from them. The following services are available with your fax machine.
Individual e-mail services Subscribing to PCC information services 7 Enter the valid date of your credit card. ユウコウキゲン? . . / . . ( 月/ 年) FACE D OWN Month Year 8 Press (Set). 9 Insert the application form FACE DOWN. 10 Press ● この面を裏向きにして、 矢印の方向へ入れてください。 The unit will start fax transmission. 11 After approx. 5 minutes, the unit will ring, and a 1 Fill in the included application form. data communication will start automatically between your unit and PCC.
Individual e-mail services Receiving and printing an e-mail 1 Press (E-mail) . 2 Press (Set). ● If there is an e-mail you have not viewed yet, the unit will print the received e-mail. ● If there is no e-mail, the following will be displayed. ミ シ ゙ ュ シ ン ア ア ア 0ケ ン The file formats recognized by your fax machine are: ● ~. doc JPEG ● ~. xls TIFF ● BMP ● ~. ppt ● TXT ● ~.
Individual e-mail services Sending a text e-mail from the main unit 7 Press (Set). 8 Enter your e-mail message, up to 200 characters (see the table on page 8 for instructions). ● You can enter the message of the last e-mail you sent by pressing (Redial). 9 Press 1 Press 2 Press (E-mail). (Search button) repeatedly until the following is displayed. 3 Press (Set). モ シ ゙ Eメ ー ル ア ソ ウ シ ン カイセシ[ ケッテイ] オス (Set). 4 Enter the desired e-mail address (see the table on page 8 for instructions).
Individual e-mail services Sending a fax e-mail Only one page can be set at a time. 6 Press (Set). 7 Enter the title of your fax e-mail, up to 32 characters FACE D OWN (see the table on page 8 for instructions). Ad docujust the en guidm es t ● You can enter the title of the last e-mail you sent by pressing (Redial). 8 Press Document cover ● (Set). After scanning a page, 2 short beeps will sound, and ツ キ ゙ ノ ケ ゙ ン コ ウ ヲ イレテククダサイ will be displayed for about 4 seconds.
Individual e-mail services Storing names and e-mail addresses in the addressbook Editing a stored name or e-mail address in the addressbook 1 Press 1 Press 2 Press (Function), then press (E-mail). (Search button) repeatedly until the アドレスシチョウ カイセシ[ ケッテイ] オス 4 Press (Function). 5 Press (Function/Edit). 6 Edit the name (see the table on page 8 for instructions). ● If you do not need to edit the name, skip to step 7. (Set). table on page 8 for instructions). (Set).
Main unit Specifications KX-PW201CL KX-PW201CW Main unit Power supply AC 100 V (50 Hz/60 Hz) Portable handset Ni-Cd battery (Part no. KX-FAN37) DC 2.4 V, 600 mAh Transmission: Approx. 8 W Reception: Approx. 13 W Power Copy: Approx. 12 W Approx. 0.5 W consumption Stand by: ( When the F-net service is not in use.) Maximum(*1): Approx. 60 W Battery charger AC adaptor (Part no. PFAP1009) AC 100 V (50 Hz/60 Hz) DC 7.5 V, 100 mA • Charging: Approx. 1.2 W • Stand by: Approx. 0.