Facsimile Quick Reference Guide Model No. KX-PW601DL KX-PW601DW KX-PW601DL Thank you for purchasing a Panasonic facsimile.
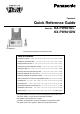
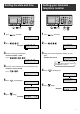
Finding the controls Main unit (control panel) 3 1 2 4 5 6 7 8 17 9 16 1 2 3 4 5 6 7 8 9 10 11 12 2 15 14 E-Mail indicator E-Mail button Pause button Speed Dialer button Hold button Intercom button Auto Answer button & indicator —light on: answering device activated. —light off: used as a regular telephone. Replay button plays back recorded messages. Record button records telephone calls. Stop button Copy button starts copying. Mute button Start/Fax button starts faxing.
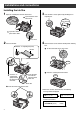
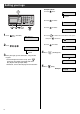
Finding the controls Portable handset Earpiece How to use LCD (with back light) key ● ● To use the phonebook. ● To redial the phone numbers in the redial list. The last 10 phone numbers dialed are stored in memory. Displays battery strength, telephone numbers etc. 1 2 子機1 ● ● 圏外 3 4 機能 留守 5 To adjust the volume. To change Hiragana into Kanji. 1 Portable handset number 2 Indicates which directions the key can be tilted. ● up and down To make/answer calls.
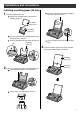
Installations and connections Installing the ink film 1 Open the control panel and the back cover. 3 開く 3 If the ink film is slack, tighten it by winding the “T” shaped gear. Open the back cover until it locks. Do not be slacken. Open the control panel until it locks. 1 2 Press here. 2 Insert the ink film. 4 Close the back cover and the control panel until they lock. Find the “T” shaped gear (blue). 1 To close the back cover, press here.
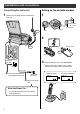
Installations and connections Installing recording paper (A4 size) 1 Install the recording paper tray. 1 3 Insert the recording paper into the recording paper tray. (Up to 30 sheets) Separate the recording paper cover from the recording paper tray. Printin side is g the bac on k Recording paper cover Recording paper tray 2 Insert the left tab on the recording paper tray into the left slot of the main unit. 3 Insert the right tab into the right slot of the main unit.
Installations and connections Connecting the main unit Setting up the portable handset 1 main Connect the cord and place the handset on the unit. 1 Power outlet (AC 100 V) AC adaptor Charger Plug Click 2 停電用 電話機 Black Click 回 (電話回線 線へ) Red Battery cover Connector Click Battery Click 3 Charge the battery in the charger for 10 hours. Telephone line cord ● Wall jack After your Panasonic battery is fully charged, it will last up to about 7 hours of conversation.
Setting the date and time 1 Press (Function). 2 Press . 機 能 登 録 モード Setting your facsimile telephone number 1 Press (Function). 2 Press . 機 能 登 録 モード 2 003年 06月 01日 Example : ■ 20:10 あなたの電 話 番 号 ? ■ ................ Cursor 3 Enter the correct year/month/day. Example: October 1, 2003 Press . Cursor 3 Enter your facsimile telephone number, up to 20 digits.
Setting your logo Example: Micah 1. Press once. M Cursor 2. Press six times. M i 3. Press six times. Mi c 1 Press 4. Press (Function). 機 能 登 録 モード to move the cursor to the next space and press four times. Mic a 2 Press 5. Press . five times. Mica h 名前(印刷用)? >_ Cursor 3 Enter your logo, up to 30 characters, using the dial keypad. 文字切替 ● To enter English characters easily, press (Character input mode) repeatedly and select “英” (English and sign input mode).
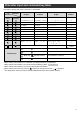
Character input and command key table Pressing the dial keys will select a character as shown below.
Automatic dialing on the main unit Storing names and telephone numbers in the phonebook Making a voice call using the phonebook 1 Press 2 Press (Phonebook). (Search button) repeatedly until the desired name is displayed. 3 Lift the handset or press 1 Press 2 Press Editing a stored name or number in the phonebook (Phonebook). 検 索 は[ ア ア ] を押 す 決定/登録 (Set/Register). “XXX” shows the remaining station numbers you can store. ● You can program up to 150 stations, including 4 preprogrammed stations.
Automatic dialing on the main unit Storing names and telephone numbers in the speed dialer Making a voice call using the speed dialer You can store up to 9 names and telephone numbers which are stored in the phonebook. The dialing buttons ( to ) function as memory stations. 1 Press (Speed dialer). 2 Press the memory station number ( to ). 1 Press (Speed dialer). 2 Press the memory station number ( to ). Example: speed dialer 1 1.登 録 されていません Memory station number 3 Press (Set/Register).
Automatic dialing on the portable handset Storing telephone number in the one-touch dial Making a voice call using the one-touch dial 1 Press 1 Press (one-touch). ワンタッチ 登録されて いません ● (one-touch). The unit will start dialing. 2 When the other party answers, start talking. 2 Enter the telephone number, up to 24 digits. ● To correct a mistake, press (Clear). ワンタッチ登 録 0009876543 3 Press .. Editing a stored number in the one-touch dial 1 Press (Function). 2 Press (one-touch).
Automatic dialing on the portable handset Storing names and telephone numbers in the phonebook Making a voice call using the phonebook 1 Press 2 Press (Phonebook). (Search button) repeatedly until the desired name is displayed. 3 Press (Phonebook). 検索は [ アア] を 押 す アアアアアアアアア 1 Press (Search button) repeatedly until the desired name is displayed. (Register). “XXX” shows the remaining station numbers you can store. ● You can program up to 150 stations, including 4 preprogrammed stations.
Intercom between the main unit and portable handset An intercom is available between the main unit and portable handset. A 2-way intercom is available between 2 portable handsets. (For KX-PW601DL users: An optional handset is needed when using this feature.) Using the main unit: Using the portable handset: 1 ■ For single portable handset users 1 ■ For single portable handset users Press 1 Lift the handset. 番号? (Intercom).
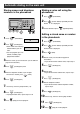
Sending faxes Sending a fax manually Sending a fax using automatic dialing Document Document Document cover Document guide Document cover Document guide FACE DO WN FACE DO WN Document Using the speed dialer 1 Open the document cover, and adjust the width of the 1 Insert the document (up to 5 pages) FACE DOWN document guides to the size of the document. 2 Insert the document (up to 5 pages) FACE DOWN until a single beep is heard.
Receiving faxes Receiving a fax manually (AUTO ANSWER off) Using the main unit: Using the portable handset: 1 When you hear a ring, lift the handset to answer the 1 When you hear a ring, lift the portable handset from call. the charger to answer the call. ● If the portable handset is not set on the charger, (Talk). press 2 When: – document reception is required, – a fax calling tone (slow beep) is heard, or – no sound is heard, press ● 16 (Fax), then replace the handset.
Receiving faxes Receiving a fax automatically (AUTO ANSWER on) Recording your own greeting message light on You can record your own greeting message. When receiving a call, it will be played to callers instead of the pre-recorded Japanese greeting message. 1 If the pressing (Auto answer) light is off, turn it on by . 2 When receiving a call, the unit will receive a fax document or record a voice message automatically depending on the caller’s request. 1 Press 2 Press (Function). .
Operating the built-in answering device Activating the answering device Operating the answering device from a remote location light on/flash light on/flash 1 Turn the (Auto answer) light on by pressing 2 When receiving a call, a greeting message will be played and the unit will record a voice message. ● To record your own greeting message, see page 17. Listening to recorded messages When new messages are recorded, the answer) light will flash. (Auto .
Individual e-mail services Using the e-mail services PCC information services Panasonic Communications Co., Ltd. (hereafter called “PCC”) offers individual information services, such as e-mail. Your fax machine with e-mail features will enable you to send an e-mail to another party’s personal computer (PC) or another e-mail fax machine anywhere in the world through the Internet. Also, you will be able to receive an e-mail from them. The following services are available with your fax machine.
Individual e-mail services Subscribing to PCC information services 7 Enter the valid date of your credit card. 有効期限? ■ . . / . . (月 /年 ) FACE DO WN Month Year 8 Press 決定/登録 (Set/Register). 9 Insert the application form FACE DOWN. 10 Press ● 1 Fill in the included application form.
Individual e-mail services Receiving and printing an e-mail Sending a text e-mail from the main unit 1 Press (E-mail). 2 Press (Search button) repeatedly until the following is displayed. 文 字 Eメ ー ル 送 信 3 Press 1 Press 2 Press ● ● 決定/登録 (Set/Register). 4 Enter the desired e-mail address (see the table on page 9 for instructions), then press (Set/Register). (E-mail). ● 決定/登録 (Set/Register).
Individual e-mail services Sending a fax e-mail Document cover 6 Press WN (see the table on page 9 for instructions). Adju documst the guide ent s ● You can enter the title of the last e-mail you sent by pressing 8 Press 1 Open the document cover, and adjust the width of the document guides to the size of the document. 2 Insert the document (up to 5 pages) FACE DOWN until a single beep is heard. 画質 (Resolution) repeatedly to select the desired setting (see page 15).
Individual e-mail services Storing names and e-mail addresses in the addressbook Editing a stored name or e-mail address in the addressbook 1 Press (Function), then press 2 Press (Search button) repeatedly until the following is displayed. 3 Press (Function), then press 2 Press (Search button) repeatedly until the following is displayed. 3 Press (E-mail). アドレス帳 決定/登録 (Set/Register) twice. 4 Enter the name, up to 20 characters (see the table on アドレス帳 決定/登録 (Set/Register).
Main unit Specifications KX-PW601DL KX-PW601DW Main unit Power supply AC 100 V (50 Hz/60 Hz) Frequency Portable handset Ni-MH battery (Part no. KX-FAN50) DC 3.6 V, 600 mAh AC adaptor (Part no. PFAP1009) AC 100 V (50 Hz/60 Hz) DC 7.5 V, 100 mA 2.4 GHz Transmission: Approx. 16 W Reception: Approx. 22 W Copy: Approx. 20 W Power consumption Stand by: Approx. 1.2 W ( When the F-net service is not in use.) Maximum(*1): Approx. 130 W • Charging: Approx. 1.5 W • Stand by: Approx. 0.