Operating Instructions Link-to-Cell Cellular Convergence Solution Model No. KX-TG9541 KX-TG9542 Model shown is KX-TG9541. Before initial use, see “Getting Started” on page 9. Thank you for purchasing a Panasonic product. Please read these operating instructions before using the unit and save them for future reference. Consulte “Guía Rápida Española”, página 73. For assistance, visit our Web site: http://www.panasonic.com/help for customers in the U.S.A. or Puerto Rico.
Table of Contents Introduction Caller ID Service Model composition ..............................................3 Accessory information ........................................3 System capabilities .............................................5 Using Caller ID service .....................................47 Caller list ...........................................................47 Important Information Copying phonebook from a cellular phone (phonebook transfer) ........................................
Introduction Model composition Series Model No. KX-TG9541 series KX-TG9541*1 KX-TG9542 Base unit Handset Part No. Part No. KX-TG9541 KX-TGA950 Quantity 1 KX-TG9541 KX-TGA950 2 *1 Single handset models: Intercom calls can be made between handsets by purchasing and registering one or more optional handsets (page 4). Accessory information Supplied accessories No.
Introduction Additional/replacement accessories Please contact your nearest Panasonic dealer for sales information (page 83). Accessory item Order number Rechargeable batteries HHR-55AAABUG*1 R To order, please call 1-800-332-5368 or visit http://www.panasonic.
Introduction Trademarks R The Bluetooth® word mark and logos are owned by the Bluetooth SIG, Inc. and any use of such marks by Panasonic Corporation is under license. All other trademarks identified herein are the property of their respective owners. System capabilities The unit can accommodate up to 2 external telephone lines and the following operations are available at the same time.
Important Information For your safety To prevent severe injury and loss of life/property, read this section carefully before using the product to ensure proper and safe operation of your product. Hospitals or health care facilities may be using equipment that could be sensitive to external RF energy. CAUTION Installation and location WARNING Power connection R Use only the power source marked on the product. R Do not overload power outlets and extension cords.
Important Information Important safety instructions When using your product, basic safety precautions should always be followed to reduce the risk of fire, electric shock, and injury to persons, including the following: 1. Do not use this product near water for example, near a bathtub, washbowl, kitchen sink, or laundry tub, in a wet basement or near a swimming pool. 2. Avoid using a telephone (other than a cordless type) during an electrical storm.
Important Information Specifications R Standard: DECT 6.0 (Digital Enhanced Cordless Telecommunications 6.0) Bluetooth wireless technology 2.1 R Frequency range: 1.92 GHz to 1.93 GHz (DECT) 2.402 GHz to 2.48 GHz (Bluetooth) R RF transmission power: 115 mW (max.) R Power source: 120 V AC, 60 Hz R Power consumption: Base unit: Standby: Approx. 1.2 W Maximum: Approx. 4.5 W Charger: Standby: Approx. 0.1 W Maximum: Approx. 1.
Getting Started Connecting the telephone line cord Setting up Connecting the AC adaptor n Base unit R Use only the supplied Panasonic AC adaptor PNLV234. B B A A Refer to one of the following methods depending on your situation: – To connect to a 2-line telephone jack: page 9 – To connect to 2 single-line telephone jacks: page 9 – If you use the unit as a single-line telephone only: page 10 Connect the telephone line cord until it clicks into the base unit and telephone line jack.
Getting Started If you use the unit as a single-line telephone only Example: DSL/ADSL line is line 2 Be sure to connect the telephone line cord to LINE 1/2. Change the line selection mode from “Auto” to “Line1” (page 16). “Click” “GREEN” plug “Click” “Transparent” plug To single-line telephone jack (RJ11C) 2-wire cord “Transparent” plug To 2-line telephone jack (RJ14C) 2-line splitter 4-wire cord “Click” Note: R “Check tel line 2” is displayed on the unit. To erase it, see page 64.
Getting Started Battery installation R USE ONLY Ni-MH batteries AAA (R03) size. R Do NOT use Alkaline/Manganese/Ni-Cd batteries. R Confirm correct polarities ( , ). Do not connect the AC adaptor to a ceiling-mounted AC outlet, as the weight of the adaptor may cause it to become disconnected. Note for battery installation R Use the supplied rechargeable batteries. For replacement, we recommend using the Panasonic rechargeable batteries noted on page 4, 6.
Getting Started Power back-up operation The backup battery in the base unit works as emergency power during a power failure. Battery installation The base unit can provide emergency power if supplied with 2 standard AAA (R03) batteries (not supplied). Important: R Before inserting the batteries into the base unit, disconnect the telephone line cords. B Battery life During a power failure, the following performance will be available.
Getting Started Controls Handset A G H By pressing a soft key, you can select the feature shown directly above it on the display. Navigator key – MDN, MCN, MFN, or MEN: Scroll through various lists and items. (Volume: MDN or MCN): Adjust the receiver – or speaker volume while talking. – MFN : View the phonebook entry. – MEN REDIAL: View the redial list. – MCN CID (Caller ID): View the caller list.
Getting Started M N (PLAY2) (Stop) Message indicator MLINE 1N LINE 1 indicator MLINE 2N LINE 2 indicator MHEADSETN Bluetooth HEADSET indicator USB jack Desk stand/Wall mounting adaptor R The adaptor is a removable attachment for desk stand or wall mounting use (page 62). Microphone Dial keypad (*: TONE) MSPEED DIALN MFLASHN MCALL WAITN MHOLDN MLOCATORN MINTERCOMN R You can locate a misplaced handset by pressing MLOCATORN.
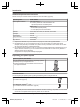
Getting Started Item Meaning – The cellular line is selected for the setting. – A cellular call is being received on that line. Z *2 Corresponding landline number(s) is(are) indicated next to the item. CELL indicators on the base unit The CELL indicators show each cellular line status. Noise reduction is set. (page 24) Status Meaning Equalizer is set. (page 24) On A cellular phone is connected. Ready to make/receive cellular calls. Flashing – The cellular line is in use.
Getting Started 3 Status Meaning Light on The line is in use. Flashing rapidly A call is being received. Flashing A call is put on hold or the answering system is answering a call. Proceed with the operation for your unit. Handset: MOFFN Base unit: MEXITN Voice guidance language Program this setting using either the base unit or one of the handsets. Handset / Base unit Date and time Program this setting using either the base unit or one of the handsets.
Getting Started When answering a call, the ringing line is selected. – “Line1”: Line 1 is selected. – “Line2”: Line 2 is selected. Handset / Base unit 1 2 3 MMENUN#250 MbN: Select the desired setting. a MSAVEN Proceed with the operation for your unit. Handset: MOFFN Base unit: MEXITN Note: R You can select a line manually regardless of the line selection mode by pressing ML1N/ML2N on the handset or MLINE 1N/MLINE 2N on the base unit. For assistance, please visit http://www.panasonic.
Link to Cell Link to cell feature To use this feature, you must first pair and connect your cellular phones to the base unit (page 18). Your cellular phones must have Bluetooth wireless technology that is compatible with this product. This feature allows you to: – make or answer cellular calls using your home phone (handset or base unit) with better reception.
Link to Cell Base unit: MEXITN Link to cell settings Selecting which unit receives cellular calls You can select which unit rings and receives calls for a cellular line. When “All” is selected, all handsets and the base unit ring. Program this setting using either the base unit or one of the handsets. – “On (with Talking CID)” (default): The handset and base unit use your cellular phone’s ringer tone. Caller information is announced even if the Talking Caller ID is turned off.
Link to Cell from the base unit. This feature allows the base unit to try to reconnect the cellular phone at regular intervals when it returns within base unit range. You can set the interval. The default setting is “1 min”. Program this setting using either the base unit or one of the handsets. Important: R When you are using a cellular line or a Bluetooth headset, the base unit loses its connection from other Bluetooth devices (cellular phone or headset).
Link to Cell Changing the Bluetooth PIN (Personal Identification Number) The PIN is used to pair cellular phones to the base unit. The default PIN is “0000”. To prevent unauthorized access to this product, we recommend that you change the PIN, and keep it confidential. Program this setting using either the base unit or one of the handsets. Important: R Please make note of your new PIN. The unit does not reveal the PIN to you. If you forget your PIN, see page 70.
Making/Answering Calls Using the Handset Making cellular calls Making landline calls Important: R Only 1 cellular line can be used at a time. R Before making calls, confirm that the corresponding CELL indicator on the base unit lights up (page 15). 1 Lift the handset and dial the phone number. R To correct a digit, press MCLEARN. 2 M N R An available line is automatically selected. To change the line selection mode, see page 16. R You can also select the line manually by pressing ML1N or ML2N.
Making/Answering Calls Using the Handset Answering calls 1 Press M N or MZN when the unit rings. R To answer a cellular call, you can also press MCELLN. R The called landline is automatically selected. To change the line selection mode, see page 16. R You can also answer the landline call by pressing ML1N or ML2N. 2 When you finish talking, press MOFFN. Any key answer: You can answer the call by pressing any dial key. Auto talk: You can answer calls simply by lifting the handset (page 42).
Making/Answering Calls Using the Handset Handset noise reduction This feature allows you to hear the voice of the person you are talking to clearly, by reducing the surrounding noise coming from the other party’s telephone. Press MNOISE REDUCTIONN to turn on/off while talking. n While another unit is on a landline call: To join the conversation, press ML1N or ML2N to select the line that is being used by another extension for an outside call.
Making/Answering Calls Using the Handset To talk with only one caller, press ML1N or ML2N for the party with which you want to continue talking. To resume both lines, press MCONFN. Conference call with an outside call and an intercom call While you are talking with an outside caller, one more extension can join the conversation and establish a conference call. 1 During an outside call, press MMENUN to put the call on hold. 2 3 4 MbN: “Intercom” a MSELECTN MbN: Select the desired unit.
Making/Answering Calls Using the Handset 2 3 MbN: “Hold” a MSELECTN 4 To hang up the 2nd call and return to the 1st call (cellular call), press MOFFN, then press MCELLN. To make a 2nd call: Dial the phone number.
Making/Answering Calls Using the Base Unit Making cellular calls Important: R Only 1 cellular line can be used at a time. R Before making calls, confirm that corresponding CELL indicator lights up (page 15). 3 When the other party answers, speak into the microphone. 4 When you finish talking, press MZN. 1 2 Dial the phone number. Press the desired cellular line key (MCELL 1N to MCELL 4N).
Making/Answering Calls Using the Base Unit R The called landline is automatically selected. To change the line selection mode, see page 16. R You can also answer the landline call by pressing MLINE 1N or MLINE 2N. 2 3 Speak into the microphone. When you finish talking, press MZN. Temporary ringer off: You can turn the ringer off temporarily by pressing M N. Adjusting the base unit ringer volume Press MDN or MCN repeatedly to select the desired volume.
Making/Answering Calls Using the Base Unit Transferring calls Outside calls can be transferred between 2 people. 1 During an outside call, press MINTERCOMN. When 2 or more handsets are registered: – To page a specific handset, enter the handset number. – To page all handsets, press 0 or wait for a few seconds. 2 Wait for the paged party to answer. R If paged party does not answer, press MINTERCOMN to return to the outside call. 3 Press MZN.
Making/Answering Calls Using the Base Unit R To hold the 2nd call, press MHOLDN. 3 To hang up the 2nd call and return to the 1st call (landline call), press the corresponding line key (MLINE 1N or MLINE 2N). Making/answering a landline call during a conversation on a cellular line 1 2 Press MHOLDN during a cellular call. 3 To hang up the 2nd call and return to the 1st call (cellular call), press MZN, then press the desired cellular line key (MCELL 1N to MCELL 4N).
Intercom Note: R The ringer volume for intercom calls follows the higher volume level of the 2 lines (page 40). Intercom Intercom calls can be made: – between handsets – between a handset and the base unit Note: R When paging unit(s), the paged unit(s) beeps for 1 minute. R If you receive an outside call while talking on the intercom, you hear 2 tones. – To answer the call with the handset, press MOFFN, then press the corresponding line key.
Phonebook Phonebook You can add 3,000 names (16 characters max.) and phone numbers (24 digits max.) to the phonebook, and assign each phonebook entry to the desired group (“Home”, “Cell 1” to “Cell 4”). Important: R All entries can be shared by the base unit and any registered handset. R You can copy phonebook entries from a Bluetooth cellular phone to the unit’s phonebook (page 50). Adding entries Handset / Base unit 1 Proceed with the operation for your unit.
Phonebook 2 3 4 5 6 MbN: Select the desired entry. R To edit the number: MMENUN a MbN: “Edit” a MSELECTN Press MEDITN repeatedly until the phone number is shown in the desired format. And then, press MSAVEN. Go to step 5. MMENUN MbN: “Save CID” a MSELECTN Handset 1 MCELLN R The unit starts dialing when: – only 1 cellular phone is paired. – a specific line is set to make cellular calls (page 20). 2 MbN: Select the desired cellular phone.
Phonebook Base unit: M 2 Na* To search for the name, enter the first characters (up to 4) in uppercase (page 32). R Characters cannot be entered in lowercase. R If there is no entry corresponding to the characters you selected, the next entry is displayed. 3 4 MOKN MbN: Scroll through the phonebook if necessary.
Phonebook entry, press MDN (Pause) to add pauses after the number and PIN as necessary (page 22). R If you have rotary/pulse service, you need to press * (TONE) before pressing MMENUN on the handset or M N on the base unit in step 1 to change the dialing mode temporarily to tone. When adding entries to the phonebook, we recommend adding * (TONE) to the beginning of phone numbers you wish to chain dial (page 32). 3 Enter the party’s name (16 characters max.).
Phonebook Erasing an entry Handset 1 Press and hold the desired speed dial key (1 to 0). a MMENUN 2 3 4 MbN: “Erase” a MSELECTN MbN: “Yes” a MSELECTN MOFFN Base unit 1 2 3 4 5 MSPEED DIALN MbN: Select the desired entry. a MDETAILN MERASEN MbN: “Yes” a MSELECTN MEXITN Viewing an entry/Making a call Handset n Using a cellular line: 1 Press and hold the desired speed dial key (1 to 0). 2 MCELLN R The unit starts dialing when: – only 1 cellular phone is paired.
Programming Menu list To access the features, there are 2 methods. Handset / Base unit n Scrolling through the display menus 1 MMENUN 2 3 4 Press MCN or MDN to select the desired main menu. a MSELECTN Press MCN or MDN to select the desired item from the next sub-menus. a MSELECTN Press MCN or MDN to select the desired setting. a MSAVEN n Using the direct command code 1 MMENUN a Enter the desired code. Example: Press MMENUN#101. 2 Select the desired setting.
Programming Sub-menu 1 Sub-menu 2 Settings Code Greeting Select greeting*3 Greeting2 Greeting1&2 Greeting1&Only Greeting only #3421*1 New message alert*3 Record greeting*3 – Greeting1 – Greeting2 – Greeting only – Check greeting – Greeting1 – Greeting2 – Greeting only – Pre-recorded*3 (Reset to pre-recorded greeting) – Greeting1 – Greeting2 – Greeting only – By calling – On/Off #3021*1 #3031*1 #3041*1 / 55 / 56 / 55 / 57 / 57 / 60 / 61 / 59 / 54 #3042*2 1: O
Programming Main menu: “Intercom” Operation Code Paging the desired unit.
Programming Sub-menu 1 Sub-menu 2 Headset Add new device*4 Settings – Code #621 Unit / 51 Connect*3/ – #622 / 52 Pair – #621 / 51 Unpair – #612 / 52 1: <1 min> 2: 3 min 3: 5 min 4: 10 min 0: Off #632 / 19 – #633 / 20 Disconnect*3 Settings Auto connect*3 Cell area code*3 Cell line select Set PIN*3 Main menu: #634 20 1*4 2*4 3*4 4*4 <0000> #619 / 21 “Set date & time” Sub-menu 1 Date and 0: 1: Cellphone 2: Cellphone 3: Cellphone 4: Cellphone Sub-menu 2 ti
Programming Sub-menu 1 Sub-menu 2 Set date & time Date and time*3 Code – #101 Unit / 16 Alarm 1: Once 2: Daily 0: #720 Time adjustment*3, *9 1: 0: Manual #226 / – Handset: 1: 0: Off Base unit: 1: On 0: #162 / 47 Talking Caller ID – Handset name – Key detector setting*13 – 1: Add new device (for Detector – 2: Add new device (for Detector – 3: Add new device (for Detector – 4: Add new device (for Detector Settings Change name*3 1)*14 – 43 #104
Programming Sub-menu 1 Settings Code LCD contrast (Display contrast) Sub-menu 2 – 1-6: Level 1-6 <3> #145 Key tone – 1: 0: Off #165 Set music on hold*18 – 1: 0: Off #167 / – Caller ID edit (Caller ID number auto edit) – 1: 0: Off #214 / 48 Auto talk*19 – 1: On 0: #200 Line select (for landline) – 0: 1: Line1 2: Line2 #250 / 16 1: Pulse 2: #120 / 16 Set flash time*3, *20 0: 900 ms 1: <700 ms> – Line1 2: 600 ms – Line2 3: 400 ms 4: 300 ms
Programming Main menu: “Key detector”*13 Sub-menu 1 Sub-menu 2 Settings Code Search – – Battery check – – Unit #655 – *1 For Line 1 *2 For Line 2 *3 If you program these settings using one of the units, you do not need to program the same item using another unit. *4 After the Bluetooth device is paired, the device name is displayed.
Programming 2 MbN: Select the desired setting. a MSAVEN R If you select “Off”, press MEXITN to exit. 3 Enter the desired hour and minute you wish to start this feature. 4 5 MAM/PMN: Select “AM” or “PM”. a MOKN MbN: Select the desired alarm tone. a MSELECTN R We recommend selecting a different ringer tone from the one used for outside calls. 6 7 MAM/PMN: Select “AM” or “PM”. MSELECTN a MOFFN Changing the start and end time “Daily” 3 4 5 6 An alarm sounds daily at the set time. Go to step 4.
Programming Important: R We recommend storing 10 digits (including an area code). If only 7 digits are stored, all numbers that have the same last 7 digits will be blocked. n From the caller list: 3 Blocking incoming calls without phone number You can reject a call when no phone number is provided, such as a call just showing “Out of area”. Handset 1 2 Handset / Base unit MCN CID MbN: Select the entry to be blocked.
Programming MERASEN a MbN: “Yes” a MSELECTN a MEXITN Note for handset and base unit: R When viewing, “Block w/o num.”*1 / “Block w/o number”*2 is displayed if the blocking incoming calls without phone number feature is turned on. To turn the feature off: MERASEN a MCN a MSAVEN a MOFFN (Handset) or MEXITN (Base unit) *1 Handset *2 Base unit Other programming Registering a handset to the base unit The supplied handset and base unit are pre-registered.
Caller ID Service Using Caller ID service Important: R This unit is Caller ID compatible. To use Caller ID features, you must subscribe to a Caller ID service. Contact your service provider/telephone company for details. Caller ID features Handset / Base unit When an outside call is being received, the caller information is displayed. Caller information for the last 50 callers is logged in the caller list from the most recent call to the oldest.
Caller ID Service 5 Base unit 1 2 MCIDN 3 To call back, press the desired cellular line key (MCELL 1N to MCELL 4N). To exit, press MEXITN. Press MCN to search from the most recent call, or MDN to search from the oldest call. n Using the landline Handset / Base unit 1 Proceed with the operation for your unit. Handset: MCN CID Base unit: MCIDN 2 Press MCN to search from the most recent call, or MDN to search from the oldest call. 3 Proceed with the operation for your unit.
Caller ID Service Note: R Phone numbers from the 4 most recently edited area codes are automatically edited. Erasing selected caller information Handset / Base unit 1 Proceed with the operation for your unit. Handset: MCN CID Base unit: MCIDN 2 3 4 MbN: Select the desired entry. MERASEN a MbN: “Yes” a MSELECTN Proceed with the operation for your unit. Handset: MOFFN Base unit: MEXITN Erasing all caller information Handset / Base unit 1 Proceed with the operation for your unit.
Using Bluetooth Devices Copying phonebook from a cellular phone (phonebook transfer) You can copy phonebook entries from the paired cellular phones or other cellular phones (not paired) to the unit’s phonebook. A cellular phone must be compatible with Bluetooth wireless technology. Important: R If a copied entry has 2 or more phone numbers, each phone number (6 max.) is stored as a separate entry with the same name.
Using Bluetooth Devices Note: R After you copy the entries, confirm that the numbers were transferred correctly. Text message (SMS) alert This feature sets the handset and base unit to notify the arrival of a new text message on a cellular phone that is paired with the base unit. This notification is displayed momentarily on both the handset and the base unit, and announced. The announcement is in English only. The default setting is “On”.
Using Bluetooth Devices Handset / Base unit 1 Your headset: Set your headset to pairing mode. R Refer to the headset operating instructions. 2 3 MMENUN#621 If your headset PIN is “0000”, go to step 4. If your headset PIN is other than “0000”, press MCLEARN, then enter your headset PIN. R Typically, default PIN is “0000”. Refer to the headset operating instructions. 4 Press MOKN, then wait until a long beep sounds. 5 Proceed with the operation for your unit.
Using Bluetooth Devices n While your headset is on a landline call: To join the conversation with the handset, press M N. R An available line is automatically selected. To change the line selection mode, see page 16. Adjusting your headset receiver volume Base unit Press MDN or MCN repeatedly while using your headset. For assistance, please visit http://www.panasonic.com/help TG954x(en)_0528_ver011.
Answering System for Landline Handset Answering system for landline 1 The answering system can answer and record calls for you when you are unavailable to answer the phone. You can also set the unit to play a greeting message but not to record caller messages by selecting “Greeting only” as the greeting setting (page 61). Answering system settings can be set for each line.
Answering System for Landline – “Greeting2”: The answering system only plays “Greeting2” for all calls. – “Greeting1&2”: The answering system announces either “Greeting1” or “Greeting2”, depending on the time of the incoming call.*1 – “Greeting1&Only”: The answering system announces either “Greeting1” or “Greeting only”, depending on the time of the incoming call.*1 – “Greeting only”: The answering system only plays “Greeting only” for all calls.
Answering System for Landline 3 4 MYESN Calling back (Caller ID subscribers only) Proceed with the operation for your unit. Handset: MOFFN Base unit: MEXITN Playing back the greeting message Handset / Base unit 1 For line 1: MMENUN#3031 For line 2: MMENUN#3032 2 MbN: Select the desired greeting message. a MSELECTN 3 Proceed with the operation for your unit. Handset: To exit, press MOFFN. Base unit: To exit, press MEXITN.
Answering System for Landline being used or you want to select the other line, press ML1N or ML2N. R To call back using a cellular line, continue from step 2, “Making cellular calls”, page 22. Operating the answering system MMENUN a MbN: “Answering device” a MSELECTN a MbN: Select the desired line.
Answering System for Landline Important: R A new message alert is stopped 1 minute after the unit starts to call. The unit will not retry the call even if the call is not answered.
Answering System for Landline Activating/inactivating the remote access code to play messages If you activate this feature, you must enter the remote access code (page 59) to play the new message from the new message alert call. This is so that unauthorized parties cannot listen to your messages. The default setting is “Inactivate”. – “Inactivate”: You can listen to the message by pressing 4 to play new messages (without entering the remote access code).
Answering System for Landline 3 Voice guidance n When the English voice guidance is selected During remote operation, the unit’s voice guidance starts and prompts you to press 1 to perform a specific operation, or press 2 to listen to more available operations. n When the Spanish voice guidance is selected To start the voice guidance, press 9. The voice guidance announces the available remote commands (page 60).
Answering System for Landline your service provider/telephone company to deactivate your voice mail service. If your service provider/telephone company cannot do this: – Set this unit’s “Ring count” setting so that this unit’s answering system answers calls before the voice mail service of your service provider/telephone company does. It is necessary to check the number of rings required to activate the voice mail service provided by your service provider/telephone company before changing this setting.
Useful Information Voice mail service for landline Voice mail is an automatic answering service offered by your service provider/telephone company. After you subscribe to this service, your service provider/telephone company’s voice mail system answers calls for you when you are unavailable to answer the phone or when your line is busy. Messages are recorded by your service provider/telephone company, not your telephone. Please contact your service provider/telephone company for details of this service.
Useful Information C Connect the AC adaptor cord and telephone line cord. Charger Drive the screws (not supplied) into the wall. 27.2 mm (1 1/16 inches) 3 Screws 1 3 2 Insert the lower tabs of the adaptor into the unit’s bottom slots (A), then insert by pushing down the levers of the adaptor into the upper slots (B). R The words “UP WALL” should be facing up. A A B B 4 Mount the unit on a wall then slide down to secure in place.
Useful Information Error messages Display message Cause/solution Base no power or No link. Re-connect base AC adaptor. R The handset has lost communication with the base unit. Move closer to the base unit and try again. R Unplug the base unit’s AC adaptor to reset the unit. Reconnect the adaptor and try again. R The handset’s registration may have been canceled. Re-register the handset (page 46). Busy R No cellular phone is paired to the base unit. Pair a cellular phone (page 18).
Useful Information Troubleshooting If you still have difficulties after following the instructions in this section, disconnect the base unit’s AC adaptor, then reconnect the base unit’s AC adaptor. Remove the batteries from the handset, and then insert the batteries into the handset again. General use Problem Cause/solution The handset does not turn on even after installing charged batteries. R Place the handset on the base unit or charger to turn on the handset. The unit does not work.
Useful Information Menu list Problem Cause/solution The display is in a language I cannot read. R Change the display language (page 16). I cannot register a handset to a base unit. R The maximum number of handsets (6) is already registered to the base unit. Cancel unused handset registrations from the base unit (page 46). Battery recharge Problem Cause/solution The handset beeps and/or flashes. R Battery charge is low. Fully charge the batteries (page 11).
Useful Information Problem Cause/solution I cannot make or answer cellular calls with the handset or base unit. R Depending on the cellular phone’s compatibility, you may not be able to make or answer cellular calls even if the cellular phone is connected to the base unit. R Make sure that the CELL indicator lights up and the cellular phone is connected to the base unit (page 20). R If someone is talking on a cellular call or using the headset, you cannot use the cellular feature.
Useful Information Problem Cause/solution Caller information is not announced. R The ringer volume for landline is turned off. Adjust the ringer volume (page 40). R The ringer volume for cellular line is turned off. Adjust the ringer volume (page 39). R When one handset is selected to ring for cellular calls, other units do not announce caller information. To change the selection, see page 19. R The Talking Caller ID feature is turned off. Turn it on (page 41).
Useful Information Problem Cause/solution Noise is heard during a call on the headset. R A Bluetooth headset can communicate with the base unit within a range of approximately 10 m (33 feet). The connection may be subject to interference from obstructions such as walls or electronic devices. Move closer to the base unit. I cannot connect my headset to the base unit. R Confirm that your headset is turned on.
Useful Information Answering system Problem Cause/solution The unit does not record new messages. R The answering system is turned off. Turn it on (page 54). R The answering system does not answer or record calls from cellular lines. R The message memory is full. Erase unnecessary messages (page 56). R The greeting setting is set to “Greeting only” or Greeting1&Only. Change the setting (page 54).
Useful Information FCC and other information This equipment complies with Part 68 of the FCC rules and the requirements adopted by the ACTA. On the bottom of this equipment is a label that contains, among other information, a product identifier in the format US:ACJ----------. If requested, this number must be provided to the telephone company. L Registration No.............(found on the bottom of the unit) L Ringer Equivalence No. (REN).......0.
Useful Information frequency energy and, if not installed and used in accordance with the instructions, may cause harmful interference to radio communications. However, there is no guarantee that interference will not occur in a particular installation.
Guía Rápida Española Guía Rápida Española Cómo conectar el adaptador para corriente Unidad base L Use solo el adaptador de corriente alterna Panasonic PNLV234 que se suministra. “Clic” A la toma de corriente *Se requiere un filtro DSL/ADSL (no incluido) si tiene servicio de DSL/ADSL. Cargador A la toma de corriente Cómo conectar el cable de la línea telefónica N Para conectarlo a una toma telefónica para 2 líneas “Clic” UTILICE SOLO un cable telefónico de 4 alambres.
Guía Rápida Española Cómo conectar el cable de la línea telefónica N Para conectarlo a 2 tomas telefónicas de una sola línea “Clic” A las tomas telefónicas de una sola línea (RJ11C) Cable de 4 alambres Enchufe “VERDE” Cable de 2 alambres Enchufe “transparente” Línea 2 Línea 1 Si está suscrito a un servicio de DSL/ADSL, añada un filtro de DSL/ADSL a la línea telefónica entre la unidad base y la toma de la línea telefónica. Consulte las instrucciones de operación para ver las conexiones.
Guía Rápida Española Sugerencias de operación Teclas de función Al oprimir una tecla de función, puede seleccionar la función que aparece directamente encima de ella en la pantalla. Preste atención a la pantalla para ver qué funciones están asignadas a las teclas de función durante la operación. Tecla navegadora Auricular: − {^}, {V}, {<}, o {>}: Navegue por diversas listas y elementos. − ? (Volumen: {^} o {V}): Ajuste el volumen del receptor o el altavoz mientras habla.
Guía Rápida Española Cómo grabar el mensaje de saludo del contestador de llamadas para la línea terrestre (Auricular/Unidad base) Si utiliza un mensaje de saludo pregrabado, no es necesario que grabe su propio mensaje de saludo. 1 Para la línea 1: {MENU}(3)21 Para la línea 2: {MENU}(3)22 2 {r}: Seleccione el mensaje de saludo deseado. s {SELEC.} 3 {r}: “Sí” s {SELEC.
Guía Rápida Española Enlace a celular Unidad base: Indicadores de CELL Estado Significado Encendido Un teléfono celular está conectado. Listo para hacer o recibir llamadas celulares. Parpadeando − La línea del celular se está usando. − Las entradas del directorio telefónico se están copiando desde un teléfono celular. − La unidad base está buscando el teléfono celular emparejado. − Una llamada de celular se pone en espera. Parpadea rápidamente Se está recibiendo una llamada de celular.
Guía Rápida Española Operaciones básicas Cómo hacer y contestar llamadas (Auricular) Para hacer llamadas de celular 1 Marque el número telefónico. s {CELL} Para hacer llamadas por la línea terrestre Marque el número telefónico. s {C}/{s} Para contestar llamadas {C}/{s} Para colgar {OFF} Para ajustar el volumen del receptor o del altavoz Oprima {^} o {V} repetidamente mientras habla. Cómo hacer una llamada usando la lista de remarcación 1 {>} REDIAL s {r}: Seleccione el número telefónico deseado.
Guía Rápida Española Operaciones básicas Directorio telefónico (Auricular) Para añadir entradas 1 2 3 4 Para hacer llamadas 1 {<} C s {r}: Seleccione la entrada deseada. 2 Para hacer una llamada celular: {<} C s {MENU} {r}: “Agregar Ent. Nueva” s {SELEC.} Introduzca el nombre de la persona (máx. 16 caracteres). s {OK} Introduzca el número telefónico de la persona (máx. 24 dígitos). s {OK} 5 {r}: Seleccione el grupo deseado. s {SELEC.
Guía Rápida Española Cómo usar dispositivos Bluetooth Copiado de entradas del directorio telefónico desde un teléfono celular con Bluetooth (transferencia del directorio telefónico) (Auricular/Unidad base) Puede copiar entradas del directorio telefónico desde los teléfonos celulares emparejados o desde otros teléfonos celulares (no emparejados) al directorio telefónico compartido de la unidad. 1 {MENU}(618 2 Para copiar desde teléfonos celulares emparejados: {r}: Seleccione el teléfono celular deseado.
Guía Rápida Española Cómo usar dispositivos Bluetooth Cómo usar un audífono Bluetooth (opcional) para llamadas por la línea terrestre Al emparejar un audífono Bluetooth con la unidad base, podrá tener conversaciones inalámbricas a manos libres para llamadas terrestres. L La conexión del audífono con Bluetooth no está disponible mientras alguien se encuentra usando la línea celular.
Guía Rápida Española Preguntas frecuentes Pregunta Causa y solución ¿Por qué aparece _? L El auricular está demasiado lejos de la unidad base. Acérquelo. L El adaptador para corriente de la unidad base no está conectado correctamente. Conecte de nuevo el adaptador para corriente a la unidad base. L El auricular no está registrado en la unidad base. Regístrelo.
Appendix Customer services Customer Services Directory (United States and Puerto Rico) Obtain Product Information and Operating Assistance; locate your nearest Dealer or Service Center; purchase Parts and Accessories; or make Customer Service and Literature requests by visiting our Web Site at: http://www.panasonic.com/help or, contact us via the web at: http://www.panasonic.
Appendix Warranty (For United States and Puerto Rico) PANASONIC CORPORATION OF NORTH AMERICA One Panasonic Way, Secaucus, New Jersey 07094 Panasonic Telephone Products Limited Warranty Limited Warranty Coverage If your product does not work properly because of a defect in materials or workmanship, Panasonic Corporation of North America (referred to as “the warrantor”) will, for the length of the period indicated on the chart below, which starts with the date of original purchase (“Limited Warranty period”
Appendix Limited Warranty Limits And Exclusions This Limited Warranty ONLY COVERS failures due to defects in materials or workmanship, and DOES NOT COVER normal wear and tear or cosmetic damage.
Index E Index # A B C D 3-way conference: 24, 28 Additional handset: 46 Alarm: 43 Answering calls: 23, 27 Answering system Call screening: 54 Erasing messages: 56, 57, 60 Greeting message: 54 Greeting only: 61 Listening to messages: 56, 59 New message alerting: 57 Number of rings: 60 Recording time: 61 Remote access code: 59 Remote operation: 59 Ring count: 60 Toll saver: 60 Turning on/off: 54 Auto talk: 42 Battery: 11 Bluetooth wireless technology Cellular phone (Link to cell): 18 Headset: 51 Phoneboo
Index Speaker: 22, 27 W Wall mounting: 62 87 TG954x(en)_0528_ver011.
IMPORTANT! If your product is not working properly. . . 1 Reconnect AC adaptor to the base unit. 2 Check if telephone line cord is connected. 3 Use rechargeable Ni-MH batteries. (Alkaline/Manganese/Ni-Cd batteries CANNOT be used.) 4 Read troubleshooting page in the Operating Instructions. Visit our Web site: http://www.panasonic.com/help L FAQ and troubleshooting hints are available.