
Operating Manual
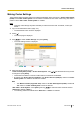


3. Use [ ][ ]
to select "HDMI Settings" and press
[Enter].
• The HDMI settings screen is displayed.
4. Use [ ][ ]
to select the following items for input:
"One Touch Play": Use [
][ ]
to select "ON" or
"OFF" (default).
Note
• Normally, select "OFF". Changing this
settings to "ON" may cause the image to
change automatically depending on the
model of the connected video camera.
"Standby": Use [ ][ ] to select "ON" or
"OFF" (default).
Note
• Depending
on the connected video camera,
changing this settings to "ON" may cause
the video camera (Main, Sub) to
synchronise and enter screen standby
mode when the unit enters screen standby
mode. Since operation may differ
depending on your video camera model,
contact your dealer for details.
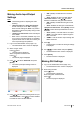
5. Press [G].
• A dialogue box to confirm the saving of settings
is displayed.
6. Use [
][ ] to select "Yes" and press [Enter].
• The administrator menu screen is displayed.
7. Press [Home].
• The Home screen is displayed.
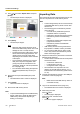
Exporting Data
The call log, operation log, and contacts list can be
saved on a USB memory device. The saved operation
log can be used to specify the cause when problems
occur. For details, contact your dealer.
Note
• A
mass storage class (FAT16 or FAT32 format)
compatible USB memory device can be used
with this unit.
• The following types of USB memory devices
cannot be used:
– U3 smart drives (USB memory devices
compatible with the U3 platform)
– USB memory devices with security features
– USB memory devices formatted using
NTFS
– USB memory devices with multiple LUNs
(Logical Unit Numbers)
– USB memory devices formatted with
multiple partitions
• USB memory devices are not guaranteed to
fully operate. For details, contact your dealer.
• To re-connect a USB memory device, make
sure to fully remove the USB memory device
before connecting it again.
• Confirm the USB memory device has sufficient
free space (at least 10 MB) before using it.
1. Connect the USB memory device to the USB jack
on the back of the unit (Page 22).
Note
• Make sure that the USB memory device is
connected correctly.
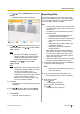
2. Log in to the administrator menu
(Page 112).
• The administrator menu screen is displayed.
3. When using IP mode:
Press [
] twice.
• The third page is displayed.
When using NAT Traversal mode:
Press [ ].
• The second page is displayed.
Document Version 2013-09 User Manual 125
Contacts and Settings