
Operating Manual


• See Page 40 for details about the
characters that can be input for address
entry.
• If
the other party has the same SIP domain
name as yours, you can register only their
SIP user name. If the other party has a
different SIP domain name from yours, their
SIP domain name must be entered along
with their SIP user name.
• If the SIP domain name is not entered, your
own SIP domain name is automatically
appended to the registered contact. This
may result in a different, unintended party
being registered as a contact, so be careful
when entering a contact’s information.
• When using H.323, you can also call by
entering the other party’s IP address (or
host name) %H.323 extension number (or
H.323 name).
• Enter a standards-compliant value.
For details, contact your network
administrator.
4. Press [G].
• A dialogue box to confirm the saving of settings
is displayed.
5. Use [
][ ] to select "Yes" and press [Enter].
• The contact list screen is displayed.
Note
• To continue entering another contact, press
[B] and repeat steps 3–5.
6. Press [Home].
• The Home screen is displayed.
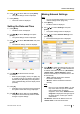
Registering a Multiple-party Contact
Note
• When using H.323, you cannot register a
multiple-party contact.
• If you are using the KX-VC300, registering a
multiple-party contact can only be done after
purchasing an activation key card
(KX-VCS301) to activate multiple
-party video
conference calls (Page 127). For details about
the activation key, contact your dealer.
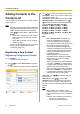
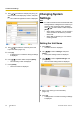
1. Press [Menu].
• The Menu screen is displayed.
2. Use [ ][ ] to select "New Contact" and press
[Enter].
• The
contact list registration screen is displayed.
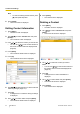
3. Use [ ][ ]
to select the following items for input:
"Group/Site": Enter a name for the video
conference call (up to 24 characters) (Page 137).
"Speed Dial": Enter a speed dial number (1–300).
"Multi-Point": Use [
][ ] to select "2 sites" or
"3 sites".
For "Site 1"/"Site 2"/"Site 3": Use the following
procedure to select these from the contact list
screen.
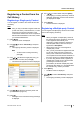
1. Use [ ][ ] to select "Site 1", "Site 2" or
"Site 3".
2. Press [Enter].
• The contact list screen is displayed.
3. Select a contact using [
][ ].
• You can use [
][ ] or the numeric
buttons of the remote control to select the
displayed tab (Page
45).
4. Press [Enter].
• The contact list registration screen is
displayed.
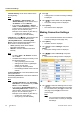
Note
• When "Multi-Point" is set to "2 sites" or
"3 sites", the maximum bandwidth that is
set on the connection settings screen
(Page 98), or on the select local site
screen when a local site is selected
(Page 131) is applied.
4. Press [G].
• A
dialogue box to confirm the saving of settings
is displayed.
5. Use [
][ ] to select "Yes" and press [Enter].
• The contact list screen is displayed.
Document Version 2013-09 User Manual 93
Contacts and Settings