Multi-Function Laser Fax Operating Instructions Model No. KX-FLM551E Please read these Operating Instructions before using the unit and save for future reference. This model is designed to be used in the United Kingdom and Ireland.
Thank you for purchasing a Panasonic facsimile. Things you should keep a record of Attach your sales receipt here For your future reference Date of purchase Serial number (found on the rear of the unit) Dealer’s name and address Dealer’s telephone number Caution: Do not rub or use an eraser on the printed side of recording paper, as the print may smear. In the event of problems, you should contact your equipment supplier in the first instance.
IMPORTANT WARRANTY REGISTRATION PLEASE FAX BACK TO REGISTER FOR YOUR 12 MONTHS WARRANTY FAX BACK NUMBER 08700 600001 Thank you for purchasing your Panasonic facsimile. By filling in the section below, this will ensure the following: ● Should you ever require a service call under warranty, your call will be dealt with quickly and efficiently. ● If you have any problems, please call our customer helpline on 08701 580560 for UK.
1. This machine is supplied with a one year swap out warranty. Please retain your Proof of Purchase and Packaging in the unlikely event that your machine should require attention. For further information please contact us on 08701 580560 or visit our web site at www.panasonic.co.uk 2. This warranty is in addition to and does not in any way affect any statutory or other right of consumer purchasers.
Safety instructions Important safety instructions! When using this unit, basic safety precautions should always be followed to reduce the risk of fire, electric shock, or personal injury. 1. Read and understand all instructions. 2. Follow all warnings and instructions marked on this unit. 3. Unplug this unit from power outlets before cleaning. Do not use liquid or aerosol cleaners. Use a damp cloth for cleaning. 4.
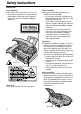
Safety instructions CAUTION: Laser radiation ● The printer of this unit utilises a laser. Use of controls or adjustments or performance of procedures other than those specified herein may result in hazardous radiation exposure. Fuser unit Fuser unit ● The fuser unit gets hot. Do not touch it. Toner cartridge Be careful of the following when you handle the toner cartridge. — Do not leave the toner cartridge out of the protection bag for a long time. It will decrease the toner life.
Safety instructions CAUTION: Installation ● Never install telephone wiring during a lightning storm. ● Never install telephone jacks in wet locations unless the jack is specifically designed for wet locations. ● Never touch uninsulated telephone wires or terminals unless the telephone line has been disconnected at the network interface. ● Use caution when installing or modifying telephone lines.
Table of Contents Initial Preparation Accessories Included accessories . . . . . . . . . . . . . . . . . . . . . . . . . . . . . . . . . . . . . 8 Accessory information . . . . . . . . . . . . . . . . . . . . . . . . . . . . . . . . . . . . 9 Help Button Help function . . . . . . . . . . . . . . . . . . . . . . . . . . . . . . . . . . . . . . . . . . 10 Finding the Controls Overview . . . . . . . . . . . . . . . . . . . . . . . . . . . . . . . . . . . . . . . . . . . . . 10 Location. . . . . . . . . .
Multi-Function Station software Setup (PC) Connecting to a computer . . . . . . . . . . . . . . . . . . . . . . . . . . . . . . . . 45 Installing Multi-Function Station software . . . . . . . . . . . . . . . . . . . . . 46 Activating Multi-Function Station software . . . . . . . . . . . . . . . . . . . . 47 Printing (PC) Using the fax machine as a printer . . . . . . . . . . . . . . . . . . . . . . . . . . 48 Scanning (PC) Using the fax machine as a scanner . . . . . . . . . . . . . . . . . . . . . . .
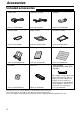
Accessories Included accessories! Mains lead......................1 Telephone line cord ...........1 Handset ...........................1 Order No. PFJA03A005Z Order No. PQJA87S Order No. PFJXE1005Z Handset cord...................1 Paper stacker ..................1 Document stacker ...........1 Order No. PFJA1029Z Order No. PFZX1FL501M Order No. PFKS1055Z1 Paper tray........................1 Operating instructions ......1 Quick Start Sheet.............1 Order No. PFZXFLM551M Order No.
Accessories Accessory information! Panasonic Accessories and Consumables DIRECT Order accessory and consumable items for all Facsimile Products with ease and confidence either by going on line through our Internet Accessory ordering application at www.panasonic.co.uk ● Or telephone our Customer Care Centre on 08701 580560 Mon - Friday 9:00am - 5:30pm ● Most major credit and debit cards accepted. ● All enquires transactions and distribution facilities are provided directly by Panasonic UK Ltd.
Help Button / Finding the Controls Help function! You can print a quick reference for assistance as follows. 1 5. How to use the copier function. Press l. COPIER ROTATE $ & SET Display: 6. List of available reports. 2 Rotate g until the desired item is displayed. 1. How to set the date, time, your logo and fax number. REPORTS 7. How to use the Caller ID service. CALLER ID QUICK SET UP 3 2. How to program the features. FEATURE LIST Press w. PRINTING 3.
Finding the Controls Location! ● To turn on/off AUTO ANSWER (p. 36, 37). ● ● ● ● ● To make a collated copy (p. 44). To store a scanned document into memory, and then send it (p. 30). ● ● To use one-touch dial (p. 22, 25, 32). To transmit to multiple entries (p. 33, 35). To print a quick reference (p. 10). Display To adjust volume (p. 21). To select an enlargement or reduction rate in copy mode (p. 44). ● To select a resolution (p. 30, 43).
Setup Toner cartridge and drum unit! Caution: ● Read the instructions below before you begin installation. After you have read them, open the drum unit protection bag. The drum unit contains a photosensitive drum. Exposing it to light may damage the drum. Once you have opened the protection bag: — Do not expose the drum unit to light for more than 5 minutes. — Do not touch or scratch the green drum surface. — Do not place the drum unit near dust or dirt, or in a high humidity area.
Setup 5b turn the two levers on the toner cartridge with firm pressure. Levers 6 The toner cartridge is installed when the triangles match. Triangles 7 Push the front cover open button then open the front cover. 8 Install the drum and toner unit by holding the tabs. ● If the lower glass is dirty, clean it with a soft and dry cloth. Front cover Front cover open button Drum and toner unit Lower glass 9 Close the front cover, until locked, by pushing down on both sides.
Setup Document stacker, paper stacker and paper tray! Document stacker Align with the ribs on the document exit (#). Pull the document stacker forward gently until it clicks into place ($). 2 Document exit Document stacker 1 Ribs Paper stacker Pegs Line up the slots in the paper stacker with the pegs on the bottom of the unit, then slide until locked. Open the paper stacker extender when using legal size paper. Paper stacker ● The paper stacker can hold up to approx. 100 sheets of printed paper.
Setup Recording paper! A4, letter or legal size recording paper can be used for fax messages. The unit can hold up to 150 sheets of 60 g/m2 to 75 g/m2 paper or 120 sheets of 90 g/m2 paper. See the note for paper specifications on page 74. ● The unit is set for A4 size paper by default. If you want to use letter or legal size paper, change the setting (feature #16 on page 55). 1 Pinch the right side of the recording paper guides, then slide it open to its full width.
Setup Connections! 1 2 3 Connect the handset cord. Connect the telephone line cord. Connect the mains lead. ● When the power is turned on for the first time, the unit will print some basic information. To Household Mains Supply (220–240 V, 50 Hz) Mains lead Connect to “LINE”. Handset cord To B.T. socket Telephone line cord Caution: ● When you operate this product, the power outlet should be near the product and easily accessible. ● Be sure to use the telephone line cord included in this unit.
Setup Date and time, your logo and facsimile telephone number! You should program the date and time, your logo and facsimile telephone number. This information will be printed on each page transmitted from your unit. Your logo Example: Your facsimile telephone number FROM : Panasonic Fax FAX NO. : 1234567 Date and time 26 Feb. 2002 09:02AM PP1 Fax Correspondence Setting the date and time 1 Press p. 2 Press #, then 01. Display: SYSTEM SET UP SET DATE & TIME 7 Press w. 8 Press p.
Setup Setting your logo The logo can be your company, division or name. 1 Press p. 2 Press #, then 02. 3 Press w. 4 Enter your logo, up to 30 characters, using the dial keypad. See the next page for details. Display: Display MENU / SYSTEM SET UP YOUR LOGO LOGO= EASY DIAL R (Hyphen) SET STOP (Delete) HANDSET MUTE (Insert) Example: “Bill” 1. Press 2 2 times. To change capital or lower case letters LOGO=B Pressing the # key will change to capital or lower case alternatively. Cursor 2.
Setup To select characters with the dial keypad Pressing the dial keys will select a character as shown below. Keys Characters 1 1 [ ] { } + – 2 A B C a b c 2 3 D E F d e f 3 4 G H I g h i 4 5 J K L j k l 5 6 M N O m n o 6 7 P Q R S p q r 8 T U V t u v 8 9 W X Y Z w x 0 0 ( ) ! < > / = s 7 y z 9 " # $ , . _ ` : ; ? | % & ¥ ? @ ^ ’ → To change capital or lower case letter.
Setup Setting your facsimile telephone number 1 Press p. 2 Press #, then 03. 3 Press w. 4 Enter your facsimile telephone number, up to 20 digits, using the dial keypad. Display: Display MENU SYSTEM SET UP YOUR FAX NO. NO.= Example: 5 Press w. 6 Press p. NO.=1234567 SETUP ITEM [ ] Note: ● You can enter your facsimile telephone number by rotating g in step 4. In this case, press ) to move the cursor. ● The * button replaces the digit with a “+” and the # button replaces it with a space.
Volumes / Recall Feature Adjusting volume! Ringer volume Monitor volume 4 levels (high/middle/low/off) are available. While the unit is idle, press , or .. 8 levels (high to low) are available. While using the monitor, press , or .. ● If any documents are in the document entrance, you cannot adjust the ringer volume. Confirm that there are no documents in the entrance. To turn the ringer off: 1. Press . repeatedly until the following is displayed.
Automatic Dialling Storing names and telephone numbers into one-touch dial! For rapid access to frequently dialled numbers, the unit provides 10 entries for one-touch dial. ● Stations 1 to 3 can be used alternatively as broadcast keys (p. 33). 1 Station keys Press DE. Display: / PRESS STATION / OR USE EASYDIAL 2 For stations 1–3: Press one of the station keys. DIAL MODE $ Press w to go to the next prompt. R (Hyphen) For stations 4–5: Press one of the station keys.
Automatic Dialling Storing names and telephone numbers into EASY DIAL! For rapid access to frequently dialled numbers, the unit provides a EASY DIAL directory (100 entries). 1 Press DE. Display: / PRESS STATION / OR USE EASYDIAL 2 Rotate g until the following is displayed. NAME= 3 Enter the name, up to 10 characters (see page 19 for instructions). Example: NAME=Alice 4 Press w. 5 Enter the telephone number, up to 30 digits, using the dial keypad. ● If SET DIRECTORY PROGRAM STOP (Delete) NO.
Automatic Dialling Editing a stored entry! You can edit a name or number that is stored in one-touch dial and EASY DIAL. 1 Rotate g until the desired name is displayed. Example: Mary Station key number for one-touch dial 2 Press DE. 3 Press * to select “EDIT”. 6 7 Edit the telephone number. For further details, see page 23. Press w. REGISTERED EDIT=? DELETE=# Example: NAME=Mary ● If you do not need to edit the name, skip to step 5. 4 5 Edit the name (see page 19 for instructions).
Automatic Dialling Making a phone call using one-touch dial and EASY DIAL! Before using this feature, program the desired names and telephone numbers into one-touch dial and EASY DIAL (p. 22, 23). Using one-touch dial 1 Press q or lift the handset. Display: ● 2 TEL= Confirm that there are no documents in the document entrance. For stations 1–5: Press the desired station key. For stations 6–10: Press o, then press the desired station key. Example: ● MONITOR NAME/TEL NO.
Caller ID Caller ID service from your phone company! This unit is compatible with the Caller ID service offered by your local telephone company. To use this feature, you must subscribe to the Caller ID service. Important: ● This unit is designed in accordance with the “FSK based subscriber line protocol” under the ETS (European Telecommunication Standard) and only supports the basic CLIP (Calling Line Identification Presentation) features.
Caller ID Viewing and calling back using caller information! You can easily view caller information and call back. Important: ● Calling back will not be possible in the following cases: — The telephone number includes data other than numbers (i.e.: or #). — The caller information does not include a telephone number. 1 Press AC. (2 new calls are received) Example: FACE DOW N 2 NEW CALLS / Display: 2 3 USE EASY DIAL Rotate g to the right (clockwise) to search from the most recent caller information.
Caller ID Printing and erasing the Caller ID list ! 1 MENU Press AB to start printing. Display: PRINTING ● The display will show the following after printing. ERASE ALL OK? / YES:SET/NO:STOP 2 Press { to exit the program, or press w to erase all of the stored caller information. To erase all caller information without printing 1. Press p repeatedly until the following is displayed. Display: CALLER SET UP 2. Press w. CALL LIST ERASE 3. Press w.
Caller ID Storing caller information into one-touch dial and EASY DIAL! Important: ● This feature is not available in the following cases. — The telephone number includes data other than numbers (i.e.: or #). — The caller information does not include a telephone number. 1 Press AC. Example: For EASY DIAL: Rotate g. 2 NEW CALLS / Display: 2 USE EASY DIAL Example: 5 1345678901 NO.=1345678901 Press w. REGISTERED Press DE. PRESS STATION / OR USE EASY DIAL 4 NAME= Press w.
Sending Faxes Sending a fax manually! 1 2 Document guides Adjust the width of the document guides to the size of the document. FACE DOW Insert the document (up to 15 pages) FACE DOWN until the unit grasps the document and a single beep is heard. Display: N STANDARD 3 If necessary, press u repeatedly to select the desired setting (see below). 4 5 6 Press q or lift the handset. MONITOR TEL= RESOLUTION FAX START Dial the fax number.
Sending Faxes Convenient way to send a fax Sending report for confirmation You can dial the fax number first before inserting the document. This is convenient if the other party’s number is indicated on the document. 1. Enter the fax number. ● The handset must be on the cradle. 2. Insert the document. 3. Press i. This report will provide you with a printed record of transmission results. To use this feature, activate feature #04 (p. 54). For the communication message in the result column, see page 58.
Sending Faxes Sending a fax using one-touch dial and EASY DIAL! Before using this feature, program the desired names and telephone numbers into one-touch dial and EASY DIAL (p. 22, 23). 1 2 Adjust the width of the document guides to the size of the document. Insert the document (up to 15 pages) FACE DOWN until the unit grasps the document and a single beep is heard. Display: If necessary, press u repeatedly to select the desired setting (p. 30). 4 Enter the fax number.
Sending Faxes Broadcast transmission! This feature is useful for sending the same document to selected parties (up to 20 entries). First program the entries, then see page 35 for transmission. ● The broadcast function utilises stations 1–3. The one-touch dial function will be cancelled. ● a key 1 and 2 can accept one-touch dial and EASY DIAL entries. HI key can also accept manual dialling entries. Programming entries into the broadcast memory 1 Press DE.
Sending Faxes Adding a new entry into the broadcast memory 1 Rotate g until the desired key name is displayed. Example: 2 3 4 5 6 Press DE to exit the program. Press DE. ADD=? DELETE=# Press * to select “ADD”. Rotate g until the desired name you want to add is displayed. Example (EASY DIAL): Mike Example (Station 2): Peter SET EASY DIAL DIRECTORY PROGRAM STOP Press w. REGISTERED ! Example: Nikki ● To add other entries, repeat steps 4 and 5 (up to 20 entries).
Sending Faxes Sending the same document to pre-programmed parties 1 2 Insert the document FACE DOWN. ● If necessary, press u repeatedly to select the desired setting (p. 30). MANUAL BROAD BROADCAST FACE DOW N Press the desired a (1–2) or HI. can also use g. Display the desired key name, and press i. ● You Example: ● The document will be fed into the unit and scanned into memory. The unit will then transmit the data to each entry, calling each number sequentially.
Receiving Faxes Setting the unit to receive faxes! Use only as a fax With answering machine External telephone answering machine (not included) How you want the unit to receive calls You have a separate telephone line just for faxes. You want to use the fax machine with an answering machine. FAX ONLY mode (p. 39) Activating an answering machine (p. 40) Turn AUTO ANSWER on by pressing PQ. You have to set this.
Receiving Faxes Mostly phone calls Other option Remote fax activation Ring Ring Ring You can also receive a fax using an extension telephone. While hearing a fax calling tone with an extension telephone, press *9 (preselected fax activation code) to receive a fax (p. 42). You plan to answer the calls yourself. TEL mode (p. 38) Turn AUTO ANSWER off by pressing PQ. OFF When receiving calls: You have to answer all calls manually. To receive a fax document, press i for each fax you are receiving.
Receiving Faxes TEL mode! (answering all calls manually) Activating TEL mode If the AUTO ANSWER light is on, turn it off by pressing PQ. Display: OFF TEL MODE Receiving a fax manually 1 2 When the unit rings, lift the handset to answer the call. When: — document reception is required, — a fax calling tone (slow beep) is heard, or — no sound is heard, press i. Display: 3 STOP FAX START CONNECTING..... Replace the handset. ● The unit will start fax reception.
Receiving Faxes FAX ONLY mode! (all calls are received as faxes) Activating FAX ONLY mode If the AUTO ANSWER light is off, turn it on by pressing PQ. Display: ● FAX ONLY MODE ON The unit will automatically answer all calls and only receive fax documents. SET Note: ● The number of rings before a call is answered in the FAX ONLY mode can be changed (feature #06 on page 54). ● This mode should not be used with a telephone line which is used for both phone calls and faxes.
Receiving Faxes Using the unit with an answering machine! Setting up the fax machine and an answering machine 1 Connect the answering machine. Remove the stopper and connect the cord. Extension telephone adaptor (not included) Answering machine (not included) Telephone line cord (not included) 2 3 Set the number of rings on the answering machine to less than 4. ● This will allow the answering machine to answer the call first. 4 5 Activate the answering machine.
Receiving Faxes How the fax machine and answering machine work Receiving phone calls The answering machine will record voice messages automatically. Receiving faxes The fax machine will receive documents automatically when the machine detects a fax calling tone. Receiving a voice message and fax document in one call See below. Note: ● Every time the fax machine receives a document, a silent pause or fax tone may be recorded on the answering machine.
Receiving Faxes Extension telephone! If you use the fax machine with an extension telephone, you can receive fax documents using the extension telephone. You do not have to press i on the fax machine. Important: ● Use a touch tone telephone as the extension telephone and enter the fax activation code firmly. 1 2 3 When the extension telephone rings, lift the handset of the extension telephone.
Copying Making a copy! The unit can make single or multiple copies (up to 99). 1 2 Adjust the width of the document guides to the size of the document. Document guides Insert the document (up to 15 pages) FACE DOWN until the unit grasps the document and a single beep is heard. Display: FACE DOW N STANDARD necessary, press u repeatedly to select the desired setting (see below). ● Make sure the handset is on the cradle. ● If 3 COPY START Press d.
Copying To reduce or enlarge a document To make a reduced copy, press . repeatedly and select the desired reduction rate. The unit can reduce copies to as little as 50% of the original by changing the reduction rate 5% at a time. To make an enlarged copy, press , repeatedly and select the desired enlargement rate. The unit can enlarge copies to as much as 200% of the original by changing the enlargement rate 5% at a time.
Setup (PC) Connecting to a computer! Panasonic Multi-Function Station software enables your fax machine to carry out the following functions: — Printing on plain paper, transparencies, labels and envelopes — Scanning documents and converting an image into text with Readiris OCR software — Scanning from other Microsoft ® Windows ® applications that support TWAIN scanning — Storing, editing or erasing entries in directories from your PC — Programming the basic and advanced features from your PC To run Multi-F
Setup (PC) Installing Multi-Function Station software! 1 Start Windows 95/98/Me/2000 and close all other applications. ● The following dialogue box will appear. Click [Cancel] to close it. 3 Follow the instructions on the screen until all files have been installed. ● Readiris OCR software can also be installed. For details about OCR software, see page 51. ● If the fax machine is not connected to your computer, the [Port Selection] dialogue box will appear. Select the port number which you want to use.
Setup (PC) Activating Multi-Function Station software! 1 2 Click [Start] in Windows. Point to [Programs], point to [Panasonic Multi-Function Station] and click [Launcher]. ● [Launcher] will appear. Remote Control (p. 52) ● To store, edit or erase entries in directories. ● To program the basic and advanced features. ● To view or erase items in the journal report or Caller ID list. ● To store caller information into directories. Viewer (Scan) (p.
Printing (PC) Using the fax machine as a printer! You can print not only on plain paper but also on special media (transparencies/labels/envelopes). Printing from Windows applications You can print a file created in a Windows application. For example, to print from Microsoft Word, proceed as follows. 1 Open the document you want to print. 2 Select [Print...] from the [File] menu. ● The [Print] dialogue box will appear. For details about the [Print] dialogue box, click [?], then click the desired item.
Printing (PC) Transparencies Use transparencies designed for laser printing. Load transparency sheets one page at a time for printing. Remove each transparency after printing and place it on a flat surface to cool and to prevent it from curling. ● Close the paper stacker extender (p. 14) while printing to prevent transparencies from curling. ● Do not re-use transparencies that have already been fed through the fax machine.
Printing (PC) Envelopes Use envelopes designed for laser printing. We recommend the following: — High quality envelopes of 90 g/m2 paper, — Envelopes that have thin sharply creased leading edges, and — Envelopes that have diagonal seams as shown right. You can load up to 10 envelopes of 90 g/m2 paper at a time for printing. ● Remove each envelope after printing. ● Wrinkles may occur in some cases, even if high quality envelopes are used. ● Avoid printing in high humidity, above 70% relative humidity (RH).
Scanning (PC) Using the fax machine as a scanner! Using Multi-Function Viewer 1 2 3 Insert the document (up to 15 pages) FACE DOWN in the fax machine. 4 Select [Scan...] from the [File] menu, or click the [Scan] icon in the tool bar. 6 Start Multi-Function Station. Select [Viewer (Scan)]. ● ● The [Multi-Function Viewer] window will appear. The [Panasonic FLM551/FLB751 Series] dialogue box will appear. Click [Scan].
Remote Control (PC) Operating the fax machine from your computer! You can easily operate the following functions from your computer. — — — — — — — Storing, editing or erasing entries in directories (p. 22–24, 33, 34) Programming the basic and advanced features (p. 54–57) Viewing or erasing items in the journal report (p. 31) Storing the journal report as PC file Viewing or erasing items in the Caller ID list (p. 26) Storing caller information into directories (p.
Features Summary Programming! The unit provides various programming features. Program the desired settings by referring to the programming tables (p. 54–57). General programming method 1 Press p. 2 Select the feature you wish to program. For basic features (p. 54, 55): Rotate g until the desired feature is displayed. For advanced features (p. 56, 57): Rotate g until the following is displayed: ADVANCED MODE Display: MENU SYSTEM SET UP then press w and rotate g until the desired feature is displayed.
Features Summary Basic features! How to set menu options 1. Press p. 5. Press w. 2. Rotate g until the desired feature is displayed. 6. Press p. 3. Press w. Note: ● Step 4 may be slightly different depending on the feature. ● See page 53 for more details. 4. Rotate g until the desired setting is displayed. Programming table Code Feature & Display Settings See page 17 for details.
Features Summary Code Feature & Display Settings Securing the remote operation for the answering machine REMOTE TAM ACT. #12 If you are using the unit with an answering machine, activate this feature, and set the remote activation ID to secure the remote operation for the answering machine. Selecting the cable type to connect to the PC ON / ID=11 OFF PARALLEL PC INTERFACE #15 If you use Multi-Function Station, change the setting depending on the cable connected to your computer.
Features Summary Advanced features! How to set menu options 1. Press p. 4. Rotate g until the desired setting is displayed. 2. Rotate g until the following is displayed: 5. Press w. 6. Press p. ADVANCED MODE then press w and rotate g until the desired feature is displayed. Note: ● Step 4 may be slightly different depending on the feature. ● See page 53 for more details. 3. Press w.
Features Summary Code Feature & Display Changing the display contrast #39 Settings NORMAL LCD CONTRAST DARKER Changing the fax activation code FAX ACTIVATION #41 If you use an extension telephone and wish to use it to receive a fax, activate this feature, and enter the code (p. 42). ● This code is also used to receive a voice message and a fax in the same call (p. 41).
Error Messages Reports! If your unit cannot send a fax, check the following: — the number you dialled is correct, — the other party’s machine is a facsimile. If the problem remains, correct it by following the communication message printed on the sending and journal reports (p. 31). COMMUNICATION ERROR (CODE: 40–42, 46–52, 58, 65, 68, 72, FF) ● A transmission or reception error occurred. Try again or check with the other party. NO DOCUMENT ● The document was not fed into the unit properly.
Error Messages Display! If the unit detects a problem, one or more of the following messages will appear on the display. Display message Cause & solution CALL SERVICE ● There is something wrong with the unit. Contact our service personnel. CHANGE DRUM ● There is something wrong with the drum unit. Replace the drum unit and the toner cartridge (p. 65). CHECK DOCUMENT ● The document was not fed into the unit properly. Reinsert the document.
Error Messages Display message Cause & solution MEMORY FULL ● When making a copy, the document being stored exceeds the memory capacity of the unit. Press { to clear the message. Divide the document into sections. MODEM ERROR ● There NO FAX REPLY ● The OUT OF PAPER ● Recording is something wrong with the modem circuit. Contact our service personnel. other party’s fax machine is busy or has run out of recording paper. Try again. paper is not installed or the unit has run out of paper.
Operations When a function does not work, check here before requesting help! General Fax – sending I cannot make and receive calls. ● The mains lead or telephone line cord is not connected. Check the connections (p. 16). ● If you used a splitter to connect the unit, remove the splitter and connect the unit to the wall jack directly. If the unit operates properly, check the splitter. The unit does not work. ● Disconnect the unit from the telephone line and connect the line to a known working telephone.
Operations Fax – receiving I cannot receive documents. ● The telephone line cord is connected to the EXT jack on the unit. Connect to the LINE jack (p. 16). I cannot receive documents automatically. ● The receiving mode is set to TEL mode. Set to FAX ONLY mode (p. 39). ● The time taken to answer the call is too long. Decrease the number of rings of feature #06 (p. 54). The display shows the following, but faxes are not received. The other party complains that they cannot send a document.
Operations Copying (cont.) The printing quality is poor. Original Copy ABC ● Some paper has instructions recommending which side to print on. Try turning the paper over. ● You may have used paper with a cotton and/or fibre content that is over 20%, such as letterhead or resume paper. ● The remaining toner is low. Replace the toner cartridge (p. 65). ● We recommend you replace the drum unit every third time you replace the toner cartridge (p. 65).
Operations Multi-Function Station (cont.) I cannot recognize the last part of an entry in the list of the [One Touch], [Directory], [Journal] or [Caller ID]. ● Put the cursor on the line between the buttons, the cursor changes shape and you can expand the area by dragging or double-clicking. When I exit Multi-Function Station, the [Multi-Function Viewer] window does not close. ● The [Multi-Function Viewer] window can be operated separately. Click the [X] button to close the window. I cannot scan.
Replacement Replacing the toner cartridge and the drum unit! When the display shows the following, replace the toner cartridge. Display: TONER LOW or TONER EMPTY We recommend you replace the drum unit every third time you replace the toner cartridge. To check the drum life and quality, please print the printer test list (p. 72). To ensure that the unit operates properly, we recommend the use of Panasonic toner cartridge (Model No. KX-FA76X) and drum unit (Model No. KX-FA78X).
Replacement 4 Tap on the used toner cartridge several times to allow the remaining toner to fall into the drum unit. Remove the drum and toner unit by holding the two tabs. ● If you replace the toner cartridge and the drum unit at the same time, skip to step 7. Drum and toner unit Levers Used toner cartridge Levers 6 7 Pull up the right edge of the used toner cartridge (#). Remove the cartridge from the drum unit ($). ● The toner may stick to the cartridge and the drum unit.
Replacement / Jams 10 The toner cartridge is installed when the triangles match. Triangles 11 Install the drum and toner unit by holding the tabs. Drum and toner unit ● If the lower glass is dirty, clean it with a soft and dry cloth. Lower glass 12 Close the front cover, until locked, by pushing down on both sides. Front cover Waste disposal method ● Waste material may be dumped or incinerated under conditions which meet all country and local environmental regulations.
Jams When the recording paper has jammed near the recording paper exit (Fuser unit): Remove the recording paper (#), then remove the drum and toner unit to allow the jammed paper to pull free from the rear cabinet ($). 1 Drum and toner unit 2 Jammed paper Remove the jammed paper from fuser unit by pulling it upwards carefully. Jammed paper 3 Close the front cover by pushing down on both sides until locked (#). Straighten and reinsert the recording paper into the recording paper entrance ($).
Jams Document jams - sending! 1 Front cover Push the front cover open button then open the front cover. Front cover open button Caution: The fuser unit gets hot. Do not touch it. Fuser unit 2 3 4 Pull down the middle guide while holding the front cover. Jammed document Front cover Remove the jammed document carefully. Middle guide 5 Close the front cover, until locked, by pushing down on both sides. Lift the middle guide firmly.
Cleaning Cleaning the inside of the unit! If any of the following problems occurs, clean the inside of the unit: — If misfeeding of your original occurs frequently. — If a black line, a white line or a dirty pattern appears on your recording paper, on your original, or on the fax document received by the other party. Caution: ● Be careful when handling the toner drum unit. See the caution for the drum unit on page 67 for details.
Cleaning 6 Remove the drum and toner unit by holding the two tabs. Drum and toner unit 7 Clean the lower glass with a soft and dry cloth. Lower glass 8 Reinstall the drum and toner unit by holding the tabs. 9 Close the front cover, until locked, by pushing down on both sides. 10 Front cover Reconnect the mains lead and the telephone line cord.
Printed Reports Reference lists and reports! You can print out the following lists and reports for your reference. Setup list: provides you with the current settings of the basic and advanced programming features (p. 54–57). Telephone number list: provides you with names and telephone numbers which are stored in one-touch dial and EASY DIAL. Journal report: keeps records of fax transmission and reception. This report will be printed automatically after every 30 fax communications (feature #22 on page 56).
Specifications Technical data about this product! Applicable lines: Document size: Effective scanning width: Effective printing width: Transmission time*: Scanning density: Halftone level: Scanner type: Printer type: Data compression system: Modem speed: Operating environment: Dimensions (H x W x D): Mass (Weight): Power consumption: Power supply: Memory capacity: Laser diode properties: Print speed: Printing resolution: Public Switched Telephone Network Max. 216 mm in width / Max.
Specifications ■ Paper specifications: Plain paper/Transparency: Envelope: A4: Letter: legal: 210 mm x 297 mm 216 mm x 279 mm 216 mm x 356 mm COM10: 105 mm x 241 mm DL: 110 mm x 220 mm Note: ● Do not use the following types of paper: — Paper with a cotton and/or fibre content that is over 20%, such as letterhead paper or paper used for resumes. — Extremely smooth or shiny paper, or paper that is highly textured. — Coated, damaged or wrinkled paper. — Paper with irregularities, such as tabs or staples.
Important Information Important Information! The connection to the telecommunication systems must not be hard wired and must be unplugged before the earth is disconnected. Method of connection This apparatus is connected to the exchange line or PABX/PMBX extension by the new standard British Telecom plug and socket. Arrangements for provision of this type of termination can be made through the nearest British Telecom Sales Office. This apparatus may be connected to the following types of installation.
Important Information Fitting a plug to the mains lead! This appliance is supplied with a moulded three pin mains plug for your safety and convenience. A 5 amp fuse is fitted in this plug. Should the fuse need to be replaced please ensure that the replacement fuse has a rating of 5 amps and that it is approved by ASTA or BSI to BS1362. Check for ASTA mark mark or the BSI on the body of the fuse. If the plug contains a removable fuse cover you must ensure that it is refitted when the fuse is replaced.
Guarantee Condition of guarantee! This guarantee is in addition to and does not in any way affect any statutory or other rights of consumer purchasers. If within the applicable guarantee period, the appliance proves to be defective by reason of faulty design, workmanship or materials, we undertake subject to the following conditions to have the defective appliance (or any part or parts there of) repaired or replaced free of charge. 1.
Index Program index! Index! Basic features A Accessories . . . . . . . . . . . . . . . . . .8, 9 (Document stacker) . . . . . . . . . . .14 (Paper stacker) . . . . . . . . . . . . . .14 (Paper tray) . . . . . . . . . . . . . . . . .14 Advanced features . . . . . . . . . . .56, 57 Alert (Memory reception) (Feature #44) .57 Answering machine . . . . . . . . . . . . . .40 Auto reduction (Feature #37) . . . .38, 56 B Basic features . . . . . . . . . . . . . . .54, 55 Broadcast sending report . . . . . . .
Index D Date and time (Feature #01) . . . .17, 54 Delayed transmission (Feature #25) . .56 Display (Contrast)(Feature #39) . . . . . . . .57 (Error messages) . . . . . . . . . .59, 60 Document size . . . . . . . . . . . . . . . . .31 Drum life . . . . . . . . . . . . . . . . . . . . .74 Drum unit . . . . . . . . . . . . . . . . . .12, 65 E EASY DIAL (Making a phone call) . . . . . . . . . .25 (Selecting characters) . . . . . . . . . .19 (Sending faxes) . . . . . . . . . . . . . .32 (Storing) . . . . . .
0682 Kyushu Matsushita Electric Co., Ltd.