KX-FP151/155GR(E)(001-007) 01.11.28 11:19 AM Page 1 Operating Instructions Compact Plain Paper Fax Model No. KX-FP151GR Compact Plain Paper Fax with Answering System This pictured model is KX-FP151. Model No. KX-FP155GR Please read these Operating Instructions before using the unit and save for future reference. These models are designed to be used only in Greece.
KX-FP151/155GR(E)(001-007) 01.11.28 11:19 AM Page 2 Thank you for purchasing a Panasonic facsimile. Things you should keep a record of Attach your sales receipt here For your future reference Date of purchase Serial number (found on the rear of the unit) Dealer’s name and address Dealer’s telephone number Caution: ● Note that the images of copied or received documents will remain on the used ink film. Use discretion when disposing of the used ink film.
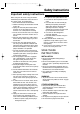
KX-FP151/155GR(E)(001-007) 01.11.28 11:19 AM Page 3 Safety instructions Important safety instructions! When using this unit, basic safety precautions should always be followed to reduce the risk of fire, electric shock, or personal injury. 1. Read and understand all instructions. 2. Follow all warnings and instructions marked on this unit. 3. Unplug this unit from power outlets before cleaning. Do not use liquid or aerosol cleaners. Use a damp cloth for cleaning. 4.
KX-FP151/155GR(E)(001-007) 01.11.28 11:19 AM Page 4 Table of Contents Initial Preparation Accessories Included accessories . . . . . . . . . . . . . . . . . . . . . . . . . . . . . . . . . . . . . 6 Accessory information . . . . . . . . . . . . . . . . . . . . . . . . . . . . . . . . . . . . 6 Help Button Help function . . . . . . . . . . . . . . . . . . . . . . . . . . . . . . . . . . . . . . . . . . . 7 Finding the Controls Overview . . . . . . . . . . . . . . . . . . . . . . . . . . . . . . . . . .
KX-FP151/155GR(E)(001-007) 01.11.28 11:19 AM Page 5 Answering Device (KX-FP155 only) Setup TAD/FAX mode (receiving phone calls and faxes automatically) . . . 46 Greeting Recording your own greeting messages . . . . . . . . . . . . . . . . . . . . . 47 Erasing your own recorded greeting messages . . . . . . . . . . . . . . . . 48 Memo Message Leaving a message for others or yourself . . . . . . . . . . . . . . . . . . . . 49 Incoming Messages Listening to recorded messages . . . . . . . . . . . . . . .
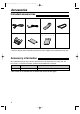
KX-FP151/155GR(E)(001-007) 01.11.28 11:19 AM Page 6 Accessories Included accessories! Power cord ..............1 Telephone line cord...1 Handset...................1 Paper tray ...............1 Ink film.....................1 Operating instructions ................................1 ● ● Handset cord...........1 If any items are missing or damaged, check with the place of purchase. Save the original carton and packing materials for future shipping and transportation of the unit.
KX-FP151/155GR(E)(001-007) 01.11.28 11:19 AM Page 7 Help Button Help function! You can print a quick reference for assistance as follows. ■ For KX-FP151 ■ 1 Press l. 2 Press ( or ) until the desired item is displayed. Display: PRESS NAVI.[I & SET H] For KX-FP155 1 Press l. 2 Press ( or ) until the desired item is displayed. PRESS NAVI.[I & SET H] 1. How to set the date, time, your logo and fax number. QUICK SET UP PRESS SET 1. How to send faxes with the voice guide.
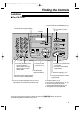
KX-FP151/155GR(E)(008-015) 01.11.28 11:20 AM Page 8 Finding the Controls Overview! Recording paper entrance Metal bar Paper tray Document guides Tension plate Speaker (Left side of the unit) Recording paper exit ● Up to 30 sheets of printed paper can be held. ● Handset To make or answer calls. Back cover Front cover Back cover open button Document exit Document entrance Microphone (KX-FP155 only) ● To talk with the other party when using the speakerphone. ** The pictured model is KX-FP155.
KX-FP151/155GR(E)(008-015) 01.11.28 11:20 AM Page 9 Finding the Controls Location! ■ For KX-FP151 ● ● To turn on/off AUTO ANSWER (p. 34). To initiate or exit programming. ● Display To use caller ID service (p. 24). MONITOR ● ● ● ● To mute your voice to the other party during a conversation. Press this button again to resume conversation. ● ● To print a quick reference (p. 7). ● To initiate fax transmission or reception. ● To store a setting during programming.
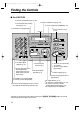
KX-FP151/155GR(E)(008-015) 01.11.28 11:20 AM Page 10 Finding the Controls ■ For KX-FP155 ● To erase recorded messages (p. 50). ● To record your own greeting messages (p. 47). ● ● To play recorded messages (p. 50). ● To turn on/off AUTO ANSWER (p. 34). To initiate or exit programming. ● Display ● ● For slow or quick playback (p. 50). To mute your voice to the other party during a conversation. Press this button again to resume conversation. ● ● To print a quick reference (p. 7).
KX-FP151/155GR(E)(008-015) 01.11.28 11:20 AM Page 11 Setup Ink film – installing / replacing! Install the included ink film or replace the used ink film with new one. Model No. KX-FA55X: Replacement film (2 rolls) Each roll prints about 140 A4-sized pages. See page 6 for accessory information. 1 Open the front cover by pulling up the center part. Center part Front cover 2 Push the back cover open button (green) on the right side of the unit.
KX-FP151/155GR(E)(008-015) 01.11.28 11:20 AM Page 12 Setup 5 For replacement only Remove the stoppers and tags from the new ink film. Find the “T” shaped gear (blue). Tags Stopper New ink film Stopper “T” shaped gear (blue) 6 Insert the blue core of the front ink film roll into the right slot of the unit (#). Insert the “T” shaped gear (blue) into the left slot of the unit ($). Insert the rear ink film roll (%).
KX-FP151/155GR(E)(008-015) 01.11.28 11:20 AM Page 13 Setup Paper tray! Paper tray Insert tabs on the paper tray into slits on the back of the unit. Tabs Tabs Slits Note: ● Do not place the unit in areas where the paper tray may be obstructed (i.e. by a wall, etc.). Slits Recording paper! A4-sized recording paper can be loaded. The unit can hold up to 50 sheets of 60 g/m2 to 75 g/m2 paper or 30 sheets of 90 g/m2 paper. See the note for paper specifications on page 81.
KX-FP151/155GR(E)(008-015) 01.11.28 11:20 AM Page 14 Setup Metal bar! The recording paper will be ejected from the top of the unit after printing. The metal bar prevents the printed paper from curling. Do not remove the metal bar. If the bar comes off, attach it into the slots on the recording paper exit. Metal bar Printed paper Slots Connections! Connect the handset cord, and the telephone line cord, then the power cord. Connect to “LINE”.
KX-FP151/155GR(E)(008-015) 01.11.28 11:20 AM Page 15 Setup Date and time, your logo and facsimile telephone number! You should program the date and time, your logo and facsimile telephone number. This information will be printed on each page transmitted from your unit. Your logo Example: Your facsimile telephone number FROM : Panasonic Fax FAX NO. : 1234567 Date and time 26 Feb. 2002 09:02AM P1 Fax Correspondence Setting the date and time 1 Press p. Display: SYSTEM SET UP PRESS NAVI.
KX-FP151/155GR(E)(016-019) 01.11.28 11:22 AM Page 16 Setup Setting your logo The logo can be your company, division or name. 1 2 Press p. Display: Display SYSTEM SET UP PRESS NAVI.[I STOP (Delete) H] Press ( or ) until the following is displayed. YOUR LOGO PRESS SET 3 Press w. 4 Enter your logo, up to 30 characters, using the dial keypad. See the next page for details. LOGO= AAAAAAAAA R (Hyphen) MENU SET MUTE (Insert) Example: “Bill” 1. Press 2 2 times. Cursor LOGO=B 2. Press 4 6 times.
KX-FP151/155GR(E)(016-019) 01.11.28 11:22 AM Page 17 Setup To select characters with the dial keypad Pressing the dial keys will select a character as shown below. Keys Characters 1 1 [ ] { } + – / = 2 A B C a b c 2 3 D E F d e f 3 4 G H I g h i 4 5 J K L j k l 5 6 M N O m n o 6 7 P Q R S p q r s 7 8 T U V t u v 8 9 W X Y Z w x y z 9 0 0 ( ) < > ! " # $ , .
KX-FP151/155GR(E)(016-019) 01.11.28 11:22 AM Page 18 Setup Setting your facsimile telephone number 1 2 Press p. Display: SYSTEM SET UP PRESS NAVI.[I H] Display STOP (Delete) Press ( or ) until the following is displayed. YOUR FAX NO. PRESS SET 3 4 Press w. NO.= Enter your facsimile telephone number, up to 20 digits, using the dial keypad. Example: 5 NO.=1234567 Press w. ● The next feature will be displayed. SENDING REPORT =ERROR [±] 6 Press p.
KX-FP151/155GR(E)(016-019) 01.11.28 11:22 AM Page 19 Volume Adjusting volume! Ringer volume 4 levels (high/middle/low/off) are available. While the unit is idle, press + or -. If any documents are in the document entrance, you cannot adjust the ringer volume. Confirm that there are no documents in the entrance. To turn the ringer off: 1. Press - repeatedly until the following is displayed. ● Display: RINGER OFF= OK? YES:SET/NO:STOP 2. Press w. RINGER OFF To turn the ringer back on, press +.
KX-FP151/155GR(E)(020-027) 01.11.28 11:24 AM Page 20 Navigator Directory Storing names and telephone numbers into the directory! For rapid access to frequently dialed numbers, the unit provides the navigator directory (100 entries). 1 Press p repeatedly until the following is displayed. DIRECTORY SET Display: NAVI.=? BROAD=# 2 Press * to select “NAVI.”. 3 Enter the name, up to 10 characters (see page 17 for instructions). NAME= STORE:PRESS SET Example: MENU R (Hyphen) Press w.
KX-FP151/155GR(E)(020-027) 01.11.28 11:24 AM Page 21 Navigator Directory Editing a stored entry! 1 2 Press ). ● Confirm that there are no documents in the document entrance. DIRECTORY [+ -] Display: 4 Press + or - until the desired entry is displayed. 5 6 Example: Mary 0123456 Example: Mary EDIT:PRESS MENU If you do not need to edit the name, skip to step 6. Edit the name (see page 17 for instructions). Press w. Example: ● Press p.
KX-FP151/155GR(E)(020-027) 01.11.28 11:24 AM Page 22 Navigator Directory / Recording Making a phone call using the directory! Before using this feature, program the desired names and telephone numbers into the directory (p. 20). 1 Press ). ● Confirm that there are no documents in the document entrance. DIRECTORY [+ -] Display: 2 Press + or - until the desired entry is displayed.
KX-FP151/155GR(E)(020-027) 01.11.28 11:24 AM Page 23 Caller ID Caller ID service from your phone company! This unit is compatible with the Caller ID service offered by your local telephone company. To use this feature, you must subscribe to the Caller ID service. Important: ● This unit is designed in accordance with the “FSK based subscriber line protocol” under the ETS (European Telecommunication Standard) and only supports the basic CLIP (Calling Line Identification Presentation) features.
KX-FP151/155GR(E)(020-027) 01.11.28 11:24 AM Page 24 Caller ID Viewing and calling back using caller information! You can easily view caller information and call back. Important: ● Calling back will not be possible in the following cases. — The telephone number includes data other than numbers (i.e.: or #). — The caller information does not include a telephone number. 1 Press b. Example: 2 NEW CALLS PRESS NAVI.
KX-FP151/155GR(E)(020-027) 01.11.28 11:24 AM Page 25 Caller ID Erasing all caller information 1 Press p repeatedly until the following is displayed. Display: 2 Press w. 3 Press w. STOP CALLER SET UP PRESS SET CALL LIST ERASE PRESS SET MENU SET ERASE ALL OK? YES:SET/NO:STOP ● To cancel erasing, press {, then p. 4 Press w. 5 Press { to exit the program. ERASE COMPLETED Erasing specific caller information (KX-FP155 only) 1 Press b. Example: 2 2 NEW CALLS PRESS NAVI.
KX-FP151/155GR(E)(020-027) 01.11.28 11:24 AM Page 26 Caller ID Storing caller information into the directory! Important: ● This feature is not available in the following cases. — The telephone number includes data other than numbers (i.e. — The caller information does not include a telephone number. CALLER ID 1 Press b. 2 Press + or - until the desired entry is displayed. 1345678901 Example: 11:50A 14Apr 3 Press p. 4 Press w. 5 Press w. Example: 2 NEW CALLS PRESS NAVI.
KX-FP151/155GR(E)(020-027) 01.11.28 11:24 AM Page 27 Voice Contact Talking to the other party after fax transmission or reception! You can talk to the other party after a fax message is completed. This will save the added expense and time of making another call. This feature only works when the other party’s fax machine is equipped with a voice contact feature. Initiating voice contact 1 Press q (KX-FP151)/ NO (KX-FP155) while transmitting or receiving documents.
KX-FP151/155GR(E)(028-030) 01.11.28 11:25 AM Page 28 Sending Faxes Sending a fax manually! 1 2 Adjust the width of the document guides to the size of the document. Insert the document (up to 10 pages) FACE DOWN until a single beep is heard and the unit grasps the document. Display: 3 4 5 6 Document guides FAC E DO STANDARD PRESS NAVI.[+ -] WN If necessary, press + or - repeatedly to select the desired resolution (see below). Lift the handset or press q (KX-FP151)/NO (KX-FP155). TEL= PRESS NAVI.
KX-FP151/155GR(E)(028-030) 01.11.28 11:25 AM Page 29 Sending Faxes Convenient way to send a fax You can dial the fax number first before inserting the document. This is convenient if the other party’s number is indicated on the document. 1. Enter the fax number. ● The handset must be on the cradle. 2. Insert the document. 3. Press j. Quick scan feature This feature is helpful when you want to send the document, then take it for other uses. To use this feature, activate feature #34 on page 63. 1.
KX-FP151/155GR(E)(028-030) 01.11.28 11:25 AM Page 30 Sending Faxes Sending a fax using the directory! Before using this feature, program the desired names and telephone numbers into the directory (p. 20). 1 2 Adjust the width of the document guides to the size of the document. Insert the document (up to 10 pages) FACE DOWN until a single beep is heard and the unit grasps the document. Display: 3 4 STANDARD PRESS NAVI.
KX-FP151/155GR(E)(031-033) 01.11.28 11:27 AM Page 31 Sending Faxes Broadcast transmission ! This feature is useful for sending the same document to selected parties (up to 20 entries). First program the entries, then see page 33 for transmission. ● To send to selected parties only once, see page 33. Programming entries into the broadcast memory 1 Press p repeatedly until the following is displayed. Display: DIRECTORY SET NAVI.=? BROAD=# 2 Press # to select “BROAD”.
KX-FP151/155GR(E)(031-033) 01.11.28 11:27 AM Page 32 Sending Faxes Adding a new entry into the broadcast memory 1 Press ). ● Confirm that there are no documents in the document entrance. DIRECTORY [+ -] Display: 2 Press + or - until the following is displayed. EDIT:PRESS MENU 3 Press p. 4 5 Press * to select “ADD”. 6 Press w. REGISTERED Example: ● 7 ! Nikki 385-217-9365 To add other entries, repeat steps 5 and 6 (up to 20 entries). Press { to exit the program.
KX-FP151/155GR(E)(031-033) 01.11.28 11:27 AM Page 33 Sending Faxes Sending the same document to pre-programmed parties 1 Insert the document FACE DOWN. ● If necessary, press + or - repeatedly to select the desired resolution (p. 28). 2 Press ). 3 Display: DIRECTORY [+ -] FAC E DO WN Press + or - until the following is displayed. SEND:PRESS SET 4 Press w. ● The document will be fed into the unit and scanned into memory.
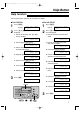
KX-FP151/155GR(E)(034-037) 01.11.28 11:32 AM Page 34 Receiving Faxes Setting the unit to receive faxes! Use as answering device and/or fax (KX-FP155 only) Use only as a fax Hi, thise... is Mik How you want the unit to receive calls You want to receive all phone calls and faxes automatically. You have a separate telephone line just for faxes. TAD/FAX mode (p. 46) FAX ONLY mode (p. 37) Turn AUTO ANSWER on by pressing PQ. Turn AUTO ANSWER on by pressing PQ. You have to set this.
KX-FP151/155GR(E)(034-037) 01.11.28 11:32 AM Page 35 Receiving Faxes Use as telephone/ automatic fax Fax receiving Mostly phone calls Phone call Ring Ring Ring Ring Ring Ring You want to answer the phone call yourself and receive faxes without rings. You plan to answer the calls yourself. TEL/FAX mode (p. 38) TEL mode (p. 36) Turn AUTO ANSWER on by pressing PQ. Turn AUTO ANSWER off by pressing PQ. ▼ ● The arrow (▼) is shown on the right of the display.
KX-FP151/155GR(E)(034-037) 01.11.28 11:32 AM Page 36 Receiving Faxes TEL mode! (answering all calls manually) Activating TEL mode If the arrow (▼) is shown on the right of the display, turn it off by pressing PQ. Display: TEL MODE ON Receiving a fax manually 1 When the unit rings, lift the handset. ● You can press q(KX-FP151)/ NO(KX-FP155). 2 When: — document reception is required, — a fax calling tone (slow beep) is heard, or — no sound is heard, press j.
KX-FP151/155GR(E)(034-037) 01.11.28 11:32 AM Page 37 Receiving Faxes FAX ONLY mode! (all calls are received as faxes) Activating FAX ONLY mode 1 2 Set feature #77 to “FAX ONLY” (p. 68). If the arrow (▼) is not shown on the right of the display, turn it on by pressing PQ. Display: FAX ONLY MODE ! ▼ ON ● When receiving calls, the unit will automatically answer all calls and only receive fax documents.
KX-FP151/155GR(E)(038-045) 01.11.28 11:32 AM Page 38 Receiving Faxes TEL/FAX mode! (receiving phone calls with ring signals and faxes without ring signals when you are near the unit) Use this mode when you are situated near the fax machine, and want to receive faxes without the unit ringing. When a call is received, the fax machine will work as follows. To set TEL/FAX mode, see below. A call is received. The fax machine will not ring. Duration depends on TEL/FAX delayed ring setting.
KX-FP151/155GR(E)(038-045) 01.11.28 11:32 AM Page 39 Receiving Faxes When an extension telephone is connected A call is received. The fax machine will not ring, but the extension telephone will ring 2 times. Duration depends on TEL/FAX delayed ring setting. (See below.) Phone call Ring Ring ● The This message will be played to the calling party (KX-FP155 only). Hello! To send a fax, start transmission. To speak with someone, please wait.
KX-FP151/155GR(E)(038-045) 01.11.28 11:32 AM Page 40 Receiving Faxes Using the unit with an answering machine (KX-FP151 only)! Setting up the fax machine and an answering machine 1 Connect the answering machine. Remove the stopper and connect the cord. Telephone line cord (not included) Answering machine (not included) 2 3 Set the number of rings on the answering machine to less than 4. ● This will allow the answering machine to answer the call first. 4 5 Activate the answering machine.
KX-FP151/155GR(E)(038-045) 01.11.28 11:32 AM Page 41 Receiving Faxes How the fax machine and answering machine work Receiving phone calls The answering machine will record voice messages automatically. Receiving faxes The fax machine will receive documents automatically when the machine detects a fax calling tone. Receiving a voice message and fax document in one call See below. Note: ● Every time the fax machine receives a document, a silent pause or fax tone may be recorded on the answering machine.
KX-FP151/155GR(E)(038-045) 01.11.28 11:32 AM Page 42 Receiving Faxes Extension telephone! If you use the fax machine with an extension telephone, you can receive fax documents using the extension telephone. You do not have to press j on the fax machine. Important: ● Use a touch tone telephone as the extension telephone and enter the fax activation code firmly. 1 2 3 When the extension telephone rings, lift the handset of the extension telephone.
KX-FP151/155GR(E)(038-045) 01.11.28 11:32 AM Page 43 Receiving Faxes Pager call! This feature allows your unit to call your pager when your unit receives the following: — For KX-FP151: a fax document. — For KX-FP155: a fax document or an incoming voice message. 1 Press p. 2 Press #, then 70. FAX PAGER CALL KX-FP151: =OFF [±] Display: KX-FP155: 3 SYSTEM SET UP PRESS NAVI.[I PAGER CALL =OFF H] [±] Press + or - to select “ON”.
KX-FP151/155GR(E)(038-045) 01.11.28 11:32 AM Page 44 Copying Making a copy! The unit can make single or multiple copies (up to 50). 1 2 Adjust the width of the document guides to the size of the document. Document guides Insert the document (up to 10 pages) FACE DOWN until a single beep is heard and the unit grasps the document. Display: FAC E DO !!!STANDARD PRESS NAVI.[+ -] WN If necessary, press + or - repeatedly to select the desired resolution (see below).
KX-FP151/155GR(E)(038-045) 01.11.28 11:32 AM Page 45 Copying To enlarge a document 1. Press ) after step 3 on page 44. Display: ZOOM 100% [+ -] H 2. Press + to select “150%” or “200%”, then press y. ● The unit will only enlarge the centermost part of the document, printing it on two pages.
KX-FP151/155GR(E)(046-050) 01.11.28 11:31 AM Page 46 Setup (KX-FP155 only) TAD/FAX mode! (receiving phone calls and faxes automatically) When TAD/FAX mode is set, the unit will work as a fax machine and/or answering device. If a fax tone is detected, the unit will automatically receive the fax. If a phone call is detected, the answering device will play a greeting message and the caller can leave a voice message.
KX-FP151/155GR(E)(046-050) 01.11.28 11:31 AM Page 47 Greeting (KX-FP155 only) Recording your own greeting messages! You can record your own greeting messages for TAD/FAX and TEL/FAX modes. When receiving a call, your own greeting message will be played instead of the pre-recorded message. The recording time will be limited to 16 seconds. We recommend you record your message within 12 seconds to make it easier to receive faxes.
KX-FP151/155GR(E)(046-050) 01.11.28 11:31 AM Page 48 Greeting (KX-FP155 only) Erasing your own recorded greeting messages! 1 Set the desired mode (TAD/FAX or TEL/FAX) for the greeting message you want to erase (feature #77 on page 68) beforehand. 2 Press h 2 times. ● The display will show the following according to your selection in step 1. 3 TEL/FAX mode: TEL/FAX GREETING PRESS SET ERASE GREETING? YES:SET/NO:STOP To cancel erasing, press {. Press w.
KX-FP151/155GR(E)(046-050) 01.11.28 11:31 AM Page 49 Memo Message (KX-FP155 only) Leaving a message for others or yourself! To leave a private message for yourself or someone else, you can record a voice memo. This memo can be played back later, either directly or remotely. 1 Press t. Display: 2 MEMO MESSAGE PRESS SET Press w. ● A long beep will sound. MEMO RECORDING 3 4 Speak clearly about 20 cm away from the microphone. When finished recording, press {.
KX-FP151/155GR(E)(046-050) 01.11.28 11:31 AM Page 50 Incoming Messages (KX-FP155 only) Listening to recorded messages! When the unit has recorded new voice messages: — the MESSAGE indicator will flash, — the call counter will show the total number of recorded messages, and — slow beeps will sound if the message alert feature is activated (feature #42 on page 63). Example: 02 Call counter PLAY MESSAGES ERASE Press LM. ● Only the new recorded messages will be played.
KX-FP151/155GR(E)(051-058) 01.11.28 11:30 AM Page 51 Remote Operation (KX-FP155 only) Operating from a remote location! The following operations can be performed from a remote location using a touch tone telephone. Program the remote operation ID (feature #11 on page 61) and set the unit to TAD/FAX mode before going out (p. 46).
KX-FP151/155GR(E)(051-058) 01.11.28 11:30 AM Page 52 Remote Operation (KX-FP155 only) Listening to recorded messages 1 2 Call your unit from a remote touch tone telephone. Enter the remote operation ID during TAD/FAX greeting playback. ■ When there are new messages The voice guide will tell you the number of new messages and they will be played automatically. Voice guide example: ■ No new messages. Press 5 or wait for 4 seconds to listen to all the messages. 3 new messages.
KX-FP151/155GR(E)(051-058) 01.11.28 11:30 AM Page 53 Remote Operation (KX-FP155 only) Other remote operations ■ Erasing a specific message Press *4 while listening to the message you want to erase. ■ Skipping Press 0 during the greeting message playback. ● Voice guide example: The message has been erased. ● A long beep will sound. The unit will then play back the next message. ■ Erasing The unit will skip the rest of the greeting message.
KX-FP151/155GR(E)(051-058) 01.11.28 11:30 AM Page 54 Voice Mailbox (KX-FP155 only) How callers can leave you private messages! This unit has two mailbox memories. Your caller can leave a private message in a specific mailbox. Only the person who knows the password can retrieve a message from a mailbox. This feature is useful when you share this unit with other people. To use a mailbox 1. Record your own TAD/FAX greeting message (p. 47). Suggested message: “This is (your name).
KX-FP151/155GR(E)(051-058) 01.11.28 11:30 AM Page 55 Voice Mailbox (KX-FP155 only) Recording your own mailbox greeting messages! The recording time is limited to 16 seconds for each mailbox. Suggested message: “This is (personal name). Please leave your name and message after the beep.” 1 Display: 2 STOP Press p. SYSTEM_SET_UP PRESS_NAVI.[I H] For mailbox 1: Press #, then 55. BOX1_GREETING CHECK________[±] For mailbox 2: Press #, then 56.
KX-FP151/155GR(E)(051-058) 01.11.28 11:30 AM Page 56 Voice Mailbox (KX-FP155 only) Listening to recorded messages! 1 Press ) 2 times. Display: MAILBOX [+_-] RECORD 2 Press + or - until the desired mailbox number is displayed. Example: 3 NEW_MESSAGES MAILBOX2_[±]_02 / PRESS REC/ERASE/PLAY ERASE Press LM. SET If you have programmed your own mailbox password, enter it. STOP PLAY MESSAGES PASSWORD= Note: Only the new recorded messages will be played.
KX-FP151/155GR(E)(051-058) 01.11.28 11:30 AM Page 57 Voice Mailbox (KX-FP155 only) Listening to recorded messages from a remote location! 1 2 Call your unit from a remote touch tone telephone. 3 Enter the mailbox password (default setting “555”). ● If you have programmed your own mailbox password, enter it instead of “555”. Press * and the desired mailbox number (1 or 2) during TAD/FAX greeting playback. ● If you have recorded your own mailbox greeting message, it will be played.
KX-FP151/155GR(E)(051-058) 01.11.28 11:30 AM Page 58 Option (KX-FP155 only) Transferring recorded messages to another telephone! This feature allows your unit to call a designated telephone number each time an incoming voice message is recorded. You can retrieve the transferred message during the same call using the remote operation. To use this feature, program the transfer telephone number first (feature #60 on page 66) and set the unit to TAD/FAX mode. 1. 2. 3. 4.
KX-FP151/155GR(E)(059-068) 01.11.28 11:29 AM Page 59 Features Summary Programming! The unit provides various programming features. Program the desired settings by referring to the programming tables (p. 60–68). General programming method 1 2 Press p. Display: SYSTEM SET UP PRESS NAVI.[I H] Select the feature you wish to program. For basic features (p. 60, 61): Press ( or ) until the desired feature is displayed. For advanced features (p.
KX-FP151/155GR(E)(059-068) 01.11.28 11:29 AM Page 60 Features Summary Basic features! How to set menu options 1. Press p. 4. Press w. 2. Press ( or ) until the desired feature is displayed. 5. Press p. Note: 3. Press + or - until the desired setting is displayed. Step 3 may be slightly different depending on the feature. ● See page 59 for more details. ● Programming table Code Feature & Display Settings See page 15 for details.
KX-FP151/155GR(E)(059-068) 01.11.28 11:29 AM Page 61 Features Summary Code Feature & Display For KX-FP155 only: Changing the incoming message recording time Settings ■ #10 RECORDING TIME =VOX [±] For KX-FP155 only: Setting the remote operation ID VOX ON / ID=111 #11 OFF Setting the ringer pattern #17 RINGER PATTERN =A [±] “VOX”: Unlimited “1–9”: 1 minute to 9 minutes 1, 2, 3, 4, 5 6, 7, 8, 9 ■ REMOTE TAD ID =ON [±] How the unit operates A B To select “ON” and enter ID: 1. Press p. 2.
KX-FP151/155GR(E)(059-068) 01.11.28 11:29 AM Page 62 Features Summary Advanced features! How to set menu options 1. Press p. 3. Press + or - until the desired setting is displayed. 2. Press ( or ) until the following is displayed: 4. Press w. 5. Press p. ADVANCED MODE PRESS SET Note: then press w and press ( or ) until the desired feature is displayed. Step 3 may be slightly different depending on the feature. ● See page 59 for more details.
KX-FP151/155GR(E)(059-068) 01.11.28 11:29 AM Page 63 Features Summary Code Feature & Display #30 Changing the number of rings when the unit detects a phone call in TEL/FAX mode (silent fax recognition ring setting) Settings How the unit operates See pages 38 and 39 for details. 3, 4, 5, 6, 7, 8, 9 SILENT FAX RING RINGS=3 [±] Setting the quick scan QUICK SCAN =OFF #34 ON [±] To scan the document into memory before sending/copying. This is helpful when you want to remove the document for other uses.
KX-FP151/155GR(E)(059-068) 01.11.28 11:29 AM Page 64 Features Summary Advanced features (cont.)! How to set menu options 1. Press p. 3. Press + or - until the desired setting is displayed. 2. Press ( or ) until the following is displayed: 4. Press w. 5. Press p. ADVANCED MODE PRESS SET Note: then press w and press ( or ) until the desired feature is displayed. Step 3 may be slightly different depending on the feature. ● See page 59 for more details. ● Programming table (cont.
KX-FP151/155GR(E)(059-068) 01.11.28 11:29 AM Page 65 Features Summary Code Feature & Display ■ For KX-FP155 only: Setting the fax voice guidance Settings ON FAX GUIDANCE =ON [±] #47 If you wish to hear the voice guidance (see right) at each fax transmission/reception, set this feature to “ON”. ● To hear the voice guidance only when fax transmission/reception fails, select “ERROR”.
KX-FP151/155GR(E)(059-068) 01.11.28 11:29 AM Page 66 Features Summary Advanced features (cont.)! How to set menu options 1. Press p. 3. Press + or - until the desired setting is displayed. 2. Press ( or ) until the following is displayed: 4. Press w. 5. Press p. ADVANCED MODE PRESS SET Note: then press w and press ( or ) until the desired feature is displayed. Step 3 may be slightly different depending on the feature. ● See page 59 for more details. ● Programming table (cont.
KX-FP151/155GR(E)(059-068) 01.11.28 11:29 AM Page 67 Features Summary Code Feature & Display For KX-FP155 only: Setting the incoming message monitor Settings If you select “OFF”, you cannot monitor the incoming message. ■ #67 ICM MONITOR =ON ON [±] To hear an incoming message (ICM) from the speaker when the answering device is recording the message.
KX-FP151/155GR(E)(059-068) 01.11.28 11:29 AM Page 68 Features Summary Advanced features (cont.)! How to set menu options 1. Press p. 3. Press + or - until the desired setting is displayed. 2. Press ( or ) until the following is displayed: 4. Press w. 5. Press p. ADVANCED MODE PRESS SET Note: then press w and press ( or ) until the desired feature is displayed. Step 3 may be slightly different depending on the feature. ● See page 59 for more details. ● Programming table (cont.
KX-FP151/155GR(E)(069-075) 01.11.28 11:29 AM Page 69 Error Messages Reports! If your unit cannot send a fax, check the following: — the number you dialed is correct, — the other party’s machine is a facsimile. If the problem remains, correct it by following the communication message printed on the sending and journal reports (p. 29). COMMUNICATION ERROR (CODE: 40–42, 46–72, FF) ● A transmission or reception error occurred. Try again or check with the other party.
KX-FP151/155GR(E)(069-075) 01.11.28 11:29 AM Page 70 Error Messages Display! If the unit detects a problem, one or more of the following messages will appear on the display. Display message CALL SERVICE Cause & solution ● There is something wrong with the unit. Contact our service personnel. CHECK DOCUMENT ● The document was not fed into the unit properly. Reinsert the document. If misfeeding occurs frequently, clean the document feeder rollers (p. 78) and try again.
KX-FP151/155GR(E)(069-075) 01.11.28 11:29 AM Page 71 Error Messages Display message Cause & solution MESSAGE FULL ● There is no room left in memory to record a voice message. Erase unnecessary messages (p. 50, 53, 56). MODEM ERROR ● There is something wrong with the modem circuit. Contact our service personnel. NO FAX REPLY ● The other party’s fax machine is busy or has run out of recording paper. Try again. PAPER JAMMED ● A recording paper jam occurred. Clear the jammed paper (p. 76).
KX-FP151/155GR(E)(069-075) 01.11.28 11:29 AM Page 72 Operations When a function does not work, check here before requesting help! General I cannot make and receive calls. ● The power cord or telephone line cord is not connected. Check the connections (p. 14). ● If you used a splitter to connect the unit, remove the splitter and connect the unit to the wall jack directly. If the unit operates properly, check the splitter. The unit does not work.
KX-FP151/155GR(E)(069-075) 01.11.28 11:29 AM Page 73 Operations Fax – sending (cont.) The other party complains that letters on their received document are distorted or not clear. ● If your line has special telephone services such as call waiting, the service may have been activated during fax transmission. Connect the unit to a line that does not have these services. ● The extension telephone on the same line is off the hook. Hang up the extension telephone and try again. ● Try copying the document.
KX-FP151/155GR(E)(069-075) 01.11.28 11:29 AM Page 74 Operations The printing quality is poor. Receiving mode I cannot select the desired receiving mode. ● If you want to set TAD/FAX (KX-FP155 only), FAX ONLY or TEL/FAX mode: — select the desired mode using feature #77 (p. 68), and — press PQ to turn ON the arrow (▼) located on the right of the display. Display: ▼ ON ● If you want to set TEL mode: press PQ to turn OFF the arrow (▼) located on the right of the display.
KX-FP151/155GR(E)(069-075) 01.11.28 11:29 AM Page 75 Operations Answering device (KX-FP155 only) I cannot retrieve recorded messages from a remote location. ● Press the remote operation ID correctly and firmly (p. 52). Messages in the mailbox do not play back. ● The mailbox password is wrong. Enter the correct password. — For mailbox 1 password, see feature #51 on page 65. — For mailbox 2 password, see feature #52 on page 65. (continued) The other party complains that they cannot leave a voice message.
KX-FP151/155GR(E)(076-078) 01.11.28 11:28 AM Page 76 Jams Recording paper jam! If the unit does not eject any recording paper during fax reception or copying, the recording paper has jammed and the display will show the following. PAPER1JAMMED Display: 1 Open the front cover by pulling up the center part. Center part Front cover 2 Push the back cover open button (green) on the right side of the unit. OR Push the back cover open lever (green) inside of the unit.
KX-FP151/155GR(E)(076-078) 01.11.28 11:28 AM Page 77 Jams 5 Turn the “T” shaped gear (blue) in the direction of the arrow. ● Make sure that the ink film is wrapped around the blue core at least once. Correct Tight Blue core Incorrect The ink film is not wrapped around the blue core. Slack 6 “T” shaped gear (blue) Ink film Reverse Close the back cover securely by pushing down on the dotted area at both ends (#). Close the front cover securely ($).
KX-FP151/155GR(E)(076-078) 01.11.28 11:28 AM Page 78 Cleaning Document feeder! If misfeeding occurs frequently or if dirty patterns or black bands appear on a transmitted document or on the original of a copied document, clean the document feeder. Disconnect the power cord and the telephone line cord. 1 2 3 4 5 6 Open the front cover by pulling up the center part.
KX-FP151/155GR(E)(079-084) 01.11.28 11:27 AM Page 79 Printed Reports Reference lists and reports! You can print out the following lists and reports for your reference. Setup list: provides you with the current settings of the basic and advanced programming features (p. 60–68). Telephone number list: provides you with names and telephone numbers which are stored in the directory. Journal report: keeps records of fax transmission and reception.
KX-FP151/155GR(E)(079-084) 01.11.28 11:27 AM Page 80 Specifications Technical data about this product! Applicable lines: Document size: Effective scanning width: Effective printing width: Transmission time*: Public Switched Telephone Network Max. 216 mm in width / Max. 600 mm in length 208 mm 202 mm ■ KX-FP151: Approx. 12 s/page (Original mode)** ■ KX-FP155: Approx. 8 s/page (Original mode)** Scanning density: Horizontal: 8 pels/mm Vertical: 3.85 lines/mm – STANDARD 7.7 lines/mm – FINE/PHOTO 15.
KX-FP151/155GR(E)(079-084) 01.11.28 11:27 AM Page 81 Specifications ■ Paper specifications Recording paper size: A4: 210 mm x 297 mm Note: not use the following types of paper: — Paper with a cotton and/or fibre content that is over 20%, such as letterhead paper or paper used for resumes. — Extremely smooth or shiny paper, or paper that is highly textured. — Coated, damaged or wrinkled paper. — Paper with irregularities, such as tabs or staples. — Paper which has dust, lint or oil stains.
KX-FP151/155GR(E)(079-084) 01.11.28 11:27 AM Page 82 Index Program index! Index! Basic features A Accessories . . . . . . . . . . . . . . . . . . . .6 (Paper tray) . . . . . . . . . . . . . . . . .13 Advanced features . . . . . . . . . . .62–68 Alert (Memory reception)(Feature #44) .64 (Message)(Feature #42) . . . . . . . .63 (Recording time)(Feature #43) . . .64 Answering machine . . . . . . . . . . . . . .40 Auto answer setting (Feature #77) . . .68 Auto disconnection (Feature #49) .
KX-FP151/155GR(E)(079-084) 01.11.28 11:27 AM Page 83 Index Display (Contrast)(Feature #39) . . . . . . . .63 (Error messages) . . . . . . . . . .70, 71 Document size . . . . . . . . . . . . . . . . .29 E ECM selection (Feature #68) . . . . . . .67 Error messages . . . . . . . . . . . . . .69–71 Extension telephone . . . . . . . . . .39, 42 F Facsimile telephone number (Feature #03) . . . . . . . . . . . . .18, 60 Fax activation code (Feature #41) . . . . . . . . . . . . .42, 63 Fax auto redial . . . . .
KX-FP151/155GR(E)(079-084) 01.11.28 11:27 AM Page 84 0682 Êáôáóêåõáóô∏ò: Panasonic Communications Company (U.K.) Ltd.