Operating Instructions Baby Monitor Model No. KX-HN3001 Before initial use, see “Getting Started” on page 9. Thank you for purchasing a Panasonic product. Please read these operating instructions before using the unit and save them for future reference. Consulte “Guía Rápida Española”, página 32. For assistance, please contact us at 1-800-272-7033 or visit our Web site: http://shop.panasonic.com/support for customers in the U.S.A. Please register your product: http://shop.panasonic.
Table of Contents Introduction Guía Rápida Española About the baby monitor ................................3 Accessory information ..................................3 Important Information Graphical symbols for use on equipment and their descriptions ..........................................5 About this system .........................................5 For your safety .............................................5 Important safety instructions ........................7 For best performance .............
Introduction About the baby monitor The baby monitor system helps you keep an eye on your baby from anywhere in your house. The system consists of a camera unit and a monitor unit that are connected wirelessly using DECT technology, which provides secure, stable, and clear sound and picture without interference from microwave ovens, wireless routers, etc.
Introduction Expanding the baby monitor system Camera unit (optional): KX-HNC301 You can expand your baby monitor system by registering optional camera units (3 max.) to the monitor unit. Other information R Design and specifications are subject to change without notice. R The illustrations in these instructions may vary slightly from the actual product. 4 For assistance, please visit http://shop.panasonic.com/support HN3001_(en_en)_0110_ver.410.
Important Information Graphical symbols for use on equipment and their descriptions Symbol Explanation Symbol Explanation Alternating current (A.C.) Class P equipment (equipment in which protection against electric shock relies on Double Insulation or Reinforced Insulation) Direct current (D.C.
Important Information R Regularly remove any dust, etc. from the AC adaptor/power plug by pulling it from the power outlet, then wiping with a dry cloth. Accumulated dust may cause an insulation defect from moisture, etc. resulting in a fire. R Unplug the product from power outlets if it emits smoke, an abnormal smell, or makes an unusual noise. These conditions can cause fire or electric shock. Confirm that smoke has stopped emitting and contact us at http://shop.panasonic.
Important Information Attention: CAUTION Installation and location R Never install wiring during a lightning storm. R The AC adaptor is used as the main disconnect device. Ensure that the AC outlet is installed near the product and is easily accessible. R Mount the product on the stable location where the camera unit can be adequately supported when installing. R Do not mount the product on soft material. It may fall down, break or cause injury.
Important Information the monitor unit and the camera unit in an indoor environment. – away from electronic appliances such as TVs, radios, personal computers, wireless devices, or other phones. – facing away from radio frequency transmitters, such as external antennas of mobile phone cell stations. (Avoid putting the product on a bay window or near a window.) R If the reception for a monitor unit location is not satisfactory, move the monitor unit to another location for better reception.
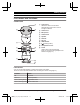
Getting Started Part names and functions Camera unit 1 3 2 A Light sensor Allows the camera unit to switch automatically to night vision mode in low-light conditions. B Camera lens C Microphone D Camera base E Speaker F Antenna G DC jack H LED indicator 4 I M N (Pairing button) J Temperature sensor 5 8 6 9 K Screw Used to secure the camera base (page 13) or wall mounting adaptor to the camera unit (page 12).
Getting Started Monitor unit A Smart LED indicator 3 4 5 1 B Display 6 2 7 8 9 C M N (Power) Press to temporarily turn off the display or press for about 2 seconds to turn on/off the monitor unit (page 16). D MMENUN E MSMARTN/MOKN Use MSMARTN to access the shortcut menu.
Getting Started Tilt range 2 select which areas of the camera image are monitored for motion detection. 1 Temperature sensor 1 Range of visibility: 28° 2 Range of movement: 72° Information about sensor features The camera unit has 3 sensor features: a visual sensor used for motion detection, a temperature sensor, and a sound sensor. Please read the following information about each sensor before deciding where to install the camera unit.
Getting Started Connections Wall mounting Insert the AC adaptor plug firmly into the DC jack. Connect the AC adaptor to the power outlet. Note: R Use only the supplied AC adaptor S006AKU0500100. R Attach the wall mounting adaptor to the camera unit after making the connections (page 12). R Only use the supplied screw that is attached to the camera base when attaching the wall mounting adaptor to the camera unit. Do not use user supplied screws.
Getting Started 3 Drive the supplied screw into the camera unit. 6 Adjust the angle of the camera unit by using MFN, MEN, MDN, or MCN on the monitor unit. Reattaching the camera base 1 2 1 Take the camera unit off from the wall. Remove the screw and then remove the wall mounting adaptor from the camera unit. 1 Supplied screw (page 9) 4 Drive the screws (not supplied) into the wall. 2 Longer than 20 mm (25/32 inches) 3 Space 1.
Getting Started Setting up the monitor unit 5 Drive the screw into the battery cover. Battery installation R USE ONLY the specified battery. 1 Remove the screw from the battery cover. R Follow the directions on the display to set up the unit. 2 3 Battery charging Remove the battery cover. Insert the battery. 1 BLK: black 2 RED 4 Insert the AC adaptor plug (A) firmly into the monitor unit’s micro-USB connector. 2 Connect the AC adaptor (B) to the power outlet.
Getting Started Replacing the battery 5 R USE ONLY the specified battery. 1 Insert the tabs (A) into the slots, and then close the battery cover (B). 2 Remove the screw from the battery cover. 1 6 2 Remove the battery cover. 3 Remove the currently used battery. Drive the screw into the battery cover. Battery level Icon Battery level High Medium Low Needs charging.*1 *1 4 Attach and insert the replacement battery.
Getting Started Turning the power on/off Press M N located on the top of the monitor unit (page 10) for about 2 seconds. R Press M N to enter sleep mode and turn off the display (page 20). Press any key on the monitor unit to exit sleep mode and turn on the display. Language setting 1 2 3 4 Smart LED indicator color Display icon color Green Green Motion or sound detected at the lower threshold level Example: When your baby makes small movements or cries quietly.
Getting Started Item Meaning Note: Timer is set to "Once". (page 28) R Timer is set to "Repeat". (page 28) Lullaby is set. (page 21) Displays the temperature detected by the temperature sensor. (page 20) Auto scan (page 21) The monitor unit is talking to the camera unit. (page 19) Camera zoom is on. (page 19) Displayed when motion is detected. (page 27) Displayed when sound is detected. (page 27) *1 *2 2 beeps sound from the monitor unit when the camera unit is out of the service area.
Getting Started are in the viewable area when the camera unit’s motion detection feature is triggered. R When the motion detection feature is is displayed on the triggered, monitor unit screen in green or amber depending on the level of motion detected. 3 Note the areas of the viewable area where movement is detected, and make adjustments as necessary. Note: R You can adjust the area detectable by the motion sensor (page 27).
Using the Baby Monitor Baby monitor The baby monitor system allows you to listen and view images on a monitor unit from a room where the camera unit is located. With the use of smart features (page 25), the monitor unit notifies you when the camera unit’s sensors are triggered, and you can also play lullabies from the camera unit. Important: R You should perform a test run of the baby monitor system before using it (page 17).
Using the Baby Monitor Adjusting the speaker volume Monitor unit 1 While viewing images from the camera N. unit, press M 2 MbN: Select the desired setting. a MOKN Camera unit MMENUN Sleep mode is used to automatically turn off the display of the monitor unit when the monitor unit has been inactive for a specified period of time. You can select how long the monitor unit is inactive for before it enters sleep mode, or turn off sleep mode. 1 2 3 4 MbN: “Camera Speaker Vol.
Using the Baby Monitor MbN: “Alert Range” a MOKN b M N: “Lower Limit” Selecting a lullaby MMENUN MbN: “Lullaby” a MOKN MbN: “Sound List” a MOKN MbN: Select the desired lullaby. R To cancel a lullaby: MbN: “OFF” Selecting camera units/ using auto scan If there are multiple camera units registered to the monitor unit, you can select which camera unit’s images to view, and also use auto scan. Auto scan automatically switches images from each camera unit every 10 seconds.
Programming Menu list Items in the menu list can be configured in the following method. 1 2 3 4 MMENUN Press MCN or MDN to select the desired main menu. ® MOKN Press MCN or MDN to select the desired item from the sub-menus. ® MOKN Press MCN, MDN, MFN, or MEN to select the desired setting. ® MOKN Note: R To exit the operation, press MMENUN repeatedly. R In the following table, < > indicates the default settings. R The number of sub-menus varies depending on the setting.
Programming Main menu Sub-menu 1 Timer Sub-menu 2 Settings – Once <1H> 2H 3H 4H 5H 6H Page 28 – Repeat <1H> 2H 3H 4H 5H 6H 28 – OFF – 28 For assistance, please visit http://shop.panasonic.com/support HN3001_(en_en)_0110_ver.410.
Programming Main menu Sub-menu 1 Sub-menu 2 Settings Sensor Settings Motion Sensor Sensitivity Level 7 (High)*3 Level 6*3 Level 5*3 *3 Level 3*3 Level 2*3 Level 1 (Low)*3 27 – 27 Set Detection Area High : all sounds Low : all sounds*4 High : baby sounds*5 Mid : baby sounds*5 Low : baby sounds*4, *5 27 Units °C <°F> 20 Alert Range Upper Limit: 33 - 104 °F (1 - 40 °C) <80 °F (27 °C)> 20 Lower Limit: 32 - 103 °F (0 - 39 °C) <60 °F (16 °C)> 20 Sound Sensit
Programming Main menu Sub-menu 1 Settings Page Monitor Settings Sleep Mode – 1min <3min> 5min OFF 20 Beep Volume – 3 2 <1> OFF 20 Language – Français Español 16 Monitor Speaker Vol. – Level 1 - 6 <3> OFF 20 – < – Camera Select*6 Sub-menu 2 > (camera 1) 21 2 (camera 2)*7 3 (camera 3)*7 4 (camera 4)*7 (auto scan)*7 – Information*8 *1 *2 *3 *4 *5 *6 *7 *8 – – – The preset lullabies in this product (“1. Lullaby1” - “10.
Programming Smart notification Auto lullaby By using the smart notification feature, you can specify how the monitor unit notifies you when motion or sound is detected by the camera unit, and configure motion detection to match the size of your baby. Depending on the settings, the monitor unit can notify you by lighting the smart LED indicator (page 16), displaying a message, and playing a chime.
Programming You can specify how long the sound sensor continually detects sound before the camera unit automatically plays a lullaby. – the distance from the camera unit to your baby – the age of your baby in months Change the settings in accordance with the growth of your baby. 1 2 3 4 1 2 3 4 Configuring the detection time *1 MMENUN MbN: “Auto Lullaby” a MOKN MbN: “Detection Time”*1 a MOKN MbN: Select the desired setting. a MOKN a MMENUN repeatedly to exit.
Programming The timer can be used to play sound from the monitor unit after the specified number of hours has passed. The timer can be set to sound once or repeat at specified intervals. 1 2 3 MMENUN MbN: “Timer” a MOKN MbN: Select “Once” or “Repeat”. a MOKN 4 MbN: Specify when the timer is set for. a MOKN a MMENUN Note: R Timers play for 1 minute. Press MOKN to stop a timer. Press and hold MOKN for 5 seconds to stop timers from repeating.
Useful Information Troubleshooting General use Problem Cause & Solution The monitor unit does not work. R Make sure the battery is installed correctly (page 14). R Fully charge the battery. The camera unit does not work. R Make sure the AC adaptor is connected to the camera unit and power outlet (page 12). The monitor unit is turned off. R Press M N located on the top of the monitor unit for about 2 seconds. Noise is heard, sound cuts in and out.
Useful Information Battery recharge Problem Cause & Solution The monitor unit beeps and The battery is not fully charged. 30 R Battery charge is low. Fully charge the battery (page 14). is displayed. R The temperature for the charging conditions is too low or too high. Charge the battery within the specified charging condition range (page 31). R The battery may not be installed. Install the battery (page 14). R The battery may be deteriorated. Please visit http://shop.panasonic.
Useful Information Specifications R Standards DECT (Digital Enhanced Cordless Telecommunications) R Frequency range DECT: 1.92 GHz – 1.93 GHz R RF transmission power DECT: 115 mW (max.) R Power source Camera unit (AC adaptor): Input: 100 – 240 V AC, 50/60 Hz Output: 5.0 V DC, 1,000 mA Monitor unit (AC adaptor): Input: 100 – 240 V AC, 50/60 Hz Output: 5.0 V DC, 1,000 mA R Power consumption Camera unit: Normal operation: 2.8 W Night vision mode: 4.2 W Sleep mode: 2.1 W Monitor unit: Charging: 3.
Guía Rápida Española Guía Rápida Española Conexiones de la unidad de cámara 1 Inserte el adaptador de corriente firmemente en el conector de CC. 2 Conecte el adaptador de corriente a la toma de corriente. 1 2 Instalación de la batería de la unidad del monitor L Use solos la batería especificada. 1 2 2 1 Carga de la batería de la unidad del monitor 1 Inserte el enchufe del adaptador de corriente (1) firmemente en el conector micro-USB de la unidad del monitor.
Guía Rápida Española Sugerencias de operación 4 {MENU} 5 {SMART}/{OK} 3 4 5 1 6 2 7 8 9 1 LED indicador inteligente 2 Pantalla 3 {c} (Alimentación) Presione para apagar la pantalla de manera temporal o presione durante aproximadamente 2 segundos para apagar o encender la unidad del monitor. Utilice {SMART} para acceder al menú de acceso rápido. 6 Tecla navegadora {<}, {>}, {^}, o {V}: – Navegue por diversas listas y elementos – Ajuste el rango de la panorámica y la inclinación.
Guía Rápida Española Operaciones básicas Escuchar y hablar con la unidad de la cámara (unidad del monitor) Escuchar la unidad de la cámara Ajuste del altavoz de la unidad de la cámara El sonido de la unidad de la cámara se oye cuando la unidad del monitor está encendida e incluso cuando se encuentra en modo de reposo y no se muestran las imágenes. Mientras ve las imágenes de la unidad de la cámara, mantenga presionado { } para hablar en la unidad del monitor. Suelte { } para terminar de hablar.
Guía Rápida Española Preguntas frecuentes Pregunta ¿Por qué no funciona la unidad del monitor? Causa y solución L La batería no se instaló correctamente. Instale la batería. L La batería no está cargada. Cargue la batería. ¿Por qué no funciona la unidad de la cámara? L El adaptador de corriente no está conectado correctamente. Conecte de nuevo el adaptador de corriente a la unidad de la cámara.
Appendix FCC and other information This device complies with Part 15 of the FCC Rules. Operation is subject to the following two conditions: (1) This device may not cause harmful interference, and (2) this device must accept any interference received, including interference that may cause undesired operation. Privacy of communications may not be ensured when using this device.
Appendix Customer services Shop Accessories! for all your Panasonic gear Go to http://shop.panasonic.com/support Get everything you need to get the most out of your Panasonic products Accessories & Parts for your Camera, Phone, A/V products, TV, Computers & Networking, Personal Care, Home Appliances, Headphones, Ba!eries, Backup Chargers & more… Customer Services Directory For Product Informa"on, Opera"ng Assistance, Parts, Owner’s Manuals, Dealer and Service info go to http://shop.panasonic.
Appendix Limited Warranty (ONLY FOR U.S.A.
Appendix Limited Warranty Limits and Exclusions This warranty ONLY COVERS failures due to defects in materials or workmanship, and DOES NOT COVER normal wear and tear or cosmetic damage.
IMPORTANT! If your product is not working properly. . . A B C D E Reconnect the AC adaptor to the camera unit. Turn the monitor unit off. Remove and then reinsert the monitor unit's battery. Turn the monitor unit on. Read the troubleshooting section in the Operating Instructions. Visit our Web site: http://shop.panasonic.com/support • FAQ and troubleshooting hints are available. For your future reference We recommend keeping a record of the following information to assist with any repair under warranty.