User’s Guide Text entity: en_us Model No.
Table of Contents Welcome to the Panasonic Home Network System! Overview .............................................................4 Monitoring ...........................................................5 Peace of mind .....................................................6 Convenience .......................................................7 Damage protection .............................................8 Communication ...................................................9 Overview .........................
Table of Contents New message alert ...........................................86 Standard remote access ...................................88 Remote commands ...........................................88 Answering system settings ...............................90 System expansion (overview) ...........................91 Registering devices ..........................................92 Deregistering devices .......................................
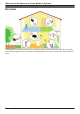
Welcome to the Panasonic Home Network System! Overview The Panasonic Home Network System is a wireless network of powerful devices that help you monitor, control, and manage your home. Its easy-to-use app allows you to stay in charge even when away from home.
Welcome to the Panasonic Home Network System! Monitoring You can use your smartphone or tablet to watch live images from your cameras, even when away from home. You can even talk to and listen to your cameras. Select an item to learn more.
Welcome to the Panasonic Home Network System! Peace of mind You can use a variety of sensors, including motion sensors, window sensors, door sensors, and the sensor features built in to cameras, to trigger camera recording features, call a pre-programmed phone number when the alarm system is triggered, sound a siren, or send a notification to your smartphone or tablet. Additionally, backup batteries can supply power to your devices in the event of a power failure. Select an item to learn more.
Welcome to the Panasonic Home Network System! Convenience You can use your smartphone or tablet to turn on lights or other appliances that are connected to your smart plugs*1. By installing keypads near frequently used entrances, you can arm and disarm the system easily on your way out or as soon as you walk in the door. Additionally, keychain remotes allow you to quickly arm and disarm the system with a simple press of a button, with no screen locks or passwords to slow you down.
Welcome to the Panasonic Home Network System! Damage protection You can use water leak sensors to notify your smartphone or tablet when water is detected. Select an item to learn more.
Welcome to the Panasonic Home Network System! Communication You can use your smartphone, tablet, or a cordless handset to make and receive phone calls using your landline while at home. Select an item to learn more. Overview The Home Network System can be expanded to suit your needs. You can choose a pre-configured bundle, add individual devices to an existing bundle, or build your own system by selecting the desired devices.
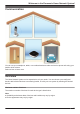
Welcome to the Panasonic Home Network System! Hub KX-HNB600 1 Indoor Camera KX-HNC200 KX-HNC210 4 Outdoor Camera KX-HNC600 10
Welcome to the Panasonic Home Network System! Window/Door Sensor KX-HNS101 Motion Sensor KX-HNS102 Water Leak Sensor KX-HNS103 Glass Break Sensor KX-HNS104 Indoor Siren KX-HNS105 50 Smart Plug KX-HNA101 Access Keypad KX-HNK101 Keychain Remote KX-HNK102 Backup Battery KX-HNP100 Digital Cordless Handset KX-HNH100 6 11
Welcome to the Panasonic Home Network System! Hub (KX-HNB600) R Joins all system devices together R Connects to your landline for making and receiving calls R Supports SD card connection for recording camera video and audio 12
Welcome to the Panasonic Home Network System! Indoor Camera (KX-HNC200, KX-HNC210) R Full-color camera with night vision and built-in microphone for live monitoring and recording R Built-in motion sensor (visual detection), sound sensor, and temperature sensor can be used to trigger other actions (camera recording, turning on a light, etc.
Welcome to the Panasonic Home Network System! Outdoor Camera (KX-HNC600) R Full-color camera with night vision and built-in microphone for live monitoring and recording R Built-in motion detection features (image sensor and infrared sensor) can be used to trigger other actions (camera recording, turning on a light, etc.
Welcome to the Panasonic Home Network System! Window/Door Sensor (KX-HNS101) R Detects when the corresponding window or door is opened R Can be used to trigger other actions (camera recording, turning on a light, etc.
Welcome to the Panasonic Home Network System! Motion Sensor (KX-HNS102) R Uses an infrared sensor (i.e., heat sensor) to detect motion in the surrounding area R Can be used to trigger other actions (camera recording, turning on a light, etc.
Welcome to the Panasonic Home Network System! Water Leak Sensor (KX-HNS103) R Uses a small probe that can detect water R Can be used to trigger other actions (camera recording, turning on a light, etc.
Welcome to the Panasonic Home Network System! Glass Break Sensor (KX-HNS104) R Uses a microphone that can detect the unique sound frequencies that are produced when glass breaks R Can be used to trigger other actions (camera recording, turning on a light, etc.
Welcome to the Panasonic Home Network System! Indoor Siren (KX-HNS105) R Uses a loudspeaker and strobe light to alert you when the alarm system is triggered R You can enable and disable the loudspeaker and strobe light for each siren 19
Welcome to the Panasonic Home Network System! Smart Plug (KX-HNA101) R Can be turned on and off using the app, when a sensor is triggered, or according to a schedule R Built-in overcurrent and overwattage detection for added peace of mind R Power consumption is logged for your reference 20
Welcome to the Panasonic Home Network System! Access Keypad (KX-HNK101) R Allows you to quickly confirm and change the system’s arm mode R Can be wall mounted inside your home near the entrances and exits for easy access 21
Welcome to the Panasonic Home Network System! Keychain Remote (KX-HNK102) R Allows you to quickly change the system’s arm mode when you come home or are going out R Can be used to trigger a pre-programmed operation, such as turning on a smart plug or sounding an alert R Can be attached to a set of keys for added convenience 22
Welcome to the Panasonic Home Network System! Backup Battery (KX-HNP100) R Supplies power to your hub or other devices in the event of a power outage R Can be used to trigger the hub to call a pre-programmed phone number in the event of a power outage 23
Welcome to the Panasonic Home Network System! Digital Cordless Handset (KX-HNH100) R Makes and receives calls using your landline R Can be used to change the system’s arm mode R Displays system status 24
System setup There are 4 basic steps you need to perform in order to access the system from your mobile device. Connections Connect your hub to a power outlet and to your telephone line.*1 ¯ Download Download the [Home Network] app to your mobile device. ¯ Initial setup Use the [Home Network] app to configure the hub to connect to your wireless router, and then register your mobile device to the hub.
System setup Before you begin In this procedure, the hub will enter “temporary access point mode”. In this mode, you can connect your mobile device directly to the hub using Wi-Fi®, and then use your mobile device to change the hub’s Wi-Fi settings so that the hub can connect to your wireless router. Confirm the following before you begin.
System setup 8 9 When prompted, set the password used to log in to the hub while away from home and then tap [OK]. 10 When prompted, select whether you want to customize device profiles, i.e., the device name, location, and other settings for your devices. R If you choose not to customize the device profiles now, you can change them later if desired (see “Setting device profiles (device names, locations, and other settings)”, Page 92).
System setup 8 When prompted, select whether you want to customize device profiles, i.e., the device name, location, and other settings for your devices. R If you choose not to customize the device profiles now, you can change them later if desired (see “Setting device profiles (device names, locations, and other settings)”, Page 92). R If you choose to customize the device profiles now, change each setting as desired.
Usage examples This section describes commonly used system features, the devices required for each example, and briefly explains the required settings. While away from home, you can receive a notification on your mobile device if the alarm system is triggered.
Usage examples – Indoor Camera (KX-HNC200, KX-HNC210) – Outdoor Camera (KX-HNC600) Required procedures R Hub initial setup and mobile device registration Refer to the System Setup Guide included with your hub. R Camera registration (if you didn’t purchase the camera as part of a pre-configured bundle) Refer to the Installation Guide included with your camera. R Use the [Home Network] app to configure a smart control scenario. Select a sensor as the trigger and your camera as the target device.
Usage examples R Wireless router R Hub (KX-HNB600) R Indoor Camera (KX-HNC200, KX-HNC210) Required procedures R Hub initial setup and mobile device registration Refer to the System Setup Guide included with your hub. R Camera registration (if you didn’t purchase the camera as part of a pre-configured bundle) Refer to the Installation Guide included with your camera. R Use the [Home Network] app to configure the camera’s sound alert feature. See “Sound alert (indoor cameras only)”, Page 62.
Using the app App basics (overview) To begin, simply start the [Home Network] app on your mobile device by tapping its icon (shown below). To prevent unauthorized access to the system, you may need to enter a system password. Whether or not you need to enter the system password depends on how your mobile device is accessing the system, as explained below.
Using the app your mobile device. You can change this setting later if desired in the privacy section your mobile device’s [Settings] app. Using the home screen The [Home Network] app home screen is displayed when you start the app. Connection mode The message displayed at the top of the app’s home screen indicates the current connection mode. – [Home Wi-Fi Connected] is displayed when your mobile device is connected to the hub while at home (i.e.
Using the app [Arm: At Home] mode selected [Arm: Away] mode selected [Disarm] mode selected Mobile device is not connected to hub; arm mode is unknown Note: R If another user changes the arm mode, the arm mode icons displayed at the top of the home screen of your mobile device will not change immediately. The icons will be updated and display the current arm mode the next time the app refreshes the home screen, such as when you start the app or return to the home screen from another screen.
Using the app Displays the system configuration screen. Returning to the previous screen iPhone, iPad Tap . Android devices Press your device’s “back” button. Returning to the [Home Network] app home screen Press your mobile device’s home button and then start the [Home Network] app again. You can also use the shortcuts menu to return to the app’s home screen ( “Using the shortcuts menu”, Page 35).
Using the app Accessing while away from home If a mobile device is accessing the system while away from home (i.e., accessing from a different network) R The next mobile device that tries to access the system while away from home will be allowed to access the system; the mobile device that was previously accessing the system will be disconnected. R For mobile devices accessing at home, certain settings and features may be temporarily unavailable.
Using the app R Landline calls can be received but not made. R Other settings and features may be temporarily unavailable. Exiting and logging out Exiting the app Use this procedure to exit the app. iPhone, iPad Use the standard iOS method for exiting an app. Android devices Use the standard Android method for exiting an app. From the app’s home screen, you can also open the options menu ( “Displaying the options menu”, Page 35) and then tap [Exit].
Using the app Status notifications for Android devices The system provides information about system status by displaying status notifications, error messages, and the following icons in your mobile device’s status bar and notifications panel.
Using the app Another user is using the device Hub is busy Hub’s date and time setting was corrected after a power outage Device was registered to the hub Arm mode was changed Entry delay countdown in effect Outdoor camera is too cold *1 You can disable these icons from being displayed in your mobile device’s status bar, if desired ( “[Connection Status Icon] (Android devices only)”, Page 98).
Using the app Indicator blinking quickly Indicator blinking very quickly Indicator blinking slowly in two colors Indicator blinking in two colors Hub LED indicator Off Green No power, or LED indicator is turned off *1 Normal operation, connected to wireless router Registration mode Hub is searching for wireless router Green and yellow Red Hub is starting up Alarm system is armed Alarm system was triggered Yellow Initial setup required Initial setup in progress, mobile device connected Initial setup is
Using the app Motion sensor LED indicator The LED indicator on the motion sensor does not light during normal operation. You can press check the LED indicator to confirm the sensor’s status. Off Green No battery power No motion detected Registration mode (you pressed and held Red and ) Motion detected Sensor is out of range of the hub, or is not registered to a hub Note: R After pressing and confirming the sensor’s status, press indicator and conserve battery power.
Using the app Note: and confirming the sensor’s status, press R After pressing indicator and conserve battery power. again to turn off the LED Glass break sensor LED indicator The LED indicator on the glass break sensor does not light during normal operation. You can press and check the LED indicator to confirm the sensor’s status.
Using the app Keychain remote LED indicator Off Green Normal operation, or no battery power*1 [Disarm] mode selected (you pressed the disarm button), or you pressed the smart button*2 Registration mode (you pressed and held Green and red Orange Red ) Low battery Signal is being sent to the hub (you are pressing a button) [Arm: Away] mode selected (you pressed the arm button)*2 Keychain remote is out of range of the hub, or is not registered to a hub *1 The LED lights for about 2 seconds after a button
Using the app Alarm system features (overview) You can use the system as an alarm system.
Using the app 3 The sensor makes a detection (a door sensor detects that its door was opened, a motion sensor detects motion, etc.). R If the sensor is configured to use entry time, entry time is in effect beginning when the sensor was triggered. During this time, the system responds as follows. – The hub sounds an alert (i.e., entry delay alert). – The system sends a notification to your mobile devices (i.e., entry delay start notification).
Using the app – Glass break sensors: Enabled – Indoor camera motion detection features: Disabled – Outdoor camera motion detection features: Enabled Disarm Use this mode when alarm system features are not needed. Water leak sensors are always enabled, even when this mode is selected. All other sensors are disabled when this mode is selected. Confirming the current arm mode The icons displayed near the top of the home screen indicate the current arm mode. See “Arm mode icons”, Page 33 for details.
Using the app Setting the exit delay alert volume The hub sounds an alert while the exit delay is counting down. To adjust the volume, tap , select the desired volume, and then tap [OK]. While adjusting this setting, the alert will sound from the hub so that you can confirm what the alert sounds like and its volume. Note: R This setting is only available when [Arm Settings (Away)] is selected in step 3, page 46.
Using the app Note: R In order to use this feature, the hub must be connected to your landline. For information about phone line connection, refer to the System Setup Guide included with your hub. Configuring the alert by phone call feature 1 2 3 4 5 6 7 From the [Home Network] app home screen, tap [Settings]. Tap [Arm Settings]. Tap [Alert by Phone Call]. Turn on the [Alert by Phone Call] switch. Tap [Arm Condition]. Select the desired setting and then tap [OK].
Using the app Alarm system PIN The alarm system PIN is required when using certain devices to change the arm mode or cancel an alert. You can use the app to change the PIN. 1 2 3 4 5 6 From the [Home Network] app home screen, tap [Settings]. Tap [Arm Settings]. Tap [Change Arm PIN]. Enter the current PIN and then tap [OK]. R The default PIN is “0000”. Enter the desired PIN and then tap [OK]. Enter the desired PIN again and then tap [OK].
Using the app I want the lights to turn on automatically when I come home. 1 2 Which device: Foyer smart plug 3 What: Turn the smart plug on When: When the alarm system is armed and the app detects that your mobile device has reconnected to your wireless router (because you came home) I want to turn on my bedside lamp if my baby starts crying.
Using the app 6 7 8 9 Tap the field next to [Recording Duration] (for cameras) or [End Time] (for smart plugs), select the desired setting, and then tap [OK]. R The maximum recording time (for cameras) is 15 minutes. The maximum power-time (for smart plugs) is 24 hours. Tap [Repeat], select the days on which the scenario can control the device, and then tap [OK]. In the [Arm Mode] field, select the arm modes in which the scenario can control the device. When finished, tap [OK].
Using the app R When using a smart control scenario to record camera images, there may be a short delay after the sensor is triggered before recording starts. Using [Trigger when Home Wi-Fi Connects] to trigger smart control scenarios You can use your mobile device’s Wi-Fi connection to your wireless router as a trigger to turn on a smart plug. An example use of this feature would be having a light turn on automatically when you return home.
Using the app Erasing all scenarios that control a device 1 2 From the [Home Network] app home screen, tap [Smart Control]. iPhone, iPad Swipe the desired device to the left and then tap [Delete]. Android devices Tap and hold the desired device and then tap [OK]. Sensor features (overview) The system supports a wide range of sensors. Some sensors are standalone devices and others are integrated into other devices.
Using the app Description Function Uses Temperature sensor in indoor camera (KX-HNC200, KX-HNC210) Detects temperature – Smart control – Temperature alert feature*3 Overcurrent and overwattage sensor in smart plug (KX-HNA101) Detects when the connected electric device draws too much current or wattage – Overcurrent or overwattage alert feature*4 Power outage detection sensor in backup battery (KX-HNP100) Detects when the backup battery is not receiving power from the power outlet – Power outage n
Using the app Motion sensor Water leak sensor Glass break sensor Camera motion sensor Siren Keychain remote Keypad Backup battery Viewing sensor history You can view a log of previous alarm events, including the date and time when sensors were triggered and when the arm mode was changed. 1 2 From the [Home Network] app home screen, tap [Sensor]. Select the [Alert Log] tab. R To update the information displayed and view the latest information, tap [Refresh].
Using the app 3 Tap [Alert Call Log]. R To update the information displayed and view the latest information, tap [Refresh]. Differences between window sensors and door sensors You can select whether a KX-HNS101 Window/Door Sensor functions as a window sensor or as a door sensor. This setting affects the icon displayed for the sensor and the voice alert that can be announced when the sensor triggers the alarm system.
Using the app Camera features (overview) You can use indoor and outdoor cameras to monitor and record the sights and sounds of the area where the cameras are located. Cameras have built-in motion detection features that, when triggered, allow cameras to record images automatically or send a notification to your mobile device. Additionally, built-in speakers and microphones allow you to talk to anyone who is near the camera.
Using the app Using night vision If there is not adequate light to illuminate the subject, such as at night, the camera automatically switches to night vision mode. When night vision mode is active, colors may appear different from normal. Camera viewing options The following items are available in the options menu (see “Displaying the options menu”, Page 35) while viewing live images from a single camera. [Camera Speaker Volume] Allows you to adjust the selected camera’s speaker volume.
Using the app 4 Tap [Stop] to stop recording. Note: R You can use smart control scenarios to record images. See “Smart control features (overview)”, Page 49. R The maximum recording time is 15 minutes. R If [The hub’s SD card is full.] is displayed, the hub’s SD card is full and new recordings cannot be saved. Erase unneeded recordings (see “Erasing recordings”, Page 61). R For information about SD cards and how recordings are saved, see “Information about SD cards”, Page 66.
Using the app 3 4 Tap [Lullaby]. Select the desired lullaby and then tap [OK]. R The lullaby starts playing. To stop the lullaby, tap [Lullaby] again. R Lullaby playback stops automatically after 30 minutes. Note: R If you talk to the camera (see “Talking to the camera”, Page 59) while a lullaby is playing, the lullaby stops.
Using the app Playing back recordings 1 2 3 4 From the [Home Network] app home screen, tap [Camera]. Tap [Recording List]. Select a recording date. Tap the desired recording. R The recording is played back. Playback controls The following controls are available during playback.
Using the app 5 To erase all recordings Tap [Delete All]. To erase selected recordings Tap [Delete Selected Contents], and then select the dates or recordings that you want to erase. 6 Tap [OK]. Note: R You can also erase a recording during playback by tapping ® [OK]. Temperature alert (indoor cameras only) You can configure the camera to send notifications if the camera’s ambient temperature is too cold or too hot. 1 2 3 4 5 6 From the [Home Network] app home screen, tap [Settings].
Using the app 4 5 6 Select the device that you want to change settings for. 7 Select the desired setting. – [High]: The microphone is very sensitive to sound, i.e., even a small sound will trigger the notification. – [Normal]: The microphone is moderately sensitive to sound. – [Low]: The microphone is only slightly sensitive to sound, i.e., a large sound is required to trigger the notification. Tap [Sound Sensor].
Using the app Note: R Higher frame rates mean images are refreshed faster and moving subjects are displayed more smoothly, however, images displayed on your mobile device may be delayed and sound may cut out or be delayed when talking to the camera, especially over a slow or congested network connection.
Using the app 3 Select the desired setting. – [High]: The selected sensor is very sensitive to changes, i.e., even a small change will trigger the sensor. – [Normal]: The selected sensor is moderately sensitive to changes. – [Low]: The selected sensor is somewhat sensitive to changes. – [Very Low]: The selected sensor is only slightly sensitive to changes, i.e., a large change is required to trigger the sensor. – [OFF]: The selected sensor is disabled. 4 Tap [OK].
Using the app 2 3 4 5 Tap the camera image of the desired camera. 6 Tap Open the options menu (see “Displaying the options menu”, Page 35). Tap [Outdoor Camera Settings] or [Indoor Camera Settings]. Tap [Brightness]. or to decrease or increase the image brightness. Temperature alert (indoor cameras only) To configure the camera to send notifications if the camera’s ambient temperature is too cold or too hot, see “Temperature alert (indoor cameras only)”, Page 62.
Using the app Example: 2M123455.mp4 This file is a manual recording (“M”) from camera 2 (“2”) that started at 12:34 PM and 55 seconds (“123455”). Backup battery features (overview) In the event of a power outage, a backup battery can supply power to your hub or to another connected device. You can configure the system to call a pre-programmed phone number in the event of a power outage, so that you can be alerted to the situation.
Using the app 7 Select the phone numbers that you want to erase, and then tap [OK]. R These phone numbers will also be erased from the alert by phone call feature ( “Alert by phone call”, Page 47). Assigning a device to a backup battery Set this setting to match the device that is connected to the backup battery. 1 2 3 4 5 6 From the [Home Network] app home screen, tap [Settings]. Tap [Device Profiles]. Tap [Backup Battery]. Tap the name of the backup battery that you want to configure.
Using the app What is overcurrent and overwattage? Overcurrent and overwattage are potentially dangerous situations in which an electric device draws too much electrical current or wattage. They could be the result of short circuits and device malfunctions, which could cause fire and other hazards. If a smart plug’s overcurrent or overwattage sensor is triggered, the smart plug turns off and sends a notification.
Using the app 2 Select the [Individual] tab. R The status of each smart plug is displayed under the appropriate category name as explained below. – [Excessive Power]: Smart plugs that are reporting overcurrent or overwattage. The time each smart plug detected the error is also displayed. – [Out of Range]: Smart plugs that are not within range of the hub (perhaps because they are disconnected from the wall outlet). – [Ready]: All other smart plugs.
Using the app R A smart plug’s power consumption will be displayed as 0.00 kWh for about an hour after it is connected, even if it has consumed power during that time. Phone features (overview) By connecting the hub to your landline, you can use your mobile device as an extension of your home phone. The following phone features are available. – Making and receiving calls using your landline – Making and receiving intercom calls (i.e.
Using the app 3 4 Tap [Landline] or [Smartphone] according to the line you want to use to make the call. If you made a landline call, tap [Disconnect] to end the call. Note: R If you are talking on a landline call and then receive and answer a mobile call, the landline call is either disconnected or put on hold, according to the [Landline Call Handling] setting (see “App behavior settings”, Page 79). R Make sure to tap [Disconnect] when ending a landline call, even if the other party hangs up first.
Using the app Note: R If the flash/recall feature does not function properly, you may need to change the [Flash Time] setting ( “Landline settings”, Page 81). R This icon varies depending on the hub’s model number. Model number Icon KX-HNB600 KX-HNB600C KX-HNB600LC KX-HNB600ME FLASH KX-HNB600AZ KX-HNB600E KX-HNB600FR KX-HNB600G KX-HNB600HM KX-HNB600SA KX-HNB600TW [R] Callwait Answering landline calls When you receive a landline call, the call receiving screen is displayed.
Using the app 3 4 Select the cordless handset that you want to call. When finished, tap [Disconnect] to end the call. Note: R You cannot use the app to make intercom calls to other mobile devices. R iPhone, iPad When you are talking on an intercom call, the intercom call is disconnected automatically if you receive a mobile call. R Android devices When you are talking on an intercom call, the intercom call is disconnected automatically if you answer a mobile call.
Using the app Call logs You can use call logs to confirm previous landline call history, call back previous callers, and add new phone numbers to your contacts. Viewing the call log 1 2 3 From the [Home Network] app home screen, tap [Phone]. Open the [Call log] screen. Tap the desired tab to view outgoing or incoming landline calls. Note: R The outgoing call log displays landline calls made by your mobile device only. Landline calls made by other devices are not displayed.
Using the app 3 4 5 Tap the desired tab to view outgoing or incoming landline calls. Open the options menu (see “Displaying the options menu”, Page 35). To erase all calls Tap [Delete All Calls]. To erase selected calls Tap [Delete Selected Calls], tap next to the desired item, and then tap [Delete]. Android devices 1 2 3 4 From the [Home Network] app home screen, tap [Phone]. Open the [Call log] screen. Tap the desired tab to view outgoing or incoming landline calls.
Using the app Phone numbers stored with country codes If you have added the country code to phone numbers stored in your mobile device (i.e., if you begin certain phone numbers with “+” and a country code), those phone numbers will be converted according to the hub’s phone number conversion settings (see “Phone numbers with country codes”, Page 82). Therefore, after you copy contacts from your mobile device to the hub, we recommend that you confirm the phone numbers were converted properly.
Using the app Blocking ranges of numbers By storing only the first few digits of a phone number, such as the area code, you can block all phone numbers that begin with the number you stored. 1 2 3 4 5 6 7 From the [Home Network] app home screen, tap [Settings]. Tap [Telephone Settings]. Tap [Call Block]. Tap [Block a Range of Numbers]. Open the options menu (see “Displaying the options menu”, Page 35). Tap [ADD]. Enter the number and then tap [OK].
Using the app 5 6 Open the options menu (see “Displaying the options menu”, Page 35). Tap [Delete All] ® [OK]. Sound settings You can change various settings related to how your mobile device behaves when landline calls and intercom calls are received. 1 2 3 From the [Home Network] app home screen, tap [Settings]. Tap [Telephone Settings]. Change the settings as desired. – [Ringtone] setting This setting determines the ring tone heard when your mobile device rings for a landline call.
Using the app Voicemail settings Clearing the “new voicemail” notification If the “new voicemail” notification remains displayed even if you have no new landline voicemail messages, use this feature to clear the notification. 1 2 3 From the [Home Network] app home screen, tap [Settings]. Tap [Telephone Settings]. Tap [Remove Voicemail Notification] ® [Yes]. Voicemail tone detection (certain models only)*1 This feature is used to display “new voicemail” notifications.
Using the app 2 3 4 5 6 Tap [Telephone Settings]. Tap [Hub PIN]. Enter the current PIN and then tap [OK]. R The default PIN is “0000”. Enter the desired PIN and then tap [OK]. Enter the desired PIN again and then tap [OK]. Model information *1 This feature is available for the following hub model numbers. – KX-HNB600AZ – KX-HNB600E – KX-HNB600FR – KX-HNB600G – KX-HNB600HM – KX-HNB600SA – KX-HNB600TW Landline settings Important: R Typically these settings do not need to be changed.
Using the app Model number Default setting KX-HNB600 700 ms KX-HNB600AZ 100 ms (when [Country / Region] is set to [Australia]) 600 ms (when [Country / Region] is set to [New Zealand]) KX-HNB600C 700 ms KX-HNB600E 100 ms KX-HNB600FR 250 ms KX-HNB600G 200 ms KX-HNB600HM 600 ms (when [Country / Region] is set to [Singapore]) 400 ms (when [Country / Region] is set to [Hong Kong]) 700 ms (when [Country / Region] is set to [Malaysia]) KX-HNB600LC 700 ms KX-HNB600ME 100 ms KX-HNB600SA 100 ms
Using the app 1 2 3 4 From the [Home Network] app home screen, tap [Settings]. Tap [Telephone Settings]. Tap [Country / Region]. Select the appropriate setting and then tap [OK]. R The hub restarts. Model information *1 This feature is available for the following hub model numbers. – KX-HNB600AZ – KX-HNB600HM Caller ID support The hub is Caller ID compatible. Caller ID is a service provided by your landline phone service provider which may require a subscription.
Using the app Answering system features (overview) The hub features a built-in answering system that can answer calls received on your landline after a certain number of rings. When it answers a call, it plays a greeting message and can then record caller messages. Messages are stored in the hub, and you can play them back even when you are away from home. The answering system cannot answer calls when you are already talking on the landline.
Using the app 4 Tap [Answer on] or [Answer off]. Playing your messages When the answering system has recorded new messages, is displayed in the status bar (Android devices only) and your mobile device’s notification feature displays a notification. To play back your messages easily, tap the notification and then use the playback controls described below. 1 2 3 From the [Home Network] app home screen, tap [Phone]. Open the [More] screen. Tap [Connect to Answering Device].
Using the app 3 4 5 6 The [Answering Device] setting may be called [Answering System]. Tap [Greeting]. Tap [Record Greeting]. Tap [OK] to start recording. R Recording starts after the beep. Tap [Stop] to stop recording and save your greeting message. R Your greeting message is played back for confirmation. Playing your greeting message 1 2 3 4 From the [Home Network] app home screen, tap [Settings]. Tap [Answering Device].
Using the app First time setup 1 2 3 4 5 6 7 From the [Home Network] app home screen, tap [Settings]. Tap [Answering Device]. R Names of features and settings may vary depending on your mobile device’s language settings. The [Answering Device] setting may be called [Answering System]. Tap [New Message Alert]. Tap [Outgoing Call]. Turn on the [Outgoing Call] switch. Enter the desired name and phone number, and then tap [OK].
Using the app 6 Tap [OK]. R The phone number used for new message alert must be entered in order to turn this feature on. Changing the phone number used for new message alert 1 2 3 4 5 6 From the [Home Network] app home screen, tap [Settings]. Tap [Answering Device]. R Names of features and settings may vary depending on your mobile device’s language settings. The [Answering Device] setting may be called [Answering System]. Tap [New Message Alert]. Tap [Outgoing Call].
Using the app 4 5 9 0 #9 *4 *5 *# Play new messages Play all messages Stop playback Start voice guidance*2 Turn answering system off Turn new message alert off*3 Erase message (during playback) Erase all messages End remote operation and end call *1 If pressed within the first 5 seconds of playback, the previous message is played. *2 Available for the following models only.
Using the app Turning on the answering system remotely Important: R The answering system must be activated in order to turn it on remotely ( “Activating the answering system”, Page 84). 1 2 Dial your phone number from a touch-tone phone. 3 Enter your remote access code within 10 seconds after the long beep. R The greeting message is played back. R You can either hang up, or enter your remote access code again and begin remote operation. Let the phone ring until a long beep is heard.
Using the app Note: R Names of features and settings may vary depending on your mobile device’s language settings. The [Ring Count] setting may be called [Number of Rings]. The [Toll Saver] setting may be called [Auto]. For landline voicemail service subscribers To receive voicemail and use the answering system properly, please note the following.
Using the app *1 8 mobile devices can be registered to the hub, however, only the first 4 can use phone features. Registering devices If you purchased any devices separately from the hub, you must register them to the hub before you can use them. Note: R To register a mobile device, use the procedure described in “Registering other mobile devices to the hub”, Page 28. 1 2 3 4 5 From the [Home Network] app home screen, tap [Settings]. Tap [Device Registration]. Tap [Registration].
Using the app Device profiles for cameras 1 2 3 From the [Home Network] app home screen, tap [Settings] ® [Device Profiles] ® [Camera]. Select the device that you want to change settings for. R Settings that affect all cameras are available by tapping [Common Settings]. See “General camera settings”, Page 63 for more information. Change the settings as desired, and then tap [OK]. – [Location]: This setting determines the location name assigned to the device.
Using the app – [Strobe Light & Sound]: Allows you to select whether the siren’s strobe light flashes and its siren sounds when the alarm system is triggered. – [Installation Test]: Allows you to sound the siren as a test. – [Status LED]: This setting determines whether the device’s LED indicator lights or is disabled. Device profiles for glass break sensors 1 From the [Home Network] app home screen, tap [Settings] ® [Device Profiles] ® [Glass Break Sensor].
Using the app 3 Change the settings as desired, and then tap [OK]. – [Location]: This setting determines the location name assigned to the device. – [Name]: This setting determines the name assigned to the device. Device profiles for keychain remotes 1 From the [Home Network] app home screen, tap [Settings] ® [Device Profiles] ® [Keychain Remote]. 2 3 Select the device that you want to change settings for. Change the settings as desired, and then tap [OK].
Using the app Device signal strength You can check the signal strength of each device’s wireless connection to the hub. 1 2 3 4 5 6 From the [Home Network] app home screen, tap [Settings]. Tap [Device Registration]. Tap [Signal Strength]. Select the type of device that you want to check. Tap the name of the device that you want to check. R For devices powered by a battery (such as sensors), press the registration button ( device when prompted. ) on the Confirm the number of blue bars.
Using the app [Hub Powered Up] This setting determines whether a notification is displayed when the hub starts up. This notification can be used to indicate that a power outage occurred. Camera notifications [Camera Recording] This setting determines whether a notification is displayed when camera images are being recorded. [Temperature Alert (Indoor Camera)] This setting determines whether a notification is displayed when an indoor camera’s temperature sensor is triggered.
Using the app General settings You can customize general system settings to suit your needs. 1 2 3 From the [Home Network] app home screen, tap [Settings]. Tap [General]. Change the settings as desired. R Each setting is explained in this section. [Change Login Password] setting See “Login password”, Page 99. [Automatic Login] setting This setting determines whether or not you must enter a password to connect to the system when accessing it from away from home.
Using the app [Firmware Update] feature See “Hub firmware”, Page 99. [Firmware Version] information Information about the system’s firmware is displayed. [App Version] information Information about the [Home Network] app installed on your mobile device is displayed. Login password The login password is used to access the system while away from home. 1 2 3 4 From the [Home Network] app home screen, tap [Settings]. Tap [General]. Tap [Change Login Password]. Enter the desired password and then tap [OK].
Using the app If the “firmware update is available” message is displayed automatically If the hub finds that a firmware update is available, it will display a message automatically that prompts you to update the firmware. Follow the on-screen instructions to update the firmware. Network features Changing your mobile device’s name You can change the name assigned to your device.
Using the app Note: R You cannot delete the wireless access point that your mobile device is currently connected to. [Port Forwarding] settings These settings are only required if you need to configure your wireless router’s port forwarding feature in order to access the hub while away from home. Important: R In order to use this feature, you must first configure the hub to use a static IP address ( “Changing IP settings”, Page 100). 1 2 3 4 5 6 From the [Home Network] app home screen, tap [Settings].
Using the app Storing your security service account number (certain models only)*1 You can store your account number in the hub and integrate the hub with your security service. 1 2 3 From the [Home Network] app home screen, tap [Settings]. Tap [Order Number]. Enter your account number and then tap [OK]. Note: R When you store your account number, settings for the alert by phone call feature ( “Alert by phone call”, Page 47) are changed automatically, as follows.
Using the app 1 From the [Home Network] app home screen, open the options menu (see “Displaying the options menu”, Page 35). 2 Tap [Deregistration from Hub] ® [OK]. Resetting the hub’s settings 1 2 3 4 5 From the [Home Network] app home screen, tap [Settings]. Tap [Reset Hub]. Select the desired feature. – [Reset All Settings]: Resets all hub settings, including Wi-Fi settings. – [Reset Hub Settings]: Resets all hub settings except Wi-Fi settings. – [Reset Wi-Fi Settings]: Resets Wi-Fi settings only.
Using the app Open source software information R Parts of this product use open source software supplied based on the relevant conditions of the Free Software Foundation’s GPL and/or LGPL and other conditions. Please read all license information and copyright notices related to the open source software used by this product. This information is available at the following web page: {{"www.panasonic.net/pcc/support/tel/homenetwork/"|tolink("http://www.panasonic.
Troubleshooting If you experience any trouble while using the system, the following information will solve most problems. If the trouble persists, refer to the appropriate section in this chapter according to the trouble you are experiencing. For the latest troubleshooting information, visit {{"www.panasonic.net/pcc/support/tel/ homenetwork/"|tolink("http://www.panasonic.net/pcc/support/tel/homenetwork/")}}. Power Use these steps to make sure that each of your system devices are receiving power.
Troubleshooting 3 Make sure your devices are registered to the hub. Register them if they are not ( “Registering devices”, Page 92). →Cameras Check the camera list ( “Viewing the camera list”, Page 57). If a camera is displayed in the camera list, it is registered; if it is not displayed, it is not registered. →Sensors Press the sensor’s registration button. If the sensor’s LED indicator lights in red or green, the sensor is registered; if it blinks in red, the sensor is not registered.
Troubleshooting →Deregister your mobile device ( “Deregistering devices”, Page 92) and register it again ( “Registering other mobile devices to the hub”, Page 28). [The hub is not responding. Use another handset to cancel the registration.] is displayed Error code: E2-04 R There was a problem when deregistering your mobile device. →Use a cordless handset or another mobile device to deregister the mobile device from the hub. [The hub is not responding.
Troubleshooting R If you continue to have trouble performing initial setup, you may be able to configure the hub’s Wi-Fi settings using the WPS feature of your wireless router. →See “Configuring the hub using your wireless router’s WPS feature”, Page 108. Configuring the hub using your wireless router’s WPS feature If you continue to have trouble performing initial setup, you may be able to configure the hub’s Wi-Fi settings using the WPS feature of your wireless router.
Troubleshooting →If you pause for too long while operating certain features, the system will cancel the operation so that other users can access the system. Try again. [Deregistered by other user] is displayed R Another user deregistered your mobile device. →Register your mobile device to the hub again ( “Registering other mobile devices to the hub”, Page 28). [The hub is not responding.] is displayed R The hub is not turned on. →Make sure the hub is connected to a power outlet.
Troubleshooting →Adjust the date and time setting ( “[Time Adjustment] setting”, Page 98). Sometimes I cannot access the system while at home R There is too much traffic on your home network. →Wait for network traffic to decrease. →Refer to the operating instructions included with your wireless router for other possible solutions. R Your mobile device is discovering too many nearby wireless networks. →Move your mobile device closer to your wireless router.
Troubleshooting →If many notifications were sent from the hub in a short time, notifications may be received late. This is a characteristic your mobile device’s notifications service. The siren stops sounding or flashing before I cancel an alert R When the alarm system is triggered, the hub signals the siren to begin sounding or flashing its strobe light. If the alert has not been canceled, the hub signals the siren to stop sounding or flashing 1 minute later.
Troubleshooting Smart plugs stay on longer than they should be R If you configure a smart control scenario to turn on a smart plug when triggered by a sensor, and if the sensor is triggered multiple times, the smart plug may stay turned on longer than anticipated. →This is not a malfunction. The smart plug stays turned on for the set amount of time each time the sensor is triggered.
Troubleshooting →Format the card ( “SD card formatting”, Page 66). R You just inserted the SD card into the hub. →Wait and try again. [Failed] is displayed R An error occurred while saving the picture. →Check all connections and try again. Colors in camera images appear different from normal R The camera is aimed at a dark location, or it is nighttime. →If there is not adequate light to illuminate the subject, such as at night, the camera automatically switches to night vision mode.
Troubleshooting – Areas where animals move in a limited area, such as birds in a nest or small animals close to the ground – Areas where brightness significantly, such as when shadows form in the afternoon, lights turn on at night, or vehicles pass by at night with their headlights or brakelights on You can prevent these false detections by adjusting the position of the camera, by limiting the detection area so that the camera ignores motion in unneeded areas of the camera’s image ( “Detection area”, Page 6
Troubleshooting →Arm the alarm system ( “Arming and disarming the alarm system”, Page 45). R The sensor is not enabled for the current arm mode. →Change the settings for the current arm mode ( “Alarm system settings”, Page 46). R The desired feature is not enabled. →Temperature alert (indoor cameras only) and sound alert (indoor camera only) do not function as part of the alarm system.
Troubleshooting →Use a cordless handset to change the call restriction feature settings as appropriate. Refer to the Operating Instructions included with your cordless handset. (Note that this feature is supported by certain models only.) I cannot use phone features R You are away from home or your mobile device is not connected to the same wireless router as the hub. →Connect your mobile device to the same wireless router as the hub. R The hub is not connected to your landline.
About this document Compatible environments For best results when viewing this document, we recommend the following environments. When using a computer – Internet Explorer 9 or later – Firefox, latest version – Google Chrome, latest version – Safari 4.1 or later When using a mobile device – iOS 6.0 or later – Android 4.1 or later Note: R Internet Explorer 8 and earlier versions are not supported. R Some content may not be displayed properly when using Android 4.0.
Notes 118
Notes 119
PNQP1107MA/eng CC1014WK12016