
Operating Instructions
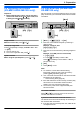
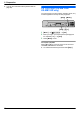
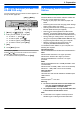


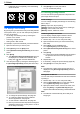
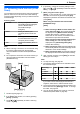

Table Of Contents
- Available features list
- Important Information
- Table of Contents
- Introduction and Installation
- Preparation
- Printer
- Scanner
- Copier
- Fax (KX-MB1520/KX-MB1530 only)
- Sending Faxes
- Receiving Faxes
- 6.5 Selecting the way to use your unit
- 6.6 Receiving a fax automatically : Auto answer ON
- 6.7 Receiving a fax manually : Auto answer OFF
- 6.8 Using the unit with an answering machine
- 6.9 Receive polling (retrieving a fax placed on another fax machine)
- 6.10 Junk fax prohibitor (preventing fax reception from undesired callers)
- 6.11 Receiving a fax on your computer
- Caller ID (KX-MB1520/KX-MB1530 only)
- Programmable Features
- Useful Information
- Help
- Paper Jams
- Cleaning
- General Information
- Index

Helpful hints:
The OCR software is not supplied. Install the desired
third-party OCR software, then specify the path of the
OCR software. To specify the path, see following.
Start Multi-Function Station A [Settings] A
Specify the path to the OCR program file (.exe) in the
[OCR Path] field. A [OK]
R We cannot guarantee the performance of
third-party OCR software.
4.2 Scanning from a computer
(Pull Scan)
Note:
R When scanning a document, we recommend using
the scanner glass rather than the automatic
document feeder for better results (KX-MB1530
only).
R Do not open the document cover when scanning a
document with the automatic document feeder
(KX-MB1530 only).
4.2.1 Using Multi-Function scan application
By clicking an application icon, the selected application
starts automatically after scanning.
1 Set the original (page 19).
2 Start Multi-Function Station. A [Scan]
3 Click the desired application icon.
R When you click [Custom], the pre-programmed
application starts.
R To cancel scanning while the documents are
being scanned, click [Cancel].
Note:
R You can change the scanning settings beforehand for
each application (page 26).
R When you point to an application icon, the scanning
settings for that application are displayed as a tooltip.
R The scanned image will be automatically saved in the
folder selected in the [Settings] window (page 26).
4.2.2 Using Multi-Function Viewer/Quick
Image Navigator
1 Set the original (page 19).
2 Start Multi-Function Station.
3 [Utilities] A [Viewer]
For users other than Italy:
R [Multi-Function Viewer] will appear.
For users in Italy:
R [Quick Image Navigator] will appear.
4 For users other than Italy:
Click the [Scan] icon in the [Multi-Function
Viewer] window.
R The unit’s name dialogue box will appear.
For users in Italy:
Click the [Acquire Image to Import Folder...] icon
in the [Quick Image Navigator] window.
R The unit’s name dialogue box will appear.
5 If necessary, change the scanning settings on your
computer.
R To preview the scanned image, click [Preview].
You can drag the frame to specify the scanning
area. If you change the scan settings, click
[Preview] to refresh the scanned image.
30
4. Scanner