Operating Instructions Multi-Function Printer KX-MB2100 series For descriptions with a (y) mark, see “y List of available features and equipment” on page 3 for availability. R Do NOT connect the unit to a computer with the USB cable until prompted to do so during the setup of Multi-Function Station (CD-ROM). R It is our duty to preserve the environment. Location selection (fax supported models only) (y): If your unit has feature #114, you can change the location setting. See the setup list (page 95).
Thank you for purchasing a Panasonic product. Object models of this manual: Suffix AG Model No.
Feature Highlights y List of available features and equipment The following features and equipment may not be available for your unit. For explanations with a (y) mark, see the following table to determine whether your unit has a particular feature or piece of equipment.
Feature Highlights Feature highlights when using a computer Connecting the unit to a computer and a network allows you to use convenient features for scanning and fax sending/ receiving. LAN USB nScan features Push scan Scan to a computer You can scan the document from unit and then send it to a computer. For details about this feature, see "6.1 Scanning from the unit (Push Scan)" on page 57.
Feature Highlights nFax features (y) Sending faxes PC fax sending You can send an electronic document as a fax message from your computer. For details about this feature, see “8.6.1 Sending an electronic document as a fax message from your computer (PC fax sending)” on page 82. Receiving faxes PC fax reception You can receive a fax document on your computer. For details about this feature, see "8.6.2 Receiving a fax on your computer (PC fax reception)" on page 82.
Important Information For your safety (emergency processing method) B C Laser radiation CLASS 1 LASER PRODUCT R The printer of this unit utilises a laser. Use of controls or adjustments or performance of procedures other than those specified herein may result in hazardous radiation exposure. Laser diode properties Laser output : Max. 10 mW Wavelength : 760 nm - 800 nm Emission duration : Continuous LED light CLASS 1 LED PRODUCT R When using the unit, do not look directly at the CIS’s LED light.
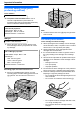
Important Information R To extend the life of the drum cartridge, the power should never be turned OFF immediately after printing. Leave the power turned ON for a minimum of 30 minutes after printing. Moving the unit When moving the unit, carry it as shown. Location R To avoid malfunction, do not position the unit near appliances such as TVs or speakers which generate an intense magnetic field.
Table of Contents 1. Introduction Accessories 1.1 Checking the supplied accessories .............10 Finding the Controls 1.2 1.3 Overview .....................................................12 Button descriptions ......................................15 2. Installation and Preparation Installation 2.1 2.2 Drum cartridge ............................................17 Output tray ..................................................18 Connections and Setup 2.3 2.4 Connections ...........................
Table of Contents 11. Help Reports and Display 11.1 Report messages (Fax supported models only) y .............................................................102 11.2 General messages ....................................102 11.3 Interface messages ...................................105 Troubleshooting 11.4 When a function does not work .................106 12. Paper Jams Paper Jams 12.1 Recording paper jam .................................117 12.2 Document jams (Automatic document feeder) y ............
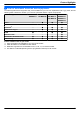
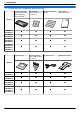
1. Introduction 1.1 Checking the supplied accessories A Drum cartridge (pre-installed inside the unit)(starter toner included*1) B CD-ROM (including driver for printer etc.) C Quick installation guide KX-MB2110 KX-MB2117 U U U U KX-MB2120 KX-MB2128 U U U U KX-MB2130 KX-MB2137 KX-MB2138 U U U U KX-MB2168 KX-MB2170 KX-MB2177 KX-MB2178 U U U U 1. .
1. Introduction I Handset*5 J Handset cord*5 Models KX-MB2110 KX-MB2117 – – KX-MB2120 KX-MB2128 U U KX-MB2130 KX-MB2137 KX-MB2138 U U KX-MB2168 KX-MB2170 KX-MB2177 KX-MB2178 U U *1 *2 *3 *4 *5 Prints approximately 700 pages in accordance with ISO/IEC 19752 standard page. See page 123 for details. Use the supplied cord that is appropriate for where you use this unit.
1. Introduction 1.2 Overview 1.2.
1. Introduction 1.2.
1. Introduction Parts J LAN interface connector R 10Base-T/100Base-TX KX-MB2110/ KX-MB2117 KX-MB2120/ KX-MB2128 KX-MB2130/KX-MB2137/ KX-MB2138/KX-MB2168/ KX-MB2170/KX-MB2177/ KX-MB2178 U — U *1 Only for models that include a handset unit. See page 10 if your unit has a handset.
1. Introduction 1.3 Button descriptions n KX-MB2110/KX-MB2117 A C D n KX-MB2120/KX-MB2128/KX-MB2130/KX-MB2137/ KX-MB2138/KX-MB2168/KX-MB2170/KX-MB2177/ KX-MB2178 E F G B C D H I J K L N O P H I J K L MN O P Q Buttons E F Descriptions A For beep sounds*1 Key beeps etc. will be heard. B Mv/FAX AUTO ANSWERN*2 To turn the auto answer setting ON/OFF. Mm/QUALITYN To select the contrast and resolution when copying. Md/QUALITYN*2 To select the contrast and resolution when sending a fax.
1. Introduction Buttons Descriptions To select desired settings. To adjust the following volume*2: – ringer volume (while setting the operation mode to fax mode) – monitor volume (while using the monitor) Navigator key – O MXN (Collate) MWN (Address MWPSN*4 handset volume (while using the handset)*5 To make a collate copy. book)*2 To search for a stored item. To connect easily to a wireless LAN. To check the status of the wireless LAN connection. To copy a document.
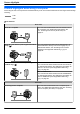
2. . Installation and Preparation 2. Installation and Preparation 2.1 Drum cartridge 2 Remove the drum cartridge (A), which is pre-installed in the unit. The supplied drum cartridge includes starter toner (toner cartridge is not supplied). R When using the unit for the first time, please use the supplied drum cartridge. A Caution: R Read the instructions before you begin installation. 1 Open the front cover by holding the indentation (A).
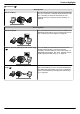
2. Installation and Preparation 4 Shake the drum cartridge horizontally more than 5 times. Toner save feature If you want to reduce toner consumption, set the toner save setting to ON (feature #482). The toner cartridge will last approximately 20 % longer. This feature may lower the print quality. 2.2 Output tray The output tray supports the recording paper exit to hold the printed paper. 1 Expand the paper exit. 5 Hold the drum cartridge (A) by the centre handle, then insert firmly to lock into place.
2. Installation and Preparation 3 Pull up the paper exit, and then replace the tab (A) to the original position. A 2.3 Connections Caution: R Never install telephone wiring during a lightning storm (fax supported models only). (y) R When you operate this product, the power outlet should be near the product and easily accessible. R Do not extend the telephone line cord (fax supported models only). (y) A B Note: R The output tray may not be shown in all illustrations.
2. Installation and Preparation To a single telephone line jack Connecting the handset For users in Germany and Austria, use the appropriate telephone line cord. See page 10 if your unit includes a handset. For Germany For Austria Important: R Before installing or removing the handset unit, be sure to turn the power switch OFF. *1 The power cord may differ slightly. Use the supplied cord that is appropriate for where you use this unit.
2. Installation and Preparation For the subnet mask: 1. M5NM0NM2N A “SUBNET MASK” A MOK/SETN 2.5 Date and time (Fax or LAN supported models only) y 2. Enter the subnet mask of the network. A MOK/ SETN We recommend setting the date and time (feature #101). The other party will receive your unit’s date and time as the header information. If you have subscribed to a Caller ID service (y) The date and time will automatically set according to the received caller information (feature #226). 2.
2. Installation and Preparation 1 Mt/MENUN A MBNM5NM8NM3N A MOK/SETN R The PIN code of the unit is displayed. 2 Register the PIN code to your wireless access point. 3 MOK/SETN R Perform step 3 within 1 minute of performing step 2. R “CONNECTING.....” blinks while connecting. When the connection is complete, “CONNECTED” will be displayed. R If the unit enters standby mode during the process, repeat from step 1 (the PIN code will be renewed). 2.7.
2. Installation and Preparation – Displaying the preview of the print image, changing the page order, deleting pages, and changing the print layout etc.
2. Installation and Preparation If the unit has already been connected to the wireless network 1. [Easy Installation (Wireless LAN)] 2. Select [Already set up wireless LAN]. R The installation will start automatically. 3. When the setup program starts, follow the on-screen instructions. R Easy Print Utility and Device Monitor will also be installed. 4. The [Select a Network Device] dialogue box appears. 1. Check [Select from the search list] and select the unit from the list.
3. Basic Operations 3.1 Operating the unit’s panel 3. . Basic Operations 3.1.1 Selecting the operation mode You can select the desired mode by pressing the following button repeatedly. For models that support the fax feature (y) – – – For models without the fax feature (y) Mh/SCANN: Select this mode when using the unit as a scanner. Mi/COPYN: Select this mode when using the unit as a copier. Ml/FAXN (y): Select this mode when using the unit as a fax machine.
3. Basic Operations To change the paper size and paper type To use other paper sizes/types, see the following table and change the appropriate settings. Tray type Paper sizes Paper types Standard input tray feature #380 feature #383 Manual tray (y) feature #381 feature #384 R For number of sheets the unit can load, see page 128. Tray number information The unit shows the tray number as follows instead of displaying the name of tray. – “#1”: Standard input tray – “#2”: Manual tray (y) 3.2.
3. Basic Operations 3 Load the paper, print-side down (A). Important: R Push down to lock the plate (B) in the standard input tray, if necessary. A B R If necessary, slide the recording paper guides to adjust the width to the size of the recording paper. R Make sure that the recording paper is under the paper limit mark (A), and the paper should not be loaded over the snubbers (B). B A 4 Insert the standard input tray into the unit, lifting the front part of the tray.
3. Basic Operations Note: R If the paper is not loaded correctly, re-adjust the paper guides, or the paper may jam. R If the standard input tray does not close, the plate in the standard input tray may not be in the locked position. Push the paper down and make sure that the paper is laying flat in the standard input tray. Loading paper larger than A4 size (using the extension guide) When loading paper larger than A4 size, install the supplied extension guide beforehand.
3. Basic Operations 2. Pinch the rear guide and then slide it back to the appropriate position. A To remove the extension guide 1. Remove the recording paper guide. 2. Release the hooks (A) from the bottom of the standard input tray to remove the extension guide. A 3. After removing the extension guide, replace the recording paper guide.
3. Basic Operations Caution for the standard input tray R Do not drop the standard input tray. R Hold the standard input tray with both hands when removing or installing. The standard input tray weighs approximately 2 kg when fully loaded with recording paper. Approx.
3. Basic Operations 3.2.2 Manual tray y R When printing with the computer, custom size recording paper can also be used (page 50). R To print from the manual tray, change the paper tray setting beforehand. – Select #2 for the printer properties when printing with the computer. – Set the copy input tray setting to “#2” (feature #460) when making a copy. Important: R To print on thick paper, label or envelope: – Be sure to open the rear cover before starting and print one sheet at a time.
3. Basic Operations R If you are using small recording paper, expanding the paper exit lets you remove it more easily. 3.3 Setting documents 3.3.1 Using the scanner glass A B 1 Open the document cover (A). 2 Place the document FACE DOWN on the scanner glass (B), aligning the top left of the document with the corner where the mark is positioned. R To make a portrait copy, set the original in portrait direction. To make a landscape copy, set the original in landscape direction. 3 Close the document cover.
3. Basic Operations 3.3.2 Using the automatic document feeder y 1 Open the document tray (A). A 2 Insert the document (up to 35 sheets) FACE UP into the feeder until a single beep is heard. R To make a portrait copy, set the original in portrait direction. To make a landscape copy, set the original in landscape direction. A R Adjust the width of the document guides (A) to fit the actual size of the document. Note: R Confirm that there are no documents on the scanner glass.
3. Basic Operations R The number of sheets that can be held in the document exit may vary depending on the specifications of the paper and the usage environment. 3.3.3 Document requirements Effective scanning area Effective scanning area is shown by the shaded area. Scanner glass: Automatic document feeder (y): 4 mm 4 mm 208 mm 4 mm 4 mm 4 mm 4 mm 4 mm 289 mm 4 mm 208 mm 216 mm R When using the unit as a scanner, the effective scanning length depends on the selected paper size.
3. Basic Operations 3.4 Multi-Function Station To start Multi-Function Station, see the following. [Start] A [All Programs] A [Panasonic] A the unit’s name A [Multi-Function Station] [Application] [Scan] (page 60) R R R R [Open Scan Folder] R To display the folder where the scanned image will be saved. [Viewer] R To start the Multi-Function Viewer/Quick Image Navigator (page 60). [PC FAX] (Fax supported models only) (y) R To send a document created on the computer as a fax message (page 82).
3. Basic Operations R To change the settings for scanning. [Help] R For detailed instructions on Multi-Function Station. R To view operating instructions. R To display Support Web Page. R To display information about Multi-Function Station. Note: R You can confirm if the unit is connected to your computer by using Device Monitor (page 43). R Computer features (printing, scanning, etc.
3. Basic Operations 3. Select the desired MAPI-compliant Email software from [Choose a default e-mail program]. A [OK] To configure the wireless LAN settings (y) 1. Start Multi-Function Station. 2. Click [Device] tab. A [Wireless LAN Setting] R When the setting tool starts, follow the on-screen instructions.
3. Basic Operations 3.5 Programming the unit from the operation panel Important: R For program availability and selection information for your unit, print the “SETUP LIST” (page 95). Programs listed are available for your unit. Programming features are as follows: – "3.6 Programming features: Basic" (page 38) – "5.3 Programming features: PC print" (page 56) – "6.3 Programming features: Scan" (page 61) – "7.3 Programming features: Copy" (page 73) – "8.7 Programming features: Fax" (page 86) – "9.
3. Basic Operations Feature Code Description Recall/Flash time #121 The recall/flash time depends on your telephone exchange or host PBX. Note: R If the unit is connected via a PBX, PBX functions (transferring a call, etc.) might not work correctly. Consult your PBX supplier for the correct setting. ADSL mode #124 When you use a DSL/ADSL line, this feature improves the reliability by reducing the transmission speed. Note: R Calling charges may be higher than usual.
3. Basic Operations Feature Code Description Beep sound #165 To set the beep sounds and keytones. If you wish to hear confirmation/error beep sounds and keytones, activate this feature. Note: R Even if this feature is deactivated, the unit beeps in some cases. For example: – the front cover is opened. Job end notification #174 #210 Automatic Caller ID list #216 When this feature is activated, the unit will print the Caller ID list automatically after every 30 new calls.
3. Basic Operations Feature Code Description Paper size in the manual tray #381 To set the recording paper size in the manual tray. Paper type for the standard input tray #383 Paper type for the manual tray #384 Power save #403 Note: R If you have set feature #147 to “INCHES”, the numbers are displayed in inches. Note: R This setting will be deactivated when printing from a computer. To set the recording paper type for printing, see page 50.
3. Basic Operations 2 Select the desired category from the menu bar. [Device]: features of the unit [Network]: network features [Directory]: registration of the address book, etc 3 Type “root” as the user name, then enter the programming password (feature #155). A [OK] 4 Select the desired feature from the menu. 5 Change the settings or edit the information. R This step will vary depending on the feature. 6 [Submit] R The new setting will be transferred to the unit. 7 Close the web browser.
3. Basic Operations 3.8 Status of the unit 3.8.1 Using Remote Control You can easily operate the following functions from your computer.
3. Basic Operations 2 Select a category from the menu. [Status]: Toner and paper information, etc. [Information]: Current status of the unit and network information, etc. 3 Confirm the status of the unit. Note: R You can update the status of the unit by clicking [Reload].
4. . Telephone Number and Email Address 4. Telephone Number and Email Address 4.1 Character entry (Fax or LAN supported models only) y The dial keypad is used to enter characters and numbers. – Press MFN or MEN to move the cursor. – Press the dial keys to enter characters and numbers. – Press Mw/STOPN to erase the character or number highlighted by the cursor. Press and hold Mw/STOPN to erase all characters or numbers.
4. Telephone Number and Email Address For HX (Polish) M2N M3N M4N M5N M6N M7N M8N M9N A Ą B CĆ 2 DE ĘF 3 GH I 4 J K L Ł5 MN ŃO Ó 6 PQR S Ś 7 TU V 8 WX YZŹ Ż 9 abc2 def 3 gh i4 j k l 5 mno 6 pq rs 7 t u v8 w x yz9 M5N M6N For RU M2N M3N M4N To search for a name by initial Example: “LISA” 1. Initiate the address book. 2. M5N (repeatedly): Display any name with the initial “L”. R To search for symbols, press MG/ToneN. 3. MCDN: “LISA” R To stop the search, press Mw/STOPN.
4. Telephone Number and Email Address 4.2 Storing telephone number and email address from your unit (Fax or LAN supported models only) y 4.2.1 Storing telephone number and email address in the address book The unit contains an address book (100 items). 1 2 3 4 Mt/MENUN (repeatedly): “ADDRESS BOOK SET” MFEN: “NEW” A MOK/SETN Enter the name, up to 16 characters. A MOK/SETN Follow the display to enter the telephone number*1 and/or email address*2.
4. Telephone Number and Email Address Adding a new item into the broadcast memory 1. Mt/MENUN (repeatedly): “BROADCAST SETUP” 2. Press MOK/SETN. 3. MCDN: Display the desired broadcast memory location. A MOK/SETN A MG/ToneN 4. MCDN: Display the item you want to add. A MOK/SETN R To add other items, repeat this step (up to 20 items). 5. Mt/MENUN Erasing a stored item from the broadcast memory 1. Mt/MENUN (repeatedly): “BROADCAST SETUP” 2. Press MOK/SETN. 3. MCDN: Display the desired broadcast memory location.
4. Telephone Number and Email Address 4.3 Registering items in the address book through a web browser (LAN supported models only) y You can register, edit or erase items in the address book, etc., in [Directory] menu. Feature Selection Registering and editing email address and telephone number in the address book Register email address and telephone number. These items can be used as destinations for the following features.
5. Printing 5.1 Printing from Windows applications 5. . Printing You can print a file created in a Windows application. For example, to print from WordPad, proceed as follows: 1 Open the document you want to print. 2 Select [Print] from the menu. 3 Select the unit’s name as the active printer. R When mode restriction (feature #154) is activated, enter the department code in the printer settings using [Job Type] beforehand (page 50).
5. Printing 3 4 5 6 Select the unit’s name as the active printer. [Preferences] Click the [Basic] tab. [Duplex] A Select the desired duplex layout. A [OK] R Select [None] to deactivate this feature. R You can also change the duplex margin. 7 Click [Print]. 5.1.2 Printing on special media You can print not only on plain paper but also on special media (labels / envelopes). R Please refer to page 128 for information on recording paper. R Use the manual tray to print on special media.
5. Printing – Envelope CHOUKEI #3/CHOUKEI #4 – Envelope YOUKEI #4/#10/DL Note: R Wrinkles and waving may occur in some cases, even if high quality envelopes are used. R Avoid printing in high humidity. High humidity may cause the envelope to curl or seal the envelope. R Store envelopes away from moisture and humidity, where they can lay flat and their edges will not be bent or damaged.
5.
5. Printing 5.2 Easy Print Utility By printing using the Panasonic Easy Print Utility instead of the printer driver, you will have access to many useful and convenient printing features: – Preventing unnecessary prints by checking the preview on PC screen – Combining multiple documents – Saving a file in PDF format For example, to print from WordPad, proceed as follows: 1 2 3 4 Open the document you want to print. Select [Print] from the menu. Select [Panasonic Easy Print Driver] as the active printer.
5. Printing Saving a file as PDF file You can save the previewed files in PDF format instead of printing it. 1. Perform steps 1 to 4 on “5.2 Easy Print Utility”. 2. Click the [Save PDF file] icon on the print toolbar. 3. Specify the folder to save, enter the file name, and then click [Save]. The [Save PDF file] dialogue appears while PDF files are being created and saved. Note: R The PDF file created with Easy Print Utility is an image type.
5. Printing 5.3 Programming features: PC print Feature Code Description Data timeout #774 To change the data timeout setting. The unit will automatically print the remaining data in memory when the computer does not send data to the unit during the set time. Enter the desired data timeout setting from 5 and 600 seconds, using the dial keypad. R The default setting is “060” seconds.
6. Scanning 6.1 Scanning from the unit (Push Scan) 6. . Scanning You can easily scan a document by using the operation panel on the unit. You can select one of the following scanning modes depending on how you intend to use the scanned image.
6. Scanning 5 If necessary, change the scanning settings. MEN A MCDN: Select the desired setting. A MOK/SETN 6 When using the scanner glass: Mx/STARTN A The unit will scan 1 page. Place the next document on the scanner glass and press MOK/SETN. Repeat this until all the documents are scanned, then press Mx/STARTN. When using the automatic document feeder (y): Mx/STARTN 7 After you finish scanning, press Mw/STOPN to reset the setting you set in these procedures.
6. Scanning 3. 4. 5. 6. 7. 8. Type “root” as the user name, then enter the programming password (feature #155). A [OK] Select the [EMAIL FEATURE] from the menu. Click [Edit] next to [EMAIL SERVER]. Enter email address (from), email server information, and time zone. [Submit] Close the web browser.
6. Scanning 6.2 Scanning from a computer (Pull Scan) Note: R When scanning a document, we recommend using the scanner glass rather than the automatic document feeder for better results. (y) R Do not open the document cover when scanning a document with the automatic document feeder. (y) 6.2.1 Using Multi-Function scan application 1 Set the original. 2 Start Multi-Function Station. A [Application] A [Scan] 3 Click the desired application icon.
6. Scanning Format Multi-Function Viewer Quick Image Navigator TIFF U U JPEG U U PDF – U PNG – U PCX U – DCX U – BMP U U R You can save images in the following formats. Format Multi-Function Viewer Quick Image Navigator TIFF U U JPEG U U PDF U U PNG – U PCX U – DCX U – BMP U U R If the [Select] button is displayed in [Target Device], click [Select] to select the unit from the list, and then click [OK].
6. Scanning Feature Code Description Scan parameter hold #494 To hold the previous scanning parameter for Push Scan. When this feature is activated, the unit will hold the previous scan settings for each mode of push scan.
7. . Copying 7. Copying 7.1 Making a copy 7.1.1 Basic procedures for making a copy 1 Make sure that the unit is set to the copy mode. 2 Set the original. 3 If necessary, change the copy size (original document size and recording paper size), resolution and contrast according to the type of document. R To select the copy size, see page 63. R To select the contrast, see page 63. R To select the resolution, see page 63. 4 If necessary, enter the number of copies (up to 99).
7. Copying Note: R You can hold the default resolution (feature #461). 7.2 More copying features Important: R Make sure that the unit is set to the copy mode. 7.2.
7. Copying 7.2.2 Duplex feature Duplex type 1-sided originals to 2-sided copies Binding type “LONG EDGE” Document setting “SHORT EDGE” Scanner glass or automatic document feeder (y) 1 2 3 4 5 Set the original. Mr/DUPLEXN MCDN: Select the desired binding setting for copies. A MOK/SETN Enter the number of copies (up to 99). Start copying. When using the scanner glass, press Mx/STARTN to scan the 1st page. R To scan the next page, place the document and press MOK/SETN.
7. Copying 7.2.3 Collate copy The unit can collate multiple copies in the same order as the original document pages. Example: Making 2 copies of a 4-page original document Collated pages 1 1 1 2 3 4 5 2 3 2 3 Uncollated pages 4 4 1 1 2 2 3 3 4 4 Set the original. MFN: “COLLATE” MCDN: “ON” A MOK/SETN Enter the number of copies (up to 99). Start copying. When using the scanner glass, press Mx/STARTN to scan the 1st page. R To scan the next page, place the document and press MOK/SETN.
7. Copying 7.2.4 Quick ID copy feature/Image repeat feature (Scanner glass only) Quick ID copy feature: To copy 2-sided documents onto one page. Quick ID copy “2 in 1” “4 in 1” “8 in 1” Original document Page layout (“LANDSCAPE”) Page layout (“PORTRAIT”) 1. Set the original. 2. Mo/PAGE LAYOUTN (repeatedly): “PAGE LAYOUT” 3. MCDN: “QUIK ID COPY” A MOK/SETN 4. 5. 6. 7. 8. MCDN: Select the number of original documents. A MOK/SETN MCDN: Select the desired page layout.
7. Copying 4. MCDN: Select the number of original documents. A MOK/SETN 5. If necessary, enter the number of copies (up to 99). 6. Mx/STARTN Note: R After you finish copying, press Mw/STOPN to reset this feature. R You do not need to change the original document size. R The scanning area changes according to the number of original document setting. The shaded area will be scanned. R This feature cannot be used when – the duplex feature (page 65) is activated.
7. Copying 7.2.6 N in 1 feature You can save paper by copying 2, 4 or 8 pages onto 1 page. The documents will be reduced to fit the recording paper. N in 1 “2 in 1” “4 in 1” “8 in 1” Original document Page layout (“LANDSCAPE”) Page layout (“PORTRAIT”) 1 2 3 4 5 6 7 Set the original. Mo/PAGE LAYOUTN (repeatedly): “PAGE LAYOUT” MCDN: “N in 1” A MOK/SETN MCDN: Select the number of original documents. A MOK/SETN MCDN: Select the desired layout.
7. Copying Separate N in 1 “2 in 1” “4 in 1” Original document (“PORTRAIT”) Separate pages 1 2 3 4 5 6 7 Set the original. Mo/PAGE LAYOUTN (repeatedly): “PAGE LAYOUT” MCDN: “SEPARATE N in 1” A MOK/SETN MCDN: Select the number of original documents. A MOK/SETN MCDN: Select the page layout of the original documents. A MOK/SETN If necessary, enter the number of copies (up to 99). Mx/STARTN Note: R After you finish copying, press Mw/STOPN to reset this feature. 7.2.
7. Copying 3. If “1” is selected in step 5, the unit will start copying. R You can press Mx/STARTN anytime to start copying. R For multiple copies, press Mx/STARTN to start copying. If “ALL” is selected in step 5, press Mx/STARTN to start copying. When using the automatic document feeder (y): Mx/STARTN Note: R After you finish copying, press Mw/STOPN to reset this feature. R Multiple copies will be collated automatically. R You can save the previous page layout setting (feature #467).
7. Copying 4 5 6 7 8 MCDN: Select the page layout. A MOK/SETN MCDN: Select the edge you want to set the margin for. A MOK/SETN Enter margin width using the dial keypad. A MOK/SETN If necessary, enter the number of documents (up to 99). Mx/STARTN Note: R After you finish copying, press Mw/STOPN to reset this feature. R To automatically reduce the copies according to the set margin, see feature #474. R This feature and page layout features cannot be used at the same time.
7. Copying 7.3 Programming features: Copy Default key Feature Code Description Input tray setting for copy #460 To set the input tray to use for copy. Default copy resolution #461 To change the default resolution setting for copying. Page layout hold #467 To hold the previous page layout setting. M0N Zoom hold #468 To hold the previous zoom setting. M0N Collate hold #469 To hold the previous collate setting. M0N Duplex hold #470 To hold the previous duplex setting.
8. . Fax 8. Fax 8.1 Availability of the fax feature Important: R The fax feature may not be available for your unit. See “y List of available features and equipment” on page 3 whether your unit has the feature. 8.2 Preparation for sending a fax We recommend programming the following so that they appear on the top of each page sent. – Date and time (feature #101) – Your logo (feature #102) – Fax number (feature #103) 8.3 Basic procedure for sending a fax Important: R Set the unit to the fax mode.
8. Fax 1 MWN 2 MCDN: Display the desired item. 8.3.3 Reserving the fax transmission (Dual Access) You can reserve a fax transmission even when the unit is receiving a fax or sending a fax from memory. – Up to 3 reservations when sending – Up to 4 reservations when receiving 1 Set the original during fax reception or fax memory transmission. 2 Enter the fax number using the dial keypad or address book. 3 Reserve the fax transmission. When using the scanner glass, press Mx/STARTN to scan the 1st page.
8. Fax Situation Mode Use mostly as a telephone You want to answer calls by yourself. If a fax call is received, you must receive the fax manually. TEL Use as a telephone and/or fax You want to answer phone calls yourself and receive faxes automatically without the unit ringing. R This feature is available only for models that support TEL/FAX mode. (y) TEL/FAX Use with an answering machine You want to use the unit with an answering machine. – Setup 1.
8. Fax For AG/CX/EU*1/G*2/HX/JT/LA/ML/SX/TW models: R If you do not answer the call within 10 rings, the unit will temporarily switch to fax reception. The other party can then send a fax. For HK models: R If you do not answer the call within 15 rings, the unit will temporarily switch to fax reception. The other party can then send a fax. *1 When U.K. is selected in feature #114, this feature is not activated. *2 You can set this feature to OFF (feature #319).
8. Fax – Some fax machines do not generate fax calling tones when sending faxes, therefore the unit will try to receive a fax even if no fax calling tone is detected. 8.5.4 Using the unit with an answering machine Setting up the unit and an answering machine 1. Connect the answering machine (A). R An answering machine is not supplied. The illustration is just an example. R Please purchase an extension telephone adaptor (for UK only). R Remove the stopper (B) if attached. R To a single telephone line (C).
8. Fax 2. The caller can leave a message after the greeting message. 3. The caller presses MGNMBNM9N (pre-selected fax activation code). R The unit will activate the fax function. 4. The caller presses the start button to send a document. Note: R To use this feature, make sure remote fax activation is turned ON (feature #434). The fax activation code can also be changed. R If there is no room left in the memory of your answering machine, the unit may not be able to receive documents.
8. Fax R If the area code of the received telephone number is the same as yours, the area code may need to be deleted before calling back. This may only apply to some areas. 1. Set the unit to the fax mode. 2. Mz/CALLER IDN 3. MCDN: Search from the recently received caller information. R While displaying the desired caller information, press Mz/CALLER IDN repeatedly to change name/telephone number information.
8. Fax Other useful features for junk fax prohibitor To display the junk fax prohibitor list 1. Mt/MENUN (repeatedly): “JUNK FAX PROH.” 2. MEN (repeatedly): “JUNK LIST DISP.” A MOK/SETN 3. MCDN: Display the items on the list. 4. Press Mw/STOPN to exit. To print the junk fax prohibitor list 1. Mt/MENUN (repeatedly): “JUNK FAX PROH.” 2. MEN (repeatedly): “JUNK LIST PRINT” A MOK/SETN 3. Press Mw/STOPN repeatedly to exit. To erase an item from the junk fax prohibitor list 1.
8. Fax 8.6 Advanced Fax features 8.6.1 Sending an electronic document as a fax message from your computer (PC fax sending) You can send an electronic document as a fax message from your computer. 1 2 3 4 5 6 Open the document you want to send. Select [Print] from the menu. Select the PCFAX unit’s name as the active printer. Click [Print]. Enter the fax number using the keypad display or the address book. [Send] Note: R If the document exceeds the memory capacity of the unit, sending will be cancelled.
8. Fax To activate this feature, set the following beforehand: 1. Activate the PC fax setting (feature #442). 1. Mt/MENUN A MBNM4NM4NM2N 2. MCDN: Select “ALWAYS” or “CONNECTED”. A MOK/SETN A Mt/MENUN R See the PC fax setting (feature #442) for details about the selections. 2. Deactivate the fax preview mode (feature #448) (LAN supported models only). (y) 1. Mt/MENUN A MBNM4NM4NM8N A M0N A MOK/SETN A Mt/MENUN 3. Set the computer setting for the PC fax reception (feature #443) (LAN supported models only).
8. Fax Note: R When the notification for fax reception is activated, the selected computer will receive a notification when the memory becomes full of received documents. R When web fax preview is activated, the fax documents are stored in memory. The memory may become full of received documents, so delete documents from the memory as soon as possible after viewing or printing them. R When web fax preview is activated, the PC fax setting (feature #442) will be deactivated.
8. Fax 3. Type “root” as the user name, then enter the programming password (feature #155). A [OK] 4. Select the [EMAIL FEATURE] from the menu. 5. Click [Edit] next to [EMAIL SERVER]. 6. Enter email address (from), email server information, and time zone. A [Submit] 3. Register email destinations (recommended). 1. [Device] A [Configuration Web Page] A [Directory] 2. Type “root” as the user name, then enter the programming password (feature #155). A [OK] 3. Select the [ADDRESS BOOK] from the menu. 4.
8. Fax 8.7 Programming features: Fax Feature Code Description TEL/FAX delayed ring count #212 If you use an extension telephone in TEL/FAX mode, select the desired number of times the extension telephone rings before the unit answers the call. Note: R See page 77 for details. R For EU models users: If you change the location setting (feature #114), the TEL/FAX delayed ring count will be reset to “2”. If necessary, select the desired ring count again.
8. Fax Feature Code Description ECM selection #413 To set the Error Correction Mode (ECM). This feature is available when the sending / receiving fax machines are ECM compatible. When this feature is activated, fax transmission / reception will be carried out so that the errors do not occur. Connecting tone #416 Default key M1N If you often have trouble when sending faxes, activating this feature allows you to hear connecting tones: fax tone, ring back tone and busy tone.
8. Fax Feature Code Description Auto reduction #432 To receive a fax document that is longer than your recording paper. When this feature is activated, the unit will fit received documents onto your recording paper. Fax activation code #434 If you wish to use an extension telephone to receive faxes, activate this feature and program the activation code. When entering the code, use the dial keypad. R The default code is “H#9”.
8. Fax Feature Code Description Fax receive notify #451 When this feature is activated, the computer connected to your unit using USB/LAN*1 will receive a notification when a fax document is received. *1 LAN supported models only (y) Default key Note: R When connecting to the LAN (y): Register computers to which fax reception notifications will be sent through the web browser interface. Select the PC to send fax reception notification message to (up to 6 destinations). 1.
9. . Network 9. Network 9.1 Availability of the network feature Important: R The network feature (LAN or wireless LAN) may not be available for your unit. See "y List of available features and equipment" on page 3 whether your unit has the feature. 9.2 Programming features: LAN Default key Feature Code Description DHCP mode #500 When this feature is activated, the following will be allocated automatically using a DHCP (Dynamic Host Configuration Protocol) server.
9. Network Feature Code Description IPv6 protocol #535 When this feature is activated, IPv6 protocol can be used. After installing the printer driver, be sure to change the port to IPv6 protocol. You can check the IPv6 protocol address by printing the “SETUP LIST” (page 95). Default key M0N Note: R To activate this feature, you need to turn the power switch of the unit OFF, then ON. WINS server #1 #538 To set the primary WINS server for the LAN connection.
9. Network Code Status Cause Solution 000 Not connected The unit is not connected correctly to the network. Check the connections (page 19). 110 Offline IP address is not configured. Configure the IP address. 112 Offline IP address is not determined, because the IP configuration is not correct. Correct the configuration of IP address information. 113 Offline IP address is not determined, because the IP address is duplicated. Change the IP address.
9. Network Feature Menu Selection Setting the IP filtering [LAN FEATURE] Enter the IP filtering information. 1. Select the [LAN FEATURE] from the menu. 2. Click [Edit] next to [IP FILTERING]. 3. Click [Edit] next to [FILTER (IPv4)]/[FILTER (IPv6)]. 4. Change the mode and edit IP filtering information. A [Submit] 5. Close the web browser. Setting the proxy server [LAN FEATURE] Enter the proxy server information for Google® Cloud Print™.
9. Network Feature Menu Selection Registering destinations for the error notify feature [EMAIL FEATURE] 1. Select the [EMAIL FEATURE] from the menu. 2. Click [Edit] next to [DESTINATION]. 3. Enter the email address to which error notifications will be sent and select the types of problems. – [LIFE WARNING]: A warning indicating that the toner cartridge or drum cartridge needs to be replaced soon. – [MEDIA PATH ERROR]: An error indicating that there is a problem with an input tray.
10. Other Useful Features 10.1 Reference lists and reports 10. . Other Useful Features You can print out the following lists and reports for your reference.
10. Other Useful Features 10.2 Mode restriction You can restrict output by enabling department codes. Only users who know the department code can: – make a copy – print a document Note: R You can set department codes and restriction settings for individual departments (up to 10 departments). R To use the mode restriction feature, do not allow many people to know the administrator code. 10.2.1 Setting the mode restriction Activating the mode restriction 1. Mt/MENUN A MBNM1NM5NM4N A MOK/SETN 2.
10. Other Useful Features MFEN: “ERASE ALL” A MOK/SETN A MOK/SETN A Mw/STOPN 4. MCDN: Display the desired item. A Mt/MENUN A MBN R To cancel erasing, press Mw/STOPN. 5. MOK/SETN A Mt/MENUN 10.2.2 Counter view and print for departments Viewing the count number of copies/prints for departments 1. Mt/MENUN A MBNM4NM7NM9N A MOK/SETN 2. Enter the administrator code (feature #151). A MOK/SETN 3. MCDFEN: Select the desired item. A Mt/MENUN Printing a report of the count number of copies/prints for departments 1.
10. Other Useful Features 5. MCDN: Select the desired setting. A MOK/SETN R To set other items, repeat steps 4 and 5. R The dial keypad can be used for the setting, depending on the item. 6. Press Mw/STOPN repeatedly to exit. Scanning/making copies using the pre-programmed setting 1. Set the unit to a desired mode (scan or copy). 2. M[/QUICK-JOBN 3. MCDN: Select the desired setting number (1-3). 4. Mx/STARTN Note: R You can print the QUICK-JOB list (page 95). 10.
10. Other Useful Features 7 Click [Print]. R The dialogue box to assign a password will be displayed only at the first time. Enter the desired 4-digit password, and then click [OK]. Note: R The Secure Print icon is displayed in the task tray. Click this icon to start the Secure Print application that can manage printing jobs. To print the secured documents from the unit 1. 2. 3. 4. M]/SECURE PRINTN MCDN: Select the desired computer’s name.
10. Other Useful Features 3 Press Ms/MONITORN while sending the 1st page. R Your unit will display “VOICE STANDBY”. After the other party has received the 1st page, your unit will ring and “PLEASE PICK UP” will be displayed. Lift the handset to talk to the other party again. 4 Repeat steps 1 to 3 until all fax pages are sent. 5 Replace the handset to end the conversation. 10.
10. Other Useful Features To use one phone number for the fax, program the ring pattern assigned for the fax (feature #431). In the example, the ring pattern assigned for fax is a triple ring, so you should program “C” (triple ring). 10.7.3 Programming the ring pattern assigned for fax R Not available for HK models. 1 Set feature #430 to “ON”. 2 Mt/MENUN A MBNM4NM3NM1N 3 MCDN: Select the desired ring pattern assigned for fax.
11. . Help 11. Help 11.1 Report messages (Fax supported models only) y To indicate the unit’s fax transmission/reception status, one of the following messages will be printed on the sending and journal reports (page 95). Message COMMUNICATION ERROR Code 40-42 46-72 FF Cause & Solution R A transmission or reception error occurred. Try again or check with the other party. 43 44 R A line problem occurred. Connect the telephone line cord to a different jack and try again.
11. Help Display Cause & Solution “CALL SERVICE” R There is something wrong with the unit. Contact our service personnel. “CHANGE DRUM” R There is something wrong with the drum cartridge. Replace the drum cartridge and the toner cartridge. “CHECK DOCUMENT” R The document was not fed into the unit properly. Remove the document, and then press Mw/STOPN to clear the message. Re-insert the document. If misfeeding occurs frequently, clean the document feeder rollers (page 123) and try again.
11. Help Display Cause & Solution “FILE SIZE OVER” R When performing scan to FTP server or scan to SMB folder, the number of scanned pages or the file size of the scanned data has exceeded the limitation. Divide the document into sections. “FRONT COVER OPEN” R The front cover is open. Close it. “KEEP COPYING” R Copying has stopped due to some existing problem (Example: a lack of recording paper or a recording paper jam). See the other displayed message instructions to continue copying. “LOW TEMP.
11. Help Display Cause & Solution “RX MEMORY FULL” R The memory is full of received documents due to a lack of recording paper or a recording paper jam. Load paper (page 25) or remove the jammed paper (page 120). R If the PC fax (feature #442) is set to “ALWAYS”, – check the connection between the computer and the unit. – check that the computer is turned on.
11. Help Display Cause & Solution “OFFLINE” R The cable between the unit and the computer is not connected correctly. Check the connections (page 19, 23). R Check that the computer is turned ON. “PATH ERROR” R The path of FTP server or SMB folder is incorrect. Consult your network administrator. “PC ACCESS ERROR” R Check that the computer is turned ON. R The Multi-Function Station’s scan application is not running correctly on the computer. Restart your computer and try again.
11. Help Problem Cause & Solution I cannot install or uninstall Multi-Function Station. R Some of the files needed to install or uninstall Multi-Function Station may be corrupted. Use the MfsCleaner utility (found on the supplied CD-ROM) to solve the problem. 1. Insert the supplied CD-ROM into your CD-ROM drive. R The setup program will start automatically. 2. [Tools] A [Cleanup Tool] 3. Click [Clean], and then click [Yes] to restart the computer.
11. Help Problem Cause & Solution The printing quality is poor (e.g. has smudges, blurred points or lines). R Some paper has instructions recommending which side to print on. Try turning the recording paper over. R You may have used paper with a cotton and/or fibre content that is over 20 %, such as letterhead or resume paper. R The recording paper is too damp. Use new paper. AB C I changed the recording paper, but the printing quality is still poor.
11. Help 11.4.3 Scanner Problem Cause & Solution I cannot scan. R When scanning at a high resolution, a large amount of available memory is required. If your computer warns that there is insufficient memory, close other applications and try again. R Select a lower resolution and try again. R Reduce the scanning area and try again. 1. To preview the scanned image, click [Preview]. 2. You can drag the frame to specify the scanning area. 3. Click [Scan] to start scanning. R The unit is in use.
11. Help 11.4.4 Copier Problem Cause & Solution The unit will not make a copy. R You cannot make a copy during programming. Make the copy after programming. R The document was not set properly (page 32). R Recording paper is not loaded or the unit has run out of paper. Load paper (page 25). Letters on the copied documents are not clear. R The original document is too dark or too light. Change the contrast (page 63) and try again. The copied documents are too dark and cannot be read.
11. Help Problem Cause & Solution I cannot receive the whole document (LAN supported models only). (y) R The fax to email address (feature #452) is activated. In this case, only faxes within the fax memory capacity (page 126) can be received. Deactivate the feature, then ask the other party to resend the document. I cannot receive documents automatically. R The receiving mode is set to TEL mode. Set to FAX ONLY mode (page 76) or TEL/FAX mode (y) (page 77).
11. Help Problem Cause & Solution I cannot hear a dial tone. R The telephone line cord is connected to the [EXT] jack on the unit. Connect to the [LINE] jack (page 19). R If you use a splitter/coupler to connect the unit, remove the splitter/coupler and connect the unit to the wall jack directly. If the unit operates properly, check the splitter/coupler. R Disconnect the unit from the telephone line and connect a known working telephone.
11. Help 11.4.6 Network (LAN supported models only) y Problem Cause & Solution I cannot operate the following functions. – PC printing – Scanning – Remote Control – PC FAX (y) – Device Monitor – Secure Print R Confirm the LED via the LAN port of the main board. If the LED is glowing or blinking, network access is working correctly. If the LED is not glowing or blinking, confirm the LAN cable (Category 5 (Cat-5) Ethernet cable) is connected to the LAN port of the main board correctly.
11. Help Problem Cause & Solution The [Windows Security Alert] dialogue box appears and asks if I want to block [PCCMFLPD] and I cannot operate the following functions after installing the Microsoft Windows XP Service Pack 2 or later. – PC printing – Scanning – Remote Control – PC FAX (y) – Device Monitor – Secure Print R Click [Keep Blocking] and run the Windows Firewall Setting Tool to allow the data transmission for Multi-Function Station (page 115). 11.4.
11. Help 11.4.8 Using an answering machine Problem Cause & Solution I cannot receive documents automatically. R Your greeting message on the answering machine is too long. Shorten the message. Record a message less than 10 seconds long. R The answering machine rings too many times. Set to 1 or 2 rings. I cannot receive voice messages. R Check if the answering machine is turned ON and connected to the unit properly (page 78). R Set the number of rings on the answering machine to 1 or 2.
11. Help To confirm the security settings (For Windows 7/Windows 8 users) 1. [Control Panel] A [System and Security] A [Windows Firewall] A [Advanced settings] 2. [Inbound Rules] 3. Confirm that [Panasonic Trap Monitor Service], [Panasonic LPD Manager] and [Panasonic LPD] are displayed and checked on the [Inbound Rules] list. 11.4.
12. . Paper Jams 12. Paper Jams 12.1 Recording paper jam 12.1.1 When the recording paper has jammed inside of the unit Case 1: When the recording paper has jammed near inside the unit, near the bottom. 1. Push down the indentation (A) and release the bottom cover. The display will show the following: – “PAPER JAMMED” L “OPEN REAR COVER” “OPEN FRONT COVER” A Caution: R Do not pull out the jammed paper forcibly. 2. Remove the jammed paper (A).
12. Paper Jams Case 2: When the recording paper has jammed inside the rear cover. 1. Open the rear cover (A). Note: R The area near the rear cover (C) may also get warm. R If the recording paper cannot be removed from rear side, expand the paper exit, and then remove the jammed paper (D). After removing it, replace the paper exit to the original position. A E 2. Push down both green levers (A) until they stop. A D Caution: R Near the recording paper exit roller shaft (E) gets hot. Do not touch it. 4.
12. Paper Jams 5. Close the rear cover firmly. 4. Remove the jammed paper. R If the bottom edge of the recording paper (A) is sticking out, push the recording paper towards the back to release it, and then pull it out. A Case 3: When the recording paper has jammed inside the front cover. 1. Open the front cover by holding the indentation (A). A 2. Remove the drum cartridge (A). R If the top edge of the recording paper (B) is sticking out, pull it out by holding the front part of the jammed paper.
12. Paper Jams 12.1.2 When the recording paper is not fed into the unit properly The display will show the following: – “CHECK PAPER #1 PRESS START” 1 Pull the standard input tray completely out. 2 Re-load the recording paper. 12.2 Document jams (Automatic document feeder) y The display will show the following: – “REMOVE DOCUMENT” Caution: R Do not pull out the jammed document forcibly before lifting the ADF cover. 3 Insert the standard input tray into the unit.
12. Paper Jams 2 Remove the jammed document (A) carefully. When the document has jammed near the document entrance: 3 Close the ADF cover. A R Press Mw/STOPN to clear the message. R If you cannot remove the jammed document (A), open the document cover, remove the document, then close the document cover.
13. . Cleaning 13. Cleaning 13.1 Cleaning the white plates and glass Clean the white plates and glass when a black line, a white line or a dirty pattern appears on: – your recording paper, – the original document, – the scanned data, or – the fax document received by the other party. (y) Caution: R Do not use paper products, such as paper towels or tissues for cleaning. 1 Open the document cover (A). A 2 Hold the document cover while cleaning the white plates (A) and the scanner glass (B).
13. Cleaning 13.2 Cleaning the document feeder rollers y 4 Close the ADF cover. Clean the rollers when documents frequently misfeed, or when a line or a dirty pattern appears on documents. Caution: R Do not use paper products, such as paper towels or tissues for cleaning. 1 Turn the power switch OFF. 2 Open the ADF cover (A) while holding down the document cover (B). A B 5 Turn the power switch ON. 13.
13. Cleaning inside of the drum cartridge. Repeat this for the right groove (C). A B C Note: R Be sure to clean all the way to the edge of each groove. R After cleaning, replace the cleaner to the original place.
14. General Information 14.1 Specifications Item 14. . General Information Specifications Printer type Laser Printer Memory capacity (for operation and storing memory) KX-MB2110/KX-MB2120/KX-MB2128/KX-MB2130/ KX-MB2138/KX-MB2168/KX-MB2170/KX-MB2178: 64 MB KX-MB2117/KX-MB2137/KX-MB2177: 128 MB Power supply AG/CX/HK/HX/ML/RU/SX models: 220-240 V AC, 50/60 Hz EU/G/JT models: 220-240 V AC, 50 Hz LA models: 120-127 V AC, 60 Hz TW models: 110 V AC, 60 Hz Sleep*1 KX-MB2110/KX-MB2117: Less than 3.
14. General Information Item CIS’s LED light properties Specifications LED radiation output Max. 1 mW Wavelength Red: 624 nm typical Green: 525 nm typical Blue: 470 nm typical Emission duration Continuous Scan to email address memory capacity*7 5 MB in total (including the header and email message) or 100 pages, whichever limit is reached first. Scan to FTP server memory capacity*7 10 MB in total or 100 pages, whichever limit is reached first.
14. General Information Item Antenna 1 ´ 1 (Diversity) Transmission method SISO (Single Input/Single Output) - OFDM, OFDM, DSSS Communication standard IEEE802.11n/b/g Frequency range (centre frequency)/ Channel 2.412 GHz - 2.472 GHz (1 - 13ch) Wireless LAN*13 *1 *2 *3 *4 *5 *6 *7 *8 *9 *10 *11 *12 *13 *14 *15 *16 Specifications Data transfer rate*15 IEEE802.11n: 6.5 - 72.2 Mbps IEEE802.11g: 6 - 54 Mbps IEEE802.
14. General Information ITU-T No.
14. General Information Tray type Manual tray Paper type Tray load sheets (Paper feed)*1 Tray load sheets (Paper eject)*2 Thin paper (60 g/m² to 75 g/m²) 1 100*5 Plain paper (75 g/m² to 105 g/m²) 1 100*5 Thick paper (105 g/m² to 220 g/m²) 1 1*4 Label 1 1*4 Envelope 1 1*4 *1 If you load more than the specified amount of paper, a paper jam may occur and the paper may be damaged. *2 The number of sheets may vary depending on the usage environment.
14. General Information Paper size (width ´ length) Item Plain paper/Thin paper/Thick paper/Label Envelope 130 Specifications A4 210 ´ 297 mm A5 148 ´ 210 mm Letter 216 ´ 279 mm Legal 216 ´ 356 mm B5 (ISO) 176 ´ 250 mm B5 (JIS) 182 ´ 257 mm 16K 195 ´ 270 mm 216 ´ 330 216 ´ 330 mm 216 ´ 340 216 ´ 340 mm Custom size 210-216 ´ 279-356 mm Envelope #10 104.7 ´ 241.
14. General Information Toner cartridge life The toner cartridge needs to be replaced regularly. Toner cartridge life depends on the amount of content in a printed document as below. The page counts are on the basis of “ISO/IEC 19752”*1 when printing A4/Letter size paper with the default print density setting. The level of toner consumption varies depending on the type of document. Please refer to below example.
14. General Information 14.2 Information of copyrights and licences (LAN supported models only) y * * * * * * * * * * * * "This product includes software developed by the OpenSSL Project for use in the OpenSSL Toolkit. (http://www.openssl.org/)" "This product includes software developed by the OpenSSL Project for use in the OpenSSL Toolkit (http://www.openssl.org/)" "This product includes cryptographic software written by Eric Young (eay@cryptsoft.
15. Index 15.
15.
15.
15.
Notes 137
Notes 138
Notes 139
Panasonic System Networks Co., Ltd.