TG1311_1312_1313EG(e).book Page 1 Tuesday, October 21, 2008 5:04 PM Operating Instructions Digital Cordless Phone Model No. KX-TG1311EG KX-TG1312EG KX-TG1313EG Table of Contents Model shown is KX-TG1311. Introduction ......................................................... 2 Preparation .......................................................... 5 Making/Answering Calls ................................... 10 Phonebook.........................................................
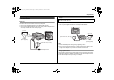
TG1311_1312_1313EG(e).book Page 2 Tuesday, October 21, 2008 5:04 PM Introduction Introduction Product information Model composition Thank you for purchasing a Panasonic digital cordless phone. Important: L The suffix (EG) in the following model numbers will be omitted in these instructions: KX-TG1311EG/KX-TG1312EG/KX-TG1313EG KX-TG1311 series General information L Model shown is KX-TG1313. L In the event of problems, you should contact your equipment supplier in the first instance.
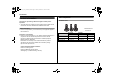
TG1311_1312_1313EG(e).book Page 3 Tuesday, October 21, 2008 5:04 PM Introduction Supplied accessories Important information Quantity No. Accessory item/Part number General KXKXKXTG1311 TG1312 TG1313 1 AC adaptor for base unit/ PQLV207CE 1 1 1 2 Telephone line cord 1 1 1 batteries*1 3 Rechargeable 2 4 6 4 Handset cover*2 1 2 3 5 Charger — 1 2 6 AC adaptor for charger/ PQLV209CE — 1 2 *1 See page 3 for replacement battery information.
TG1311_1312_1313EG(e).book Page 4 Tuesday, October 21, 2008 5:04 PM Introduction L This product should be kept away from heat sources such as radiators, cookers, etc. It should also not be placed in rooms where the temperature is less than 5 °C or greater than 40 °C. Warning: L To prevent the risk of electrical shock, do not expose this product to rain or any other type of moisture. L Unplug this product from power outlets if it emits smoke, an abnormal smell, or makes unusual noise.
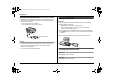
TG1311_1312_1313EG(e).book Page 5 Tuesday, October 21, 2008 5:04 PM Preparation Preparation Charger Connections Available for: KX-TG1312/KX-TG1313 Base unit The base unit can be mounted on the wall, if required. L Use only the supplied Panasonic AC adaptor PQLV207CE. L Use only the supplied telephone line cord. Using another telephone line cord may not allow the unit to work properly. The charger can be mounted on the wall, if required. L Use only the supplied Panasonic AC adaptor PQLV209CE.
TG1311_1312_1313EG(e).book Page 6 Tuesday, October 21, 2008 5:04 PM Preparation If you subscribe to a DSL/ADSL service L Please attach a DSL/ADSL filter (contact your DSL/ADSL provider) to the telephone line between the base unit and the telephone line jack in the event of the following: − noise is heard during conversations. − Caller ID features do not function properly. Battery installation Important: L Use the supplied rechargeable batteries (Part No. HHR-55AAAB).
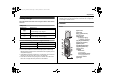
TG1311_1312_1313EG(e).book Page 7 Tuesday, October 21, 2008 5:04 PM Preparation L The battery level may not be displayed correctly after you replace the batteries. In this case, place the handset on the base unit or charger and let it charge for at least 7 hours. Battery charge Place the handset on the base unit or charger for about 7 hours before initial use. Controls Battery level Handset Battery icon Battery level 5 High L When flashing: Fully charged.
TG1311_1312_1313EG(e).book Page 8 Tuesday, October 21, 2008 5:04 PM Preparation Item Base unit Meaning Call bar is on. (page 14) A Charge contacts B {x} (Locator) A Direct call is on. (page 14) Key lock is on. (page 10) B Ringer volume is off. (page 13) Displayed when you press {#}. Display If “BS NO” is selected for standby mode display (page 13) and the current base unit number is 1, “-1-” is displayed.
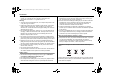
TG1311_1312_1313EG(e).book Page 9 Tuesday, October 21, 2008 5:04 PM Preparation Symbols used in these operating instructions Symbol Meaning {j/OK} Press {j/OK}. i Proceed to the next operation. {v}/{e}: “ ” Press {v} or {e} to select the words in quotations. Example: {v}/{e}: “OFF” Display language 1 2 3 4 5 Dialling mode If you cannot make calls, change this setting according to your telephone line service. The default setting is Tone. “1” (Tone): For tone dial service.
TG1311_1312_1313EG(e).book Page 10 Tuesday, October 21, 2008 5:04 PM Making/Answering Calls Making/Answering Calls Making calls Redial functions (redialling/storing/editing before calling/erasing) 1 2 1 2 Dial the phone number. i {C} When you finish talking, press {ih} or place the handset on the base unit or charger. Answering calls 1 Press {C} to answer the call. L You can also answer the call by pressing any dial key from {0} to {9}, {*}, or {#}.
TG1311_1312_1313EG(e).book Page 11 Tuesday, October 21, 2008 5:04 PM Phonebook Phonebook For call waiting or Call Waiting Caller ID service users To use call waiting, you must first subscribe to the call waiting service of your service provider/telephone company. This feature allows you to receive calls while you are already talking on the phone. If you receive a call while on the phone, you will hear a call waiting tone.
TG1311_1312_1313EG(e).book Page 12 Tuesday, October 21, 2008 5:04 PM Phonebook Making calls/editing/erasing 1 2 {k} i {v}/{e}: Select the desired entry. ■ Making calls: {C} ■ Editing: {>} i {v}/{e}: “EDIT” i {>} i Edit the phone number. i {j/OK} i Edit the name.
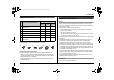
TG1311_1312_1313EG(e).book Page 13 Tuesday, October 21, 2008 5:04 PM Useful Telephone Settings Useful Telephone Settings Menu Sub-menu DISPLAY OPT STANDBY MODE — To customise the handset (general approach): TALK MODE — 1 2 3 LANGUAGE 9 Guide to handset settings 4 5 {j/OK} Press {v} or {e} to select “SETTING HS”. i {>} CALL OPT Press {v} or {e} to select the desired item in the handset settings menu.
TG1311_1312_1313EG(e).book Page 14 Tuesday, October 21, 2008 5:04 PM Useful Telephone Settings 5 6 Enter the desired hour and minute (24 hour time entry). i {>} {v}/{e}: Select the desired setting. i {>} i {ih} Call bar Call bar feature prohibits outside calls from being made. When call bar is turned on, only emergency calls can be made. To store emergency numbers, see page 15.
TG1311_1312_1313EG(e).book Page 15 Tuesday, October 21, 2008 5:04 PM Useful Telephone Settings Guide to base unit settings To customise the base unit (general approach): 1 2 3 {j/OK} Press {v} or {e} to select “SETTING BS”. i {>} L “INPUT CODE” is displayed. Enter the desired code number. Follow the instructions in the “Feature” column of the chart. L To exit the operation, press {ih}. Code No. Feature (default setting) {0} Reset base unit to its default settings.
TG1311_1312_1313EG(e).book Page 16 Tuesday, October 21, 2008 5:04 PM Caller ID Service Caller ID Service Code No. Feature (default setting) {*} Date and time: page 9 *1 Only the emergency number setting is not reset. *2 If you forget your PIN, see page 21. *3 The recall/flash time depends on your telephone exchange or host PBX. Contact your PBX supplier if necessary. *4 If you change the PIN, please write down your new PIN as the unit will not reveal it to you again.
TG1311_1312_1313EG(e).book Page 17 Tuesday, October 21, 2008 5:04 PM Caller ID Service DTMF mode setting Certain service providers/telephone companies send caller information between the first and second rings. If the display does not show caller information after a few rings, follow these instructions to set DTMF mode. 1 2 3 4 5 {j/OK} {v}/{e}: “SETTING BS” i {>} i {3} Enter base unit PIN (default: “0000”). i {4} L If you forget your PIN, see page 21. Select DTMF mode by pressing {2}.
TG1311_1312_1313EG(e).book Page 18 Tuesday, October 21, 2008 5:04 PM Multi-unit Operation Multi-unit Operation Intercom Available for: KX-TG1312/KX-TG1313 Intercom calls can be made between handsets. Example: When handset 1 calls handset 2 1 Handset 1: {INT} i Press {2} (desired handset number). 2 Handset 2: {C} 3 When you finish talking, press {ih}. Transferring calls, conference calls Available for: KX-TG1312/KX-TG1313 Outside calls can be transferred between 2 handsets.
TG1311_1312_1313EG(e).book Page 19 Tuesday, October 21, 2008 5:04 PM Useful Information Useful Information Troubleshooting If you still have difficulties after following the instructions in this section, disconnect the base unit’s AC adaptor and turn off the handset, then reconnect the base unit’s AC adaptor and turn on the handset. Problem Cause/solution w is flashing. L The handset is too far from the base unit. Move closer. L The base unit’s AC adaptor is not connected.
TG1311_1312_1313EG(e).book Page 20 Tuesday, October 21, 2008 5:04 PM Useful Information Problem Cause/solution Problem Cause/solution Noise is heard, sound cuts in and out. L You are using the handset or base unit in an area with high electrical interference. Re-position the base unit and use the handset away from sources of interference. L Move closer to the base unit. L If you use a DSL/ADSL service, we recommend connecting a DSL/ADSL filter between the base unit and the telephone line jack.
TG1311_1312_1313EG(e).book Page 21 Tuesday, October 21, 2008 5:04 PM Useful Information L If you forget your PIN, see page 21. L When the handset has been registered successfully, w stops flashing. L If w is still flashing, start again from step 1. Liquid damage Problem Cause/solution Liquid or other form of moisture has entered the handset/base unit. L Disconnect the AC adaptor and telephone line cord from the base unit. Remove the batteries from the handset and leave to dry for at least 3 days.
TG1311_1312_1313EG(e).book Page 22 Tuesday, October 21, 2008 5:04 PM Useful Information Specifications ■ Standard: DECT (Digital Enhanced Cordless Telecommunications) ■ Number of channels: 120 Duplex Channels ■ Frequency range: 1.88 GHz to 1.90 GHz ■ Duplex procedure: TDMA (Time Division Multiple Access) ■ Channel spacing: 1,728 kHz ■ Bit rate: 1,152 kbit/s ■ Modulation: GFSK (Gaussian Frequency Shift Keying) ■ RF transmission power: Approx.
TG1311_1312_1313EG(e).
TG1311_1312_1313EG(e).book Page 24 Tuesday, October 21, 2008 5:04 PM For your future reference We recommend keeping a record of the following information to assist with any repair under warranty. Serial No. Date of purchase (found on the bottom of the base unit) Name and address of dealer Attach your purchase receipt here. Copyright: This material is copyrighted by Panasonic Communications Co., Ltd., and may be reproduced for internal use only.