TG5779(e)_camera.OI.book Page 1 Wednesday, February 14, 2007 11:04 AM Operating Instructions for 5.8 GHz Expandable Digital Cordless Camera Model No. KX-TGA573 Indoor Use Only Cordless camera KX-TGA573 Camera monitoring requires a color display handset (KX-TGA571). Please read these Operating Instructions before using the unit and save for future reference. For assistance, visit our website: http://www.panasonic.com/help for customers in the U.S.A. or Puerto Rico.
TG5779(e)_camera.OI.book Page 2 Wednesday, February 14, 2007 11:04 AM Table of Contents Introduction Feature highlight. . . . . . . . . . . . . . . . . . . 3 Important safety instructions . . . . . . . . . 4 For best performance . . . . . . . . . . . . . . . 5 Preparation Controls . . . . . . . . . . . . . . . . . . . . . . . . . 6 Setting up the cordless camera . . . . . . . 7 Symbols used in these operating instructions . . . . . . . . . . . . . . . . . . . . . .
TG5779(e)_camera.OI.book Page 3 Wednesday, February 14, 2007 11:04 AM Introduction Feature highlight Camera monitoring using the color display handset Important: L This unit is compatible only with the 5.8 GHz expandable digital cordless handset KXTGA571 (color display type). L In these operating instructions, the term “handset” is used to refer to the color display handset (KX-TGA571).
TG5779(e)_camera.OI.book Page 4 Wednesday, February 14, 2007 11:04 AM Introduction Important safety instructions When using the product, basic safety precautions should always be followed to reduce the risk of fire, electric shock, or personal injury. 1. Read and understand all instructions. 2. Keep these instructions. 3. Heed all warnings. 4. Follow all instructions. 5. After cleaning away the dust on the lens, wipe the lens with a cotton bud. 6.
TG5779(e)_camera.OI.book Page 5 Wednesday, February 14, 2007 11:04 AM Introduction frequency) energy. (The product operates in the frequency range of 5.76 GHz to 5.84 GHz, and the power output is 200 mW (max.).) Do not use the product in health care facilities if any regulations posted in the area instruct you not to do so. Hospitals or health care facilities may be using equipment that could be sensitive to external RF energy. For best performance Avoiding noise This unit communicates using radio waves.
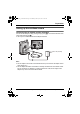
TG5779(e)_camera.OI.book Page 6 Wednesday, February 14, 2007 11:04 AM Preparation Controls A B G C E F H D A B C D E F G H Antenna Camera lens MIC (Microphone) {Call button} Indicator DIP switches Speaker PROG. (Program) Understanding the cordless camera indicator The cordless camera indicator shows the status as follows. Status Description Red (flashing rapidly) L The cordless camera is not registered. Register the cordless camera (page 15). L The cordless camera is out of range.
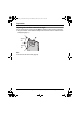
TG5779(e)_camera.OI.book Page 7 Wednesday, February 14, 2007 11:04 AM Preparation Setting up the cordless camera Connecting the AC adaptor and the call button Connect the AC adaptor cord by pressing the plug firmly (A). Connect the call button cord until it clicks into the unit (B). L Use only the included Panasonic AC adaptor PQLV235. B A Hooks (120 V AC, 60 Hz) Note: L The AC adaptor must remain connected at all times. (It is normal for the adaptor to feel warm during use.
TG5779(e)_camera.OI.book Page 8 Wednesday, February 14, 2007 11:04 AM Preparation Adjusting the cordless camera lens angle Aim the camera lens by pushing the tab (A) and rotating the lens forward or backward. L Using the handset, confirm that the area you want to monitor from the cordless camera is displayed (page 11). Approx. 40° A Approx. 40° Note: L Do not touch the camera lens (page 6). 8 For assistance, please visit http://www.panasonic.
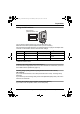
TG5779(e)_camera.OI.book Page 9 Wednesday, February 14, 2007 11:04 AM Preparation Setting the DIP switches DIP switches (Default position: ON) ON 1 2 3 OFF*1 You can set the following functions by using the DIP switch 1 to 3. Slide each switch with a pointed object such as a pen as necessary. After repositioning the DIP switches to your preferred settings, unplug the AC adaptor then reconnect it. The cordless camera is reset to these settings.
TG5779(e)_camera.OI.book Page 10 Wednesday, February 14, 2007 11:04 AM Preparation Symbols used in these operating instructions Symbol Meaning { }: button name/soft key name The words in the brackets indicate button names/ soft key names on the handset and base unit. Example: Unit keys: {INTERCOM}, {OFF} Soft keys: {CALL} Example: 1 2 3 4 {INTERCOM} Select the desired cordless camera. i {CALL} {MUTE} {OFF} {^} {V} 10 1 2 Press {INTERCOM}. 3 4 Press {MUTE}.
TG5779(e)_camera.OI.book Page 11 Wednesday, February 14, 2007 11:04 AM Camera Monitoring Camera monitoring using a handset L The cordless camera may not page handsets in the following conditions: – when other users are on an intercom or conference call. – when electrical interference is emitted from electrical devices. – while you are on a call with the handset. (In this case you will hear 2 tones and z will flash on the handset.
TG5779(e)_camera.OI.book Page 12 Wednesday, February 14, 2007 11:04 AM Camera Monitoring Handset display item for camera monitoring Displayed Meaning item Example: z The handset is connected to the cordless camera. When flashing: The cordless camera is paging the handset. (It detects sound or its {Call button} is pressed.) Paging the handsets from the cordless camera The cordless camera can page color display handsets (KX-TGA571) when it detects sound or by pressing its {Call button}.
TG5779(e)_camera.OI.book Page 13 Wednesday, February 14, 2007 11:04 AM Camera Monitoring Paging using the cordless camera call button Useful settings while camera monitoring 1 With a color display handset (KXTGA571), you can set the camera settings while monitoring. Cordless camera: Press {Call button}. L The cordless camera produces a camera tone and pages the handsets for 1 minute. Important: L Each time you press {OPTION}, the right soft key switches between {BRIGHT}, {ZOOM}, and {SENSOR}.
TG5779(e)_camera.OI.book Page 14 Wednesday, February 14, 2007 11:04 AM Camera Monitoring Setting the audio detection sensitivity The cordless camera features a sensor that detects human voices such as a baby cry. Sounds other than human voices may be difficult to detect. To use this feature, confirm that the cordless camera is located in a place where it can easily detect voices. Once the sensor has detected sound, the cordless camera pages the handset.
TG5779(e)_camera.OI.book Page 15 Wednesday, February 14, 2007 11:04 AM Useful Information Registering the cordless camera The included cordless camera and base unit are preregistered. If for some reason the cordless camera is not registered to the base unit, register the cordless camera. 1 2 Base unit: Press and hold {INTERCOM} until the IN USE indicator flashes. L After the IN USE indicator starts flashing, the rest of the procedure must be completed within 90 seconds. Cordless camera: Press PROG.
TG5779(e)_camera.OI.book Page 16 Wednesday, February 14, 2007 11:04 AM Useful Information Wall mounting The cordless camera can be mounted by the standard mounting or upside down mounting. CAUTION: L Mount the cordless camera on the stable location where the unit can be adequately supported when installing. L The AC adaptor should be connected to a vertically oriented or floor-mounted AC outlet.
TG5779(e)_camera.OI.book Page 17 Wednesday, February 14, 2007 11:04 AM Useful Information Mounting the cordless camera on the wall Standard mounting 1 Drive the screws (not included) into the wall at a recommended height of 1.8 m (5.9 feet) or below using the wall mount template as a guide (page 18). 2 Mount the cordless camera (A), then slide it down (B) and to the right (C) until it is secure. L To aim the camera lens, see page 8. 50.
TG5779(e)_camera.OI.book Page 18 Wednesday, February 14, 2007 11:04 AM Useful Information About the screws for wall mounting L Use the recommended screw size below. L Drive the mounting screws leaving enough length from the wall to hook the cordless camera. Space Max. 9.3 mm (23/64 inch) Max. 4.5 mm (11/64 inch) Removing the wall-mounting adaptor Press and hold the hold button (A) on the left side of the wall-mounting plate. Slide the cordless camera to the right (B).
TG5779(e)_camera.OI.book Page 19 Wednesday, February 14, 2007 11:04 AM Useful Information Troubleshooting Problem Cause & solution The cordless camera does not work. L Check the connections (page 7). L The cordless camera is not registered to the base unit. Register the cordless camera to the base unit (page 15). The cordless camera’s indicator is flashing red. L The cordless camera is not registered to the base unit. Register the cordless camera to the base unit (page 15).
TG5779(e)_camera.OI.book Page 20 Wednesday, February 14, 2007 11:04 AM Useful Information Problem Cause & solution I pressed {Call button} but the cordless camera does not page the handsets. L While the image of the cordless camera is being monitored by a handset, {Call button} will not have response. The handset speaker and/or the cordless camera emit a howling noise while monitoring. L Move the handset away from the cordless camera.
TG5779(e)_camera.OI.book Page 21 Wednesday, February 14, 2007 11:04 AM Useful Information FCC and other information This device complies with Part 15 of the FCC Rules. Operation is subject to the following two conditions: (1) This device may not cause harmful interference, and (2) this device must accept any interference received, including interference that may cause undesired operation.
TG5779(e)_camera.OI.book Page 22 Wednesday, February 14, 2007 11:04 AM Useful Information Notice 22 For assistance, please visit http://www.panasonic.
TG5779(e)_camera.OI.book Page 23 Wednesday, February 14, 2007 11:04 AM Useful Information Specifications Operating environment 5 °C – 40 °C (41 °F – 104 °F) Frequency 5.76 GHz – 5.84 GHz Dimensions Approx. height 124 mm x width 86 mm x depth 68 mm (47/8 inches x 33/8 inches x 211/16 inches) Mass (Weight) Approx. 150 g (0.33 lb.) Power consumption Standby: Approx. 1.5 W Maximum: Approx. 2.8 W Power output 200 mW (max.
TG5779(e)_camera.OI.
TG5779(e)_camera.OI.book Page 25 Wednesday, February 14, 2007 11:04 AM If you need assistance with setup or operation 1 2 3 Visit our website: http://www.panasonic.com/help Contact us via the web at: http://www.panasonic.com/contactinfo Call us at: 1-800-211-PANA (1-800-211-7262) TTY users (hearing or speech impaired users) can call 1-877-833-8855.
TG5779(sp)_camera.OI.book Page 1 Wednesday, February 14, 2007 10:19 AM Manual de instrucciones por cámara inalámbrica digital expandible de 5,8 GHz Modelo N° KX-TGA573 Sólo para usarse en interiores Cámara inalámbrica KX-TGA573 Lea este manual de instrucciones antes de usar la unidad y guárdelo para consultarlo en el futuro. Para obtener ayuda, visite nuestro sitio web: http://www.panasonic.com/help para los clientes de Estados Unidos o Puerto Rico.
TG5779(sp)_camera.OI.book Page 2 Wednesday, February 14, 2007 10:19 AM Tabla de Contenido Preparación Controles . . . . . . . . . . . . . . . . . . . . . . . . . . . . 3 Instalación de la cámara inalámbrica . . . . . . 4 Monitoreo de la cámara Monitoreo de la cámara usando un auricular 6 Información útil Para registrar la cámara inalámbrica . . . . . . 9 Instalación en la pared . . . . . . . . . . . . . . . . 10 Solución de problemas . . . . . . . . . . . . . . . . 13 Especificaciones . . . . . . . . .
TG5779(sp)_camera.OI.book Page 3 Wednesday, February 14, 2007 10:19 AM Preparación Controles A B G C E F H D A B C D E F G H Antena Lente de la cámara MIC (Micrófono) {Botón llamada} Indicador Interruptores DIP Altavoz PROG. (Programa) Funcionamiento del indicador de la cámara inalámbrica El indicador de la cámara inalámbrica muestra el siguiente estado. Estado Descripción Rojo (parpadeando rápidamente) L La cámara inalámbrica no está registrada. Registre la cámara inalámbrica (página 9).
TG5779(sp)_camera.OI.book Page 4 Wednesday, February 14, 2007 10:19 AM Preparación Instalación de la cámara inalámbrica Para conectar el adaptador de corriente alterna y el botón de llamada Conecte el cable del adaptador para corriente oprimiendo firmemente el enchufe (A). Conecte el cable del botón de llamada hasta que haga clic en la unidad (B). L Use sólo el adaptador de corriente alterna Panasonic PQLV235 incluido.
TG5779(sp)_camera.OI.book Page 5 Wednesday, February 14, 2007 10:19 AM Preparación Configuración de los interruptores DIP Interruptores DIP (Posición predeterminada: ON (encendido)) ON 1 2 3 OFF (apagado)*1 Puede configurar las siguientes funciones utilizando los interruptores DIP 1 a 3. Deslice cada interruptor según lo requiera con un objeto puntiagudo como una pluma. Después de colocar los interruptores DIP en su configuración preferida, desconecte el adaptador para corriente y conéctelo de nuevo.
TG5779(sp)_camera.OI.book Page 6 Wednesday, February 14, 2007 10:19 AM Monitoreo de la cámara Monitoreo de la cámara usando un auricular Puede monitorear la imagen y sonido de la habitación donde se encuentra la cámara inalámbrica con un auricular con pantalla en color (KX-TGA571). La cámara monitoreada no timbra, lo cual le permite monitorear fácilmente la habitación de un bebé, por ejemplo, desde diferentes áreas de la casa.
TG5779(sp)_camera.OI.book Page 7 Wednesday, February 14, 2007 10:19 AM Monitoreo de la cámara Elemento en la pantalla del auricular para el monitoreo de la cámara Elemento mostrado Significado Ejemplo: z El auricular está conectado con la cámara inalámbrica. Cuando parpadea: La cámara inalámbrica está buscando el auricular. (Detecta sonido o su {Botón llamada} está pulsado.
TG5779(sp)_camera.OI.book Page 8 Wednesday, February 14, 2007 10:19 AM Monitoreo de la cámara 2 3 4 Auricular: Oprima {s} para contestar la llamada de búsqueda. L Puede monitorear la habitación donde se encuentra la cámara inalámbrica. Cámara inalámbrica: Cuando el usuario del auricular conteste, hable claramente hacia el MIC (micrófono). Auricular: Cuando termine de monitorear, oprima {OFF} o coloque el auricular en la unidad base o el cargador.
TG5779(sp)_camera.OI.book Page 9 Wednesday, February 14, 2007 10:19 AM Información útil Para registrar la cámara inalámbrica La cámara inalámbrica y la unidad base que se incluyen han sido previamente registradas. Si por alguna razón la cámara inalámbrica no está registrada en la unidad base, regístrela. 1 2 Unidad base: Oprima y mantenga oprimido {INTERCOM} hasta que comience a parpadear y se emita un pitido.
TG5779(sp)_camera.OI.book Page 10 Wednesday, February 14, 2007 10:19 AM Información útil Instalación en la pared La cámara inalámbrica se puede montar de forma normal o de cabeza. PRECAUCIÓN: L Instale la cámara inalámbrica en una ubicación estable en la que la unidad se pueda apoyar adecuadamente al instalarla. L El adaptador de corriente alterna debe estar conectado a una toma de corriente alterna orientada verticalmente o montada en el piso.
TG5779(sp)_camera.OI.book Page 11 Wednesday, February 14, 2007 10:19 AM Información útil Cómo instalar la cámara inalámbrica en el techo Instalación estándar 1 Inserte los tornillos (no incluidos) en la pared, a una altura recomendada de 1,8 m (5,9 pies) o menos usando como guía la plantilla de montaje en la pared (página 12). 2 Monte la cámara inalámbrica (A) y deslícela hacia abajo (B) y a la derecha (C) hasta que quede bien asegurada. L Para dirigir la lente de la cámara, consulte la página 4.
TG5779(sp)_camera.OI.book Page 12 Wednesday, February 14, 2007 10:19 AM Información útil Acerca de los tornillos para la instalación en la pared L Utilice el tamaño de tornillo que se recomienda abajo. L Coloque los tornillos de instalación dejando suficiente espacio desde la pared para ganchar la cámara inalámbrica. Espacio Max. 9,3 mm (23/64 pulgada) Max.
TG5779(sp)_camera.OI.book Page 13 Wednesday, February 14, 2007 10:19 AM Información útil Solución de problemas Problema Causa y solución La cámara inalámbrica no funciona. L Revise las conexiones (página 4). L La cámara inalámbrica no está registrada en la unidad base. Registre la cámara inalámbrica en la unidad base (página 9). El indicador de la cámara inalámbrica está parpadeando en rojo. L La cámara inalámbrica no está registrada en la unidad base.
TG5779(sp)_camera.OI.book Page 14 Wednesday, February 14, 2007 10:19 AM Información útil Problema Causa y solución Aunque se pulsa {Botón llamada}, la cámara inalámbrica no busca los auriculares. L Mientras la imagen de la cámara inalámbrica esté siendo monitoreada por un auricular, {Botón llamada} no obtendrá respuesta. Al usar el altavoz del auricular para tener una llamada de intercomunicador con la cámara inalámbrica, el sonido se corta y es difícil escuchar al otro usuario.
TG5779(sp)_camera.OI.book Page 15 Wednesday, February 14, 2007 10:19 AM Derechos de autor: Este material cuenta con derechos de autor propiedad de Panasonic Communications Co., Ltd., y se puede reproducir sólo para uso interno. Queda prohibida cualquier otra reproducción, total o parcial, sin consentimiento por escrito de Panasonic Communications Co., Ltd. © 2007 Panasonic Communications Co., Ltd. Todos los derechos reservados.