TG6511(e).book Page 1 Thursday, January 21, 2010 1:11 PM Operating Instructions Expandable Digital Cordless Phone Model No. KX-TG6511 KX-TG6512 KX-TG6513 Expandable Digital Cordless Answering System Model No. KX-TG6522 KX-TG6523 KX-TG6524 KX-TG6525 KX-TG6531 KX-TG6532 KX-TG6533 KX-TG6534 KX-TG6541 KX-TG6542 KX-TG6543 KX-TG6544 KX-TG6545 Model shown is KX-TG6511. Before initial use, see “Getting Started” on page 10. Thank you for purchasing a Panasonic product.
TG6511(e).book Page 2 Thursday, January 21, 2010 1:11 PM Table of Contents Introduction Voice Mail Service Model composition . . . . . . . . . . . . . . . 3 Accessory information . . . . . . . . . . . . . 4 Voice mail service. . . . . . . . . . . . . . . 43 Important Information Intercom . . . . . . . . . . . . . . . . . . . . . . 45 Handset locator . . . . . . . . . . . . . . . . 45 Transferring calls, conference calls . 46 For your safety . . . . . . . . . . . . . . . . . .
TG6511(e).book Page 3 Thursday, January 21, 2010 1:11 PM Introduction Model composition ■ KX-TG6511 series ■ KX-TG6521/ KX-TG6531 series ■ KX-TG6541 series L Model shown is KX-TG6512. L Model shown is KX-TG6522. L Model shown is KX-TG6542. Base unit Handset Part No. Part No.
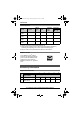
TG6511(e).book Page 4 Thursday, January 21, 2010 1:11 PM Introduction Feature differences Answering system Talking Caller ID Headset jack Call with base unit*1 Intercom*2 KX-TG6511 series – – r – – KX-TG6521 series r r – – – KX-TG6531 series r r r – – KX-TG6541 series r r r r r Series | ⇔ N*3 *1 Calls can be made or answered with the base unit.
TG6511(e).book Page 5 Thursday, January 21, 2010 1:11 PM Introduction unit*1 4 unit*4 5 unit*5 6 8 10 2 3 4 5 1 2 3 4 5 – 1 2 3 4 2 unit*2 Supplied handset qty. 1 3 No. Accessory item/ Order number Accessory quantity 3 Rechargeable batteries/ HHR-4DPA (Part No.
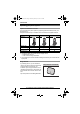
TG6511(e).book Page 6 Thursday, January 21, 2010 1:11 PM Introduction Expanding your phone system Optional handset feature overview You can expand your phone system by registering optional handsets (6 max.) to a single base unit. L Optional handsets may be a different color from that of the supplied handsets. Feature KX-TGA651 KX-TGA401 KX-TGA750 Handset Display size 1.8 inches 1.8 inches 2.
TG6511(e).book Page 7 Thursday, January 21, 2010 1:11 PM Important Information For your safety To prevent severe injury and loss of life/ property, read this section carefully before using the product to ensure proper and safe operation of your product. WARNING Power connection L Use only the power source marked on the product. L Do not overload power outlets and extension cords. This can result in the risk of fire or electric shock. L Completely insert the AC adaptor/power plug into the power outlet.
TG6511(e).book Page 8 Thursday, January 21, 2010 1:11 PM Important Information Battery L We recommend using the batteries noted on page 5. USE ONLY rechargeable Ni-MH batteries AAA (R03) size. L Do not mix old and new batteries. L Do not open or mutilate the batteries. Released electrolyte from the batteries is corrosive and may cause burns or injury to the eyes or skin. The electrolyte is toxic and may be harmful if swallowed. L Exercise care when handling the batteries.
TG6511(e).book Page 9 Thursday, January 21, 2010 1:11 PM Important Information L When you leave the product unused for a long period of time, unplug the product from the power outlet. L The product should be kept away from heat sources such as heaters, kitchen stoves, etc. It should not be placed in rooms where the temperature is less than 0 °C (32 °F) or greater than 40 °C (104 °F). Damp basements should also be avoided.
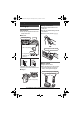
TG6511(e).book Page 10 Thursday, January 21, 2010 1:11 PM Getting Started Battery installation Setting up Connections L Use only the supplied Panasonic AC adaptor PQLV219. L USE ONLY Ni-MH batteries AAA (R03) size. L Do NOT use Alkaline/Manganese/NiCd batteries. L Confirm correct polarities (S, T). ■ Base unit Press plug firmly.
TG6511(e).book Page 11 Thursday, January 21, 2010 1:11 PM Getting Started Note when setting up Battery level Icon Battery level Note for connections & High L The AC adaptor must remain connected at all times. (It is normal for the adaptor to feel warm during use.) L The AC adaptor should be connected to a vertically oriented or floormounted AC outlet. Do not connect the AC adaptor to a ceiling-mounted AC outlet, as the weight of the adaptor may cause it to become disconnected.
TG6511(e).book Page 12 Thursday, January 21, 2010 1:11 PM Getting Started L Eco mode is turned off when the clarity booster is activated (page 19). Controls Handset (KX-TGA652) A H I B C D E J K F G L M F Headset jack (KX-TG6511/KX-TG6531/ KX-TG6541 series: page 3) G Dial keypad ({*}: TONE) H Receiver I Display J {OFF} K {FLASH} {CALL WAIT} L Microphone M Charge contacts ■ Control type A Soft keys The handset features 3 soft keys.
TG6511(e).book Page 13 Thursday, January 21, 2010 1:11 PM Getting Started B {x} (LOCATOR) C Bracket*1 ■ KX-TG6541 series (page 3) A ■ KX-TG6521/KX-TG6531 series (page 3) A B CDE F G H B I J K L M NOPQR C D E F G HI A B C D E F G H I Charge contacts Speaker {ERASE} {■} (STOP) {^}/{V} (VOL.
TG6511(e).book Page 14 Thursday, January 21, 2010 1:11 PM Getting Started Belt clip ■ To attach ■ To remove Meaning $ Blocked call (page 30) ( Clarity booster is on. (page 19) In use Answering system is being used by another handset or the base unit.*1 Line in use Someone is using the line. *1 KX-TG6521/KX-TG6531/KX-TG6541 series: page 3 Display Handset display items Item Meaning w Within base unit range _ Out of base unit range C The line is in use.
TG6511(e).book Page 15 Thursday, January 21, 2010 1:11 PM Getting Started 3 {SAVE} i {OFF} Dialing mode If you cannot make calls, change this setting according to your telephone line service. The default setting is “Tone”. “Tone”: For tone dial service. “Pulse”: For rotary/pulse dial service. 1 2 3 {MENU} i {#}{1}{2}{0} {V}/{^}: Select the desired setting. {SAVE} i {OFF} Date and time 1 {MENU} i {#}{1}{0}{1} 2 Enter the current month, date, and year by selecting 2 digits for each.
TG6511(e).book Page 16 Thursday, January 21, 2010 1:11 PM Making/Answering Calls Making calls Using the handset 1 Lift the handset and dial the phone number. L To correct a digit, press {CLEAR}. 2 3 Press {C} or {CALL}. When you finish talking, press {OFF} or place the handset on the base unit or charger. Using the speakerphone 1 Dial the phone number and press {s}. L Speak alternately with the other party. 2 When you finish talking, press {OFF}.
TG6511(e).book Page 17 Thursday, January 21, 2010 1:11 PM Making/Answering Calls L While on a call, you can switch from the base unit to the handset: – Press {C} on the handset, then press {SP-PHONE} on the base unit with the privacy mode off (page 19). – If the handset is on the base unit, simply lift it. Note: L You can also program the handset ringer volume beforehand (page 25). Adjusting the speaker volume Press {^} or {V} repeatedly while talking.
TG6511(e).book Page 18 Thursday, January 21, 2010 1:11 PM Making/Answering Calls Useful features during a call Mute While mute is turned on, you can hear the other party, but the other party cannot hear you. Hold Handset This feature allows you to put an outside call on hold. Handset 1 Press {MENU} during an outside call. 2 3 {V}/{^}: “Hold” i {SELECT} To release hold, press {C}. L Another handset user can take the call by pressing {C}.
TG6511(e).book Page 19 Thursday, January 21, 2010 1:11 PM Making/Answering Calls For call waiting or Call Waiting Caller ID service users To use call waiting, you must first subscribe to call waiting from your service provider/telephone company. This feature allows you to receive calls while you are already talking on the phone. If you receive a call while on the phone, you will hear a call waiting tone.
TG6511(e).book Page 20 Thursday, January 21, 2010 1:11 PM Shared Phonebook Shared phonebook The shared phonebook allows you to make calls without having to dial manually. Any handset registered to the base unit can use the shared phonebook. You can add 50 names and phone numbers to the shared phonebook, and assign each phonebook entry to the desired group. Important: L Only 1 person can access the shared phonebook at a time. L Caller ID subscribers can use group ringer tone features (page 34).
TG6511(e).book Page 21 Thursday, January 21, 2010 1:11 PM Shared Phonebook ringer tone feature is available for Caller ID subscribers (page 34). Changing group names The default group name is “Group 1” to “Group 9”. 1 2 3 {C} i {MENU} 4 {V}/{^}: “Group name” i {SELECT} 5 Edit the name (10 characters max.; page 20). i {SAVE} 6 {OFF} {V}/{^}: “Group” i {SELECT} {V}/{^}: Select the desired group.
TG6511(e).book Page 22 Thursday, January 21, 2010 1:11 PM Shared Phonebook Chain dial This feature allows you to dial phone numbers in the phonebook while you are on a call. This feature can be used, for example, to dial a calling card access number or bank account PIN that you have stored in the phonebook, without having to dial manually. 1 During an outside call, press {MENU}. 2 {V}/{^}: “Phonebook” i {SELECT} 3 4 {V}/{^}: Select the desired entry. Press {CALL} to dial the number.
TG6511(e).book Page 23 Thursday, January 21, 2010 1:11 PM Programming Programmable settings You can customize the unit by programming the following features using the handset. To access the features, there are 2 methods: – scrolling through the display menus (page 23) – using the direct commands (page 25) L Direct command is the main method used in these operating instructions. Programming by scrolling through the display menus 1 {MENU} 2 Press {V} or {^} to select the desired main menu.
TG6511(e).
TG6511(e).book Page 25 Thursday, January 21, 2010 1:11 PM Programming Main menu Sub-menu 1 Customer support a Sub-menu 2 – Page – – *1 If you program these settings using one of the handsets, you do not need to program the same item using another handset. Programming using the direct commands 1 {MENU} i {#} 2 Enter the desired code. 3 Select the desired setting. i {SAVE} L This step may vary depending on the feature being programmed. L To exit the operation, press {OFF}.
TG6511(e).
TG6511(e).book Page 27 Thursday, January 21, 2010 1:11 PM Programming For the answering system (KX-TG6521/KX-TG6531/KX-TG6541 series: page 3) Feature Code Play new msg. (msg.: message) {3}{2}{3} Setting – System *1 Page – 38 38 Play all msg. {3}{2}{4} – – Erase all msg.
TG6511(e).book Page 28 Thursday, January 21, 2010 1:11 PM Programming *8 If you subscribe to a Caller ID service and want to view the caller’s information after lifting up the handset to answer a call, turn off this feature. *9 The flash time depends on your telephone exchange or host PBX. Contact your PBX supplier if necessary. The setting should stay at “700 ms” unless pressing {FLASH} fails to pick up the waiting call. *10Generally, the line mode setting should not be changed.
TG6511(e).book Page 29 Thursday, January 21, 2010 1:11 PM Programming Special programming Alarm An alarm sounds at the set time for 3 minutes once or daily. Alarm can be set for each handset. Important: L Set the date and time beforehand (page 15). 1 2 {MENU} i {#}{7}{2}{0} {V}/{^}: Select the desired alarm option. i {SELECT} Off Turns alarm off. Go to step 7. Once An alarm sounds once at the set time. Daily An alarm sounds daily at the set time. Go to step 4. 3 Enter the desired month and date.
TG6511(e).book Page 30 Thursday, January 21, 2010 1:11 PM Programming Changing the start and end time 1 2 {MENU} i {#}{2}{3}{7} Continue from step 3, “Turning silent mode on/off”, page 29. Changing the handset name Each handset can be given a customized name (“Bob”, “Kitchen”, etc.). This is useful when you make intercom calls between handsets. You can also select whether or not the handset name is displayed in standby mode. The default setting is “Off”.
TG6511(e).book Page 31 Thursday, January 21, 2010 1:11 PM Programming Block calls without phone number You can reject a call without phone number including “Out of area”, “Private caller”, or “Long distance”. 1 2 {MENU} i {#}{2}{4}{0} {V}/{^}: Select the desired setting. i {SAVE} i {OFF} Viewing/editing/erasing call block numbers 1 2 {MENU} i {#}{2}{1}{7} 3 To edit a number: {EDIT} i Edit the phone number.
TG6511(e).book Page 32 Thursday, January 21, 2010 1:11 PM Programming Deregistering a handset A handset can cancel its own registration (or the registration of another handset) that is stored to the base unit. This allows the handset to end its wireless connection with the system. 1 {MENU} i {#}{1}{3}{1} L All handsets registered to the base unit are displayed. 2 {V}/{^}: Select the handset you want to cancel.
TG6511(e).book Page 33 Thursday, January 21, 2010 1:11 PM Caller ID Service Using Caller ID service Important: L This unit is Caller ID compatible. To use Caller ID features, you must subscribe to a Caller ID service. Contact your service provider/ telephone company for details. Caller ID features When an outside call is being received, the caller’s name and phone number are displayed. Caller information for the last 50 callers is logged in the caller list from the most recent call to the oldest.
TG6511(e).book Page 34 Thursday, January 21, 2010 1:11 PM Caller ID Service “Toll saver” is selected and there is a new message, the unit does not announce the caller information. L When you receive a call while on the phone, the 2nd caller’s name is not announced even if you subscribe to both Caller ID and Call Waiting with Caller ID services.
TG6511(e).book Page 35 Thursday, January 21, 2010 1:11 PM Caller ID Service 3 Press {EDIT} repeatedly until the phone number is shown in the desired format. 1 Local phone number Example: 321-5555 2 Area code – Local phone number Example: 555-321-5555 3 1 – Area code – Local phone number Example: 1-555-321-5555 4 {C} Caller ID number auto edit feature Once you call back an edited number, the handset which was used to call back remembers the area code and format of the edited number.
TG6511(e).book Page 36 Thursday, January 21, 2010 1:11 PM Answering System greeting message asking callers to call again later. – If you recorded your own greeting message, the same message is still announced to callers even though their messages are not recorded. Answering system Available for: KX-TG6521/KX-TG6531/KX-TG6541 series (page 3) The answering system can answer and record calls for you when you are unavailable to answer the phone.
TG6511(e).book Page 37 Thursday, January 21, 2010 1:11 PM Answering System Base unit Available for: KX-TG6541 series (page 3) To adjust the speaker volume, press {^} or {V} repeatedly. You can answer the call by pressing {SP-PHONE}. To turn off while screening a call, press {V} repeatedly until the sounds goes off. Note: L If you adjust the speaker volume while listening to messages or talking on the intercom, the speaker volume for call screening is turned on again.
TG6511(e).book Page 38 Thursday, January 21, 2010 1:11 PM Answering System Operating the answering system during playback Key Operation {^} or {V} Adjust the speaker volume message*1 {7} Repeat {8} Skip message {■} (STOP) Stop playback {ERASE} Erase currently playing message *1 If pressed within the first 5 seconds of a message, the previous message is played. Erasing all messages Press {ERASE} 2 times while the unit is not in use.
TG6511(e).book Page 39 Thursday, January 21, 2010 1:11 PM Answering System *1 If pressed within the first 5 seconds of a message, the previous message is played. *2 To resume playback: {V}/{^}: “Playback” i {SELECT} *3 You can also erase as follows: {ERASE} i {V}/{^}: “Yes” i {SELECT} Calling back (Caller ID subscribers only) If caller information is received for the call, you can call the caller back while listening to a message. 1 2 Press {PAUSE} during playback.
TG6511(e).book Page 40 Thursday, January 21, 2010 1:11 PM Answering System Using the answering system remotely 1 Dial your phone number from a touch-tone phone. 2 After the greeting message starts, enter your remote access code. L The unit announces the number of new messages. L The voice guidance announcements are different depending on the voice guidance language setting (page 14). 3 Follow the voice guidance prompts as necessary or control the unit using remote commands (page 40).
TG6511(e).book Page 41 Thursday, January 21, 2010 1:11 PM Answering System 3 Enter your remote access code within 10 seconds after the long beep. L The greeting message is played back. L You can either hang up, or enter your remote access code again and begin remote operation (page 39). Answering system settings Number of rings before the unit answers a call You can change the number of times the phone rings “Ring count” before the unit answers calls. You can select 2 to 7 rings, or “Toll saver”.
TG6511(e).book Page 42 Thursday, January 21, 2010 1:11 PM Answering System Select “Greeting only” in step 2 on “Caller’s recording time”, page 41. Note: L When you select “Greeting only”: – If you do not record your own message, the unit will play the prerecorded greeting-only message asking callers to call again later. – If you use your own message, record the greeting-only message asking callers to call again later (page 37).
TG6511(e).book Page 43 Thursday, January 21, 2010 1:11 PM Voice Mail Service press {PAUSE} to add pauses (page 16) between the access number and the password as necessary. Contact your service provider/telephone company for the required pause time. Voice mail service Voice mail is an automatic answering service offered by your service provider/telephone company.
TG6511(e).book Page 44 Thursday, January 21, 2010 1:11 PM Voice Mail Service Turning VM tone detection on/off The default setting is “On”. 1 2 to listen to voice mail messages, you have to dial your access number manually. {MENU} i {#}{3}{3}{2} {V}/{^}: Select the desired setting. i {SAVE} i {OFF} Listening to voice mail messages The unit lets you know that you have new voice mail messages in the following ways: – “New Voice Mail” is displayed on the handset if message indication service is available.
TG6511(e).book Page 45 Thursday, January 21, 2010 1:11 PM Intercom/Locator 2 Intercom Intercom calls can be made: – between handsets – between the handset and base unit (KX-TG6541 series: page 3) Note: L If you receive an outside call while talking on the intercom, you hear 2 tones. – To answer the call with the handset, press {OFF}, then press {C}. – To answer the call with the base unit, press {SP-PHONE} 2 times. (KX-TG6541 series: page 3) L When paging unit(s), the paged unit(s) beeps for 1 minute.
TG6511(e).book Page 46 Thursday, January 21, 2010 1:11 PM Intercom/Locator Transferring calls, conference calls Outside calls can be transferred or a conference call with an outside party can be made: – between 2 handsets – between the handset and base unit (KX-TG6541 series: page 3) Handset 1 During an outside call, press {INT} to put the call on hold. 2 {V}/{^}: Select the desired unit. i {SELECT} 3 Wait for the paged party to answer.
TG6511(e).book Page 47 Thursday, January 21, 2010 1:11 PM Useful Information 3 Wall mounting Mount the unit on a wall then slide down to secure in place. (120 V AC, 60 Hz) 1 83 mm (31/4 inches) or 102 mm (4 inches) The base unit can be mounted on a wall by revolving the bracket to “WALL” position (default: “DESK” stand position). Note: L Make sure that the wall is strong enough to support the weight of the unit.
TG6511(e).book Page 48 Thursday, January 21, 2010 1:11 PM Useful Information Error messages If the unit detects a problem, one of the following messages is shown on the display. Display message Cause/solution Base no power L The handset has lost communication with the base unit. Move closer to the base unit and try again. L Unplug the base unit’s AC adaptor to reset the unit. Reconnect the adaptor and try again. L The handset’s registration may have been canceled. Re-register the handset (page 31).
TG6511(e).book Page 49 Thursday, January 21, 2010 1:11 PM Useful Information Troubleshooting If you still have difficulties after following the instructions in this section, disconnect the base unit’s AC adaptor, then reconnect the base unit’s AC adaptor. Remove the batteries from the handset, and then insert the batteries into the handset again. General use Problem Cause/solution The handset does not turn on even after installing charged batteries.
TG6511(e).book Page 50 Thursday, January 21, 2010 1:11 PM Useful Information Battery recharge Problem Cause/solution The handset beeps and/or ) flashes. L Battery charge is low. Fully charge the batteries (page 10). I fully charged the batteries, but – ) still flashes, – 0 is displayed, or – the operating time seems to be shorter. L Clean the battery ends (S, T) and the charge contacts with a dry cloth and charge again. L It is time to replace the batteries (page 10).
TG6511(e).book Page 51 Thursday, January 21, 2010 1:11 PM Useful Information Caller ID/Talking Caller ID*1 Problem Cause/solution Caller information is not displayed. L You must subscribe to Caller ID service. Contact your service provider/telephone company for details. L If your unit is connected to any additional telephone equipment such as a Caller ID box or cordless telephone line jack, plug the unit directly into the wall jack.
TG6511(e).book Page 52 Thursday, January 21, 2010 1:11 PM Useful Information Problem Cause/solution Time on the unit has shifted. L Incorrect time information from incoming Caller ID changes the time. Set the time adjustment to “Manual” (off) (page 25). The 2nd caller’s information is not displayed during an outside call. L In order to use Caller ID, call waiting, or Call Waiting Caller ID (CWID), you must first contact your service provider/telephone company and subscribe to the desired service.
TG6511(e).book Page 53 Thursday, January 21, 2010 1:11 PM Useful Information Problem Cause/solution I cannot operate the answering system remotely. L The remote access code is not set. Set the remote access code (page 39). L You are entering the wrong remote access code. If you have forgotten your remote access code, enter the remote access code setting to check your current code (page 39). L Press each key firmly. L The answering system is turned off. Turn it on (page 40).
TG6511(e).book Page 54 Thursday, January 21, 2010 1:11 PM Useful Information FCC and other information This equipment complies with Part 68 of the FCC rules and the requirements adopted by the ACTA. On the bottom of this equipment is a label that contains, among other information, a product identifier in the format US:ACJ----------. If requested, this number must be provided to the telephone company. L Registration No.............(found on the bottom of the unit) L Ringer Equivalence No. (REN).......0.
TG6511(e).book Page 55 Thursday, January 21, 2010 1:11 PM Useful Information WHEN PROGRAMMING EMERGENCY NUMBERS AND(OR) MAKING TEST CALLS TO EMERGENCY NUMBERS: 1) Remain on the line and briefly explain to the dispatcher the reason for the call. 2) Perform such activities in the off-peak hours, such as early morning or late evenings. This device complies with Part 15 of the FCC Rules.
TG6511(e).book Page 56 Thursday, January 21, 2010 1:11 PM Guía Rápida Española Guía Rápida Española Instalación Unidad base L Use solo el adaptador de corriente Panasonic PQLV219 incluido. “Clic” Oprima firmemente el contacto. Gancho Correcto (120 V CA, 60 Hz) Incorrecto A la toma de teléfono de línea única (RJ11C) “Clic” Filtro DSL/ADSL* *Requiere un filtro DSL/ADSL (no incluido) si tiene este tipo de servicio. Auricular L UTILICE SOLO baterías de Ni-MH tamaño AAA (R03).
TG6511(e).book Page 57 Thursday, January 21, 2010 1:11 PM Guía Rápida Española Sugerencias de operación Teclas de función El auricular incluye 3 teclas de función. Al oprimir una tecla de función, puede seleccionar la función que aparece directamente encima de ella en la pantalla. {C}, {MENU}, {REMR.} y otras funciones adicionales se asignan a las teclas de función. Preste atención a la pantalla para ver qué funciones están asignadas a las teclas de función durante la operación del auricular.
TG6511(e).book Page 58 Thursday, January 21, 2010 1:11 PM Guía Rápida Española Operaciones básicas Cómo hacer y contestar llamadas (Auricular) Para ajustar el volumen del timbre del auricular 1 2 {MENU} i {#}{1}{6}{0} {V}/{^}: Seleccione el volumen deseado. i{GUARDA}i {OFF} Cómo hacer y contestar llamadas (Unidad base): serie KX-TG6541 Para hacer llamadas {SP-PHONE} i Marque el número telefónico.
TG6511(e).book Page 59 Thursday, January 21, 2010 1:11 PM Guía Rápida Española Preguntas frecuentes Pregunta Causa y solución ¿Por qué aparece _? L El adaptador para corriente de la unidad base no está conectado correctamente. Conecte de nuevo el adaptador para corriente a la unidad base. L El auricular no está registrado en la unidad base. Regístrelo. 1 Auricular: {MENU} i {#}{1}{3}{0} 2 Unidad base: 3 N Serie KX-TG6511 Oprima y mantenga oprimido {LOCATOR} durante aproximadamente 5 segundos.
TG6511(e).book Page 60 Thursday, January 21, 2010 1:11 PM Appendix Customer services Customer Services Directory (United States and Puerto Rico) Obtain Product Information and Operating Assistance; locate your nearest Dealer or Service Center; purchase Parts and Accessories; or make Customer Service and Literature requests by visiting our Web Site at: http://www.panasonic.com/help or, contact us via the web at: http://www.panasonic.
TG6511(e).
TG6511(e).book Page 62 Thursday, January 21, 2010 1:11 PM Appendix Limited Warranty Limits And Exclusions This Limited Warranty ONLY COVERS failures due to defects in materials or workmanship, and DOES NOT COVER normal wear and tear or cosmetic damage.
TG6511(e).
TG6511(e).book Page 64 Thursday, January 21, 2010 1:11 PM IMPORTANT! If your product is not working properly. . . 1 Reconnect AC adaptor to the base unit. 2 Check if telephone line cord is connected. 3 Use rechargeable Ni-MH batteries. (Alkaline/Manganese/Ni-Cd batteries CANNOT be used.) 4 Read troubleshooting page in the Operating Instructions. Visit our Web site: http://www.panasonic.com/help L FAQ and troubleshooting hints are available.